从 0 开始手把手带你搭建一套规范的 Vue3.x 项目工程环境
架构创建
1.使用vite4.x创建
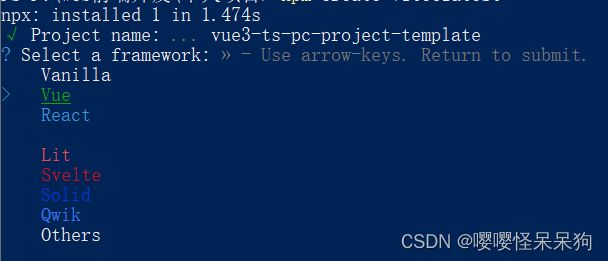
#1、输入下面的命令 使用此命令创建vite 项目
npm create vite@latest
#2、输入项目名称

#3、选择项目类型 此模板选择的vue
#4、选择TS
#5、安装依赖
npm i
#6、启动项目
npm run dev
你还可以通过其他模板来创建,可以参考
vite官网
2.更改vite配置文件
import { defineConfig } from "vite";
import vue from "@vitejs/plugin-vue";

// 如果编辑器提示 path 模块找不到,则可以安装一下 @types/node -> npm i @types/node -D
import { resolve } from "path";

// https://vitejs.dev/config/
export default defineConfig({
  plugins: [vue()],
  base: "./",
  resolve: {
    alias: {
      "@": resolve(__dirname, "src"), // 设置 `@` 指向 `src` 目录
    },
  },
});
3.初始化项目css
#1、安装normalize.css
npm install --save normalize.css
# main.ts 中引入
import "normalize.css";
4.集成router
# 安装router
npm install vue-router@4
// 在 src ->router文件夹下创建 index.ts 和 modules 文件夹,在index.ts中加入以下代码
import { createRouter, createWebHashHistory, RouteRecordRaw } from "vue-router";

const routes: Array<RouteRecordRaw> = [
  {
    path: "/",
    name: "Login",
    component: () => import("@/views/login/index.vue"),
  },
];

const router = createRouter({
  history: createWebHashHistory(),
  routes,
});

export default router;


// 在main.ts 中加入以下代码
import { createApp } from "vue";
import router from "./router";

import App from "./App.vue";
import "normalize.css";

createApp(App).use(router).mount("#app");
5.集成pinia
npm i pinia
// 在 src ->store 文件夹下创建 index.ts 和 modules 文件夹,在index.ts中加入以下代码
import { createPinia } from "pinia";

const pinia = createPinia();

export default pinia;

// 在 main.ts 中导入
import { createApp } from "vue";
import router from "./router";
import pinia from "./store";
import App from "./App.vue";
import "normalize.css";

createApp(App).use(router).use(pinia).mount("#app");
6.集成UI库
此处集成 Naive UI,如需集成其他库,可参考对应UI库的官方文档
完全按照文档来就可以了
7.集成axios
后续更~~~
8.集成css预处理器less
Vite 内部已帮我们集成了相关的 loader,不需要额外配置,也可以使用 Sass 或 Less 等
npm i stylus -D
# or
npm i sass -D
npm i less -D # 此模板使用less
代码规范
1.EditorConfig 配置
EditorConfig 有助于为不同 IDE 编辑器上处理同一项目的多个开发人员维护一致的编码风格。
EditorConfig官网
- 在根目录下,创建
.editorconfig文件 - 在文件中输入以下代码
# http://editorconfig.org

root = true

[*] # 表示所有文件适用
charset = utf-8 # 设置文件字符集为 utf-8
indent_style = space # 缩进风格(tab | space)
indent_size = 2 # 缩进大小
end_of_line = lf # 控制换行类型(lf | cr | crlf)
trim_trailing_whitespace = true # 去除行首的任意空白字符
insert_final_newline = true # 始终在文件末尾插入一个新行

[*.md] # 表示仅 md 文件适用以下规则
max_line_length = off
trim_trailing_whitespace = false
可以在任何一个vue文中,最后如果有一行空格删除,然后按保存键,看是否会在文件最后增加一个新的空白行,如果可以增加,那表示
成功
2.Prettier配置
Prettier 是一款强大的代码格式化工具,支持 JavaScript、TypeScript、CSS、SCSS、Less、JSX、Angular、Vue、GraphQL、JSON、Markdown 等语言,基本上前端能用到的文件格式它都可以搞定,是当下最流行的代码格式化工具。
- 安装prettier
npm i prettier -D
- 在根目录下创建
.prettierrc文件, 文件内容如下(常见配置)
{
  "useTabs": false,
  "tabWidth": 2,
  "printWidth": 80,
  "singleQuote": true,
  "trailingComma": "none",
  "semi": false
}
// 下方为 常见选项含义
{
  "printWidth": 80,	//每行最多显示的字符数
  "tabWidth": 2,//tab的宽度 2个字符
  "useTabs": false,//使用tab缩进还是空格缩进,选择false;
  "semi": false,//结尾是否使用分号
  "singleQuote": true,//使用单引号代替双引号
  "trailingComma": "none",//结尾是否添加逗号
  "bracketSpacing": true,//对象括号俩边是否用空格隔开
  "bracketSameLine": true,;//组件最后的尖括号不另起一行
  "arrowParens": "always",//箭头函数参数始终添加括号
  "htmlWhitespaceSensitivity": "ignore",//html存在空格是不敏感的
  "vueIndentScriptAndStyle": false,//vue 的script和style的内容是否缩进
  "endOfLine": "auto",//行结尾形式 mac和linux是\n  windows是\r\n
  "singleAttributePerLine": false //组件或者标签的属性是否控制一行只显示一个属性
}
- 在根目录下创建配置忽略文件
.prettierignore配置如下
/dist/*
.local
.output.js
/node_modules/**

**/*.svg
**/*.sh

/public/*
- 在
package.json 文件的script节点下添加以下代码
  "scripts": {
    "dev": "vite",
    "build": "vue-tsc && vite build",
    "preview": "vite preview",
    "prettier": "prettier --write ." // 格式化所有文件(. 表示所有文件)
  },
可以在终端执行
npm run prettier看是否有打印输出,文件里面的是否按照prettier配置文件发生改变
3.eslint配置
- 安装eslint 、在vsocde中安装eslint插件
npm i eslint -D
- 执行
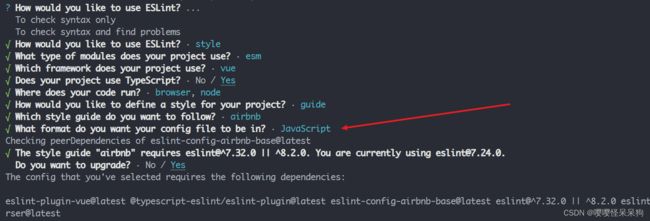
npx eslint --init进行配置
1、第一步:How would you like to use ESLint? (你想如何使用 ESLint?)
选择to ckeck syntax,find problems ,and enforce code style(检查语法、发现问题并强制执行代码风格)
2、第二步:What type of modules does your project use?(你的项目使用哪种类型的模块?)
选择:javascript modules(import/export)
3、第三步:Which framework does your project use? (你的项目使用哪种框架?)
根据自己情况选择
4、第四步:Does your project use TypeScript?(你的项目是否使用 TypeScript?)
选择:Yes
5、第五步:Where does your code run?(你的代码在哪里运行?)
选择:Browser 和 Node按空格进行选择
6、第六步:How would you like to define a style for your project?(你想怎样为你的项目定义风格?)
选择:Use a popular style guide(使用一种流行的风格指南)
7、第七步:Which style guide do you want to follow?(你想遵循哪一种风格指南?)
选择:AirbnbESLint 为我们列出了三种社区流行的 JavaScript 风格指南,分别是 Airbnb、Standard、Google。
8、第八步:What format do you want your config file to be in?(你希望你的配置文件是什么格式?)
选择:JS
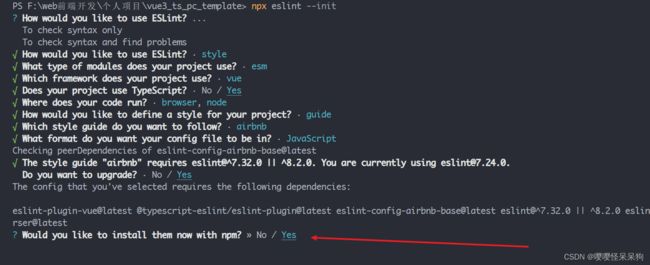
9、第九步:Would you like to install them now with npm?(你想现在就用 NPM 安装它们吗?)
选择:yes
选择安装工具,选择
npm
会在项目根目录下自动生成 .eslintrc.js 配置文件
??? 好像不需要解决 prettier 和eslint 的冲突问题?
代码提交git
1.Husky
虽然我们已经要求项目使用eslint了,但是不能保证组员提交代码之前都将eslint中的问题解决掉了:
-
也就是我们希望保证代码仓库中的代码都是符合eslint规范的; -
那么我们需要在组员执行
git commit命令的时候对其进行校验,如果不符合eslint规范,那么自动通过规范进行修复;让没通过 ESLint 检测和修复的代码禁止提交,从而保证仓库代码都是符合规范的。
那么如何做到这一点呢?可以通过Husky工具:
- husky是一个git hook工具,可以帮助我们触发git提交的各个阶段:pre-commit、commit-msg、pre-push
pre-commit:git commit 之前进行的操作
commit-msg:针对提交的信息做检查
pre-push:在git push 之前进行的操作
如何使用husky呢?
这里我们可以使用自动配置命令:
注意:要先初始化一个仓库 即git init。如果在vscode的 powershell 终端执行下面的命令报错,那边要用cmd,在执行即可 ,
npx husky-init && npm install
这个命令,会做三个操作
- 安装 husky 依赖
- 在项目目录下创建
.husky文件夹 - 在package.json中添加一个脚本:
"prepare": "husky install"
在 .husky 文件夹下的 pre-commit 的 npm test 改成 npm run lint:eslint ,如果 ESLint 通过,成功 commit,否则终止 commit。
测试步骤
- git init 初始化仓库
- npx husky-init && npm install
3、之星
git add . ; git commit -m "测试01"; 然后他就会执行 npm run lint:eslint
这样就是
检测到了语法错误,停止提交到成功了
2.lint-staged
我们要做到只用 ESLint 修复自己此次写的代码,而不去影响其他的代码。所以我们还需借助一个神奇的工具
lint-staged;lint-staged 这个工具一般结合 husky 来使用,它可以让 husky 的 hook 触发的命令只作用于 git add那些文件(即 git 暂存区的文件),而不会影响到其他文件。
1、安装 staged
npm i lint-staged -D
2、在package.json 加入以下代码
"lint-staged": {
  "*.{vue,js,ts}": "eslint --fix"
},
3、修改 .husky/pre-commit hook 的触发命令为:npx lint-staged
再次执行 git commit -m “xxx” 的时候,只会校验 暂存区的文件,其他的不会校验
3.集成 Commitizen 实现规范提交
Commitizen 是一个帮助撰写规范 commit message 的工具。它有一个命令行工具 cz-cli。
1、安装
npm install commitizen -D
2、初始化项目
npx commitizen init cz-conventional-changelog --save-dev --save-exact
这行命令做了两件事:
- 安装 cz-conventional-changelog 到开发依赖(devDependencies)
- 在 package.json 中增加了 config.commitizen
"config": {
  "commitizen": {
    "path": "./node_modules/cz-conventional-changelog"
  }
}
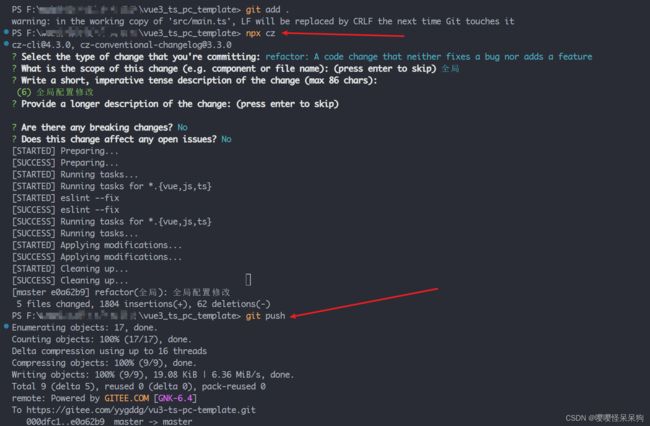
3、执行 git add . ,然后 不执行 git commit -m ,使用git cz ,如果这个不好使,使用npx cz 或者,在package.jspn文件中增加一个 script 节点
git cz 不好使,则需要全局安装 npm install commitizen -g
4. cz-customizable
git cz 终端操作提示都是英文的如果想改成中文的或者自定义这些配置选项,使用cz-customizable 适配器。
1、初始化项目
npx commitizen init cz-customizable --save-dev --save-exact --force
上面这个命令会做两件事情
- 安装 cz-customizable 到开发依赖(devDependencies)
- 修改 package.json 中的 config.commitizen 字段为:
  "config": {
    "commitizen": {
      "path": "./node_modules/cz-customizable"
    }
  }
2、在项目根目录创建 .cz-config.js 文件
const fs = require('fs')
const path = require('path')

// 拿到src 下面所有的文件夹
const scopes = fs
  .readdirSync(path.resolve(__dirname, 'src'), { withFileTypes: true })
  .filter((dirent) => dirent.isDirectory())
  .map((dirent) => dirent.name.replace(/s$/, ''))
module.exports = {
  // 可选类型
  types: [
    { value: 'feat', name: 'feat:  新功能', emoji: '' },
    { value: 'fix', name: 'fix:  修复', emoji: '' },
    { value: 'docs', name: 'docs:  文档变更', emoji: '' },
    { value: 'style', name: 'style:  代码格式(不影响代码运行的变动)', emoji: '' },
    {
      value: 'refactor',
      name: 'refactor: ♻️ 重构(既不是增加feature,也不是修复bug)',
      emoji: '♻️'
    },
    { value: 'perf', name: 'perf: ⚡️ 性能优化', emoji: '⚡️' },
    { value: 'test', name: 'test: ✅ 增加测试', emoji: '✅' },
    { value: 'chore', name: 'chore:  构建过程或辅助工具的变动', emoji: '' },
    { value: 'revert', name: 'revert: ⏪️ 回退', emoji: '⏪️' },
    { value: 'build', name: 'build:️ 打包', emoji: '️' }
  ],
  useEmoji: true,
  // 消息步骤
  messages: {
    type: '请选择提交类型:',
    scope: '选择一个提交范围(可选):',
    customScope: '请输入修改范围(可选):',
    subject: '请简要描述提交(必填):',
    body: '请输入详细描述(可选):',
    footer: '请输入要关闭的issue(可选):',
    confirmCommit: '确认使用以上信息提交?'
  },
  // 跳过问题
  // skipQuestions: ['body', 'footer'],
  // subject文字长度默认是72
  subjectLimit: 72,
  scopes: [...scopes, 'global']
}
5.增加提交校验
增加一个限制:只让符合 Angular 规范的 commit message 通过,我们借助 @commitlint/config-conventional 和 @commitlint/cli 来实现。
1.安装 @commitlint/config-conventional 和 @commitlint/cli
npm i @commitlint/config-conventional @commitlint/cli -D
2.在根目录创建commitlint.config.js文件,配置commitlint
module.exports = {
  extends: ['@commitlint/config-conventional']
}
3.使用husky生成commit-msg文件,验证提交信息:
npx husky add .husky/commit-msg "npx --no-install commitlint --edit $1"
注意,window电脑 执行这行命令会报错 参考链接
把这行代码分两步执行,先执行 npx husky add .husky/commit-msg,然后再新建的commit-msg 文件中把undefined,替换成 npx --no-install commitlint --edit
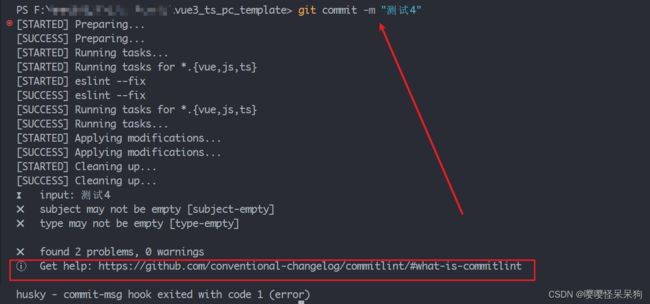
当我们再执行git add . ;git commit -m "哈哈哈哈" ;终端就会报错
踩坑
1.在vie.config.ts中配置别名但是编辑器的智能提示路径工具提示找不到
- 在vite.config.ts 中配置
export default defineConfig({
  plugins: [vue()],
  base: "./",
  resolve: {
    alias: {
      "@": resolve(__dirname, "src"), // 设置 `@` 指向 `src` 目录
    },
  },
});
- 在 tsconfig.json 也需要做配置
{
	// + 增加以下配置
    // 配置路径别名,baseUrl 和 paths 要同时配置
    "baseUrl": ".",
    "paths": {
      "@/*": [
        "src/*"
      ]
    },
  }
}
2.在项目中导入vue文件提示:找不到模块“./App.vue”或其相应的类型声明。ts(2307)
在 vite-env.d.ts 中 加入以下代码
/// 3.vscode中eslint 不生效
1、检查package.json 中是否有 "type": "module", 如果有删除
2、vsocde 配置文件增加以下代码
  // 每次保存的时候将代码按eslint格式进行修复
  "eslint.validate": [
    "javascript",
    "javascriptreact",
    "html",
    "vue"
  ],
  // "eslint.autoFixOnSave": true,   // 改成下面的"editor.codeActionsOnSave"
  // #每次保存的时候将代码按eslint格式进行修复
  "editor.codeActionsOnSave": {
    "source.fixAll.eslint": true
  },
4.配置 husky 的时候报eslint找不到
大概率就是 node 版本问题

