Linux 上部署 Seafile 9.0.x 专业版(Seafile Server端)——踩一路坑,溅一身水
1. Seafile 简介
Seafile 是一款开源的企业云盘,注重可靠性和性能。支持 Windows, Mac, Linux, iOS, Android 平台。支持文件同步或者直接挂载到本地访问。Seafile 主要注重的是文件安全工作,写一个基本的文件同步工具是件简单的事情,但是要保证在各种极端的场合下都能正确的工作、不丢数据是件不容易的事情。Seafile 专注文件同步的可靠性。同步算法经过 3 年的不断改进和数十万用户的使用,已经非常可靠。Seafile 的文件历史和资料库镜像机制保证了文件可随时方便的恢复到任意历史状态。
其拥有如下特点:
-
可靠的文件同步
文件组织成资料库。每个资料库可选择性的同步到任意设备。可靠高效的文件同步将提高您的工作效率。 -
挂载盘客户端
直接通过本地S盘来访问云端文件,不占用本地存储。为电脑提供服务器的海量存储空间。同操作系统无缝集成,还可以离线修改文件。 -
团队协作
可以共享文件到群组。权限管理、版本控制、事件通知让协作更为流畅。 -
高性能
Seafile服务器内核由C语言编写。运行起来小巧快速。 -
Wiki 与知识管理
融合Wiki与网盘的功能,使用Markdown格式以所见即所得方式编辑Wiki文档,提供搜索、标签、评审等知识管理功能,支持对外发布Wiki内容。 -
适用于企业环境
可与AD/LDAP集成。可同步AD群组和用户信息。

来看看官网给的一张示例图片,和我们正常使用的网盘基本没什么区别。

官方的介绍文档:Seafile 简介
2. Seafile pro Server 下载链接
官方下载连接:
Linux 服务器端开源版: Seafile 9.0.5 64bit
Linux 服务器端专业版: Seafile 专业版
其它的支持平台:Seafile
笔者的当前环境:
OS: Ubuntu server 22.04
选择的 Seafile Server 专业版本: Seafile pro 9.0.5 64bit
3. 一些安装前的准备工作
3.1. 安装依赖
适合 Seafile 9.0.x 版本
imaginemiracle:~$ sudo apt-get update

imaginemiracle:~$ sudo apt-get install -y python3 python3-setuptools python3-pip python3-ldap libmysqlclient-dev
imaginemiracle:~$ sudo apt-get install -y memcached libmemcached-dev
安装过程中可能会弹出一个选项框,问你 “哪个服务需要被重新安装呢?”,你回答 “不!”,就可以了,我们不需要重新安装之前装过的服务。

注意,由于依赖项较多,因此下面这行命令非常的长,务必复制完整!!!
imaginemiracle:~$ sudo pip3 install --timeout=3600 django==3.2.* Pillow pylibmc captcha jinja2 sqlalchemy==1.4.3 \
    django-pylibmc django-simple-captcha python3-ldap mysqlclient pycryptodome==3.12.0 cffi==1.14.0
接下来根据每个人的网络情况,如果网络像笔者一样不好的朋友就要等稍微久一点的时间了(╮(╯▽╰)╭)。(老实说我等了很久,大概有个两千年吧~)
[注]: Seafile Pro 9.0.x 版本不支持在 Centos 系统 tar 包部署,支持 Docker 方式部署 。
3.1.1. 可能出现的错误
安装过程中有可能会出现各种各样的错误,这里笔者将自己遇到的问题也整理下来供大家参考。
在每次遇到问题的时候我都会这样想,也会这样做:
并不会所有人都会遇到问题,
而所有人也不会都出现同样的问题。
但只要每个人将自己的解决过程分享出来,
那么我相信,
所有人的问题都会迎刃而解。
互相帮助,将会使我们进步的更快!
问题(1). fatal error: libmemcached/memcached.h: No such file or directory
x86_64-linux-gnu-gcc -Wno-unused-result -Wsign-compare -DNDEBUG -g -fwrapv -O2 -Wall -g -fstack-protector-strong -Wformat -Werror=format-security -g -fwrapv -O2 -g -fstack-protector-strong -Wformat -Werror=format-security -Wdate-time -D_FORTIFY_SOURCE=2 -fPIC -DUSE_ZLIB -I/usr/include/python3.10 -c src/_pylibmcmodule.c -o build/temp.linux-x86_64-3.10/src/_pylibmcmodule.o -fno-strict-aliasing -std=c99
In file included from src/_pylibmcmodule.c:34:
src/_pylibmcmodule.h:42:10: fatal error: libmemcached/memcached.h: No such file or directory
42 | #include 解决(1)
imaginemiracle:~$ sudo apt-get install libmemcached-dev zlib1g-dev
问题(2). fatal error: ffi.h: No such file or directory
x86_64-linux-gnu-gcc -Wno-unused-result -Wsign-compare -DNDEBUG -g -fwrapv -O2 -Wall -g -fstack-protector-strong -Wformat -Werror=format-security -g -fwrapv -O2 -g -fstack-protector-strong -Wformat -Werror=format-security -Wdate-time -D_FORTIFY_SOURCE=2 -fPIC -DUSE__THREAD -DHAVE_SYNC_SYNCHRONIZE -I/usr/include/ffi -I/usr/include/libffi -I/usr/include/python3.10 -c c/_cffi_backend.c -o build/temp.linux-x86_64-3.10/c/_cffi_backend.o
c/_cffi_backend.c:15:10: fatal error: ffi.h: No such file or directory
15 | #include 解决(2)
imaginemiracle:~$ sudo apt-get install libffi-dev
问题(3). 出现有关 c/_cffi_backend.c 源文件报错
      c/_cffi_backend.c: In function ‘ctypedescr_dealloc’:
      c/_cffi_backend.c:407:23: error: lvalue required as left operand of assignment
        407 |         Py_REFCNT(ct) = 43;
            |                       ^
      c/_cffi_backend.c:410:23: error: lvalue required as left operand of assignment
        410 |         Py_REFCNT(ct) = 0;
            |                       ^
      c/_cffi_backend.c: In function ‘prepare_callback_info_tuple’:
      c/_cffi_backend.c:6185:5: warning: ‘PyEval_InitThreads’ is deprecated [-Wdeprecated-declarations]
       6185 |     PyEval_InitThreads();
            |     ^~~~~~~~~~~~~~~~~~
      In file included from /usr/include/python3.10/Python.h:130,
                       from c/_cffi_backend.c:2:
      /usr/include/python3.10/ceval.h:122:37: note: declared here
        122 | Py_DEPRECATED(3.9) PyAPI_FUNC(void) PyEval_InitThreads(void);
            |                                     ^~~~~~~~~~~~~~~~~~
      c/_cffi_backend.c: In function ‘b_callback’:
      c/_cffi_backend.c:6245:5: warning: ‘ffi_prep_closure’ is deprecated: use ffi_prep_closure_loc instead [-Wdeprecated-declarations]
       6245 |     if (ffi_prep_closure(closure, &cif_descr->cif,
            |     ^~
      In file included from c/_cffi_backend.c:15:
      /usr/include/x86_64-linux-gnu/ffi.h:347:1: note: declared here
        347 | ffi_prep_closure (ffi_closure*,
            | ^~~~~~~~~~~~~~~~
      error: command '/usr/bin/x86_64-linux-gnu-gcc' failed with exit code 1
      [end of output]
假的解决(3) 这里耍了小聪明
以下被划掉的部分为笔者初次解决该错误的方法,但这种方法导致了后面出现了严重而尴尬的问题,此处展示仅供读者欣(cháo)赏(fěng)
对于该问题找了好久,但并没有解决,因此笔者试着搜了一下 cffi 这个东西。

从当前的官网来看,cffi 目前最新版本号为 1.15.0,而我们使用 pip 下载时候写的是 cffi==1.14.0,看到这里尝试将上文那串下载命令后面的版本号更改为 1.15.0再重新下载,问题解决,因此笔者这里猜测应该是新版本与旧版本不兼容导致报错的。
imaginemiracle:~$ pip3 install --timeout=3600 django==3.2.* future mysqlclient \
 pymysql Pillow pylibmc captcha jinja2 sqlalchemy==1.4.3 psd-tools \
 django-pylibmc django-simple-captcha pycryptodome==3.12.0 cffi==1.15.0
来吧看看笔者这自以为是的解决方法会导致什么问题。
在一切安装配置结束后,发现 seafile 的网站运行不起来。
seafile:seafile-server-latest$ ./seahub.sh start

LC_ALL is not set in ENV, set to en_US.UTF-8
Starting seahub at port 8000 ...
Error:Seahub failed to start.
Please try to run "./seahub.sh start" again
使用 ./seahub.sh start-fastcgi 可以看到更细节的错误原因。
seafile:seafile-server-latest$ ./seahub.sh start-fastcgi

LC_ALL is not set in ENV, set to en_US.UTF-8
Starting seahub (fastcgi) at 127.0.0.1:8000 ...
Traceback (most recent call last):
----------------------------snip--------------------------------
----------------------------snip--------------------------------
  File "/usr/local/seafile-pro-server/seafile-pro-server-9.0.5/seahub/thirdpart/cffi/api.py", line 54, in __init__
    raise Exception("Version mismatch: this is the 'cffi' package version %s, located in %r.  When we import the top-level '_cffi_backend' extension module, we get version %s, located in %r.  The two versions should be equal; check your installation." % (
Exception: Version mismatch: this is the 'cffi' package version 1.14.0, located in '/usr/local/seafile-pro-server/seafile-pro-server-9.0.5/seahub/thirdpart/cffi/api.py'.  When we import the top-level '_cffi_backend' extension module, we get version 1.15.0, located in '/usr/local/lib/python3.10/dist-packages/_cffi_backend.cpython-310-x86_64-linux-gnu.so'.  The two versions should be equal; check your installation.
Error:Seahub failed to start.
这里省略掉无关紧要的输出,直接看错误原因,程序说,他应该要的是 cffi 1.14.0 版本,而却拿到的是 cffi 1.15.0,纯属找茬是不。这谁能想到这玩意竟然指定版本的,唉。
真的解决(3)
这里我们把 cffi 1.14.0 和 cffi 1.15.0 源码包下载下来,用源码方式安装。稍后会解释为什么要下载两个。
坚持做免积分的CSDN下载链接:cffi 1.14.0 & cffi 1.15.0
git下载: cffi 1.14.0、cffi 1.15.0
cffi 官方下载链接: cffi 1.14.0、cffi 1.15.0
这里我们在终端直接下载并解压
imaginemiracle:Downloads$ git clone https://gitcode.net/imagine-miracle/cffi.git
imaginemiracle:Downloads$ cd cffi
imaginemiracle:cffi$ ls
cffi-1.14.0.tar.gz  cffi-1.15.0.tar.gz  README.md
imaginemiracle:cffi$  tar -xf cffi-1.14.0.tar.gz
imaginemiracle:cffi$  tar -xf cffi-1.15.0.tar.gz
imaginemiracle:cffi$  ls
cffi-1.14.0  cffi-1.14.0.tar.gz  cffi-1.15.0  cffi-1.15.0.tar.gz  README.md
进入 cffi-1.14.0 目录
imaginemiracle:cffi$ cd cffi-1.14.0/
imaginemiracle:cffi-1.14.0$ ls
AUTHORS  cffi           demo  LICENSE      PKG-INFO   setup_base.py  setup.py
c        cffi.egg-info  doc   MANIFEST.in  README.md  setup.cfg      testing
安装 python 插件 cffi
imaginemiracle:cffi-1.14.0$ sudo python3 setup.py install
输出如下
---------------------------snip----------------------------------
---------------------------snip----------------------------------
c/_cffi_backend.c: In function ‘ctypedescr_dealloc’:
c/_cffi_backend.c:407:23: error: lvalue required as left operand of assignment
  407 |         Py_REFCNT(ct) = 43;
      |                       ^
c/_cffi_backend.c:410:23: error: lvalue required as left operand of assignment
  410 |         Py_REFCNT(ct) = 0;
      |                       ^
c/_cffi_backend.c: In function ‘prepare_callback_info_tuple’:
c/_cffi_backend.c:6185:5: warning: ‘PyEval_InitThreads’ is deprecated [-Wdeprecated-declarations]
 6185 |     PyEval_InitThreads();
      |     ^~~~~~~~~~~~~~~~~~
In file included from /usr/include/python3.10/Python.h:130,
                 from c/_cffi_backend.c:2:
/usr/include/python3.10/ceval.h:122:37: note: declared here
  122 | Py_DEPRECATED(3.9) PyAPI_FUNC(void) PyEval_InitThreads(void);
      |                                     ^~~~~~~~~~~~~~~~~~
c/_cffi_backend.c: In function ‘b_callback’:
c/_cffi_backend.c:6245:5: warning: ‘ffi_prep_closure’ is deprecated: use ffi_prep_closure_loc instead [-Wdeprecated-declarations]
 6245 |     if (ffi_prep_closure(closure, &cif_descr->cif,
      |     ^~
In file included from c/_cffi_backend.c:15:
/usr/include/x86_64-linux-gnu/ffi.h:347:1: note: declared here
  347 | ffi_prep_closure (ffi_closure*,
      | ^~~~~~~~~~~~~~~~
error: command '/usr/bin/x86_64-linux-gnu-gcc' failed with exit code 1
这里可以看到出现的错误,和我们用 pip3 安装时候报错一样,都是在 c/_cffi_backend.c 文件中出错,说我们运算符用错了这个那个的,笔者这里也偷懒一下。
      c/_cffi_backend.c: In function ‘ctypedescr_dealloc’:
      c/_cffi_backend.c:407:23: error: lvalue required as left operand of assignment
        407 |         Py_REFCNT(ct) = 43;
            |                       ^
      c/_cffi_backend.c:410:23: error: lvalue required as left operand of assignment
        410 |         Py_REFCNT(ct) = 0;
            |
我们打开 cffi 1.14.0 里的 _cffi_backend.c 文件,并锁定到出错行。可以看到报错是由 ctypedescr_dealloc 函数引起。
// # File: cffi 1.14.0/c/_cffi_backend.c		##------## ctypedescr_dealloc()
static void
ctypedescr_dealloc(CTypeDescrObject *ct)
{
    PyObject_GC_UnTrack(ct);
    if (ct->ct_weakreflist != NULL)
        PyObject_ClearWeakRefs((PyObject *) ct);

    if (ct->ct_unique_key != NULL) {
        /* revive dead object temporarily for DelItem */
        Py_REFCNT(ct) = 43;
        PyDict_DelItem(unique_cache, ct->ct_unique_key);
        assert(Py_REFCNT(ct) == 42);
        Py_REFCNT(ct) = 0;
        Py_DECREF(ct->ct_unique_key);
    }
    Py_XDECREF(ct->ct_itemdescr);
    Py_XDECREF(ct->ct_stuff);
    if (ct->ct_flags & CT_FUNCTIONPTR)
        PyObject_Free(ct->ct_extra);
    Py_TYPE(ct)->tp_free((PyObject *)ct);
}
这里我们对比 cffi 1.15.0 中的 _cffi_backend.c 文件,同样找到 ctypedescr_dealloc 函数位置。可以看到在 1.15.0 版本中已经修复了这个问题,使用的是新的赋值调用 Py_SET_REFCNT(ct, 43);
static void
ctypedescr_dealloc(CTypeDescrObject *ct)
{
    PyObject_GC_UnTrack(ct);
    if (ct->ct_weakreflist != NULL)
        PyObject_ClearWeakRefs((PyObject *) ct);

    if (ct->ct_unique_key != NULL) {
        /* revive dead object temporarily for DelItem */
        Py_SET_REFCNT(ct, 43);
        PyDict_DelItem(unique_cache, ct->ct_unique_key);
        assert(Py_REFCNT(ct) == 42);
        Py_SET_REFCNT(ct, 0);
        Py_DECREF(ct->ct_unique_key);
    }
    Py_XDECREF(ct->ct_itemdescr);
    Py_XDECREF(ct->ct_stuff);
    if (ct->ct_flags & CT_FUNCTIONPTR)
        PyObject_Free(ct->ct_extra);
    Py_TYPE(ct)->tp_free((PyObject *)ct);
}
这里我们也不深追代码了,使用最简单的方法——“文件替换”,我们将用 cffi 1.15.0 中的 _cffi_backend.c 文件替换掉 cffi 1.14.0 中的 _cffi_backend.c 文件。
imaginemiracle:cffi-1.14.0$ cp ../cffi-1.15.0/c/_cffi_backend.c ./c/
接下来,重新执行安装命令,这个时候就会发现我们已经成功安装好了 cffi-1.14.0。
imaginemiracle:cffi-1.14.0$ sudo python3 setup.py install
----------------------------snip---------------------------------
Installed /usr/local/lib/python3.10/dist-packages/cffi-1.14.0-py3.10-linux-x86_64.egg
Processing dependencies for cffi==1.14.0
Searching for pycparser==2.21
Best match: pycparser 2.21
Adding pycparser 2.21 to easy-install.pth file

Using /usr/local/lib/python3.10/dist-packages
Finished processing dependencies for cffi==1.14.0
3.2. 安装 MySQL
3.2.1. 使用 apt 安装 mysql-server
若不提前安装 MySQL 后面在设置创建数据库时则会失败!
imaginemiracle:~$ sudo apt-get update
imaginemiracle:~$ sudo apt-get install mysql-server
imaginemiracle:~$ sudo systemctl start mysql.service
3.2.2. 查看是否安装成功
使用 netstat 命令查看 MySQL 的 socket 是否为 listen 监听状态。若显示 LISTEN 则说明安装成功。
imaginemiracle:~$ netstat -tag | gerp mysql
tcp        0      0 localhost:mysql         0.0.0.0:*               LISTEN
查看 mysql.service 服务状态,看是否在运行状态。
imaginemiracle:~$ sudo systemctl status mysql.service
● mysql.service - MySQL Community Server
     Loaded: loaded (/lib/systemd/system/mysql.service; enabled; vendor preset: enabled)
     Active: active (running) since Mon 2022-06-20 05:54:15 UTC; 15min ago
   Main PID: 29399 (mysqld)
     Status: "Server is operational"
      Tasks: 39 (limit: 19069)
     Memory: 361.5M
        CPU: 2.610s
     CGroup: /system.slice/mysql.service
             └─29399 /usr/sbin/mysqld

Jun 20 05:54:14 imaginemiracle-linux systemd[1]: Starting MySQL Community Server...
Jun 20 05:54:15 imaginemiracle-linux systemd[1]: Started MySQL Community Server.
3.2.3. 配置 MySQL
使用 mysql_secure_installation 对 MySQL 初始化。
使用该命令,会对你提出几个问题让你回答:
| 她问你 | 你就说 |
|---|---|
| 是否安装密码校验插件 VALIDATE PASSWORD COMPONENT | no |
请为 root 管理员账户设置数据库密码 |
我是强壮的密码(这里需要自己设置哦!) |
| 删除匿名账户吗 | yes |
| 是否禁止root管理员从远程登录 | no |
| 是否删除test数据库并取消对它的访问权限 | yes |
| 是否刷新授权表,让初始化的设定立即生效 | yes |
执行 MySQL 配置脚本
imaginemiracle:~$ sudo mysql_secure_installation
第一个提示将询问你是否要设置验证密码插件,该插件可用于在认为新用户有效之前测试新 MySQL 用户的密码强度。
如果你选择设置验证密码插件,则创建的任何使用密码进行身份验证的 MySQL 用户都需要具有满足选择的策略的密码,所以选择 No ,便可以使用简单的密码。
Securing the MySQL server deployment.

Connecting to MySQL using a blank password.

VALIDATE PASSWORD COMPONENT can be used to test passwords
and improve security. It checks the strength of password
and allows the users to set only those passwords which are
secure enough. Would you like to setup VALIDATE PASSWORD component?

Press y|Y for Yes, any other key for No: Y

There are three levels of password validation policy:

LOW    Length >= 8
MEDIUM Length >= 8, numeric, mixed case, and special characters
STRONG Length >= 8, numeric, mixed case, special characters and dictionary                  file

Please enter 0 = LOW, 1 = MEDIUM and 2 = STRONG:
2
无论是否选择设置验证密码插件,下一个提示都是为 MySQL root 用户设置密码。输入并确认你设置的密码:
Please set the password for root here.

New password:

Re-enter new password:
如果第一个问题选择使用了验证密码插件,则将收到有关新密码强度的反馈。然后脚本将询问你是要继续使用刚刚输入的密码还是要输入新密码。若对刚刚输入的密码强度感到满意,则输入 Y 以继续执行脚本:
Estimated strength of the password: 100
Do you wish to continue with the password provided?(Press y|Y for Yes, any other key for No) : Y
后续将会继续询问,是否需要删除匿名用户、禁用 root 用户远程登录和 是否删除 test 数据库,是否确认现在重新加载权限表?,分别回答 Y、N、Y、Y 便可。
By default, a MySQL installation has an anonymous user,
allowing anyone to log into MySQL without having to have
a user account created for them. This is intended only for
testing, and to make the installation go a bit smoother.
You should remove them before moving into a production
environment.

Remove anonymous users? (Press y|Y for Yes, any other key for No) : yes
Success.


Normally, root should only be allowed to connect from
'localhost'. This ensures that someone cannot guess at
the root password from the network.

Disallow root login remotely? (Press y|Y for Yes, any other key for No) : no

 ... skipping.
By default, MySQL comes with a database named 'test' that
anyone can access. This is also intended only for testing,
and should be removed before moving into a production
environment.


Remove test database and access to it? (Press y|Y for Yes, any other key for No) : yes
 - Dropping test database...
Success.

 - Removing privileges on test database...
Success.

Reloading the privilege tables will ensure that all changes
made so far will take effect immediately.

Reload privilege tables now? (Press y|Y for Yes, any other key for No) : yes
Success.

All done!
3.2.4. 修改 MySQL root 用户为 mysql_native_password 验证方式
以 root 用户登录 MySQL
imaginemiracle:~$ sudo mysql -u root -p
使用 ALTER USER 语句修改用户信息。
mysql> ALTER USER 'root'@'localhost' IDENTIFIED WITH mysql_native_password by 'imaginemiracle';
Query OK, 0 rows affected (0.00 sec)

mysql> FLUSH PRIVILEGES;
Query OK, 0 rows affected (0.01 sec)

mysql> exit
Bye
3.2.5. 可能发生的意外(Error: SET PASSWORD has no significance for user ‘root’@‘localhost’)
有的小伙伴可能在第一次使用登录时,看到下面提示了 Enter password,并没有使用回车跳过输入,而是习惯性的输入了本机 root 用户的密码。
imaginemiracle:~$ sudo mysql -u root -p
Enter password: # 未设置的情况下这里可以直接使用 “回车” 跳过
事实上如果这个时候输入的话,则会导致后面使用 mysql_secure_installation 设置 root 密码失败。你将会看到这样的提示。
 … Failed! Error: SET PASSWORD has no significance for user ‘root’@‘localhost’ as the
 authentication method used doesn’t store authentication data in the MySQL server.
 Please consider using ALTER USER instead if you want to change authentication parameters.
这个时候也莫需慌张,先直接退出设置,用下面命令重新连接数据库。
imaginemiracle:~$ sudo mysql
这个时候可能需要你输入刚才输入过的密码,也就是你机器的 root 密码。
进入 sql 命令行后,输入下面命令,并敲回车,则可以将你的密码改成 imaginemiracle。(这里设置的密码根据自己需要替换即可)
mysql> ALTER USER 'root'@'localhost' IDENTIFIED WITH mysql_native_password by 'imaginemiracle';
Query OK, 0 rows affected (0.00 sec)

mysql> FLUSH PRIVILEGES;
Query OK, 0 rows affected (0.01 sec)

mysql> exit
Bye
这个时候 exit 到终端下,再对 MySQL 重新进行设置,对于前两个问题直接输入 no 即可。
imaginemiracle:~$ sudo mysql_secure_installation
3.3. 安装 Java 运行环境
Java 运行时环境 (JRE) 是使用 elasticsearch 进行全文搜索的要求。
执行下面任意一组命令即可:
(1) Debian 10
imaginemiracle:~$ sudo apt-get install default-jre -y
(2) Ubuntu 16.04/18.04/20.04/22.04
imaginemiracle:~$ sudo apt-get install openjdk-8-jre -y
imaginemiracle:~$ sudo ln -sf /usr/lib/jvm/java-8-openjdk-amd64/jre/bin/java /usr/bin/
(3) CentOS
imaginemiracle:~$ sudo yum install java-1.8.0-openjdk -y
3.4. 安装 poppler-utils
pdf 文件的全文搜索需要包 poppler-utils。
执行下面任意一组命令即可:
(1) Ubuntu/Debian
imaginemiracle:~$ sudo apt-get install poppler-utils -y
(2) CentOS
imaginemiracle:~$ sudo yum install poppler-utils -y
3.5. 创建安装目录
在 /usr/local 目录下创建 seafile-pro-server/installed(可以自定义命名),由于是在根目录下 / 创建目录,因此这里需要超级权限,或者可以直接切换到 root 用户进行操作。
imaginemiracle:~$ sudo mkdir -p /usr/local/seafile-pro-server/installed
3.6. 创建 seafile 用户
一般来说不要直接使用 root 用户来运行程序,这里新建一个 seafile 用户。
使用 adduser 命令创建用户,并根据屏幕输出提示设置密码等其它用户相关信息。
imaginemiracle:~$ sudo adduser seafile
将在 /usr/local 下刚创建的目录所有权更改为新用户 seafile。
imaginemiracle:~$ sudo chown -R seafile: /usr/local/seafile-pro-server
给 seafile 用户授予 sudo 权限。
imaginemiracle:~$ sudo usermod -aG sudo seafile
切换到 seafile 用户
imaginemiracle:~$ su seafile
3.7. 下载并解压 Seafile 安装包
进入 installed 目录。
seafile:~$ cd /usr/local/seafile-pro-server/installed
下载 seafile pro server。
seafile:installed$ wget https://download.seafile.com/seafhttp/files/7338d67f-3a22-4243-bfe6-99632f01ca63/seafile-pro-server_9.0.5_x86-64_Ubuntu.tar.gz
使用 tar 解压 seafile 压缩包。
seafile:installed$ tar -zxvf seafile-pro-server_9.0.5_x86-64_Ubuntu.tar.gz -C /usr/local/seafile-pro-server/
进入解压后的目录:
seafile:installed$ cd /usr/local/seafile-pro-server/seafile-pro-server-9.0.5/
创建好的目录结构大概是这样的
seafile:seafile-pro-server-9.0.5$ tree /usr/local/seafile-pro-server/ -L 2
/usr/local/seafile-pro-server/
├── installed
│   └── seafile-pro-server_9.0.5_x86-64_Ubuntu.tar.gz
└── seafile-pro-server-9.0.5
    ├── check-db-type.py
    ├── check_init_admin.py
    ├── index_op.py
    ├── migrate.py
    ├── migrate-repo.py
    ├── migrate-repo.sh
    ├── migrate.sh
    ├── pro
    ├── remove-objs.py
    ├── remove-objs.sh
    ├── reset-admin.sh
    ├── run_index_master.sh
    ├── run_index_worker.sh
    ├── runtime
    ├── seaf-backup-cmd.py
    ├── seaf-backup-cmd.sh
    ├── seaf-encrypt.sh
    ├── seaf-fsck.sh
    ├── seaf-fuse.sh
    ├── seaf-gc.sh
    ├── seafile
    ├── seafile-background-tasks.sh
    ├── seafile.sh
    ├── seaf-import.sh
    ├── seahub
    ├── seahub.sh
    ├── setup-seafile-mysql.py
    ├── setup-seafile-mysql.sh
    ├── setup-seafile.sh
    ├── sql
    └── upgrade

8 directories, 26 files
这样构建目录的好处在于:
- 与
seafile相关配置文件都可以放在/usr/local/seafile-pro-server/conf目录下,便于集中管理; - 后续升级时,只需要解压最新的安装包到
/usr/local/seafile-pro-server目录下即可。
4. 开始部署 Seafile 服务器
正常流程的话,我们的当前目录应该是:
seafile:seafile-pro-server-9.0.5$ pwd
/usr/local/seafile-pro-server/seafile-pro-server-9.0.5
如果不在 seafile 解压后的目录的话,请移步到此目录,该目录的文件大概像下面这样:
seafile:seafile-pro-server-9.0.5$ ls
check-db-type.py     migrate.sh           run_index_worker.sh  seaf-fuse.sh                 seahub                  upgrade
check_init_admin.py  pro                  runtime              seaf-gc.sh                   seahub.sh
index_op.py          remove-objs.py       seaf-backup-cmd.py   seafile                      setup-seafile-mysql.py
migrate.py           remove-objs.sh       seaf-backup-cmd.sh   seafile-background-tasks.sh  setup-seafile-mysql.sh
migrate-repo.py      reset-admin.sh       seaf-encrypt.sh      seafile.sh                   setup-seafile.sh
migrate-repo.sh      run_index_master.sh  seaf-fsck.sh         seaf-import.sh               sql
4.1. 执行安装脚本
在安装目录下有一个 setup-seafile-mysql.sh 这个文件,运行它。正常情况下它会依次开始询问一些配置问题,并引导你来安装它,虽然再上文有写过安装 Java 环境(那是后来补上的),但由于笔者刚开始没有安装,因此它会提示我来安装,如果你的系统也缺少的话,那么它也会提示你的,按照提示安装即可。
seafile:seafile-pro-server-9.0.5$ ./setup-seafile-mysql.sh
Checking python on this machine ...

Checking for java ...
Java is not found. install it first.

On Debian/Ubuntu:     apt-get install default-jre
On CentOS/RHEL:       yum install jre


Error occured during setup.
Please fix possible problems and run the script again.
看起来是我的系统里没有 Java 的运行环境,安装它。
seafile:seafile-pro-server-9.0.5$ sudo apt-get install default-jre -y
安装完毕后,重新执行安装脚本。
[注]:不是 root 的你记得要加 sudo 哦。
seafile:seafile-pro-server-9.0.5$ sudo ./setup-seafile-mysql.sh
初始化脚本会检查是否满足安装条件,条件满足后,按回车即可继续安装。下面会依次询问你一些问题,从而引导使用者安装并配置 Seafile,不输入直接敲回车则表示使用默认配置。

4.1.1. 设置服务器名称
命名要求:由 3-15 个字符,只允许英文字母、数字和下划线(‘_’),不可少也不可多。

4.1.2. 设置服务器 ip 或域名
如果本机使用的是公网 IP 的话并且绑定了域名,那么就可以使用域名来设置,之后便可以通过域名来访问云盘了。
如果没有的话,这里设置本机 IP 即可。

4.1.3. 设置端口号
使用哪个端口访问,这里可以自定义端口,也可以使用默认端口。(在默认端口未被占用时,建议使用默认端口)

4.1.4. 选择数据库构建方式
这里提供两个选项:
[1] 创建新的数据库 ccnet/seafile/seahub,选择该项则提供 root 密码,脚本程序会自动为你创建好数据库和用户;
[2] 使用已有数据库 ccnet/seafile/seahub,选择该项则说明已经存在创建好的数据库,否则请选择 [1]。

选择“ [1]创建新的 ccnet/seafile/seahub 数据库”时,该脚本会创建这些数据库,并且 Seafile Server 将使用Seafile Server 访问它们的 MySQL 用户。你将需要回答以下问题:
| 她问 | 分析 | 备注 | 你说 |
|---|---|---|---|
mysql 服务器主机 |
MySQL 服务器的主机地址 |
默认是本地主机 | 本机 IP |
mysql 服务器端口 |
MySQL 服务器使用的 TCP 端口 |
默认端口为 3306。几乎每个 MySQL 服务器都使用这个端口 |
听她的 |
mysql root 密码 |
MySQL root 账户的密码 |
创建新数据库和 MySQL 用户需要 root 密码 |
给她你 root 密码 |
Seafile 的 mysql 用户 |
由脚本创建的 MySQL 用户,Seafile 的组件使用它来访问数据库 |
默认为seafile;除非用户存在,否则创建用户 |
我们早建好了 |
Seafile 用户的 mysql 密码 |
上面用户的密码,写在 Seafile 的配置文件中 |
不允许使用百分号 (‘%’) | 我们也设好了 |
| 数据库名称 | ccnet使用的数据库名称 |
默认为“ccnet-db”,如果数据库不存在则创建 |
\ |
seafile 数据库名称 |
Seafile 使用的数据库名称 |
默认为“seafile-db”,如果数据库不存在则创建 |
\ |
seahub 数据库名称 |
seahub 使用的数据库名称 |
默认为“seahub-db”,如果数据库不存在则创建 |
\ |
| 她问 | 分析 | 备注 | 你说 |
|---|---|---|---|
mysql服务器主机 |
MySQL服务器的主机地址 |
默认是本地主机 | 本机 IP |
mysql服务器端口 |
MySQL 服务器使用的 TCP 端口 |
默认端口为 3306;几乎每个 MySQL 服务器都使用这个端口 |
听她的 |
Seafile 的 mysql 用户 |
Seafile 组件用来访问数据库的用户 | 用户必须存在 | \ |
Seafile 用户的 mysql 密码 |
上面用户的密码 | \ | \ |
ccnet 数据库名称 |
ccnet使用的数据库名称,默认为“ccnet-db” |
数据库必须存在 | \ |
seafile 数据库名称 |
Seafile 使用的数据库名称,默认为“seafile-db” |
数据库必须存在 | \ |
seahub 数据库名称 |
Seahub 使用的数据库名称,默认为“seahub-db” |
数据库必须存在 | \ |
来看看实际情况,初次安装都会选择 [1] 选项。此时则会询问你如下问题:
(1) 设置数据库地址
这里可以使用默认,也可以自定义设置。

(2) 设置可连接主机
这里的默认为 %,该通配符代表允许用户账户从任何主机都可以连接。一般情况使用默认就好。
![]()
(3) 设置数据库端口号
没有特殊情况,使用默认即可。

(4) 输入数据库 root 用户的密码

4.1.5. 创建 MySQL seafile 用户
按上文操作的话,我们已经创建好了系统的 seafile 用户,这里会为我们创建 MySQL seafile 用户,这里会要求我们设置 MySQL seafile 用户的密码。

4.1.6. 创建数据库
创建数据库 ccnet-db、seafile-db、seahub-db,这三个数据库直接使用默认设置即可,这里输入三次回车即可。(若此处并无权限操作,请看后面手动创建数据库过程)

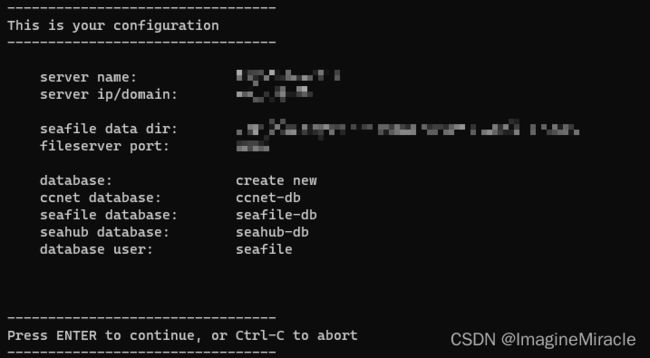
4.1.7. 确认设置
确认设置的信息没问题直接输入回车,将会自动为我们安装好 seafile。
4.1.8. 确认完成
seafile:~$ tree -L 2 /usr/local/seafile-pro-server/
/usr/local/seafile-pro-server/
├── ccnet
├── conf
│   ├── ccnet.conf
│   ├── gunicorn.conf.py
│   ├── seafdav.conf
│   ├── seafevents.conf
│   ├── seafile.conf
│   └── seahub_settings.py
├── installed
│   └── seafile-pro-server_9.0.5_x86-64_Ubuntu.tar.gz
├── pro-data
├── seafile-data
│   └── library-template
├── seafile-pro-server-9.0.5
│   ├── check-db-type.py
│   ├── check_init_admin.py
│   ├── index_op.py
│   ├── migrate.py
│   ├── migrate-repo.py
│   ├── migrate-repo.sh
│   ├── migrate.sh
│   ├── pro
│   ├── remove-objs.py
│   ├── remove-objs.sh
│   ├── reset-admin.sh
│   ├── run_index_master.sh
│   ├── run_index_worker.sh
│   ├── runtime
│   ├── seaf-backup-cmd.py
│   ├── seaf-backup-cmd.sh
│   ├── seaf-encrypt.sh
│   ├── seaf-fsck.sh
│   ├── seaf-fuse.sh
│   ├── seaf-gc.sh
│   ├── seafile
│   ├── seafile-background-tasks.sh
│   ├── seafile.sh
│   ├── seaf-import.sh
│   ├── seahub
│   ├── seahub.sh
│   ├── setup-seafile-mysql.py
│   ├── setup-seafile-mysql.sh
│   ├── setup-seafile.sh
│   ├── sql
│   └── upgrade
├── seafile-server-latest -> seafile-pro-server-9.0.5
└── seahub-data
    └── avatars

16 directories, 32 files
该文件夹 seafile-server-latest 是指向当前 Seafile Server 文件夹的符号链接。当您稍后升级到新版本时,升级脚本会更新此链接以指向最新的 Seafile Server 文件夹。
5. 设置 MySQL
以 root 用户登录数据库。
imaginemiracle:~$ sudo mysql -u root -p
创建 mtsql seafile 用户,imaginemiracle 则为 seafile 用户登录 mysql 的密码。
mysql> create user 'seafile'@'localhost' identified by 'imaginemiracle';
将用户 seafile 的身份验证插件更改为 mysql_native_password:
mysql> ALTER USER 'seafile'@'localhost' identified with mysql_native_password by 'imaginemiracle';
手动创建数据库 ccnet、seafile、seahub(已使用脚本成功创建数据库的读者无需执行)
mysql> create database `ccnet_db` character set = 'utf8';

mysql> create database `seafile_db` character set = 'utf8';

mysql> create database `seahub_db` character set = 'utf8';
赋予 seafile 用户这三个数据库的访问权限。(已使用脚本成功创建数据库的读者无需执行)
mysql> GRANT ALL PRIVILEGES ON `ccnet_db`.* to `seafile`@localhost;

mysql> GRANT ALL PRIVILEGES ON `seafile_db`.* to `seafile`@localhost;

mysql> GRANT ALL PRIVILEGES ON `seahub_db`.* to `seafile`@localhost;
刷新权限表。
mysql> FLUSH PRIVILEGES;
退出 mysql
mysql> exit
6. 调整 conf 文件
由安装脚本创建的 Seafile 配置文件是为在反向代理后面运行的 Seafile 准备的。
要访问 Seafile 的 Web 界面并在没有反向代理的情况下创建工作共享链接,需要修改以下两个配置文件 /usr/local/seafile-pro-server/conf:
- seahub_settings.py(适用于
9.0.x): 将端口8000添加到SERVICE_URL(即 SERVICE_URL = http://11.22.33.44:8000/);
[注]:此处的 ip 地址仅作为示例。 - ccnet.conf(适用于
8.0.x或7.1.x): 将端口8000添加到SERVICE_URL(即 SERVICE_URL = http://11.22.33.44:8000/)。 - gunicorn.conf.py: 将绑定更改为
"0.0.0.0:8000"(即 bind = “0.0.0.0:8000”)。
7. 启动 Seafile 服务器
进入 /usr/local/seafile-pro-server/seafile-server-latest 目录。
seafile:~$ cd /usr/local/seafile-pro-server/seafile-server-latest
使用启动如下两个脚本。
seafile:seafile-server-latest$ ./seafile.sh start		# 启动 Seafile 服务
seafile:seafile-server-latest$ ./seahub.sh start 		# 启动 seahub 网站,默认端口为 127.0.0.1:8000
第一次启动 Seahub 时,脚本会提示您为 Seafile 服务器创建一个管理员帐户。输入管理员用户的电子邮件地址和密码。

当输入完你的 seafile 账户后,则会提示启动完成。
LC_ALL is not set in ENV, set to en_US.UTF-8
Starting seahub at port 8000 ...

Seahub is started

Done.
7.1. 可能出现的错误(Failed to connect to MySQL: Plugin caching_sha2_password could not be loaded)
执行完 seafile.sh start 命令后,有可能会出现如下错误。
seafile:seafile-server-latest$ ./seafile.sh start

** Message: 06:43:27.575: seafile-controller.c(1023): loading seafdav config from /usr/local/seafile-pro-server/conf/seafdav.conf

2022-06-21 06:43:27 ../common/seaf-utils.c(409): Use database Mysql
2022-06-21 06:43:27 http-server.c(236): fileserver: worker_threads = 10

2022-06-21 06:43:27 http-server.c(249): fileserver: backlog = 32
2022-06-21 06:43:27 http-server.c(264): fileserver: fixed_block_size = 8388608
2022-06-21 06:43:27 http-server.c(279): fileserver: web_token_expire_time = 3600
2022-06-21 06:43:27 http-server.c(294): fileserver: max_indexing_threads = 1
2022-06-21 06:43:27 http-server.c(309): fileserver: max_index_processing_threads= 3
2022-06-21 06:43:27 http-server.c(331): fileserver: cluster_shared_temp_file_mode = 600
2022-06-21 06:43:27 http-server.c(409): fileserver: enable_async_indexing = 0
2022-06-21 06:43:27 http-server.c(421): fileserver: async_indexing_threshold = 700
2022-06-21 06:43:27 http-server.c(433): fileserver: fs_id_list_request_timeout = 300
2022-06-21 06:43:27 http-server.c(446): fileserver: max_sync_file_count = 100000
2022-06-21 06:43:27 http-server.c(461): fileserver: put_head_commit_request_timeout = 10
2022-06-21 06:43:27 ../common/license.c(709): License file /usr/local/seafile-pro-server/seafile-license.txt does not exist, allow at most 3 trial users
License file /usr/local/seafile-pro-server/seafile-license.txt does not exist, allow at most 3 trial users
2022-06-21 06:43:27 ../common/seaf-db.c(739): Failed to connect to MySQL: Plugin caching_sha2_password could not be loaded: /usr/lib/mariadb/plugin/caching_sha2_password.so: cannot open shared object file: No such file or directory
2022-06-21 06:43:27 ../common/user-mgr.c(97): Failed to get user number from DB.
2022-06-21 06:43:27 seafile-session.c(422): Failed to init user manager.
failed to run "seaf-server -t" [65280]
该错误是 seafile 无法被验证从而无法连接到数据库,解决方法如下。
以 root 用户登录到 MySQL。
seafile:seafile-server-latest$ sudo mysql -u root -p
将 seafile 用户的验证插件修改为 mysql_native_password:
mysql> ALTER USER 'seafile'@'127.0.0.1' identified with mysql_native_password by 'imaginemiracle';
7.2. 这里没找到你的错误???
执行 seafile.sh 文件时一般会输出详细的错误信息,根据错误信息查询解决方法即可。
而启动 seahub.sh 是不会给出特别详细的错误信息,这个时候使用如下命令启动,可以查看更详细的信息,根据错误信息来查询相应解决方法即可。
./seahub.sh start-fast-cgi
8. 访问 Seafile 云盘服务器
当完全成功通过上文配置后,此时你将可以在内网下通过主机地址和端口 8000(例如 http://11.22.33.44:8000)的 Web 界面访问 Seafile。
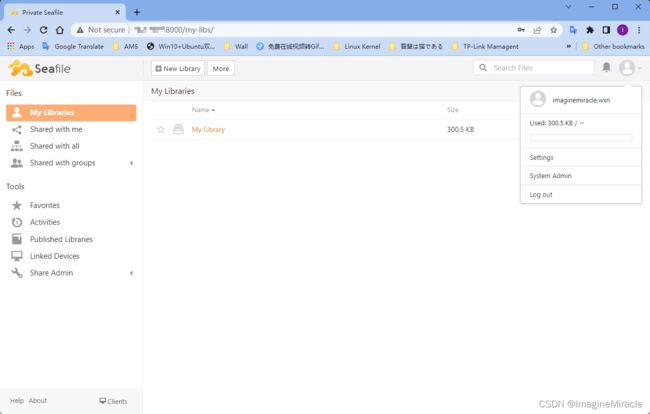
但这个时候在内网的主机也只能通过 IP: Port 的形式访问网页,并不能做上传/下载的操作,只能在本机上上传/下载,这完全不符合我们的要求,最起码可以在内网下的主机都可以上传下载才行。
9. 配置内网(局域网)下上传/下载
9.1. 修改 MySQL 服务的配置
打开 mysql 的配置文件。
imaginemiracle:~$ sudo vim /etc/mysql/mysql.conf.d/mysqld.cnf
找到 bind-address = 127.0.0.1 和 mysqlx-bind-address = 127.0.0.1,将这两行注释掉,即在这两行最前面加上 # 即可。
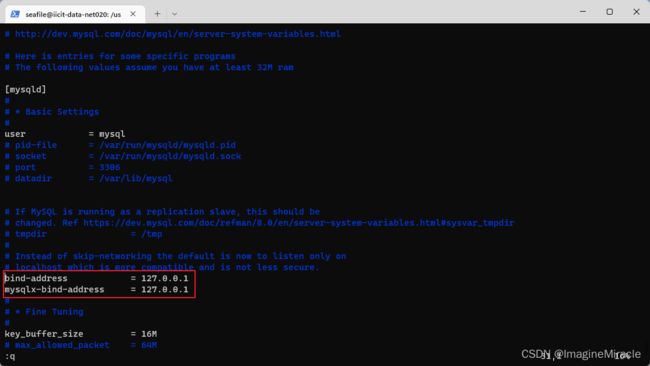
重启 mysql.service。
imaginemiracle:~$ sudo systemctl restart mysql.service
9.2. 修改 MySQL 的 seafile 用户设置
以 root 用户登录 mysql。
imaginemiracle:~$ sudo mysql -u root -p
选择 user 表。
mysql> use mysql;
Reading table information for completion of table and column names
You can turn off this feature to get a quicker startup with -A

Database change
查看 user 表,可以看到 seafile 用户目前只能通过 localhost 也就是本机的 127.0.0.1 来访问数据库,由于目前 seahub 是通过 localhost:8082 上传和下载文件,这也就是为什么不能在其它主机上上传和下载的原因。
mysql> select user,host from user;
+------------------+-----------+
| user             | host      |
+------------------+-----------+
| debian-sys-maint | localhost |
| mysql.infoschema | localhost |
| mysql.session    | localhost |
| mysql.sys        | localhost |
| root             | localhost |
| seafile          | localhost |
+------------------+-----------+
6 rows in set (0.00 sec)
因此我们需要修改 seafile 用户的访问地址,使其可以通过本机的网络 IP 访问数据库,同时刷新权限表。这里使用通用符 % 来表示该用户可以通过任何途径访问数据库;
mysql> update user set host='%' where user='seafile';
Query OK, 1 row affected (0.00 sec)
Rows matched: 1  Changed: 1  Warnings: 0

mysql> select user,host from user;
+------------------+-----------+
| user             | host      |
+------------------+-----------+
| seafile          | %         |
| debian-sys-maint | localhost |
| mysql.infoschema | localhost |
| mysql.session    | localhost |
| mysql.sys        | localhost |
| root             | localhost |
+------------------+-----------+
6 rows in set (0.00 sec)

mysql> flush privileges;
Query OK, 0 rows affected (0.00 sec)
修改 seafile 用户信息(修改为可以通过任何途径连接数据库,即可通过域名访问或主机 IP 连接数据库,同时修改 seafile 用户的验证插件为 mysql_native_password),同时刷新权限表。
mysql>  ALTER USER 'seafile'@'%' IDENTIFIED WITH mysql_native_password by 'imaginemiracle';
Query OK, 0 rows affected (0.00 sec)

mysql> flush privileges;
Query OK, 0 rows affected (0.00 sec)
9.3. 修改 seafile 可通过域名或 主机IP 访问 ccnet、seafile、seahub 数据库
修改 seafile 访问数据库的方式,同时刷新权限表。
mysql> GRANT ALL PRIVILEGES ON `ccnet_db`.* to `seafile`@'%';
Query OK, 0 rows affected (0.00 sec)

mysql> GRANT ALL PRIVILEGES ON `seafile_db`.* to `seafile`@'%';
Query OK, 0 rows affected (0.00 sec)

mysql> GRANT ALL PRIVILEGES ON `seahub_db`.* to `seafile`@'%';
Query OK, 0 rows affected (0.00 sec)

mysql> flush privileges;
Query OK, 0 rows affected (0.01 sec)
MySQL 配置完成,退出 mysql。
mysql> exit
Bye
重启 mysql.service。
imaginemiracle:~$ sudo systemctl restart mysql.service
9.4. 修改 seafile pro server 配置
进入 seafile 服务器的配置目录。
seafile:~$ cd /usr/local/seafile-pro-server/conf
seafile:conf$ ls
ccnet.conf  gunicorn.conf.py  __pycache__  seafdav.conf  seafevents.conf  seafile.conf  seahub_settings.py
(1). 打开 ccnet.conf 文件,将其中 HOST = 127.0.0.1 修改为 HOST = www.imaginemiracle.com;
(2). 打开 seafevents.conf 文件,其中 host = 127.0.0.1 修改为 host = www.imaginemiracle.com;
(3). 打开 seafile.conf 文件,其中 host = 127.0.0.1 修改为 host = www.imaginemiracle.com;
(4). 打开 seahub_settings.py 文件,其中 ‘HOST’ : ‘127.0.0.1’ 修改为 ‘HOST’ : ‘www.imaginemiracle.com’;
[注]:以上仅以 www.imaginemiracle.com 作为示例使用,具体应根据实际情况修改为正确域名或本机 IP。
9.5. 重启 seafile 服务
进入 seafile 安装目录。
seafile:~$ cd /usr/local/seafile-pro-server/seafile-server-latest
重启服务。
seafile:seafile-server-latest$ ./seafile.sh start
seafile:seafile-server-latest$ ./seahub.sh start
9.6. 设置 seafile 网页的文件服务地址
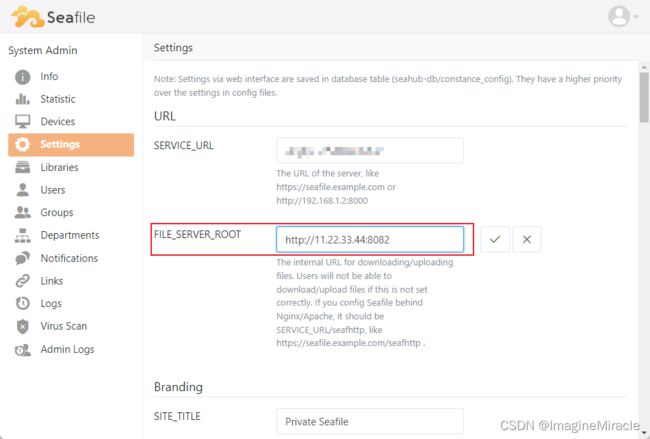
使用 IP:Prot 进入 seafile 网址的系统设置。(默认设置下的端口应该是 8000)

修改 FILE_SERVER_ROOT 的地址为 http://host ip:port。默认设置这里的端口为 8082,可以通过查看 conf/seafile.conf 文件获取修改配置后的文件服务端口。
[注]:http://11.22.33.44:8082 仅作为示例,请根据实际情况修改。
10. 启用 Https(可选——但建议)
将服务器通过加密的 Https 访问代替现在的从未加密的 Http 访问。
10.1. 安装 Nginx
适用于 Debian/Ubuntu
imaginemiracle:~$ sudo apt install nginx -y
适用于 CentOS
imaginemiracle:~$ sudo yum install nginx -y
安装成功后,启动它,并开启随系统开机启动。
适用于 CentOS/Debian/Ubuntu
imaginemiracle:~$ sudo systemctl start nginx
imaginemiracle:~$ sudo systemctl enable nginx
10.2. 准备工作
适用于 Debian/Ubuntu
在以下位置为 seafile 创建一个配置文件 /etc/nginx/sites-available/:
imaginemiracle:~$ sudo touch /etc/nginx/sites-available/seafile.conf
/etc/nginx/sites-enabled/ 删除和中的默认文件 /etc/nginx/sites-available:
imaginemiracle:~$ sudo rm /etc/nginx/sites-enabled/default
imaginemiracle:~$ sudo rm /etc/nginx/sites-available/default
创建符号链接:
imaginemiracle:~$ sudo ln -s /etc/nginx/sites-available/seafile.conf /etc/nginx/sites-enabled/seafile.conf
适用于 CentOS
将 SELinux 切换到许可模式并保持设置:
imaginemiracle:~$ sudo setenforce permissive
imaginemiracle:~$ sed -i 's/^SELINUX=.*/SELINUX=permissive/' /etc/selinux/config
在以下位置为 seafile 创建一个配置文件 /etc/nginx/conf.d:
imaginemiracle:~$ touch /etc/nginx/conf.d/seafile.conf
10.3. 配置 Nginx
将以下内容复制到刚创建好的 seafile.conf 文件中,并对以下内容做一些修改。
log_format seafileformat '$http_x_forwarded_for $remote_addr [$time_local] "$request" $status $body_bytes_sent "$http_referer" "$http_user_agent" $upstream_response_time';

server {
    listen 80;
    server_name imaginemiracle.com;

    proxy_set_header X-Forwarded-For $remote_addr;

    location / {
         proxy_pass         http://127.0.0.1:8000;
         proxy_set_header   Host $host;
         proxy_set_header   X-Real-IP $remote_addr;
         proxy_set_header   X-Forwarded-For $proxy_add_x_forwarded_for;
         proxy_set_header   X-Forwarded-Host $server_name;
         proxy_read_timeout  1200s;

         # used for view/edit office file via Office Online Server
         client_max_body_size 10000m;

         access_log      /var/log/nginx/seahub.access.log seafileformat;
         error_log       /var/log/nginx/seahub.error.log;
    }

# If you are using [FastCGI](http://en.wikipedia.org/wiki/FastCGI),
# which is not recommended, you should use the following config for location `/`.
#
#    location / {
#         fastcgi_pass    127.0.0.1:8000;
#         fastcgi_param   SCRIPT_FILENAME     $document_root$fastcgi_script_name;
#         fastcgi_param   PATH_INFO           $fastcgi_script_name;
#
#         fastcgi_param  SERVER_PROTOCOL     $server_protocol;
#         fastcgi_param   QUERY_STRING        $query_string;
#         fastcgi_param   REQUEST_METHOD      $request_method;
#         fastcgi_param   CONTENT_TYPE        $content_type;
#         fastcgi_param   CONTENT_LENGTH      $content_length;
#         fastcgi_param  SERVER_ADDR         $server_addr;
#         fastcgi_param  SERVER_PORT         $server_port;
#         fastcgi_param  SERVER_NAME         $server_name;
#         fastcgi_param   REMOTE_ADDR         $remote_addr;
#        fastcgi_read_timeout 36000;
#
#         client_max_body_size 0;
#
#         access_log      /var/log/nginx/seahub.access.log;
#        error_log       /var/log/nginx/seahub.error.log;
#    }

    location /seafhttp {
        rewrite ^/seafhttp(.*)$ $1 break;
        proxy_pass http://127.0.0.1:8082;
        client_max_body_size 10000m;
        proxy_set_header   X-Forwarded-For $proxy_add_x_forwarded_for;

        proxy_connect_timeout  36000s;
        proxy_read_timeout  36000s;
        proxy_send_timeout  36000s;

        send_timeout  36000s;

        access_log      /var/log/nginx/seafhttp.access.log seafileformat;
        error_log       /var/log/nginx/seafhttp.error.log;
    }
    location /media {
        root /usr/local/seafile-pro-server/seafile-server-latest/seahub;
    }
}
- 修改 server_name(必须):
该项的默认值为"imaginemiracle.com",这里若有域名则修改为域名,无可用域名则修改为本机IP即可。 - location /media(必须):
该项描述的是seafile的资源目录,笔者已经在上面提供的配置文件中做出修改,根据本文安装的读者可以不用再次修改,安装在其他目录的读者需根据自己安装的目录自行修改即可。 - 服务器监听端口 listen(可选):
若希望配置的seafile服务器运行在非标准端口上则修改即可。 - location /::proxy_pass(可选):
如果Seahub配置为在不同于8000的端口上启动。 - ** location /seafhttp::proxy_pass(可选):**
如果seaf-server配置为在不同于8082的端口上启动。 - 请求正文的最大允许大小 client_max_body_size(可选):
本文给出的默认值为1000m,表示Nginx可支持的请求实体最大为1GB,可根据实际情况调节。Seahub的默认值为1M,上传较大文件将导致错误消息HTTP错误代码413(“请求实体太大”)。建议将client_max_body_size的值与conf/seafile.conf中max_upload_size部分[fileserver]中的参数同步。
为所有用户设置默认配额(例如 2GB)。为此,只需将以下行添加到 conf/seafile.conf 文件中。
[quota]
# default user quota in GB, integer only
default = 2
10.4. 为 443 端口添加服务块(没有域名的小伙伴可以忽略此小节)
若有域名的小伙伴可以暂停,先看 11 小节内容,完了再回来继续。。
为端口 443 添加一个服务器块,并将 http-to-https 重定向 seafile.conf 到 /etc/nginx。
编辑 /etc/nginx/sites-available/seafile.conf 文件。
log_format seafileformat '$http_x_forwarded_for $remote_addr [$time_local] "$request" $status $body_bytes_sent "$http_referer" "$http_user_agent" $upstream_response_time';

server {
    listen 80;
    server_name www.imaginemiracle.com;
    rewrite ^ https://$http_host$request_uri? permanent;    # Forced redirect from HTTP to HTTPS

    server_tokens off;      # Prevents the Nginx version from being displayed in the HTTP response header
}

server {
    listen 443;
    ssl on;
    ssl_certificate /etc/letsencrypt/live/www.imaginemiracle.com/fullchain.pem;    # Path to your fullchain.pem
    ssl_certificate_key /etc/letsencrypt/live/www.imaginemiracle.com/privkey.pem;  # Path to your privkey.pem
    server_name www.imaginemiracle.com;
    server_tokens off;

	# HSTS for protection against man-in-the-middle-attacks
	# 启用 HTTP 严格传输安全 (HSTS) 以防止中间人攻击
    add_header Strict-Transport-Security "max-age=31536000; includeSubDomains";

    location / {
         proxy_pass         http://127.0.0.1:8000;
         proxy_set_header   Host $host;
         proxy_set_header   X-Real-IP $remote_addr;
         proxy_set_header   X-Forwarded-For $proxy_add_x_forwarded_for;
         proxy_set_header   X-Forwarded-Host $server_name;
         proxy_read_timeout  1200s;

         # proxy_set_header X-Forwarded-For $remote_addr;
         proxy_set_header X-Forwarded-Proto https;

         # used for view/edit office file via Office Online Server
         client_max_body_size 0;
... # No changes beyond this point compared to the Nginx configuration without HTTPS
以上是笔者修改部分的全部内容,是文件的部分内容,大家根据对比该内容,并根据实际情况修改相应内容。
10.5. 重启 Ngnix
确保您的 seafile.conf 不包含语法错误并重新启动 Nginx 以使配置更改生效。
imaginemiracle:~$ sudo nginx -t
imaginemiracle:~$ sudo nginx -s reload
10.6. 修改 seahub_settings.py
修改 seahub_settings.py 文件中的 SERVICE_URL = “https://11.22.33.44:8000/”,修改为 SERVICE_URL = “https://www.imaginemiracle.com/”。
重启 seafile 服务。
seafile:seafile-server-latest$ ./seafile.sh start
seafile:seafile-server-latest$ ./seahub.sh start
删除防火墙的 8000 的入站规则。
seafile:seafile-server-latest$ firewall-cmd --permanent --remove-port=8000/tcp
systemctl reload firewalld.service
10.7. 修改 seafile.conf 并重启 seafile 服务
为了提高安全性,文件服务器应该只能通过 Nginx 访问。
修改 conf/seafile.conf 文件,在 [fileserver] 块下添加如内容:
host = 127.0.0.1 ## default port 0.0.0.0
更新之后,文件服务器只接受来自 Nginx 的请求。
重启 Seafile 服务。
10.8. 验证
使用域名 www.imaginemiracle.com 或 IP 访问 seafile 网页,查看网页的管理设置,就会发现这里已经变为 https 的开头了。
没有域名的读者需要在此处将 FILE_SERVER_ROOT 的值设置为 “http://[host ip]:[port]/seafhttp”
有域名并且根据 11 章节完成 SSL 配置后可将 FILE_SERVER_ROOT 的值设置为 “https://[your domain]/seafhttp”
11. 获取 Let’s Encrypt 证书 (没有域名的小伙伴请忽略此章节)
Certbot 让获得 Let's Encrypt 证书如此简单。Certbot 是一个免费的开源软件工具,用于请求、接收和更新 Let's Encrypt 证书。
11.1 进入 Cerbot 官网
访问 Cerbot官网 选择所部署的网络服务器和操作系统类型。
11.2. 根据提示操作
根据官网提示一步步操作即可。虽然笔者也将具体步骤写下来了。
11.3. 与官网同样的步骤——多余的忧心
原谅笔者出于对大家不信任的担心,这里还是写下根据官网说明的具体步骤吧。
一般情况下,若使用的是近几年发行版的 Linux,那么其本身已经预装过 snapd 了,不过我们也可以再安装一次,反正无所谓。
11.4. 安装 snapd
imaginemiracle:~$ sudo apt-get update
imaginemiracle:~$ sudo apt-get install snap
11.5. 更新 snapd
执行如下命令来确保使用的 snapd 是最新版,若如下输出则说明已经是最新版。
imaginemiracle:~$ sudo snap install core; sudo snap refresh core
snap "core" is already installed, see 'snap help refresh'
snap "core" has no updates available
可能出现的问题(忧心关键点):
当执行更新命令时,也有可能是得到如下错误输出。
imaginemiracle:~$ sudo snap install core; sudo snap refresh core
error: cannot communicate with server: Post http://localhost/v2/snaps/core: dial unix /run/snapd.socket: connect: no such file or directory
error: cannot communicate with server: Post http://localhost/v2/snaps/core: dial unix /run/snapd.socket: connect: no such file or directory
那么此时检查 snapd.service 服务是否开启。一般这种情况是该服务未打开导致。
imaginemiracle:~$ sudo systemctl status snapd.service
○ snapd.service - Snap Daemon
     Loaded: loaded (/lib/systemd/system/snapd.service; enabled; vendor preset: enabled)
     Active: inactive (dead)
TriggeredBy: ○ snapd.socket
如上显示的状态是 “未活动”,那么将其打开即可。
imaginemiracle:~$ sudo systemctl start snapd.service
开启服务后再次执行更新命令便可成功运行。
imaginemiracle:~$ sudo snap install core; sudo snap refresh core
11.6. 删除 cerbot 包
安装 Cerbot snap 之前需要将之前任意类型的 Cerbot 包卸载掉。
适用于 Debian/Ubuntu:
imaginemiracle:~$ sudo apt-get remove certbot
适用于 CentOS:
imaginemiracle:~$ sudo yum remove certbot
适用于 Fedora:
imaginemiracle:~$ sudo dnf remove certbot
11.7. 安装 Cerbot
适用于 Debian/Ubuntu/CentOS/Fedora:
imaginemiracle:~$ sudo snap install --classic certbot
在机器上的命令行执行以下指令,保证 certbot 命令可以运行。
imaginemiracle:~$ sudo ln -s /snap/bin/certbot /usr/bin/certbot
11.8. 获取证书
根据官网建议,只获得一个证书并自己修改 Nginx 配置。
imaginemiracle:~$ sudo certbot certonly --nginx
按照屏幕提示操作即可。验证成功后,Certbot 会将证书文件保存在以主机名命名的目录中 /etc/letsencrypt/live。对于主机名 www.imaginemiracle.com,文件存储在/ etc/letsencrypt/live/www.imaginemiracle.com。
[注]:这里的 www.imaginemiracle.com,仅作为示例。
11.9. 启用 Nginx 的 SSL 模块 (可选)
如果你的 Nginx 不支持 SSL,你需要重新编译它。使用以下命令。
imaginemiracle:~$ sudo ./configure --with-http_stub_status_module --with-http_ssl_module
imaginemiracle:~$ sudo make && make install
12. 开启 WebDav
12.1. 修改 seafdav.conf 文件
在 seafile 的部署目录下的 conf 目录创建或为已有的 seafdav.conf 配置文件添加入内容。
[注]:若以本文的指导此目录应该为 /usr/local/seafile-pro-server/conf/seafdav.conf
# File: seafdav.conf
[WEBDAV]
# Default is false. Change it to true to enable SeafDAV server.
enabled = true

# 默认端口为 8080,在非被占用情况不建议修改
port = 8080

# 若为开启 Nginx 代理,share_name 应选择下行配置
# share_name = /
# 若开启 Nginx 代理,请使用下行配置,可自行修改,但必须保证与 Nginx 中配置相同
share_name = /imiracledav

# SeafDAV uses Gunicorn as web server.
# This option maps to Gunicorn's 'workers' setting. https://docs.gunicorn.org/en/stable/settings.html?#workers
# By default it's set to 5 processes.
workers = 5

# This option maps to Gunicorn's 'timeout' setting. https://docs.gunicorn.org/en/stable/settings.html?#timeout
# By default it's set to 1200 seconds, to support large file uploads.
timeout = 1200
12.2. 修改 nginx 配置文件
若以本文指导安装的 Nginx,其配置文件目录应该为 /etc/nginx/sites-available/seafile.conf,其它伙伴可以根据自己的安装目录自行匹配。
为配置文件添加如下内容:
    location /imiracledav {
    	# proxy_pass 的值应该修改为本机 IP:prot/imiracledav
    	# 此处的 imiracledav 可自行修改,但必须与 conf/seafdav.conf 中配置相同
        proxy_pass         http://11.22.33.44:8080/imiracledav;
        proxy_set_header   Host $host;
        proxy_set_header   X-Real-IP $remote_addr;
        proxy_set_header   X-Forwarded-For $proxy_add_x_forwarded_for;
        proxy_set_header   X-Forwarded-Host $server_name;
        proxy_set_header   X-Forwarded-Proto $scheme;
        proxy_read_timeout  1200s;
        client_max_body_size 0;

        access_log      /var/log/nginx/seafdav.access.log seafileformat;
        error_log       /var/log/nginx/seafdav.error.log;
    }
12.3. 重启 Nginx 和 Seafile 服务
重新加载 Nginx 配置
sudo nginx -s reload
重启 Seafile
./seafile.sh restart
./seafhub.sh restart
12.4. 验证
Windwos 端:
可通过浏览器使用以配置的域名或 ip 访问,访问方式:
使用域名 `www.imaginemiracle.com/imiracledav`
或 `IP` `11.22.33.44:8000/imiracledav`	# 默认端口为 8000,若修改请使用修改后端口
访问 `webdav`
也可使用 Windows 资源管理器连接,但该方式仅支持非加密 HTTP 连接。因此,为了安全,唯一可行的选择是使用第三方客户端,例如 Cyberduck 或 Bitkinex。
Linux 端:
在 Linux 上,有更多选择。可以使用 Nautilus 等文件管理器连接到 webdav 服务器。
也可在终端命令行中使用 davfs2 打开。
imaginemiracle:~$ sudo apt-get update
imaginemiracle:~$ sudo apt-get install davfs2
# 注意:下面命令
# (1) 本行命令中的 uid=,此处的 username 需要修改为当前用户名
# 例如,这里的用户名为 `imaginemiracle`, 即 uid=imaginemiracle
# 目的是为了让当前用户拥有读写权限,若当前用户为 root,则可以不写该选项
#
# 该命令执行后,需要输入 Seafile 的账户和密码,根据实际情况输入即可
imaginemiracle:~$ sudo mount -t davfs -o uid=<username> http://www.imaginemiracle.com/imiracledav /media/seafdav/
在连接没有任何报错后,则会正常的看到 mount 到的目录下有了网盘上的内容。
使用 sudo umount /media/seafdav 可取消挂载。
建议禁用 davfs2 的 LOCK 操作。编辑 /etc/davfs2/davfs2.conf
use_locks 0
13. 开启邮件服务
修改 seahub_settings.py 在其中添加如下内容:
EMAIL_USE_TLS = True
EMAIL_HOST = 'smtp-mail.outlook.com'        # smpt server
EMAIL_HOST_USER = '[email protected]'    # username and domain
EMAIL_HOST_PASSWORD = '*******************'    # password
EMAIL_PORT = 587
DEFAULT_FROM_EMAIL = EMAIL_HOST_USER
SERVER_EMAIL = EMAIL_HOST_USER
这里的 EMAIL_HOST_PASSWORD 项需要填写你的使用邮箱的密码,为了保护隐私,笔者这里使用 * 代替。可以看到笔者使用的邮件服务器是 smtp-mail.outlook.com,他的指定端口是 587,若大家使用的是其它邮件服务器的话,对应的端口有可能不同,可以在网络上检索一下对应的服务器。
这里设置好后们需要开启对应端口的防火墙,然后重启 seafile 即可。
14. 日常维护(数据备份)
在服务器端,Seafile 是通过一种内部格式将文件存储在资料库中,并对于文件和目录有其独有的保存方式(类似于 Git)。默认安装下,这些内部对象,会被直接存储在服务器的文件系统中(例如 Ext4,NTFS)。文件在服务器上通过分块存储,以支持大文件的断点续传和增量同步。
在服务器端可以使用 seaf-fuse.sh 直接将所有目录挂载到本地目录下,以普通目录树的方式访问和备份,需要注意的是,此方法挂载的目录只具有读权限,即不可以直接修改目录文件,只可备份。(加密文件不可使用此方法访问)
进入 seafile 安装目录,若如按照本文安装,则进入下面目录即可。
seafile:~$ cd /usr/local/seafile-pro-server/seafile-server-latest
seafile:seafile-server-latest$ ls
check-db-type.py     pro                  seaf-backup-cmd.py  seafile-background-tasks.sh  setup-seafile.sh
check_init_admin.py  remove-objs.py       seaf-backup-cmd.sh  seafile.sh                   sql
index_op.py          remove-objs.sh       seaf-encrypt.sh     seaf-import.sh               start-seafile.sh
migrate.py           reset-admin.sh       seaf-fsck.sh        seahub                       tmp.log
migrate-repo.py      run_index_master.sh  seaf-fuse.sh        seahub.sh                    upgrade
migrate-repo.sh      run_index_worker.sh  seaf-gc.sh          setup-seafile-mysql.py
migrate.sh           runtime              seafile             setup-seafile-mysql.sh
使用 seaf-fuse.sh 将所有文件挂载到本地目录。
# 命令格式
./seaf-fuse.sh start <path>
seafile:seafile-server-latest$ ./seaf-fuse.sh start ~/drive-data/

Starting seaf-fuse, please wait ...
seaf-fuse started

Done.
这个时候进入挂载的目标目录即可看到对应的所有用户目录。
卸载目录命令。
seafile:seafile-server-latest$ ./seaf-fuse.sh stop
14.1 如果出现 “Permission denied” 的错误
如果你运行 ./seaf-fuse.sh start 时,遇到 "Permission denied" 的错误信息, 很有可能你没有在 “fuse用户组” 解决方法:
(1) 把你的用户加到 fuse 组
sudo usermod -a -G fuse
(2) 退出 shell 重新登陆
(3) 现在试着再一次执行 ./seaf-fuse.sh start
#15. 常见问题
以 # 开头的章节代表的是该部分内容不能算是正文部分,此部分内容为附加章节,一般用于提供针对文章中常常会出现的问题的一些解决办法,或者分享笔者的一些啰嗦文字,以及对于参考的文章发出的感谢等内容。
#15.1. 无法上传/下载文件
通过以上的所有配置后,发现仍无法访问 Web 网址或无法上传/下载文件。那么需要做的事情有两点。
(1). 确认防火墙是否开放了设置的端口,若未开放则放开这几个端口;(默认的几个需要放开的端口 8000、8082、3306)
防火墙设置命令参考:
# 开启防火墙
systemctl start firewalld.service
# 查看防火墙状态
systemctl status firewalld.service
# 关闭防火墙
systemctl stop firewalld.service
# 查看防火墙放开的端口
firewall-cmd --list-port
# 添加防火墙入站规则
firewall-cmd --permanent --add-port=[port]/[protocol]
# 示例:添加防火墙入站规则,开放 22222 号端口用于 tcp 协议
e.g.: firewall-cmd --permanent --add-port=22222/tcp
# 删除防火墙入站规则
firewall-cmd --permanent --remove-port=[port]/[protocol]
# 示例:删除防火墙入站规则,删除 22222 号端口用于 tcp 协议
e.g.: firewall-cmd --permanent --remove-port=22222/tcp
# 重新加载防火墙规则,每次配置完必须重新加载方可生效
systemctl reload firewalld.service
(2). 检查 seahub_settings.py 中的 SERVICE_URL 设置和 seafile 网页中的 FILE_SERVER_ROOT 设置。
#15.2. 网页中用户头像显示异常
(1). 进入 seafile 的安装目录
若是按照本文的安装步骤安装,则目录位于 /usr/local/seafile-pro-server/seafile-server-latest/seahub/seahub/avatar/templatetags
若非本安装教程安装,则按此提示进入,/自己的安装目录/seafile-server-latest/seahub/seahub/avatar/templatetags
(2). 编辑 avatar_tags.py 文件
(3). 修改如下两部分
- return service_url + url, False, date_uploaded 修改为 return url, False, date_uploaded;
- return service_url + get_default_avatar_url(), True, None 修改为 return get_default_avatar_url(), True, None。
[注]:即删掉 return 语句中的 service_url + 即可。
@cache_result
def api_avatar_url(user, size=AVATAR_DEFAULT_SIZE):
    service_url = get_service_url()
    service_url = service_url.rstrip('/')

    # when store avatars in the media directory
    if not AVATAR_FILE_STORAGE:
        # urlparse('https://192.157.12.3:89/demo')
        # ParseResult(scheme='https', netloc='192.157.12.3:89', path='/demo', params='', query='', fragment='')
        parse_result = urlparse(service_url)
        service_url = '%s://%s' % (parse_result[0], parse_result[1])

    avatar = get_primary_avatar(user, size=size)
    if avatar:
        url = avatar.avatar_url(size)
        date_uploaded = avatar.date_uploaded
        # /media/avatars/6/9/5011f01afac2a506b9544c5ce21a0a/resized/32/109af9901c0fd38ab39d018f5cd4baf6.png
        # 修改前
        # return service_url + url, False, date_uploaded
        # 修改后
        return url, False, date_uploaded
    else:
        # /media/avatars/default.png
        # 修改前
        # return service_url + get_default_avatar_url(), True, None
        # 修改后
        return get_default_avatar_url(), True, None
(4). 删除系统缓存
imaginemiracle:~$ sudo rm -rf /tmp/seahub_cache/*
(5). 重启 Seafile 服务
seafile:seafile-server-latest$ ./seafile.sh restart		# 启动 Seafile 服务
seafile:seafile-server-latest$ ./seahub.sh restart
#15.3. 文件夹上传数量限制
默认的单次上传文件夹数量为 1000。

如果这个数量也不能满足你的话,那么打开 conf/seahub_settings.py 文件,并添加或修改项 MAX_NUMBER_OF_FILES_FOR_FILEUPLOAD = 100000,修改并保存后,再重启 seafile 服务即可。
此时刷新 web 端,再次上传大数量文件夹则不会限制。
!0. “!” 说明
以 ! 开头的章节代表着此章节具有一定的 “危险性”(从各方面而言),更多的是提供给读者用来学习参考。本文示例仅供学习使用,还请各位读者切勿将所学技术于商业用途以及其它非法用途。本文里 ! 章节试图去突破 Seafile 对于部署无 lincense 文件的服务器存在人数限制最大免费注册用户数量为 3 个。
!1. Seafile 的 Python 部分
首先通过对 seafile 文件的大致分析,其网页端是使用 django 框架由 Python 语言开发,而后端程序是由 C 实现的。
那么先看其 Python 部分代码,通过搜查有关 license 的文件。找到了前端检测 MaxUsers 用户最大数的部分代码,此段代码会影响用户的登录、注册等功能。
修改 ./seahub/seahub/utils/licenseparse.py 文件中的 MaxUsers,能改多大就改多大。
def user_number_over_limit(new_users=0):
    logger = logging.getLogger(__name__)
    if is_pro_version():
        try:
            # get license user limit
            license_dict = parse_license()
            max_users = int(license_dict.get('MaxUsers', 3))

            # get active user number
            active_db_users = ccnet_api.count_emailusers('DB')
            active_ldap_users = ccnet_api.count_emailusers('LDAP')
            active_users = active_db_users + active_ldap_users if \
                           active_ldap_users > 0 else active_db_users

            if new_users < 0:
                logger.debug('`new_users` must be greater or equal to 0.')
                return False
            elif new_users == 0:
                return active_users >= max_users
            else:
                return active_users + new_users > max_users
!2. C 部分
再看 C 部分,通过 IDA 软件可以去查看二进制文件,并将其反编译为汇编代码,若觉得汇编代码还不好看的话,还可以进一步将其反编译为 C 的伪代码形式,说是伪代码,其实已经和真实的代码差不多了。
[注]:这里所说的伪代码,实际上这类代码有一个准确的名称叫做——中间代码形式。
经过对 seafile.sh 启动脚本的分析,找到了启动时会执行的几个二进制文件,并将其逐一使用 IDA 打开查看,查找有关 license 部分的代码,最终被定位到一个具体的二进制文件里。
此处为了一定程度上保护 Seafile 不被破解滥用,就不在这里说明具体的 文件 位置了。毕竟也是国产软件,支持国产!
通过找到对应二进制文件的 main 函数开始阅读代码,很快就找到了于之相关的判断。

其检测部分的函数调用结构很简单。如下:
main()
 ⨽> sub_9DE30(v364, 0, &v372, &v371)	// 校验 license 函数
  ⨽> sub_9DE30(__int64 a1, unsigned int a2, time_t **a3, _DWORD *a4)
简单分析以下这里的判断,首先我们已经可以明确两点:
- 第一,这个函数就是
License的检查函数; - 第二,这个函数会返回一个值用来判断
License是否检测成功,若返回值小于0则表示不成功程序会直接退出。
查看 sub_9DE30(__int64 a1, unsigned int a2, time_t **a3, _DWORD *a4) 函数的定义。
    if ( !(unsigned int)g_file_test(v7, 16LL) )
    {
      if ( a4 )
        *a4 = 3;	// Address: 0009DE9C
      g_log(
        0LL,
        16LL,
        "%s(%d): License file %s does not exist, allow at most %d trial users\n",
        "../common/license.c",
        709LL,
        v7,
        3LL);	// Address: 0009DEC8
      v8 = 0;
      __fprintf_chk(stdout, 1LL, "License file %s does not exist, allow at most %d trial users\n", v7, 3LL);	// Address: 0009DEDB
      g_free(v7);
      goto LABEL_6;
    }
很明显的找到了判断无 license 文件时的情况,可以看到这里有一个关键变量被赋值为 3,那么这个变量就是用来显示用户数量的关键点。虽然我们只用修改 a4 变量赋值的那一个地方既可,但为了更加明显的判断我们的修改是否有效,这里我们将出现的两次打印中的 3 也修改一下。

转回到汇编代码,使用二进制修改,这样不容易出问题。建议不要尝试使用其它方式修改,很容易导致崩溃无法运行。具体做法:
修改:edit > Patch program > Change byte…
保存:edit > Patch program > Apply aptches to input file…
这里由于第二个地方的变量长度只有 8 位,因此只能修改成最大整数 127,其余两个修改为 0x1F40 十进制的值为 8000。那么按照想法来说修改完后的用户上限应该为 8000。

修改完并保存后再反编译为 C 语言再来查看,可以检查是否修改成功以及是否影响其它代码。事实证明这样修改是没有问题的,也不会影响到其它地方的代码。
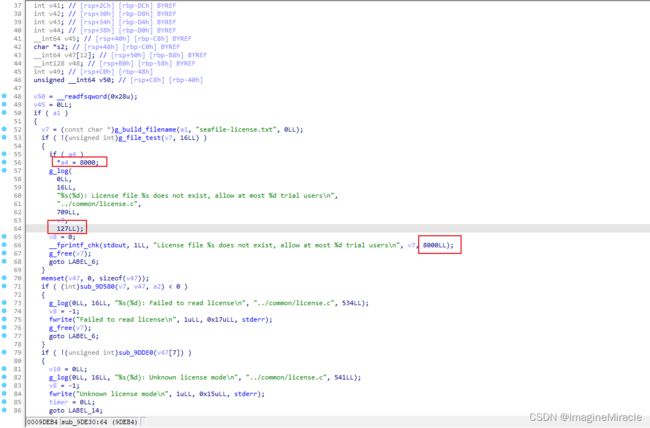
这段代码最后有一条 goto 跳转语句千万不能忽视。goto LABEL_6;,我们看看 LABEL_6 是怎么写的。
LABEL_6:
  result = v8;
  if ( __readfsqword(0x28u) != v50 )
    goto LABEL_89;
  return result;	// Address: 0009DF18 sub_9DE30:338(9DF18)
  // 48 81 C4 D8 00 00 00 5B 5D 41 5C 41 5D 41 5E 41
}
可以看出该函数最终的返回值为 result,该值会在返回之前使用 v8 变量的值对其赋值,虽然我们直接在二进制中不容易修改变量名为整数值,但我们可以做的是将 v8 可能会被赋值为负值的地方改为正数即可,这样为了保证不让 main 函数退出而继续执行下去。也不用全部看只需要修改 LABEL_89 之后的所有便可。
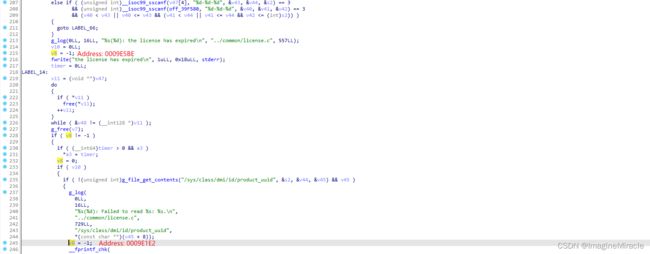
LABEL_89 标签后一共存在四次对 v8 变量的赋值。如下图:
(1)&(2) v8 = -1;

四处的语句是一样的,因此在汇编中看到的也是一样的,这里只展示其中一个,将其修改为 0 或者任意大于 0 的数均可。

对文件的修改已经完成,现在重启 seafile 服务测试。

成功启动就表示着已经突破完成。我们现在已经成功将没有 license 的试用人数改为 8000 个用户,与预期结果一样,不用管上面显示的 127,为什么呢?
还记得在修改变量值的时候,那个 127 只是一行输出,是个无关紧要的值,无需关心它即可,重点只用看后面有无输出,同时查看网页端能否新加用户。
!3. 再次声明
请杜绝传播破解软件!
本文内容仅供学习,请勿用于商业用途以及其它非法用途。若按照本文教程学习并成功破解的读者,请保护网络环境和软件环境,请勿以任意途径分享破解文件或中间文件,否则全部法律责任将由文件分享者全部承担。
如需商业用途请购买正版,为国产软件的助力!
#参考文章
(1) Seafile 管理员手册
(2) 使用 Nginx 启用 HTTPS
觉得这篇文章对你有帮助的话,就留下一个赞吧v*
请尊重作者,转载还请注明出处!感谢配合~
[作者]: Imagine Miracle
[版权]: 本作品采用知识共享署名-非商业性-相同方式共享 4.0 国际许可协议进行许可。
[本文链接]: https://blog.csdn.net/qq_36393978/article/details/125327701


