elasticsearch实现数据的导入Mysql
需要用到的工具
- Ense -- 用于连接elasticsearch做es语言测试
- Node.Js -- 用于下载elasticdump
- Elasticdump -- 用于elasticsearch导出JSON文件
- Maven -- 下载JsonDataToMySQL依赖
- JDK --运行程序插入数据
一、安装Ense
①下载Ense https://pan.baidu.com/s/1ncoIpVQBjumibS_8FTDi0g 提取码:Rzx6
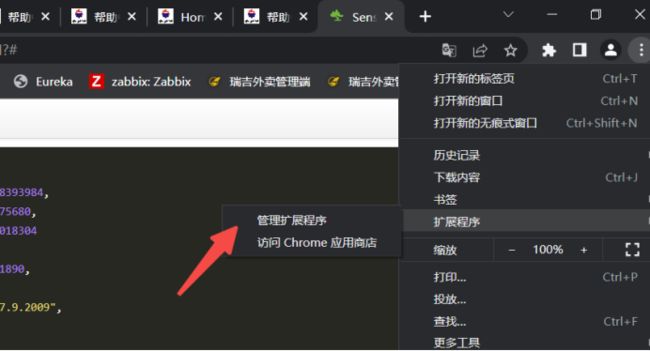
②打开Google Chrome的管理扩展程序
③加载刚才解压的文件夹
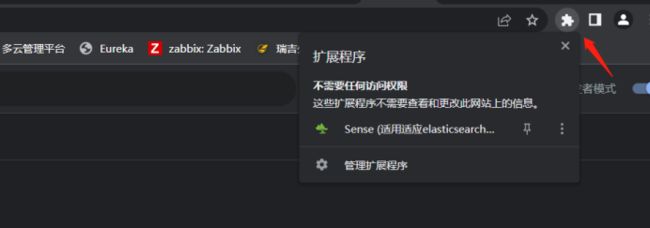
④右上角多出来的这个扩展程序点开就可以使用了
⑤输入地址后测试
能够查出数据说明正常。
⑥常见的查询
-- 查询ES信息
GET /

-- 查询某个库的总数
GET performance_processing1/_count
{
  "query": {
    "match_all": {}
  }
}

-- 查询全部数据
GET performance_processing1/_search
{
  "query": {
    "match_all": {}
  }
}

-- 查询指定条数
GET performance_processing1/_search
{  "size": 100,
  "query": {
    "match_all": {}
  }
}

-- 根据ID查询
GET /performance_processing1/_doc/73242d5d-247d-4c34-9585-aebf4bf9a23a?pretty


-- 查询字符串搜索
GET /performance_processing1/_search?q=metricUnit:packets

-- match搜索
GET /performance_processing1/_search
{
    "query" : {
        "match" : {
            "metricUnit" : "packets"
        }
    }
}

-- term搜索
GET /performance_processing1/_search
{
  "query": {
    "term": {
      "poolId": {
        "value": "402822c183401c8d0183401d91e30000"
      }
    }
  }


-- bool搜索
GET /performance_processing1/_search
{
  "query": {
    "bool": {
      "must": [
        {"match": {
          "poolId": "402822c183401c8d0183401d91e30000"
        }}
      ],
      "filter": [
        {"range": {
          "monitorTime": {
            "gte": 1685360979000
          }
        }}
      ]
    }
  }
}

-- must多条件匹配查询(相当于SQL里的and)
GET /performance_processing1/_search
{
  "query": {
    "bool": {
      "must": [
        {
          "match": {
          "metricUnit": "iops"
          }
        },
        {
          "match": {
            "resourceType": "linux"
          }
        }
      ]
    }
  }
}


-- Should满足一个条件查询(相当于SQL里的or)
GET /performance_processing1/_search
{
  "query": {
    "bool": {
      "should": [
        {
          "match": {
          "documentId": "4ecea8c2-ca31-4a21-9b53-19c3f46b99bc"
          }
        },
        {
          "match": {
            "documentId": "aa1e0dd0-5bd4-4a24-9130-bda3a00998eb"
          }
        }
      ]
    }
  }
}

-- must_not必须不匹配查询
GET /performance_processing1/_search
{
  "query": {
    "bool": {
      "must_not": [
        {
          "match": {
         "documentId": "4ecea8c2-ca31-4a21-9b53-19c3f46b99bc"
          }
        },
        {
          "match": {
         "documentId": "aa1e0dd0-5bd4-4a24-9130-bda3a00998eb"
          }
        }
      ]
    }
  }
}


-- 多个字段查询内容
GET /performance_processing1/_search
{
 "query": {
    "multi_match": {
      "query": "packets",
      "fields": ["metricUnit","metricValue"]
    }
 }
}

-- 一个字段查询多个内容
GET /performance_processing1/_search
{
 "query": {
   "terms": {
     "metricUnit": [
       "Mbps",
       "iops"
     ]
   }
 }
}


-- 范围查询
GET performance_processing1/_search
{
  "query": {
    "range": {
      "monitorTime": {
        "gte": 1685663835000,
        "lt": 1685693835000
      }
    }
  }
}


-- 排序
GET /demo_person/_search
{
  "query": {
    "bool": {
      "must": [
        {"term": {
          "last_name.keyword": {
            "value": "Smith"
          }
        }},
        {
          "term": {
            "about": {
              "value": "climbing"
            }
          }
        }
      ]
    }
  },
  "sort": [
    {
      "last_name": {
        "order": "desc"
      }
    }
  ]
}


-- 茅台云资源池监控数据
GET /performance_processing1/_search
{
  "query": {
    "bool": {
      "must": [
        {
          "match": {
          "poolType": "huawei-private"
          }
        },
        {
          "range": {
            "monitorTime": {
        "gte": 1685993835000,
        "lt": 1686093835000
      }
          }
        }
      ]
    }
  }
}
二、查询监控数据
-- 查询资源池是茅台云资源池且时间在6月7日9:00 -6月7日10:00数据
GET /performance_processing1/_search
{"query": {"bool": {"must": [{"match": {"poolType": "huawei-private"}},{"range": {"monitorTime": {"gte": 1686099695000,"lt": 1686103535000}}}]}}}

-- 查询资源池是茅台云资源池且时间为最新数据降序
GET /performance_processing1/_search
{"query":{ "match": {"poolType":"huawei-private"} },"sort": [{"monitorTime": {"order": "desc"}}], "_source": true
三、安装Node.Js以及Elasticdump
[(234条消息) Node.js安装与配置(详细步骤)_node安装_普通网友的博客-CSDN博客]((234条消息)
[(234条消息) 离线安装elasticdump及备份数据_elasticdump离线安装_韩帅平的博客-CSDN博客]((234条消息)
四、使用Elasticdump导出
- Input是elasticsearch数据源地址
- output是输出位置
- limit 单次导入多少条
示例:
elasticdump --input=http://elastic:[email protected]:9200/performance_processing1 --output=H:/zhangxi.json --searchBody '{"query": {"bool": {"must": [{"range": {"monitorTime.keyword": {"gte": "2021-10-20 00:00:00","lte": "2022-10-09 00:00:00"}}}]}}}'

elasticdump
--limit 5000
--input=http://elastic:[email protected]:9200/performance_processing1 --output=H:/monitor.json --searchBody {"""query""":{"""bool""":{"""must""":[{"""match""":{"""poolType""":"""huawei-private"""}},{"""range""":{"""monitorTime""":{"""gte""":1686099695000,"""lt""":1686103535000}}}]}}}
Cmd运行效果:
导出成功后文件:
6月7日至6月8日 数据335468条数据
打开文件预览一遍
看见这样说明成功 在文件的最开头添加“[” 末尾添加“]” 让他变成完整的JSON串
五、 搭建JsonDataToMySQL环境
根据MySQL版本更改,我本地的是8.0.32,如果要投入RDS数据库使用的话,最后的依赖要根据版本进行更改。 导入maven依赖
    4.0.0

    org.example
    JsonToMySQL
    1.0-SNAPSHOT


        8
        8
        UTF-8


           commons-io
           commons-io
           2.4


           org.projectlombok
           lombok
           1.18.20


           com.alibaba
           fastjson
           1.2.47


           org.springframework
           spring-core
           4.2.0.RELEASE


           mysql
           mysql-connector-java
           8.0.32
六、Monitor实体类
package org.example;
import lombok.Data;
import java.io.Serializable;
@Data
public class Monitor implements Serializable{
    private static final long serialVersionUID = -38873741878079746L;

    private String _index;

    private String _type;
    private String  _id;
    private String _score;
    private String _source;
    private String sort;
}
七、JsonDataToMysql.java
package org.example;

import com.alibaba.fastjson.JSONObject;
import org.apache.commons.io.FileUtils;
import org.springframework.util.ResourceUtils;
import java.io.File;
import java.sql.Connection;
import java.sql.DriverManager;
import java.sql.PreparedStatement;
import java.util.List;

/**
 * @author zhangxi
 * @create 2023-06-07 10:09
 * @url 18840064595
 */
public class JsonDataToMysql {

    private static final String URI = "jdbc:mysql://127.0.0.1/monitor?"
            + "user=root&password=1234&useUnicode=true&characterEncoding=UTF-8";

    private static final String DRIVER = "com.mysql.jdbc.Driver";

    /**
     * 获取数据库的连接
     *
     * @return
     * @throws Exception
     */
    public static Connection connectDB() throws Exception {
        //1、加载数据库驱动
        Class.forName(DRIVER);
        //2、获取数据库连接
        Connection conn = DriverManager.getConnection(URI);

        return conn;
    }

    public static void main(String[] args) throws Exception {
        //1.利用spring提供的工具类读取资源文件
        File jsonfile = ResourceUtils.getFile("H:/monitor.json");
        //2.读取到的文件转换成为String类型
        String jsonsting = FileUtils.readFileToString(jsonfile);
        //3.将字符串转成list集合
        List monitors = JSONObject.parseArray(jsonsting, Monitor.class);
        //获取当前系统的时间戳
        long start = System.currentTimeMillis();
        //获取数据库连接
        Connection conn = JsonDataToMysql.connectDB();
        //开启事务,取消自动提交
        conn.setAutoCommit(false);
        String sql = "INSERT INTO monitor(_index, _type, _id, _score,_source,sort) "
                + " VALUES(?, ?, ?, ?, ?, ?)";
        //预编译sql语句
        PreparedStatement pstmt = conn.prepareStatement(sql);
        //4.遍历插入到数据库
        for (int i = 0; i < monitors.size(); i++) {
            pstmt.setString(1, monitors.get(i).get_index());
            pstmt.setString(2, monitors.get(i).get_type());
            pstmt.setString(3, monitors.get(i).get_id());
            pstmt.setString(4, monitors.get(i).get_score());
            pstmt.setString(5, monitors.get(i).get_source());
            pstmt.setString(6, monitors.get(i).getSort());

            //"攒"SQL
            pstmt.addBatch();
            //每100条执行一次
            if ((i + 1) % 100 == 0) {
                //执行sql
                pstmt.executeBatch();
                //事务提交
                conn.commit();
            }
        }

        //最后插入不能整除的
        pstmt.executeBatch();
        conn.commit();
        long end = System.currentTimeMillis();
        System.out.println("花费时间:" + (end - start));
        System.out.println("成功插入" + monitors.size() + "条");
        //释放资源
        pstmt.close();
        //再把自动提交打开,避免影响其他需要自动提交的操作
        conn.setAutoCommit(true);
        conn.close();
    }
}
创建表结构(未加索引)
CREATE TABLE `monitor` (
  `id` int(11) NOT NULL AUTO_INCREMENT,
  `_index` varchar(100) DEFAULT NULL,
  `_type` varchar(100) DEFAULT NULL,
  `_id` varchar(200) DEFAULT NULL,
  `_score` varchar(200) DEFAULT NULL,
  `_source` text,
	`sort` varchar(200) DEFAULT NULL,
  PRIMARY KEY (`id`)
) ENGINE=InnoDB AUTO_INCREMENT=43 DEFAULT CHARSET=utf8;
最后运行成功。
已落入数据库中。


