基于SpringCloud的广告系统设计与实现
基于SpringCloud的广告系统设计与实现
- 第二章 广告系统概览与准备工作
- 第三章 广告系统骨架开发
-
- maven基础
- 构建工程基本骨架
-
- 建立工程
- 建立ad-eureka
- 微服务架构
-
- 新建ad-gateway
- 第四章 微服务通用模块的开发
-
- 理论部分
- 代码操作
-
- 统一的响应处理
- 统一的异常处理
- 第五章 广告投放系统的开发
-
- Spring IOC原理拆解
- Spring MVC模块解析
- 广告投放系统
-
- 理论部分
- 代码操作部分
-
- 实体类的定义
- 推广计划服务的
- 推广单元服务的实现
- Controller
- 第六章 广告检索系统-微服务调用
- 广告数据索引的设计与实现
-
- 广告数据索引的设计
- 广告数据索引的维护
- 广告检索系统的代码实现
-
- 正向索引
- 倒排索引
- 第 八 章 广告检索系统:加载全量索引
- 监听binlog构造增量数据
写在前面:博客基于 https://coding.imooc.com/class/chapter/310.html#Anchor 慕课网课程写成,实现课中的基本功能。
第二章 广告系统概览与准备工作
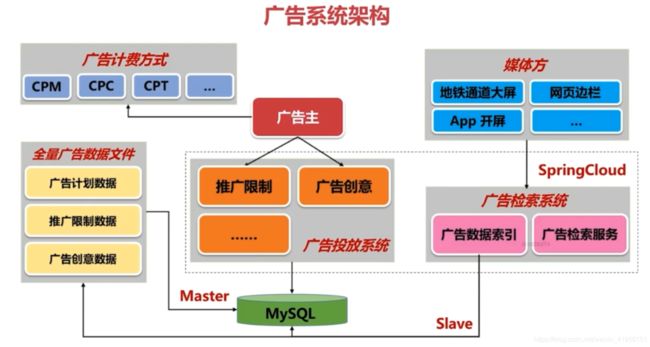
其中的CPM是每(per)一千次曝光所支付的广告费用cost(应该付给广告播放提供商),CPT是指按照时长来计费的广告,CPC是每点击一次收费
广告主的广告投放和媒体方的广告曝光 是本次课程中要实现的主要部分。
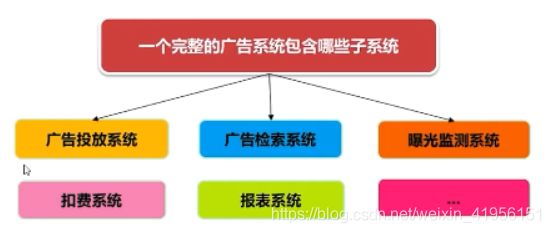
- 广告投放系统
是一个广告系统的最前沿 - 广告检索系统
由客户端发出请求,后台的API响应请求,并且进行一些计算,检索出要推送的广告返回给客户端。这些广告信息就是广告主通过广告投放系统 投放进来的数据。 - 曝光检测系统
广告系统自身需要实现的一个曝光系统。以及,广告主需要验收广告投放是否达到了效果,所以一般广告主也需要请第三方,对曝光度做一个检测,查看广告是否真的如广告投放方所宣称的那样投放到位。 - 扣费系统
对广告的收费进行管理 - 报表系统
广告系统的技术负责人员,运营人员,需要监控广告的投放数据。同样的,广告投放主也需要对广告的投放效果有一定的掌握。
- SpringCloud
当前最流行的微服务开发框架,基于springboot - MySQL
增量索引 - kafka
负责各个进程之间的通信
对于广告检索系统中的广告数据索引,是一个比较重要的内容,主要包括两个,一个是全量索引,一个是增量索引:
- 全量索引
系统启动之处启动的数据,从这之后的数据就是动态数据;广告数据索引会读取这份“广告数据文件”,建立一个全量索引。 - 增量索引
广告数据索引伪装成一个slave 绑定到MySQL,监听MySQL的binlog,然后建立一个增量索引
关于什么是binlog,我在博客《MySQL实战》笔记中有提到
binlog 是逻辑日志,记录的是这个语句的原始逻辑,比如“给 ID=2 这一行的 c 字段加 1 ”。经常和relog做比较,前者即binlog位于server层,后者即relog是innoDB引擎独有的。
- 为什么要建立增量索引和全量索引?
广告检索服务对于频响(每次响应时间)要求比较高,给数据建立索引,可以加快检索服务,
最后,媒体方发出请求,广告检索系统去索引数据中检索,获取媒体方想要的广告数据,交给媒体方展示出来。
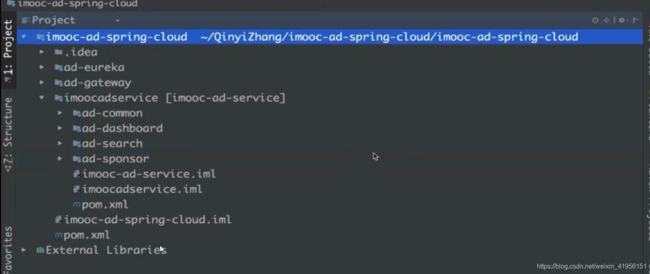
以下是视频中给出的这个工程的结构,后面将跟着手动实现这个系统。后续也会将代码放在github上。
第三章 广告系统骨架开发
maven基础
maven 常用命令
- mvn -v 查看maven的版本,检查maven是否安装成功
- mvn compile 编译,将Java源文件编译成class文件
- mvn test 执行test目录下的测试用例
- mvn package 打包,将Java工程打包成jar包
- mvn clean 清理环境,清楚target 文件夹
- mvn install 安装,将当前目录安装到maven的本地仓库中
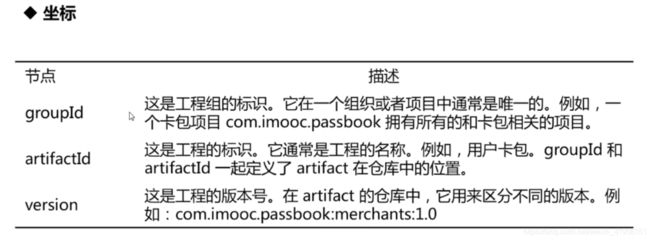
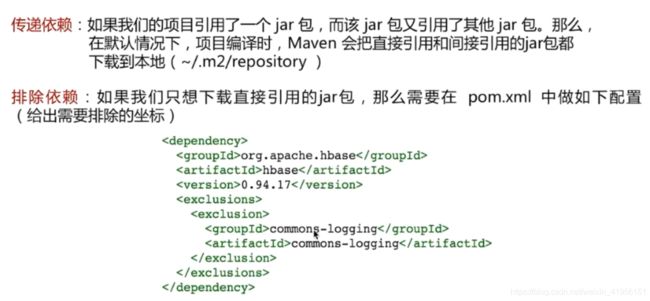
传递依赖和排除依赖
依赖冲突
在maven中有 短路优先(两个传递依赖中优先选择传递次数少的)和 声明优先(先写的先引用) 两种策略。
构建工程基本骨架
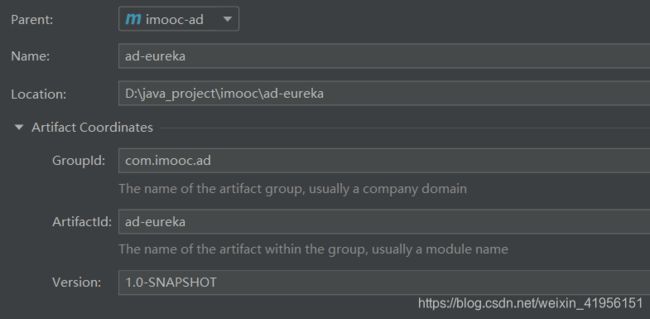
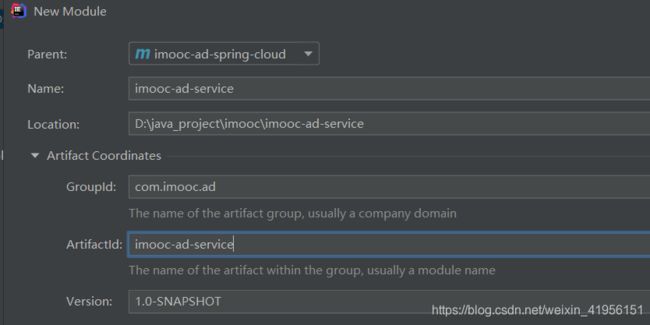
建立工程
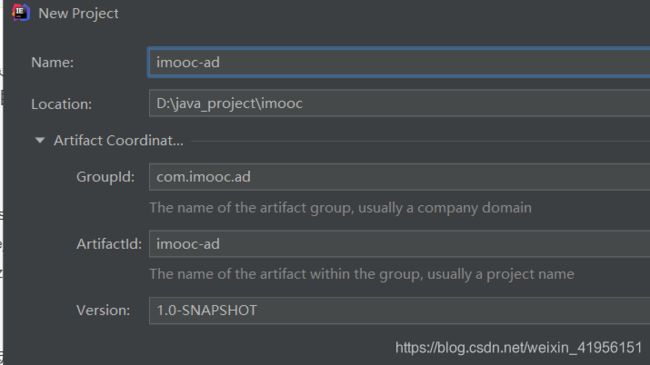
由于这里新建的是整个工程的目录,新建完毕之后可以将src文件删除,编写必要的 pom依赖,由于太长所以就暂时不贴出来
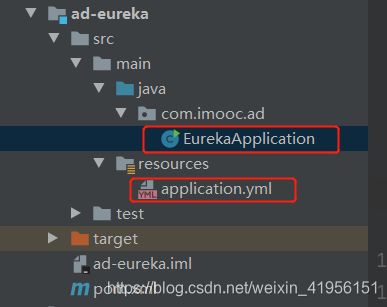
建立ad-eureka
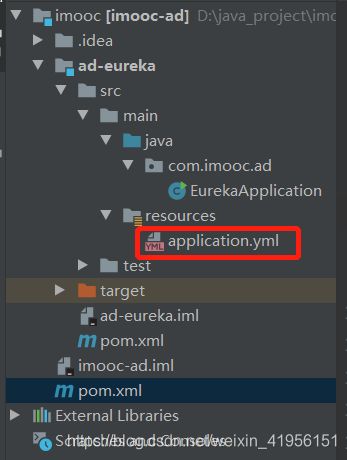
新建yml文件并且填入如下所示的配置(单节点)
spring:
  application:
    name: ad-eureka
server:
  port: 8000
eureka:
  instance:
    hostname: localhost
  client:
    #  是否获取注册信息,单节点   是否向eureka注册
    fetch-registry: false
    register-with-eureka: false
    service-url:
      defaultZone: http://${
   eureka.instance.hostname}:${
   server.port}/eureka/
package com.imooc.ad;
import org.springframework.boot.SpringApplication;
import org.springframework.boot.autoconfigure.SpringBootApplication;
import org.springframework.cloud.netflix.eureka.server.EnableEurekaServer;
import java.util.*;
@EnableEurekaServer
@SpringBootApplication
public class EurekaApplication {

    public static void main(String args[]) {

        SpringApplication.run(EurekaApplication.class,args);
    }
}
我在配的时候遇到一个坑,导致这个eureka老是没办法启动,springboot的日志也是比较晦涩,问题如下:
nested exception is org.springframework.boot.web.server.WebServerException: Unable to start embedded
问题就在于在springboot 比较高的版本是不支持eureka的,由于之前使用过springframework都是默认使用最新的版本,因此改成下面 2.0.2(貌似是2.1以上就不行)就可以正常运行

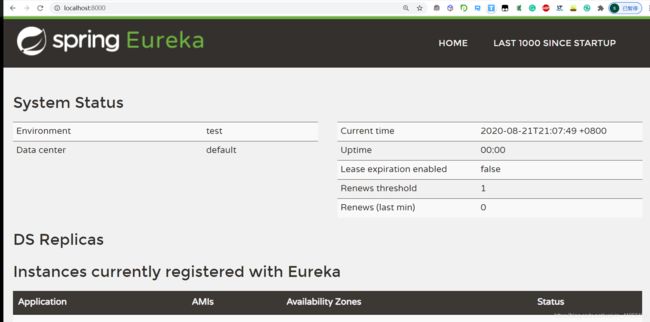
此时用浏览器打开 localhost:8000 就可以看到eureka的管理后台
之后可以尝试配置一下多实例的高可用的注册(单机模拟),注释掉之前单节点的配置,依次填入一下配置
---
spring:
  application:
    name: ad-eureka
  profiles: server1
server:
  port: 8000
eureka:
  instance:
    hostname: server1
    prefer-ip-address: false
  client:
    service-url:
      defaultZone: http://server2:8001/eureka/,http://server3:8002/eureka/
其中server1需要指向server2和server3, 另外两个依次类推
---
spring:
  application:
    name: ad-eureka
  profiles: server2
server:
  port: 8001
eureka:
  instance:
    hostname: server2
    prefer-ip-address: false
  client:
    service-url:
      defaultZone: http://server1:8000/eureka/,http://server3:8002/eureka/

---
spring:
  application:
    name: ad-eureka
  profiles: server3
server:
  port: 8002
eureka:
  instance:
    hostname: server3
    prefer-ip-address: false
  client:
    service-url:
      defaultZone: http://server1:8000/eureka/,http://server2:8001/eureka/
这种负载均衡的模式需要通过打包程序之后分别指定运行,打包以及指定各自的server运行命令如下所示:
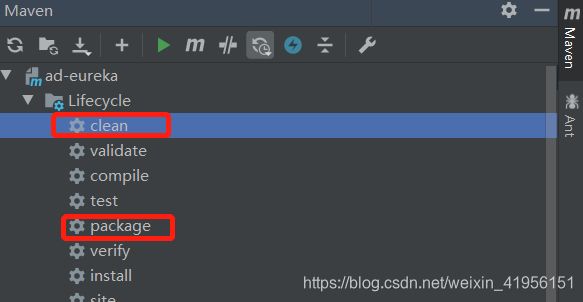
mvn clean package -Dmaven.test.skip=true -U
java -jar ad-eureka-1.0-SNAPSHOT.jar --spring.profiles.active=server1
由于我是在win系统上运行,maven没有加入系统变量,因此我们通过手动按package按钮,所以之后只需要指定运行,输入第二行代码即可
而且上面这个小按钮就是 skip test的意思 ,可以加快打包过程,一开始没点开很慢(test.skip = true;另外 -U是强制打包的意思)

![]()
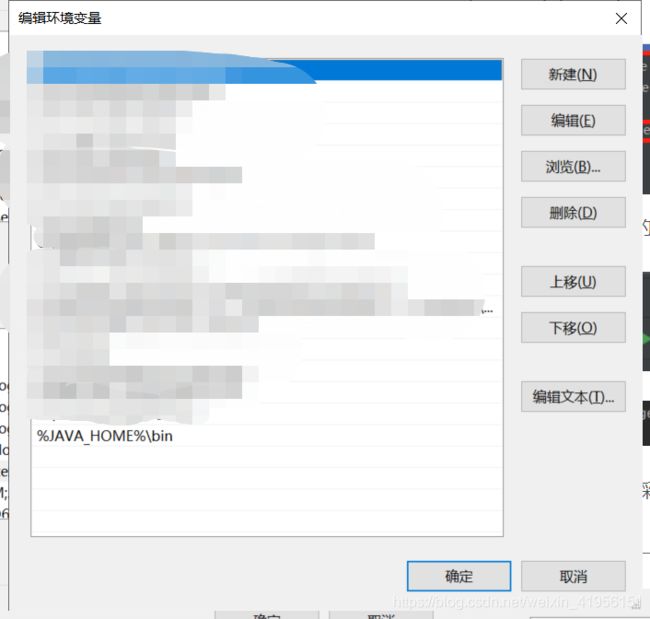
为了配置这个多节点,这步骤真的踩了有一些坑,springframework的日志也写得很难懂,谷歌加硬猜,最后才发现,是Java版本不对,不是指一开始建工程的Java版本,是系统变量里面的Java版本,改成Java8之后就没有那么多毛病了
java -jar ad-eureka-1.0-SNAPSHOT.jar --spring.profiles.active=server1
java -jar ad-eureka-1.0-SNAPSHOT.jar --spring.profiles.active=server2
java -jar ad-eureka-1.0-SNAPSHOT.jar --spring.profiles.active=server3
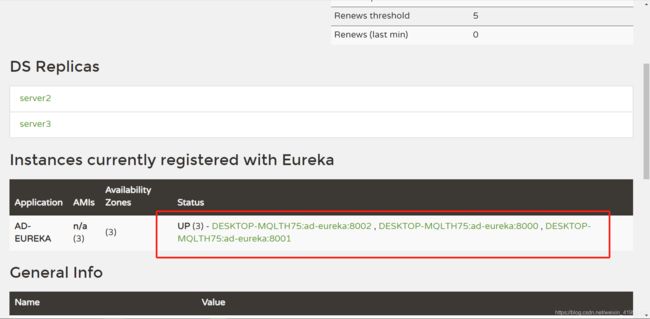
至此实现了高可用的多节点的eureka server的部署
微服务架构
点对点的方式:
服务之间直接调用,每个微服务都开放Rest API,并调用其他微服务的接口。
点对点的方式,每个微服务都需要开放一个端口,并且其他的微服务都需要记住这个地址,如果其中一个地址发生变化,就会导致其他模块的代码也要进行相应的变动。这在一个庞大的工程中是不可接受的,因此在大工程中有必要采用其他方式。
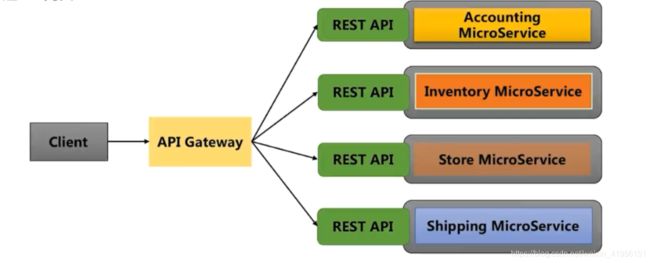
API-网关方式
业务接口通过API网关暴露,是所有客户端接口的唯一入口。微服务之间的通信也通过API网关。
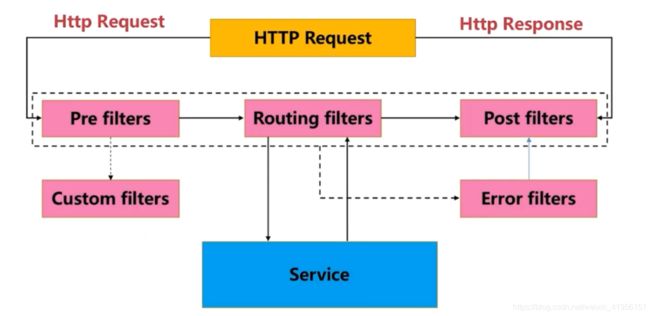
SpringCloud的微服务网关是zuul。Zuul的生命周期如下:
pre filters:可以用来实现身份验证
Routing filters:将请求路由到微服务
Post filters:可以为响应添加Http请求
error filters:处理错误的请求
custom filters: 自定义请求
然后我们就开始搭建这个微服务网关
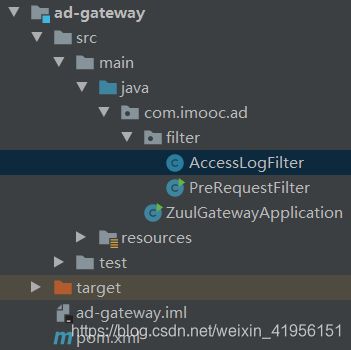
新建ad-gateway
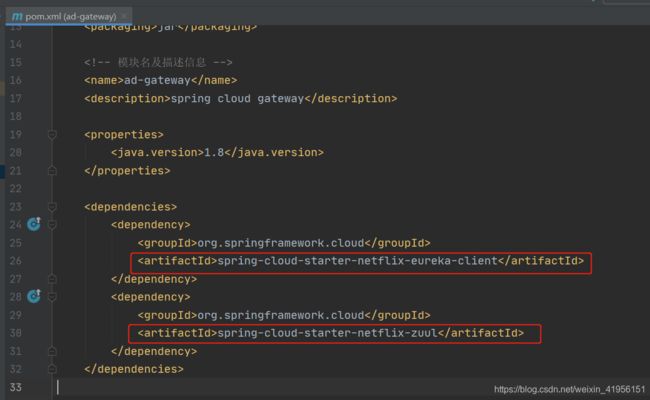
同样是要新建一个module,pom文件和ad-eureka的类似,有部分区别
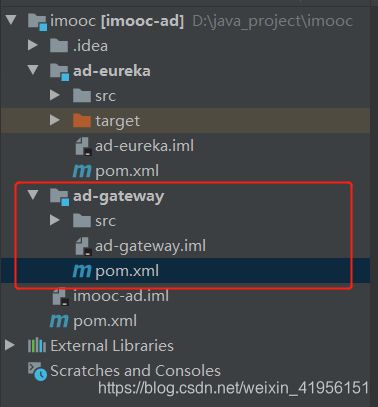
其中,网关是一个client不是一个server,需要注册到server上面,并且还需要一个zuul实现网关的服务
package com.imooc.ad;
import org.springframework.boot.SpringApplication;
import org.springframework.cloud.client.SpringCloudApplication;
import org.springframework.cloud.netflix.zuul.EnableZuulProxy;
import java.util.*;
@EnableZuulProxy
@SpringCloudApplication
public class ZuulGatewayApplication {

    public static void main(String []args){

        SpringApplication.run(ZuulGatewayApplication.class,args);
    }
}
由于网关是一个client,因此需要注册到服务器,还是默认指向一个节点的服务器
server:
  port: 9000
spring:
  application:
    name: ad-gateway
eureka:
  client:
    service-url:
      defaultZone: http://server1:8000/eureka/
接下来来实现一个自定义的filter,能够记录服务的响应时间(也就是结束时间减去开始时间),对于继承ZuulFilter的类来说,需要实现四个方法,其中
- filtertype在前面的filter类型中有介绍过,一共是四种(除去custom);
- 而对于执行顺序来说,0是最先执行的,由于是pre 的type,所以最先执行是合理的
- shouldfilter是“是否执行过滤”,之所以有这个需求是,有些方法可能是触发某些条件才过滤
- run方法写操作部分
package com.imooc.ad.filter;

import com.netflix.zuul.ZuulFilter;
import com.netflix.zuul.context.RequestContext;
import com.netflix.zuul.exception.ZuulException;
import lombok.extern.slf4j.Slf4j;
import org.springframework.cloud.netflix.zuul.filters.support.FilterConstants;
import org.springframework.stereotype.Component;

import java.util.*;
@Slf4j
@Component // 定义成组件,过滤器才能被发现,注册到容器中
public class PreRequestFilter extends ZuulFilter {

    @Override
    public String filterType() {

//      定义filter的类型,总共有四种,pre routing post error
        return FilterConstants.PRE_TYPE;//当前是pre filter
    }

    @Override
    public int filterOrder() {

//      定义执行的顺序,数字小的先执行
        return 0;
    }

    @Override
    public boolean shouldFilter() {

//      是否执行这个过滤器
        return true;//永远执行
    }

    @Override
    public Object run() throws ZuulException {

//      filter需要执行的具体操作
        RequestContext ctx = RequestContext.getCurrentContext();
        ctx.set("startTime",System.currentTimeMillis());
        return null;
    }
}
然后新建一个post的 filter,代码如下(AccessLogFilter.java):
package com.imooc.ad.filter;

import com.netflix.zuul.ZuulFilter;
import com.netflix.zuul.context.RequestContext;
import com.netflix.zuul.exception.ZuulException;
import lombok.extern.slf4j.Slf4j;
import org.springframework.cloud.netflix.zuul.filters.support.FilterConstants;

import javax.servlet.http.HttpServletRequest;
import java.util.*;

@Slf4j
public class AccessLogFilter extends ZuulFilter {


    @Override
    public String filterType() {

        return FilterConstants.POST_TYPE;
    }

    @Override
    public int filterOrder() {

        return FilterConstants.SEND_RESPONSE_FILTER_ORDER - 1;//在发出请求之前执行,就是最后执行的
    }

    @Override
    public boolean shouldFilter() {

        return true;
    }

    @Override
    public Object run() throws ZuulException {

        RequestContext context = RequestContext.getCurrentContext();
        HttpServletRequest request = context.getRequest();
        Long startTime = (Long) context.get("startTime");
        String uri = request.getRequestURI();
        long duration = System.currentTimeMillis() - startTime;
        log.info("uri: "+uri+", duration: "+duration / 100 + "ms");
        return null;
    }
}
之后启动eureka 服务器,然后再启动 Zuul网关主程序,可以看到网关已经注册完成了
到这里广告系统的框架就已经搭建完毕了,接下来就是各种服务的编写
第四章 微服务通用模块的开发
理论部分
ad-commom
三个部分:
- 通用代码的定义
- 统一的响应处理
- 统一的异常处理
统一的响应处理
其中message 是错误消息;code是响应码;实现统一响应会使用两个注解,一个是RestControllerAdvice ,另一个是ResponseBodyAdvice的语义结合,advice 在spring中是增强的意思;前者会对响应进行拦截,统一处理响应。后者可以控制使用什么响应,以及对响应做对应的处理。做一个统一的响应有利于前端的使用。
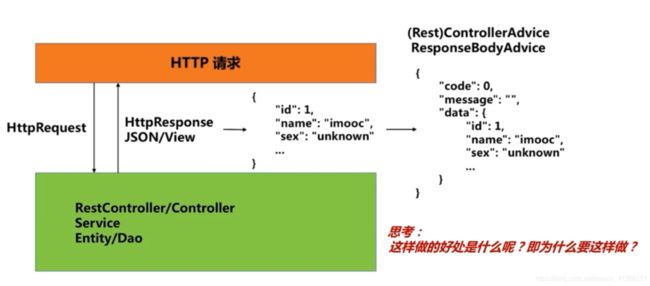
统一的异常处理
由于异常也是通过响应来使用的,所以这里同样可以使用RestControllerAdvice 的注解;实现统一的异常处理个人感觉最大的好处了降低了异常处理的耦合,不然每次都需要在代码中写try catch,一个是比较繁琐,另一个是代码结构会不清晰。
代码操作
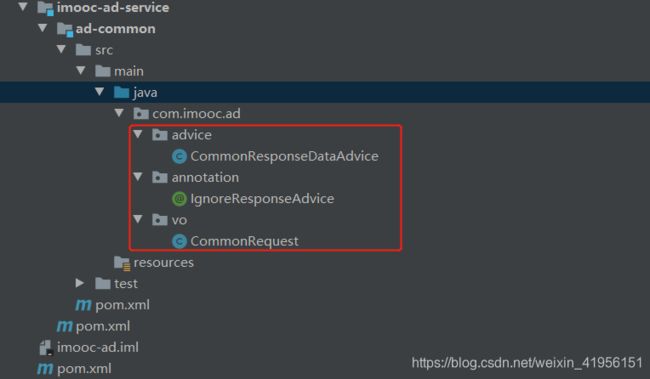
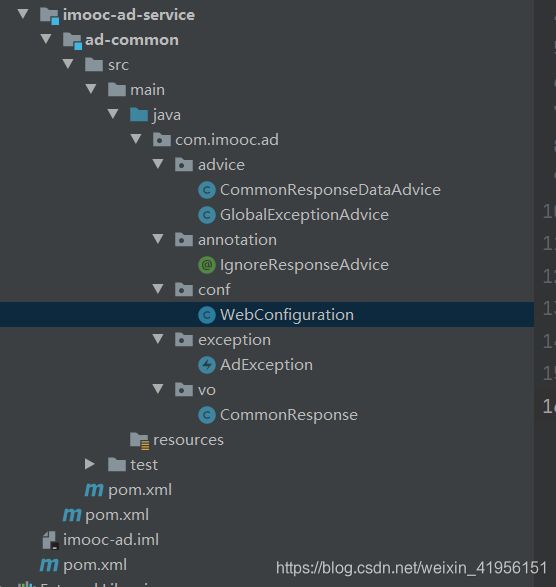
这里需要特别修改一下目录,应该是个bug
至于pom文件的编写,好像是父模块的就使用 pom,而子模块就是用jar的方式
<packaging>jar</packaging>
统一的响应处理
commonRequest.java
package com.imooc.ad.vo;

import lombok.AllArgsConstructor;
import lombok.Data;
import lombok.NoArgsConstructor;

import java.io.Serializable;
import java.util.*;

@Data  //所有属性get和set方法
@NoArgsConstructor
@AllArgsConstructor
public class CommonRequest<T> implements Serializable {

   private Integer code;
   private String message;
   private T data;

   public CommonRequest(Integer code,String message){

       this.code = code;
       this.message = message;
   }

}
ignoreResponseAdvice.java
package com.imooc.ad.annotation;

import java.lang.annotation.ElementType;
import java.lang.annotation.Retention;
import java.lang.annotation.RetentionPolicy;
import java.lang.annotation.Target;
import java.util.*;
@Target({
   ElementType.TYPE,ElementType.METHOD}) //告知注释类型的程序元素的种类
@Retention(RetentionPolicy.RUNTIME) //告诉编译器如何处理,此时表示运行时处理
public @interface IgnoreResponseAdvice {


}
关于这两个新出现的注解 https://www.jianshu.com/p/3a3748260eac
CommonResponseDataAdvice.java
package com.imooc.ad.advice;

import com.imooc.ad.annotation.IgnoreResponseAdvice;
import com.imooc.ad.vo.CommonResponse;
import org.springframework.core.MethodParameter;
import org.springframework.http.MediaType;
import org.springframework.http.converter.HttpMessageConverter;
import org.springframework.http.server.ServerHttpRequest;
import org.springframework.http.server.ServerHttpResponse;
import org.springframework.web.bind.annotation.RestControllerAdvice;
import org.springframework.web.servlet.mvc.method.annotation.ResponseBodyAdvice;

import java.util.*;

@RestControllerAdvice
public class CommonResponseDataAdvice implements ResponseBodyAdvice<Object>{


    @Override
    @SuppressWarnings("all")
    public boolean supports(MethodParameter methodParameter,
                            Class<? extends HttpMessageConverter<?>> aClass) {

        //是否支持拦截 可以根据方法参数,也可以根据类
        if(methodParameter.getDeclaringClass().isAnnotationPresent(
                IgnoreResponseAdvice.class //类上使用了这个ignore注解,就不使用commonResponse
                // 详细看IgnoreResponseAdvice.java文件
        )){

            return false;
        }else if(methodParameter.getMethod().isAnnotationPresent(
                IgnoreResponseAdvice.class//如果方法使用了ignore注解,也不使用commonResponse进行包装
        )){

            return false;
        }
        return false;
    }

    @Override
    @SuppressWarnings("all")
    public Object beforeBodyWrite(Object o,
                                  MethodParameter methodParameter,
                                  MediaType mediaType,
                                  Class<? extends HttpMessageConverter<?>> aClass,
                                  ServerHttpRequest serverHttpRequest,
                                  ServerHttpResponse serverHttpResponse) {

        // 应该在这里完成统一响应拦截,将CommonResponse在这里构造
        CommonResponse<Object> response = new CommonResponse<>(0,"");
        if(null == o){

            return response;
        }else if(o instanceof CommonResponse){

            response = (CommonResponse<Object>) o;
        }else{

            response.setData(o);
        }
        return response;
    }
}
统一的异常处理
定一个通用的异常,AdException.java
package com.imooc.ad.exception;

import java.util.*;

public class AdException extends Exception{

    public AdException(String message){

        super(message);
    }
}
GlobalExceptionAdvice.java
package com.imooc.ad.advice;

import com.imooc.ad.exception.AdException;
import com.imooc.ad.vo.CommonResponse;
import org.springframework.web.bind.annotation.ExceptionHandler;

import javax.servlet.http.HttpServletRequest;
import java.util.*;

public class GlobalExceptionAdvice {

    @ExceptionHandler(value = AdException.class) //这么写之后就只会捕获这种异常
    public CommonResponse<String> handlerAdException(HttpServletRequest req,
                                                     AdException ex){

        CommonResponse <String> response = new CommonResponse<>(-1,"business error");
        response.setData(ex.getMessage());
        return response;
    }
}
统一的配置定义
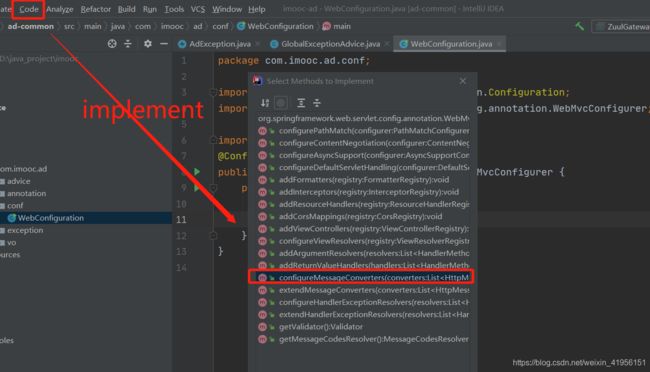
以实现消息转换器为例子
消息转换器需要支持 从HTTP请求(字节码)向Java对象转换,或者Java对象向HTTP请求的转换。有的消息转换器支持的数据类型比较多。为了定制适合自己的消息转换器,最方便的方法是重写 方法
首先新建一个WebConfiguration,从前面的通用请求到现在,目前的目录结构如下图所示:
package com.imooc.ad.conf;

import org.springframework.context.annotation.Configuration;
import org.springframework.http.converter.HttpMessageConverter;
import org.springframework.http.converter.json.MappingJackson2HttpMessageConverter;
import org.springframework.web.servlet.config.annotation.WebMvcConfigurer;

import java.util.*;
@Configuration
public class WebConfiguration implements WebMvcConfigurer {

    @Override
    public void configureMessageConverters(List<HttpMessageConverter<?>> converters) {


        converters.clear();
        converters.add(new MappingJackson2HttpMessageConverter());
    }

}
第五章 广告投放系统的开发
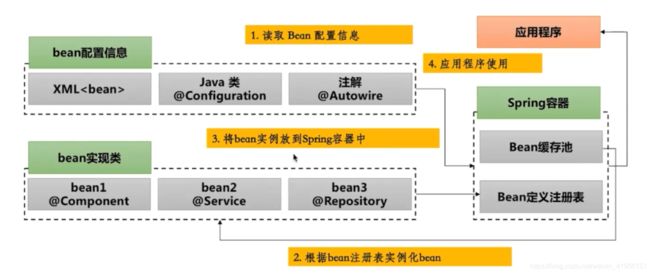
Spring IOC原理拆解
Spring MVC模块解析
spring 是基于spring mvc和spring boot的,spring mvc是web的一个模块
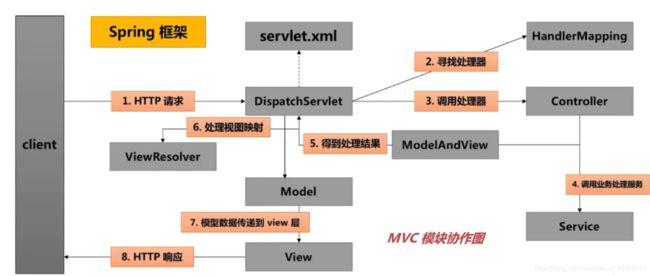
- dispatchservlet 是一个前端控制器 ,类似一个网关,对请求进行分发
- handlermapping
- modelsandview
- viewresolver是一个视图解析器
dispatchservlet 三个功能:
- 捕获符合特定格式的请求
- 初始化上下文
- 初始化spring MVC的各个组成部件,比如modelsandview 以及 model
广告投放系统
理论部分
代码操作部分
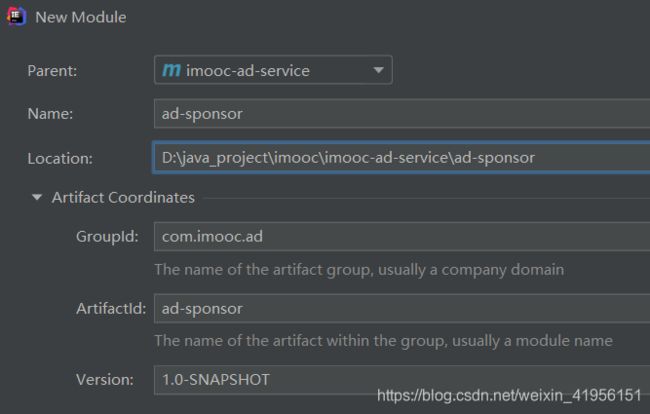
ad-sponsor编写pom文件以及yml配置文件,其中
- ddl-auto几个选项
- create :hibernate每次加载的时候删除数据表结构并且重建
- create drop:加载的时候create,退出的时候drop
- none :不使用ddl操作,让开发者主动去操作数据表
- update: 加载 自动更新数据库结构
- validate:加载 验证数据表结构是否正确
SponsorApplication.java 推广应用代码
package com.imooc.ad;

import java.util.*;

import org.springframework.boot.SpringApplication;
import org.springframework.boot.autoconfigure.SpringBootApplication;
import org.springframework.cloud.client.circuitbreaker.EnableCircuitBreaker;
import org.springframework.cloud.netflix.eureka.EnableEurekaClient;
import org.springframework.cloud.openfeign.EnableFeignClients;

@EnableFeignClients
@EnableCircuitBreaker
@EnableEurekaClient
@SpringBootApplication
public class SponsorApplication {

    public static void main(String args[]) {

        SpringApplication.run(SponsorApplication.class,args);
    }
}
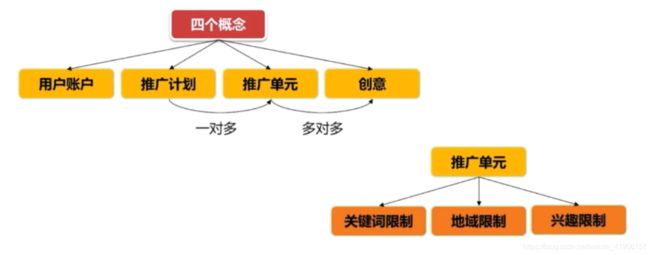
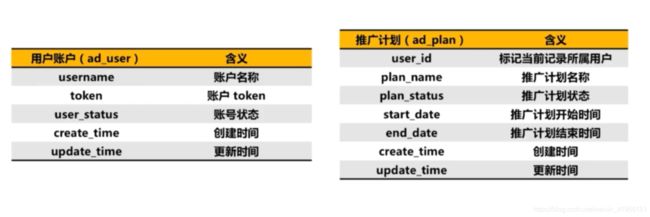
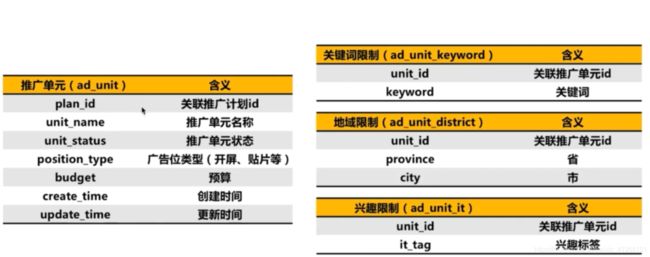
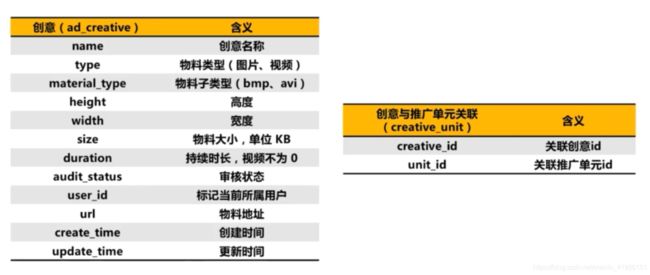
然后新建一个entity的package,这个entity,专门用来存我们在上面介绍的那些数据表,一张表就是一个类文件,在编写entity的过程中,可以逐渐熟悉这些注解,比如,对于注解 @Transient ,对于一个类变量使用这个注解,相当于不希望这个变量成为数据库的一个字段,希望其成为一个临时变量。和其相对应的就是Basic注解,不写默认就是basic。
这里需要注意的一个细节就是,我们在介绍到 用户、推广计划以及推广单元,数据表都存在一个状态的字段,因此,这里有必要将状态解耦出来,降低代码量,提高代码复用性,因此,这里,新建一个constant 的包,新建第一个类,CommonStatus.java
package com.imooc.ad.constant;

import lombok.Getter;
import java.util.*;

@Getter
public enum  CommonStatus {

    VALID(1,"有效状态"),
    INVALID(0,"无效状态");
    private Integer status;
    private String desc;

    CommonStatus(Integer status,String desc){

        this.status = status;
        this.desc = desc;//描述信息
    }

}
实体类的定义
然后在 entity 中的Aduser.java(用户) 中
package com.imooc.ad.entity;

import lombok.AllArgsConstructor;
import lombok.Data;
import lombok.NoArgsConstructor;
import org.hibernate.annotations.BatchSize;
import com.imooc.ad.constant.CommonStatus;
import javax.persistence.*;
import java.util.*;

@Data
@NoArgsConstructor
@AllArgsConstructor
@Entity
@Table(name="ad_user")
public class AdUser {

    @Id
    @GeneratedValue(strategy = GenerationType.IDENTITY)
    @Column(name = "id",nullable = false)
    private Long id;

    @Basic
    @Column(name="username",nullable = false)
    private String username;

    @Basic
    @Column(name = "token",nullable = false)
    private String token;

    @Basic
    @Column(name = "user_status",nullable = false)
    private Integer userStatus;

    @Basic
    @Column(name = "create_time",nullable = false)
    private Date createTime;

    @Basic
    @Column(name = "update_time",nullable = false)
    private Date updateTime;

    public AdUser(String username,String token){

        this.username = username;
        this.token = token;
        this.userStatus = CommonStatus.VALID.getStatus();//具体看CommonStatus中的定义
        this.createTime = new Date();
        this.updateTime = this.createTime;
    }
}
接下来我们编写推广计划和推广单元的实体类
外键的缺点:1.外键占用空间; 2.外键和母表有一定的关联,如果母表收到损坏,子表很难恢复 3.数据表存在外键的时候,不容易迁移以及维护
那由于推广计划和用户存在一个外键的关系,在企业级开发中,又尽量不使用外键,因此尽量在应用程序中维持这种外键的关系而不是在定义表中定义外键。因此我们这里的开发也遵循这种原则。
AdPlan.java
package com.imooc.ad.entity;

import com.imooc.ad.constant.CommonStatus;
import lombok.AllArgsConstructor;
import lombok.Data;
import lombok.NoArgsConstructor;

import javax.persistence.*;
import java.util.*;

@Data
@NoArgsConstructor
@AllArgsConstructor
@Entity
@Table(name = "ad_plan")
public class AdPlan {

    @Id
    @GeneratedValue(strategy = GenerationType.IDENTITY) //自增主键
    @Column(name = "id",nullable = false)
    private Long id;

    @Basic
    @Column(name="user_id",nullable = false)
    private Long userId;

    @Basic
    @Column(name = "plan_name",nullable = false)
    private String planName;

    @Basic
    @Column(name="plan_status",nullable = false)
    private Integer planStatus;

    @Basic
    @Column(name = "start_date",nullable = false)
    private Date startDate;

    @Basic
    @Column(name = "end_date",nullable = false)
    private Date endDate;

    @Basic
    @Column(name = "create_time",nullable = false)
    private Date createTime;

    @Basic
    @Column(name = "update_time",nullable = false)
    private Date updateTime;

    public AdPlan(Long userId,String planName,Date startDate,Date endDate){

        this.userId = userId;
        this.planName = planName;
        this.planStatus = CommonStatus.VALID.getStatus();
        this.startDate = startDate;
        this.createTime = new Date();
        this.updateTime = this.createTime;
    }
}
AdUnit.java
package com.imooc.ad.entity;

import com.imooc.ad.constant.CommonStatus;
import lombok.AllArgsConstructor;
import lombok.Data;
import lombok.NoArgsConstructor;

import javax.management.monitor.CounterMonitor;
import javax.persistence.*;
import java.util.*;

@Data
@NoArgsConstructor
@AllArgsConstructor
@Entity
@Table(name="ad_unit")
public class AdUnit {

    @Id
    @GeneratedValue(strategy = GenerationType.IDENTITY)
    @Column(name = "id",nullable = false)
    private Long id;

    @Basic
    @Column(name = "plan_id",nullable = false)
    private Long planId;

    @Basic
    @Column(name = "unit_name",nullable = false)
    private String  unitName;

    @Basic
    @Column(name = "unit_status",nullable = false)
    private Integer unitStatus;

//    广告类型:开屏,贴片,中屏
    @Basic
    @Column(name = "position_type",nullable = false)
    private Integer positionType;

    @Basic
    @Column(name = "budget",nullable = false)
    private Long budget;

    @Basic
    @Column(name = "create_time",nullable = false)
    private Date createTime;

    @Basic
    @Column(name = "update_time",nullable = false)
    private Date updateTime;

    public AdUnit(Long planId,String unitName,Integer positionType,Long budget){

        this.planId = planId;
        this.unitName = unitName;
        this.unitStatus = CommonStatus.VALID.getStatus();
        this.positionType = positionType;
        this.budget = budget;
        this.createTime = new Date();
        this.updateTime = this.createTime;
    }
}
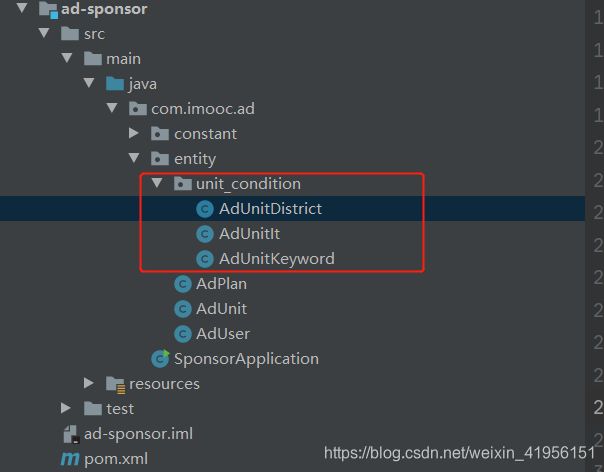
添加三个广告检索系统的限制条件
广告检索的时候会根据这三个条件对广告进行筛选,再反馈给用户
package com.imooc.ad.entity.unit_condition;

import lombok.AllArgsConstructor;
import lombok.Data;
import lombok.NoArgsConstructor;

import javax.persistence.*;
import java.util.*;
@Data
@NoArgsConstructor
@AllArgsConstructor
@Entity
@Table(name="ad_unit_district")
public class AdUnitDistrict {

    @Id
    @GeneratedValue(strategy = GenerationType.IDENTITY)
    @Column(name="id",nullable = false)
    private Long id;

    @Basic
    @Column(name = "unit_id",nullable = false)
    private Long unitId;

    @Basic
    @Column(name = "province",nullable = false)
    private String province;

    @Basic
    @Column(name = "city",nullable = false)
    private String city;

    public AdUnitDistrict(Long unitId,String province,String city){

        this.unitId = unitId;
        this.province = province;
        this.city = city;
    }
}
AdUnitIt
package com.imooc.ad.entity.unit_condition;

import lombok.AllArgsConstructor;
import lombok.Data;
import lombok.NoArgsConstructor;

import javax.persistence.*;
import java.util.*;
@Data
@NoArgsConstructor
@AllArgsConstructor
@Entity
@Table(name="ad_unit_it")
public class AdUnitIt {

    @Id
    @GeneratedValue(strategy = GenerationType.IDENTITY)
    @Column(name="id",nullable = false)
    private Long id;

    @Basic
    @Column(name = "unit_id",nullable = false)
    private Long unitId;

    @Basic
    @Column(name = "it_tag",nullable = false)
    private String itTag;

    public AdUnitIt(Long unitId,String itTag){

        this.unitId = unitId;
        this.itTag = itTag;
    }

}
AdUnitKeyword
package com.imooc.ad.entity.unit_condition;

import lombok.AllArgsConstructor;


