M1芯片Mac book pro部署stable diffusion模型
使用的电脑配置:
本文中,我的实验环境是 Apple M1CPU 的 MacBook Pro,机器内存容量为 16GB。同样还能够运行本文的设备包含:
- 2022 年生产的MacBook Air (M2)、13寸的 MacBook Pro (M2)、Mac Studio (2022)
- 2021 年生产的 14寸和16寸的 MacBook Pro、24寸的 iMac (M1)
- 2020 年生产的 Mac mini (M1)、MacBook Air (M1)、13寸的 MacBook Pro (M1)
- 当然,还有搭载了 M1 芯片的第五代 iPad Pro
第一步 基础环境准备
想要在 ARM 芯片的 Mac 设备上运行这个模型应用,我们需要做几件事:
- 准备 Python 基础运行环境
- 准备软件运行所需要的软件包
首先需要安装anoconda,可以使用conda来简化安装,具体方法参考如下链接用让新海诚本人惊讶的 AI 模型制作属于你的动漫视频 - 苏洋博客
# 先进行 conda 的安装
bash Anaconda3-2022.05.(你的安装文件名称).sh
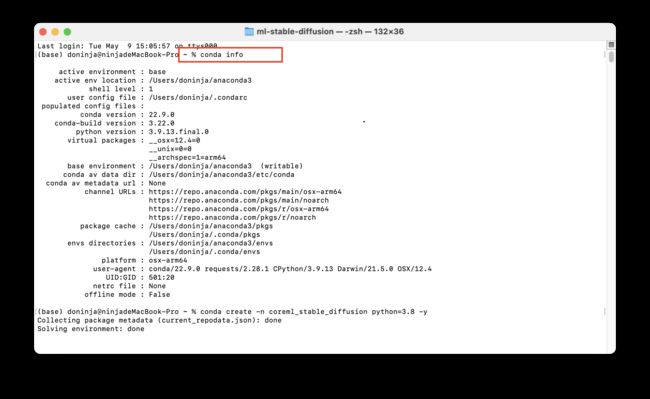
执行完成后可以通过conda info指令来检查anaconda是否安装成功
接下来,我们来通过 conda 命令,来快速创建我们所需要的模型应用程序所需要的运行环境:
conda create -n corem1_stable_diffusion python=3.8 -y执行上述命令后会得到如下的结果:
注意我们在这里创建的环境叫做coreml_stable_diffusion所以会在anaconda子级下创建相应的文件夹
直到提示完成。下一步激活我们创建的环境。执行如下命令:
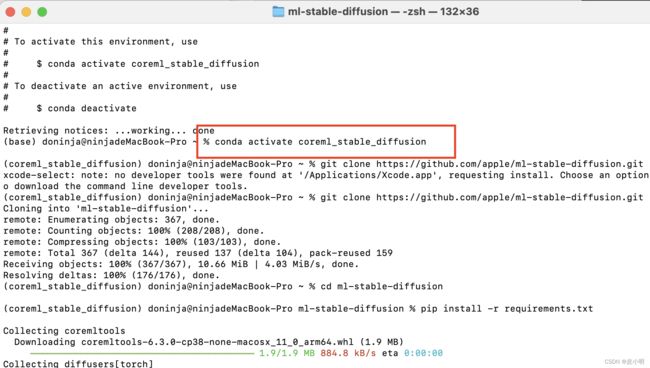
conda activate coreml_stable_diffusion首次执行会弹出一堆信息,不用管。当命令执行完毕之后,我们会看到终端前的展示字符串会出现变化,带上了我们创建的环境名,这就表示我们的环境已激活了。
****另如果你经常在 MacOS 上折腾 “Huggingface” 等项目,尤其是运行相对新一些的模型项目,大概率会遇到 “Failed building wheel for tokenizers”这个问题。可以参考如下文章解决。在搭载 M1 及 M2 芯片 MacBook设备上玩 Stable Diffusion 模型 - 苏洋博客
第二步 完成 Stable Diffusion 项目的初始化
我们可以通过 git clone 命令,或者直接下载包含代码的压缩包,来获得项目的代码:
git clone https://github.com/apple/ml-stable-diffusion.git
如果没有下载git,需要先执行安装命令 git lfs install。 Git LFS(Large File Storage,大型文件存储)是一个相对于GitHub高级开发者非常重要的东西。当一个项目的最大文件超过128MB,那么Git就会报错。这时候,就要请出我们的Git LFS了。
如果不想下载也可参考pip install git(pip直接安装git上的项目)_吨吨不打野的博客-CSDN博客直接通过pip下载git上的项目。
待下载完成后,cd到相应项目文件目录下,再下载所需文件。
cd ml-stable-diffusion
pip install -r requirements.txt
至此,基础环境准备工作就都就绪了。
第三步 转换和运行模型应用
基础环境就绪之后,我们需要转换 Huggingface 上的 PyTorch / TF 开放模型到 Apple Core ML 模型格式。
转换 PyTorch 模型为 Apple Core ML 模型
项目仓库中 python_coreml_stable_diffusion/torch2coreml.py 文件中,封装了调用 coremltools.models.MLModel 工具方法来转换其他格式模型到 Core ML 模型的逻辑如下:
coreml_model = coremltools.models.MLModel(...)
coreml_model.convert(...)
coreml_model.save(...)
所以,作为用户我们的使用就比较简单了,只需要执行下面的命令:
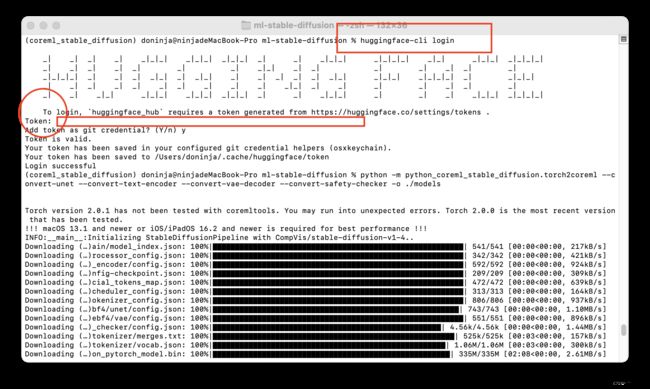
python -m python_coreml_stable_diffusion.torch2coreml --convert-unet --convert-text-encoder --convert-vae-decoder --convert-safety-checker -o ./modelsToken is required ('token=True"), but no token found. You need to provide a token or be logged in to Hugging Face with "hug gingface-cli login' or 'huggingface_hub.login'. See https://huggingface.co/settings/tokens. 所以我们首先要去官网注册hugging face并登录。然后在标红链接页面下创建一个tokens,之后点击后面的复制即可。然后在命令窗口执行如下命令
huggingface-cli login如下图是命令执行结果,圆圈后有一处空白是填token的地方,点击直接粘贴,然后enter即可。之前在这儿浪费了很多的时间,因为你粘贴后的token在窗口上是看不到的,不知道到底输入没输入成功,所以就来回的多次粘贴导致token不正确。提示token is valid之后只需等待即可。命令执行会比较久,十来分钟左右,包含从 Huggingface 下载模型,加载并转换模型格式。默认情况下,模型使用的是 CompVis/stable-diffusion-v1-4,如果你希望使用其他的模型,可以通过添加 --model-version 参数,支持的模型版本除了默认的 “v1.4” 之外,还有: runwayml/stable-diffusion-v1-5 和 stabilityai/stable-diffusion-2-base。从hugging face上下载模型即可。
命令执行完毕,我们将在 ./models 目录,得到必须的四个模型,尺寸都不算小:
580M	./models/Stable_Diffusion_version_CompVis_stable-diffusion-v1-4_safety_checker.mlpackage
235M	./models/Stable_Diffusion_version_CompVis_stable-diffusion-v1-4_text_encoder.mlpackage
1.6G	./models/Stable_Diffusion_version_CompVis_stable-diffusion-v1-4_unet.mlpackage
 95M	./models/Stable_Diffusion_version_CompVis_stable-diffusion-v1-4_vae_decoder.mlpackage
第四步 运行转换后的模型进行验证
完成模型构建之后,我们可以运行模型,来验证模型转换是否成功:
python -m python_coreml_stable_diffusion.pipeline --prompt "magic book on the table" -i ./models -o ./output --compute-unit ALL --seed 93在上面的命令中,我们做了几件事,告诉程序使用 ./models 目录中的模型进行计算,将生成的图谱保存在 ./output 目录中,允许使用所有类型的运算单元(CPU/GPU),使用一个固定的随机数种子,确保每次生成的结果都是一样的,方便我们进行测试复现。当然,最重要的是,我们将要生成图片的文本描述写在 --prompt 参数中,告诉模型应用要生成“一本放在桌子上的魔法书”。如果你的设备只有 8GB 的内存,这里需要调整下 --compute-unit 参数,指定参数值为 CPU_AND_NE。
程序运行之后,需要等几分钟:
最后命令窗口出现saving generated image to……即表示生成成功。我们将能够在 ./output 目录中,找到生成的图片。
但是,每次使用都要等三四分钟才能得到图片,未免太慢了。而且想生成不同的图,不论是需要调整“随机数种子”,还是要改变“描述文本”,都得在命令行中完成,遇到文本特别长的时候,非常不方便。
第五步 为 ML Stable Diffusion 编写一个 Web UI
通过 gradio 工具,能够为 Python 应用,快速创建简洁美观的 Web 界面。Huggingface 中非常多的应用界面都是用它完成的。链接 Gradio
为了解决上面的问题,我们可以用它来创建一个 Web 界面,把 ML Stable Diffusion 的图片生成和 Web 界面“绑定”到一起。实现代码如下:
import python_coreml_stable_diffusion.pipeline as pipeline
import gradio as gr
from diffusers import StableDiffusionPipeline
def init(args):
pipeline.logger.info("Initializing PyTorch pipe for reference configuration")
pytorch_pipe = StableDiffusionPipeline.from_pretrained(args.model_version,
use_auth_token=True)
user_specified_scheduler = None
if args.scheduler is not None:
user_specified_scheduler = pipeline.SCHEDULER_MAP[
args.scheduler].from_config(pytorch_pipe.scheduler.config)
coreml_pipe = pipeline.get_coreml_pipe(pytorch_pipe=pytorch_pipe,
mlpackages_dir=args.i,
model_version=args.model_version,
compute_unit=args.compute_unit,
scheduler_override=user_specified_scheduler)
def infer(prompt, steps):
pipeline.logger.info("Beginning image generation.")
image = coreml_pipe(
prompt=prompt,
height=coreml_pipe.height,
width=coreml_pipe.width,
num_inference_steps=steps,
)
images = []
images.append(image["images"][0])
return images
demo = gr.Blocks()
with demo:
gr.Markdown(
"Core ML Stable Diffusion
Run Stable Diffusion on Apple Silicon with Core ML我们将上面的代码保存为 web.py,同样放在项目的 python_coreml_stable_diffusion 目录中。然后执行命令:
python -m python_coreml_stable_diffusion.web -i ./models --compute-unit ALL执行日志结果如下:
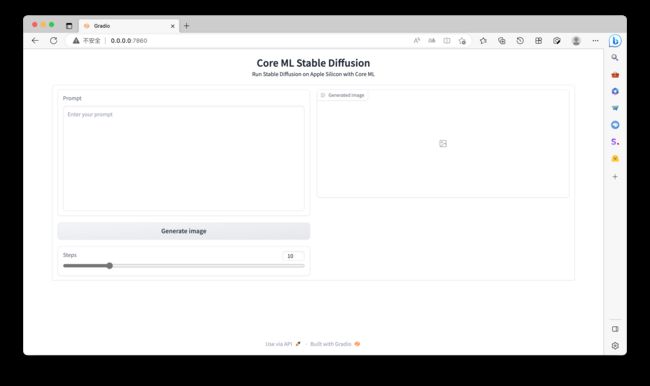
在日志的结束处,我们看到程序启动了 Web 服务,并监听了 7860 端口。打开浏览器,访问这个地址,我们就能看到预期中的 Web UI 啦。注意该URL可能某些浏览器打不开,我的Mac上Safari浏览器就打不开,而edge浏览器就可以。
想要生成图片只需要调整文本框中的 “prompt” 文本,然后点击 “Generate image” ,等待结果展示在页面上就行了,不用去调整命令行,也不用去翻找文件夹里的图片了。并且,因为我们将程序当服务运行了起来,被模型加载只需要一次,不再需要像上文一样,每次生成图片都要先加载模型,再进行计算,能节约不少时间。
部分内容来自文章:在搭载 M1 及 M2 芯片 MacBook设备上玩 Stable Diffusion 模型 - 苏洋博客


