Spring Cloud Alibaba 教程 | Nacos 篇
Spring Cloud Alibaba 教程 | Nacos 篇
写在前面的话: 本笔记在参考网上视频以及博客的基础上,只做个人学习笔记,如有侵权,请联系删除,谢谢!
1、使用nacos做服务的注册和发现
1、父工程项目pom
<dependencyManagement>
    <dependencies>

    <dependency>
                <groupId>org.springframework.bootgroupId>
                <artifactId>spring-boot-dependenciesartifactId>
                <version>2.1.2.RELEASEversion>
                <type>pomtype>
                <scope>importscope>
      dependency>

    <dependency>
        <groupId>org.springframework.cloudgroupId>
        <artifactId>spring-cloud-dependenciesartifactId>
        <version>Greenwich.SR2version>
        <type>pomtype>
        <scope>importscope>
    dependency>

    <dependency>
        <groupId>com.alibaba.cloudgroupId>
        <artifactId>spring-cloud-alibaba-dependenciesartifactId>
        <version>2.1.0.RELEASEversion>
        <type>pomtype>
        <scope>importscope>
    dependency>
    dependencies>
dependencyManagement>
2、nacos-provider 工程Pom文件
<dependencies>
    <dependency>
        <groupId>org.projectlombokgroupId>
        <artifactId>lombokartifactId>
        <version>1.18.0version>
        <optional>trueoptional>
    dependency>
    <dependency>
        <groupId>org.springframework.bootgroupId>
        <artifactId>spring-boot-starter-webartifactId>
    dependency>
    <dependency>
        <groupId>org.springframework.bootgroupId>
        <artifactId>spring-boot-starter-testartifactId>
        <scope>testscope>
    dependency>

    <dependency>
        <groupId>com.alibaba.cloudgroupId>
        <artifactId>spring-cloud-starter-alibaba-nacos-discoveryartifactId>
    dependency>
dependencies>
YAML文件配置
server:
  port: 8081
  servlet:
    context-path: /nacos-provider

spring:
  application:
    name: nacos-provider
  cloud:
    nacos:
      discovery:
        server-addr: localhost:8848
服务提供类
import org.springframework.web.bind.annotation.PathVariable;
import org.springframework.web.bind.annotation.RequestMapping;
import org.springframework.web.bind.annotation.RestController;

@RestController
@RequestMapping("/sayHello")
public class HelloController {
    @RequestMapping("/test/{name}")
    public String sayHello(@PathVariable("name") String name){
        return "nihao! " + name;
    }
}
3、nacos-consumer pom文件配置
<dependencies>
        <dependency>
            <groupId>org.projectlombokgroupId>
            <artifactId>lombokartifactId>
            <version>1.18.0version>
            <optional>trueoptional>
        dependency>
        <dependency>
            <groupId>org.springframework.bootgroupId>
            <artifactId>spring-boot-starter-webartifactId>
        dependency>
        <dependency>
            <groupId>org.springframework.bootgroupId>
            <artifactId>spring-boot-starter-testartifactId>
            <scope>testscope>
        dependency>

        <dependency>
            <groupId>com.alibaba.cloudgroupId>
            <artifactId>spring-cloud-starter-alibaba-nacos-discoveryartifactId>
        dependency>
    dependencies>
YAML配置
server:
  port: 8082

spring:
  application:
    name: nacos-consumer
  cloud:
    nacos:
      discovery:
        server-addr: localhost:8848
消费类
import org.springframework.boot.SpringApplication;
import org.springframework.boot.autoconfigure.SpringBootApplication;
import org.springframework.cloud.client.discovery.EnableDiscoveryClient;
import org.springframework.cloud.client.loadbalancer.LoadBalanced;
import org.springframework.context.annotation.Bean;
import org.springframework.web.client.RestTemplate;

@SpringBootApplication
@EnableDiscoveryClient
public class NacosConsumerApplication {
    public static void main(String[] args) {
        SpringApplication.run(NacosConsumerApplication.class,args);
    }

    /**
     * 创建RestTemplate并注入Spring容器
     */
    @Bean
    @LoadBalanced
    public RestTemplate restTemplate(){
        return new RestTemplate();
    }
}

/**********************调用服务测试**************/


import org.springframework.beans.factory.annotation.Autowired;
import org.springframework.web.bind.annotation.PathVariable;
import org.springframework.web.bind.annotation.RequestMapping;
import org.springframework.web.bind.annotation.RestController;
import org.springframework.web.client.RestTemplate;

@RestController
@RequestMapping("hello")
public class ConsumerController {

    @Autowired
    public RestTemplate restTemplate;

    @RequestMapping("sayHi/{name}")
    public String sayHello(@PathVariable("name") String name){
        return restTemplate.getForObject("http://nacos-provider/nacos-provider/sayHello/test/" +name, String.class);
    }

}
网页端测试:
http://localhost:8082/hello/sayHi/zhngsan
2、使用nacos做配置管理
微服务要拉取nacos中管理的配置,并且与本地的application.yml配置合并,才能完成项目启动。
但如果尚未读取application.yml,又如何得知nacos地址呢?
因此spring引入了一种新的配置文件:bootstrap.yaml文件,会在application.yml之前被读取,流程如下:
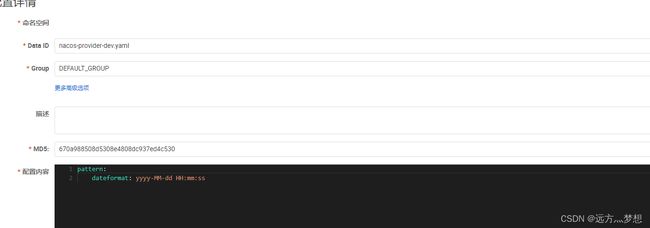
在nacos中新建配置
- 在需要抽取配置到nacos中的工程中引入nacos-config依赖配置:
<dependency>
    <groupId>com.alibaba.cloudgroupId>
    <artifactId>spring-cloud-starter-alibaba-nacos-configartifactId>
dependency>
-
添加bootstrap.yaml
spring:
  application:
    name: nacos-provider # 服务名称
  profiles:
    active: dev #开发环境,这里是dev
  cloud:
    nacos:
      discovery:
        server-addr: 192.168.192.128:8848
      config:
        server-addr: 192.168.192.128:8848 # Nacos地址
        file-extension: yaml  # 文件后缀名
使用
${spring.application.name}-${spring.profiles.active}.${spring.cloud.nacos.config.file-extension}作为文件id,来读取配置。即nacos-provider-dev.yaml
3、读取nacos配置
@Value("${pattern.dateformat}")
private String dateFormater;

@RequestMapping("getConfig")
public String getConfig(){
    return DateTimeFormatter.ofPattern(dateFormater).format(LocalDateTime.now());
}
2、1配置热更新
上面的步骤简单实现了读取nacos上的配置,还未实现配置的热更新。
要实现配置热更新,可以使用两种方式:
1、在@Value注入的变量所在类上添加注解@RefreshScope:
@RefreshScope
public class HelloController {

    @Value("${pattern.dateformat}")
    private String dateFormater;
}
2、使用@ConfigurationProperties注解的配置类代替@Value注解。
创建配置类:
import org.springframework.boot.context.properties.ConfigurationProperties;
import org.springframework.stereotype.Component;

@Component
@ConfigurationProperties(prefix = "pattern")
public class PaternProperties {
    private String dateformat;

    public String getDateformat() {
        return dateformat;
    }

    public void setDateformat(String dateformat) {
        this.dateformat = dateformat;
    }
}
使用nacos配置
@Autowired
private PaternProperties paternProperties;

@RequestMapping("getConfig")
public String getConfig(){
    return DateTimeFormatter.ofPattern(paternProperties.getDateformat()).format(LocalDateTime.now());
}

