SpringEvent学习笔记
SpringEvent学习笔记
很久没有写文章,这次不再题解竞赛源码了,来点spring的干货废话不多说,直接进入正题:
首先我们要了解SpringEvent之前要了解java中的设计模式:
Java的设计模式中有两种设计模式,观察者模式和监听者模式
监听者模式:当有一个事件发生时,通知关注此事件的对象,告诉事件发生了就发布这个事件,那怎么知道通知谁呢,所以需要知道谁关心这个事件,那么就需要对这个事件关心的对象中定义一个事件,如果事件发生了,关心的这个对象就监听到了,可以执行相应的操作。
观察者模式:一对多的模式,一个被观察者Observable和多个观察者Observer,被观察者中存储了所有的观察者对象,当被观察者接收到一个外界的消息,就会遍历广播推算消息给所有的观察者
例如日常生活中的订阅报纸,报纸老板A,现在小明和老板打招呼说我要订报纸(这个过程就相当于观察者的注册),老板A就会拿出自己的小本本记下小明,下次小王、小芳也是类似的操作,现在老板A就有了三个观察者了,然后老板会自动的把报纸送到三位的家里,突然有一天小明说不想订报纸了,老板就在自己的小本本上划掉小明的名字(观察者的取消注册),等到送报纸的时候就不再送到小明家里
而我们本文讲解的SpringEvent就是一种事件监听机制,何为事件家监听机制?通俗的理解就是甲方发送消息,乙方用来监听甲方发送消息这个事件,进而做出我们定义好的操作,这一套流程称为事件监听机制Spring的事件通知机制是一项很有用的功能,使用事件机制我们可以将相互耦合的代码解耦,从而方便功能的修改与添加
举个例子:如果我们需要编写一个添加功能,而添加之后需要进行添加操作的推送,当然可以在添加的代码后面假设这些操作,但是这样的代码违反了设计模式的多项原则:单一职责原则、迪米特法则、开闭原则。一句话说就是耦合性太大了,比如将来评论添加成功之后还需要有另外一个操作,这时候我们就需要去修改我们的添加评论代码了。
在以前的代码中,我使用观察者模式来解决这个问题。不过Spring中已经存在了一个升级版观察者模式的机制,这就是监听者模式。通过该机制我们就可以发送接收任意的事件并处理。
直接上一个小的demo:
首先我们在依赖上只需要导入最基本的SpringWeb即可

之后我们在代码中定义:
/**
 * 定义一个事件
 * 需要继承ApplicationEvent类
 * */
public class EventDemoVO extends ApplicationEvent {

    private String message;

    public EventDemoVO(Object source,String message) {
        super(source);
        this.message=message;
    }

    public String getMessage() {
        return message;
    }

}
/**
 * 定义一个事件监听者
 * 需要实现ApplicationListener接口并且设置监听EventDemoVO类
 * */
@Component
public class EventDemoListener implements ApplicationListener<EventDemoVO> {
    Logger logger = LoggerFactory.getLogger(EventDemoListener.class);


    @Override
    public void onApplicationEvent(EventDemoVO eventDemoVO) {
        logger.info("receiver 0 " + eventDemoVO.getMessage());
        try {
            Thread.sleep(1000);
        } catch (InterruptedException e) {
            e.printStackTrace();
        }
    }
}
/**
 * 定义一个事件发布
 * */
// 事件发布
@Service
public class EventDemoPublish {

    @Autowired
    private ApplicationEventPublisher applicationEventPublisher;

    public void publish(String message) {
        EventDemoVO eventDemoVO = new EventDemoVO(this, message);
        applicationEventPublisher.publishEvent(eventDemoVO);
    }
}
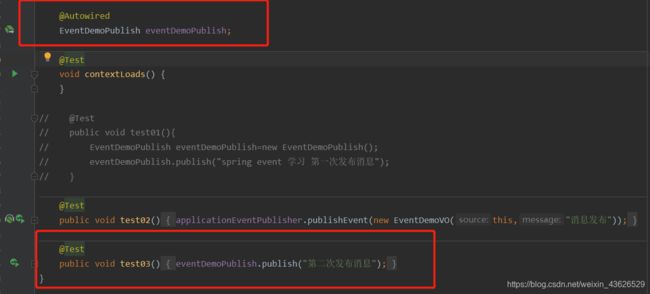
之后我们在test中执行代码:

可以看到执行结果,事件发布之后可以执行我们的设置的监听操作:

Spring事件通知原理
首先我们跟踪publishEvent方法,这个方法在AbstractApplicationContext类中
protected void publishEvent(Object event, @Nullable ResolvableType eventType) {
    Assert.notNull(event, "Event must not be null");

    // Decorate event as an ApplicationEvent if necessary
    ApplicationEvent applicationEvent;
    if (event instanceof ApplicationEvent) {
        // 如果event是ApplicationEvent对象
        applicationEvent = (ApplicationEvent) event;
    }
    else {
        // 如果event不是ApplicationEvent对象,则将其包装成PayloadApplicationEvent事件,并获取对应的事件类型
        applicationEvent = new PayloadApplicationEvent<>(this, event);
        if (eventType == null) {
            eventType = ((PayloadApplicationEvent) applicationEvent).getResolvableType();
        }
    }

    // Multicast right now if possible - or lazily once the multicaster is initialized
    if (this.earlyApplicationEvents != null) {
        this.earlyApplicationEvents.add(applicationEvent);
    }
    else {
        // 获取ApplicationEventMulticaster,调用`multicastEvent`方法广播事件
        getApplicationEventMulticaster().multicastEvent(applicationEvent, eventType);
    }

    // 如果当前命名空间还有父亲节点,也需要给父亲推送该消息
    // Publish event via parent context as well...
    if (this.parent != null) {
        if (this.parent instanceof AbstractApplicationContext) {
            ((AbstractApplicationContext) this.parent).publishEvent(event, eventType);
        }
        else {
            this.parent.publishEvent(event);
        }
    }
}

// 获取ApplicationEventMulticaster
ApplicationEventMulticaster getApplicationEventMulticaster() throws IllegalStateException {
    if (this.applicationEventMulticaster == null) {
        throw new IllegalStateException("ApplicationEventMulticaster not initialized - " +
                "call 'refresh' before multicasting events via the context: " + this);
    }
    return this.applicationEventMulticaster;
}
经过上面的分析,我们看到事件是通过applicationEventMulticaster来广播出去的。
applicationEventMulticaster在Spring的启动过程中被建立,我们在之前的文章Spring启动过程分析1(overview)中分析过Spring的启动过程,在核心方法refresh中建立applicationEventMulticaster:
// Initialize message source for this context.
initMessageSource();

// Initialize event multicaster for this context.
// 在Spring容器中初始化事件广播器,事件广播器用于事件的发布
initApplicationEventMulticaster();

// Initialize other special beans in specific context subclasses.
onRefresh();

// Check for listener beans and register them.
// 把Spring容器内的事件监听器和BeanFactory中的事件监听器都添加的事件广播器中。
registerListeners();

// Instantiate all remaining (non-lazy-init) singletons.
finishBeanFactoryInitialization(beanFactory);

// Last step: publish corresponding event.
finishRefresh();
关注initApplicationEventMulticaster和registerListeners方法。
// 初始化事件广播器
protected void initApplicationEventMulticaster() {
    ConfigurableListableBeanFactory beanFactory = getBeanFactory();
    // 如果用户手动新建了一个名为applicationEventMulticaster类型为ApplicationEventMulticaster的bean,则将这个bean作为事件广播器
    if (beanFactory.containsLocalBean(APPLICATION_EVENT_MULTICASTER_BEAN_NAME)) {
        this.applicationEventMulticaster =
                beanFactory.getBean(APPLICATION_EVENT_MULTICASTER_BEAN_NAME, ApplicationEventMulticaster.class);
        if (logger.isTraceEnabled()) {
            logger.trace("Using ApplicationEventMulticaster [" + this.applicationEventMulticaster + "]");
        }
    }
    else {
        // 否则新建一个SimpleApplicationEventMulticaster作为默认的事件广播器
        this.applicationEventMulticaster = new SimpleApplicationEventMulticaster(beanFactory);
        beanFactory.registerSingleton(APPLICATION_EVENT_MULTICASTER_BEAN_NAME, this.applicationEventMulticaster);
        if (logger.isTraceEnabled()) {
            logger.trace("No '" + APPLICATION_EVENT_MULTICASTER_BEAN_NAME + "' bean, using " +
                    "[" + this.applicationEventMulticaster.getClass().getSimpleName() + "]");
        }
    }
}
// 注册监听器
protected void registerListeners() {
    // Register statically specified listeners first.
    // 把提前存储好的监听器添加到监听器容器中
    for (ApplicationListener<?> listener : getApplicationListeners()) {
        getApplicationEventMulticaster().addApplicationListener(listener);
    }

    // Do not initialize FactoryBeans here: We need to leave all regular beans
    // uninitialized to let post-processors apply to them!
    // 获取类型是ApplicationListener的beanName集合,此处不会去实例化bean
    String[] listenerBeanNames = getBeanNamesForType(ApplicationListener.class, true, false);
    for (String listenerBeanName : listenerBeanNames) {
        getApplicationEventMulticaster().addApplicationListenerBean(listenerBeanName);
    }

    // Publish early application events now that we finally have a multicaster...
    Set<ApplicationEvent> earlyEventsToProcess = this.earlyApplicationEvents;
    this.earlyApplicationEvents = null;
    // 如果存在earlyEventsToProcess,提前处理这些事件
    if (earlyEventsToProcess != null) {
        for (ApplicationEvent earlyEvent : earlyEventsToProcess) {
            getApplicationEventMulticaster().multicastEvent(earlyEvent);
        }
    }
}
经过前面的分析,我们知道了事件广播器applicationEventMulticaster如何被构建,下面我们分析事件的广播过程
@Override
public void multicastEvent(final ApplicationEvent event, @Nullable ResolvableType eventType) {
    ResolvableType type = (eventType != null ? eventType : resolveDefaultEventType(event));
    // 根据event类型获取适合的监听器
    for (final ApplicationListener<?> listener : getApplicationListeners(event, type)) {
        // 获取SimpleApplicationEventMulticaster中的线程执行器,如果存在线程执行器则在新线程中异步执行,否则直接同步执行监听器中的方法
        Executor executor = getTaskExecutor();
        if (executor != null) {
            executor.execute(() -> invokeListener(listener, event));
        }
        else {
            invokeListener(listener, event);
        }
    }
}

protected void invokeListener(ApplicationListener<?> listener, ApplicationEvent event) {
    // 如果存在ErrorHandler,调用监听器方法如果抛出异常则调用ErrorHandler来处理异常。否则直接调用监听器方法
    ErrorHandler errorHandler = getErrorHandler();
    if (errorHandler != null) {
        try {
            doInvokeListener(listener, event);
        }
        catch (Throwable err) {
            errorHandler.handleError(err);
        }
    }
    else {
        doInvokeListener(listener, event);
    }
}
异步响应Event
默认情况下,Spring是同步执行Event的响应方法的。如果响应方法的执行时间很长会阻塞发送事件的方法,因此很多场景下,我们需要让事件的响应异步化。
为了更直观地说明Event的响应默认是同步的,我们修改一下EventDemoListener并增加一个EventDemoListener2:
@Component
public class EventDemoListener1 implements ApplicationListener<EventDemoVO>{

    Logger logger = LoggerFactory.getLogger(EventDemoListener1.class);


    @Override
    public void onApplicationEvent(EventDemoVO eventDemoVO) {
        logger.info("receiver 1 " + eventDemoVO.getMessage());
        try {
            Thread.sleep(1000);
        } catch (InterruptedException e) {
            e.printStackTrace();
        }
    }
}
@Component
public class EventDemoListener2 implements ApplicationListener<EventDemoVO> {

    Logger logger = LoggerFactory.getLogger(EventDemoListener2.class);


    @Override
    public void onApplicationEvent(EventDemoVO eventDemoVO) {
        logger.info("receiver 2 " + eventDemoVO.getMessage());
        try {
            Thread.sleep(1000);
        } catch (InterruptedException e) {
            e.printStackTrace();
        }
    }
}
执行结果如下:

执行结果显示:EventDemoListener2和EventDemoListener1和EventDemoListener的执行间隔1秒,EventDemoListener2的执行和程序的结束也间隔1秒。结果表示我们的响应程序是同步执行的,一个响应程序的执行会阻塞下一个响应程序的执行。
自定义SimpleApplicationEventMulticaster
通过前面的代码分析,我们发现如果SimpleApplicationEventMulticaster中的taskExecutor如果不为null,将在taskExecutor中异步执行响应程序。applicationEventMulticaster的新建在initApplicationEventMulticaster方法中,默认情况下它会新建一个SimpleApplicationEventMulticaster,其中的taskExecutor为null。因此想要taskExecutor不为null,我们可以自己手动创建一个SimpleApplicationEventMulticaster然后设置一个taskExecutor。
@Configuration
@ComponentScan("com.springevent")
public class ListenerConfig {
    @Bean
    public SimpleAsyncTaskExecutor simpleAsyncTaskExecutor(){
        return new SimpleAsyncTaskExecutor();
    }

    /**
     * 手动设置一个taskExecutor
     * */
    @Bean
    public SimpleApplicationEventMulticaster applicationEventMulticaster(){
        SimpleApplicationEventMulticaster simpleApplicationEventMulticaster=new SimpleApplicationEventMulticaster();
        simpleApplicationEventMulticaster.setTaskExecutor(simpleAsyncTaskExecutor());
        return simpleApplicationEventMulticaster;
    }
}
@Async
前面我们看到,通过手动新建SimpleApplicationEventMulticaster并设置TaskExecutor可以使所有的事件响应程序都在另外的线程中执行,不阻塞主程序的执行。不过这样也带来一个问题,那就是所有的事件响应程序都异步化了,某些场景下我们希望某些关系密切的响应程序可以同步执行另外一些响应程序异步执行。这种场景下,我们就不能简单地新建SimpleApplicationEventMulticaster并设置TaskExecutor。
Spring中提供了一个@Async注解,可以将加上这个注解的方法在另外的线程中执行。通过这个注解我们可以将指定的事件响应程序异步化。
我们修改EventDemoListener,在onApplicationEvent中加上@Async注解;同时修改Config类:
@Configuration
@ComponentScan("com.springevent")
@EnableAsync
public class AsyncConfig {
    @Bean
    public SimpleAsyncTaskExecutor simpleAsyncTaskExecutor(){
        return new SimpleAsyncTaskExecutor();
    }
}
@Component
public class EventDemoListener1 implements ApplicationListener<EventDemoVO>{

    Logger logger = LoggerFactory.getLogger(EventDemoListener1.class);


//    @Override
//    public void onApplicationEvent(EventDemoVO eventDemoVO) {
//        logger.info("receiver 1 " + eventDemoVO.getMessage());
//        try {
//            Thread.sleep(1000);
//        } catch (InterruptedException e) {
//            e.printStackTrace();
//        }
//    }

    @Override
    @Async
    public void onApplicationEvent(EventDemoVO eventDemoVO) {
        logger.info("receiver 1 " + eventDemoVO.getMessage());
        try {
            Thread.sleep(1000);
        } catch (InterruptedException e) {
            e.printStackTrace();
        }
    }
}
@Component
public class EventDemoListener2 implements ApplicationListener<EventDemoVO> {

    Logger logger = LoggerFactory.getLogger(EventDemoListener2.class);


//    @Override
//    public void onApplicationEvent(EventDemoVO eventDemoVO) {
//        logger.info("receiver 2 " + eventDemoVO.getMessage());
//        try {
//            Thread.sleep(1000);
//        } catch (InterruptedException e) {
//            e.printStackTrace();
//        }
//    }

    @Override
    @Async
    public void onApplicationEvent(EventDemoVO eventDemoVO) {
        logger.info("receiver 2 " + eventDemoVO.getMessage());
        try {
            Thread.sleep(1000);
        } catch (InterruptedException e) {
            e.printStackTrace();
        }
    }
}
运行发现EventDemoListenr1和EventDemoListener2可以同时运行但是需要等待EventDemoListener运行结束之后,说明:我们看到,EventDemoListener1和EventDemoListener2是在另外的线程中执行的,但是EventDemoListener仍然在主线程中执行,因此EventDemoListener阻塞了主线程的执行。

@Async原理
@Async注解可以将方法异步化,下面我们来看看它的原理是什么:
注解@EnableAsync导入AsyncConfigurationSelector,AsyncConfigurationSelector根据注解@EnableAsync属性AdviceMode决定引入代理的创建方式ProxyAsyncConfiguration/AspectJAsyncConfiguration(最终@Async的切面操作都是通过代理来做的)
public class AsyncConfigurationSelector extends AdviceModeImportSelector<EnableAsync> {
    private static final String ASYNC_EXECUTION_ASPECT_CONFIGURATION_CLASS_NAME = "org.springframework.scheduling.aspectj.AspectJAsyncConfiguration";

    public AsyncConfigurationSelector() {
    }

    @Nullable
    public String[] selectImports(AdviceMode adviceMode) {
        switch(adviceMode) {
        case PROXY:
            return new String[]{ProxyAsyncConfiguration.class.getName()};
        case ASPECTJ:
            return new String[]{"org.springframework.scheduling.aspectj.AspectJAsyncConfiguration"};
        default:
            return null;
        }
    }
}
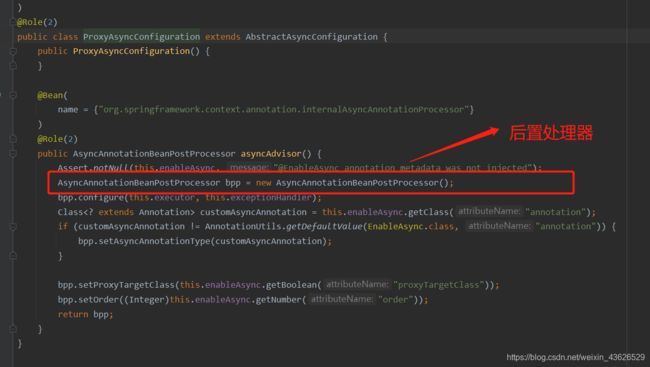
配置类ProxyAsyncConfiguration
其中通过AsyncAnnotationBeanPostProcessor为Spring Bean的后置处理器,主要作用是对于带有@Async注解的类或者类方法的bean做后置处理,将相关的bean包装为Proxy

后置处理器AsyncAnnotationBeanPostProcessor
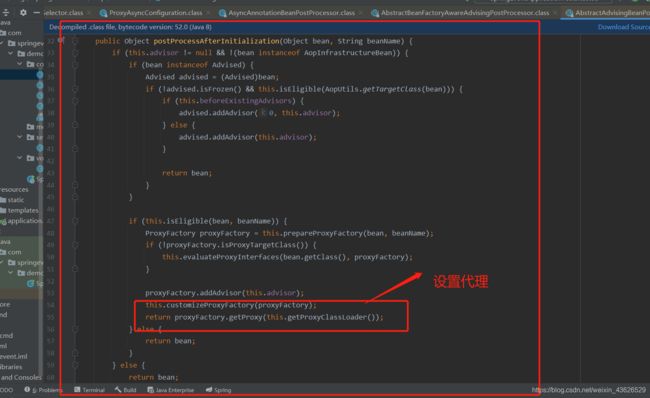
AsyncAnnotationBeanPostProcessor拥有一个AsyncAnnotationAdvisor,这是一个Spring Advisor,会被包裹到方法或者bean级别使用了注解@Async或EJB 3.1 javax.ejb.Asynchronous注解的bean上

在容器启动时对每个bean 的初始化进行后置处理,则将自己所拥有的AsyncAnnotationAdvisor包裹到目标bean的最外面,其后置处理的逻辑是在其父类AbstractAdvisingBeanPostProcessor的postProcessAfterInitialization方法中实现的,我们找到代理


拦截器AnnotationAsyncExecutionInterceptor
AnnotationAsyncExecutionInterceptor拦截器是MethodInterceptor的实现类,MethodInterceptor我们都很熟悉,就是通过代理的方式实现AOP的一种方式,而AnnotationAsyncExecutionInterceptor对MethodInterceptor的invoke方法的实现是在其父类AsyncExecutionInterceptor中

总结:
Spring的事件机制是一套相当灵活的机制,使用它可以简便地将我们的代码解耦从而优化我们的代码。经过前面的分析我们了解了其中的运行原理,这有助于我们更好地使用这套机制
转载借鉴于:https://blog.wangqi.love/articles/Java/Spring%20Event%E4%BA%8B%E4%BB%B6%E9%80%9A%E7%9F%A5%E6%9C%BA%E5%88%B6.html
https://blog.csdn.net/u014250530/article/details/108407750