Jetpack Compose中的Modifier
Modifier的基本使用
Modifier修饰符是Jetpack Compose中用来修饰组件的,提供常用的属性,写布局时几乎所有Composable组件的大部分属性都可以用Modifier 来修饰。官方在开发Compose UI时,最初尝试过将所有属性全部以函数参数的形式提供,但是那样太多了,他们也尝试过像Flutter那样的方式,将属性也作为一个组件进行嵌套,但这样又很容易让人感到困惑,所以才诞生了Modifier,将大部分组件常用属性封装成Modifier的形式来提供,哪个组件需要就在哪个组件上应用。我认为Modifier是Compose中最优秀的设计点之一。
@Composable
fun ModifierExample() {
    Box(modifier = Modifier.size(200.dp)) { // size同时指定宽高大小
        Box(Modifier.fillMaxSize()  // 填满父空间
            .background(Color.Red))
        Box(Modifier.fillMaxHeight() // 高度填满父空间
            .width(60.dp)
            .background(Color.Blue))
        Box(Modifier.fillMaxWidth() // 宽度填满父空间
            .height(60.dp)
            .background(Color.Green)
            .align(Alignment.Center))
        Column(Modifier.clickable { } // 点击事件
                .padding(15.dp) // 外间距
                .fillMaxWidth()
                .background(MaterialTheme.colorScheme.primary) // 背景
            	.border(2.dp, Color.Red, RoundedCornerShape(2.dp)) // 边框
            	.padding(8.dp) // 内间距
        ) {
            Text(
                text = "从基线到顶部保持特定距离",
                modifier = Modifier.paddingFromBaseline(top = 35.dp))
            Text(
                text = "offset设置偏移量",
                modifier = Modifier.offset(x = 14.dp) // 正offset会将元素向右移
            )
        }
    }
}
部分Modifier属性只能在特定组件的作用域范围内才能使用,避免了像传统xml布局中的属性那样对自身没有用的属性也能被写出来造成污染。例如 Modifier.matchParentSize() 只有在 Box 组件范围内才能使用:
 Box(modifier = Modifier.size(200.dp)) {
        Text(
            text = "aaa",
            modifier = Modifier
            .align(Alignment.Center)
            .matchParentSize() // matchParentSize 仅在 BoxScope 中可用
        )
}
观察源码发现 Modifier.matchParentSize() 与 Modifier.align() 被定义在了BoxScope接口的内部,所以只能在Box的lambda中使用,该lambda函数的类型是 @Composable BoxScope.() -> Unit,可见其定义了Receiver是BoxScope
interface BoxScope {
    @Stable
    fun Modifier.align(alignment: Alignment): Modifier
    @Stable
    fun Modifier.matchParentSize(): Modifier
}
可以在 Row 和 Column 中使用Modifier.weight,类比传统线性布局中的layout_weight属性,并且仅可在 RowScope 和 ColumnScope 中使用。
@Composable
fun ArtistCard() {
    Row(
        modifier = Modifier
            .fillMaxWidth()
            .size(150.dp)
    ) {
        Image(
            painter = painterResource(id = R.drawable.ic_sky),
            contentDescription = null,
            contentScale = ContentScale.Crop,
            modifier = Modifier.weight(2f) // 占比2/3
        )
        Column(
            modifier = Modifier.weight(1f) // 占比1/3
        ) {
            Text(text = "Hello", style = MaterialTheme.typography.titleSmall)
            Text(text = "Compose", style = MaterialTheme.typography.bodyMedium)
        }
    }
}
点击事件相关的Modifier属性:
Column{
        Box(Modifier
            .clickable { println("clickable") }
            .size(30.dp)
            .background(Color.Red))
        Box(Modifier
            .size(50.dp)
            .background(Color.Blue)
            .combinedClickable(
                onLongClick = { println("onLongClick") },
                onDoubleClick = { println("onDoubleClick") },
                onClick = { println("onClick") }
            ))
        Box(Modifier
            .size(50.dp)
            .background(Color.Green)
            .pointerInput(Unit) {
                detectTapGestures(
                    onDoubleTap = { },
                    onLongPress = { },
                    onPress = { },
                    onTap = {})
                detectDragGestures(
                    onDragStart = { },
                    onDragEnd = { },
                    onDragCancel = { },
                    onDrag = { change, dragAmount -> }
                )
            })
    }
Modifier的复用
可以通过定义扩展函数复用常用的Modifier属性配置:
fun Modifier.redCircle(): Modifier = clip(CircleShape).background(Color.Red)
使用:
	Column {
        Box(Modifier.size(80.dp).redCircle())
    }
可以提取和复用同一修饰符实例,并将其传递给可组合项,避免在每一帧重组中创建大量对象:
val reusableModifier = Modifier
    .padding(12.dp)
    .background(Color.Gray)

@Composable
fun LoadingWheelAnimation() {
    val animatedState = animateFloatAsState(...)

    LoadingWheel(
        // No allocation, as we're just reusing the same instance
        modifier = reusableModifier,
        animatedState = animatedState.value
    )
}
提取和复用未限定作用域的修饰符
修饰符可以不限定作用域,也可以将作用域限定为特定可组合项。对于未限定作用域的修饰符,可以从任何可组合项之外提取它们作为简单变量:
val reusableModifier = Modifier
    .fillMaxWidth()
    .background(Color.Red)
    .padding(12.dp)

@Composable
fun AuthorField() {
    HeaderText(
        // ...
        modifier = reusableModifier
    )
    SubtitleText(
        // ...
        modifier = reusableModifier
    )
}
与延迟布局结合使用时,这尤为有用。在大多数情况下,建议对所有潜在的重要项目使用完全相同的修饰符:
val reusableItemModifier = Modifier
    .padding(bottom = 12.dp)
    .size(216.dp)
    .clip(CircleShape)

@Composable
private fun AuthorList(authors: List<Author>) {
    LazyColumn {
        items(authors) {
            AsyncImage(
                // ...
                modifier = reusableItemModifier,
            )
        }
    }
}
提取和复用限定作用域的修饰符
在处理作用域限定为特定可组合项的修饰符时,您可以将其提取到尽可能高的级别,并在适当的情况下重复使用:
Column(...) {
    val reusableItemModifier = Modifier
        .padding(bottom = 12.dp)
        .align(Alignment.CenterHorizontally)
        .weight(1f)
    Text1(
        modifier = reusableItemModifier,
        // ...
    )
    Text2(
        modifier = reusableItemModifier
        // ...
    )
    // ...
}
注意:只能将提取的限定作用域的修饰符传递给限定相同作用域的直接子项
例如:
Column(modifier = Modifier.fillMaxWidth()) {
    // Weight modifier is scoped to the Column composable
    val reusableItemModifier =  Modifier.weight(1f)
    // Weight 可以在这里正常应用因为 Text 是 Column 的一个直接子项
    Text(modifier = reusableItemModifier
        // ...
    )
    Box {
         // Weight 在这里不起作用,因为当前 Text 不是 Column 的直接子项
        Text(modifier = reusableItemModifier
            // ...
        )
    }
}
延长提取Modifier链
您可以通过调用 .then() 函数进一步链接或附加提取的Modifier链:
val reusableModifier = Modifier
    .fillMaxWidth()
    .background(Color.Red)
    .padding(12.dp)

// Append to your reusableModifier
reusableModifier.clickable { … }

// Append your reusableModifier
otherModifier.then(reusableModifier)
Modifier的分类
Modifier有很多属性,这些属性属于不同类型的Modifier,每种类型的Modifier负责处理一类的功能,就常用的属性而言可以分成LayoutModifier和DrawModifier,如size、padding等背后的实现是基于LayoutModifier,而background、border等背后的实现是基于DrawModifier。
Modifier的自定义
Modifier.composed 自定义
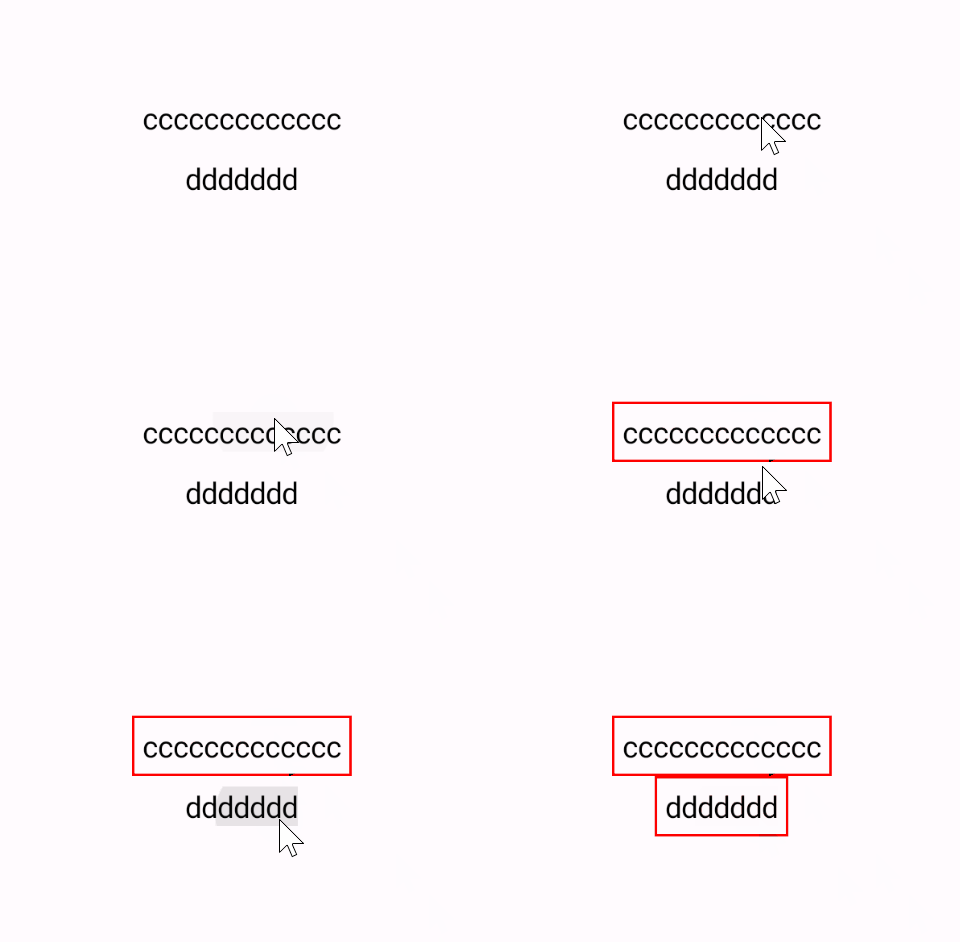
Modifier.composed 是一种可以支持有状态的 Modifier,可以将很多行为延时到重组后执行,而不是状态变化后立即执行,例如:
// 点击的时候添加一个边框
fun Modifier.addBorderOnClicked() = composed {
    var width by remember { mutableStateOf(0.dp) }
    when(width) {
        0.dp -> Modifier
        else -> Modifier.border(width, Color.Red)
    }.then(
        Modifier
        .padding(5.dp)
        .clickable { width = 1.dp }
    )
}
使用:
Column {
     Text("ccccccccccccc", Modifier.addBorderOnClicked())
     Text("ddddddd", Modifier.addBorderOnClicked())
}
composed{…} 会使用 工厂函数 创建一个新的 Modifier 对象 , 它会在重组的时候被调用, composed与普通Modifier属性的区别是其状态是独享的,在重组运行时才生效,因为其factory参数是一个Composable函数 @Composable Modifier.() -> Modifier,所以在{…}中可以使用remember,可以把它当成一个Composable组件。
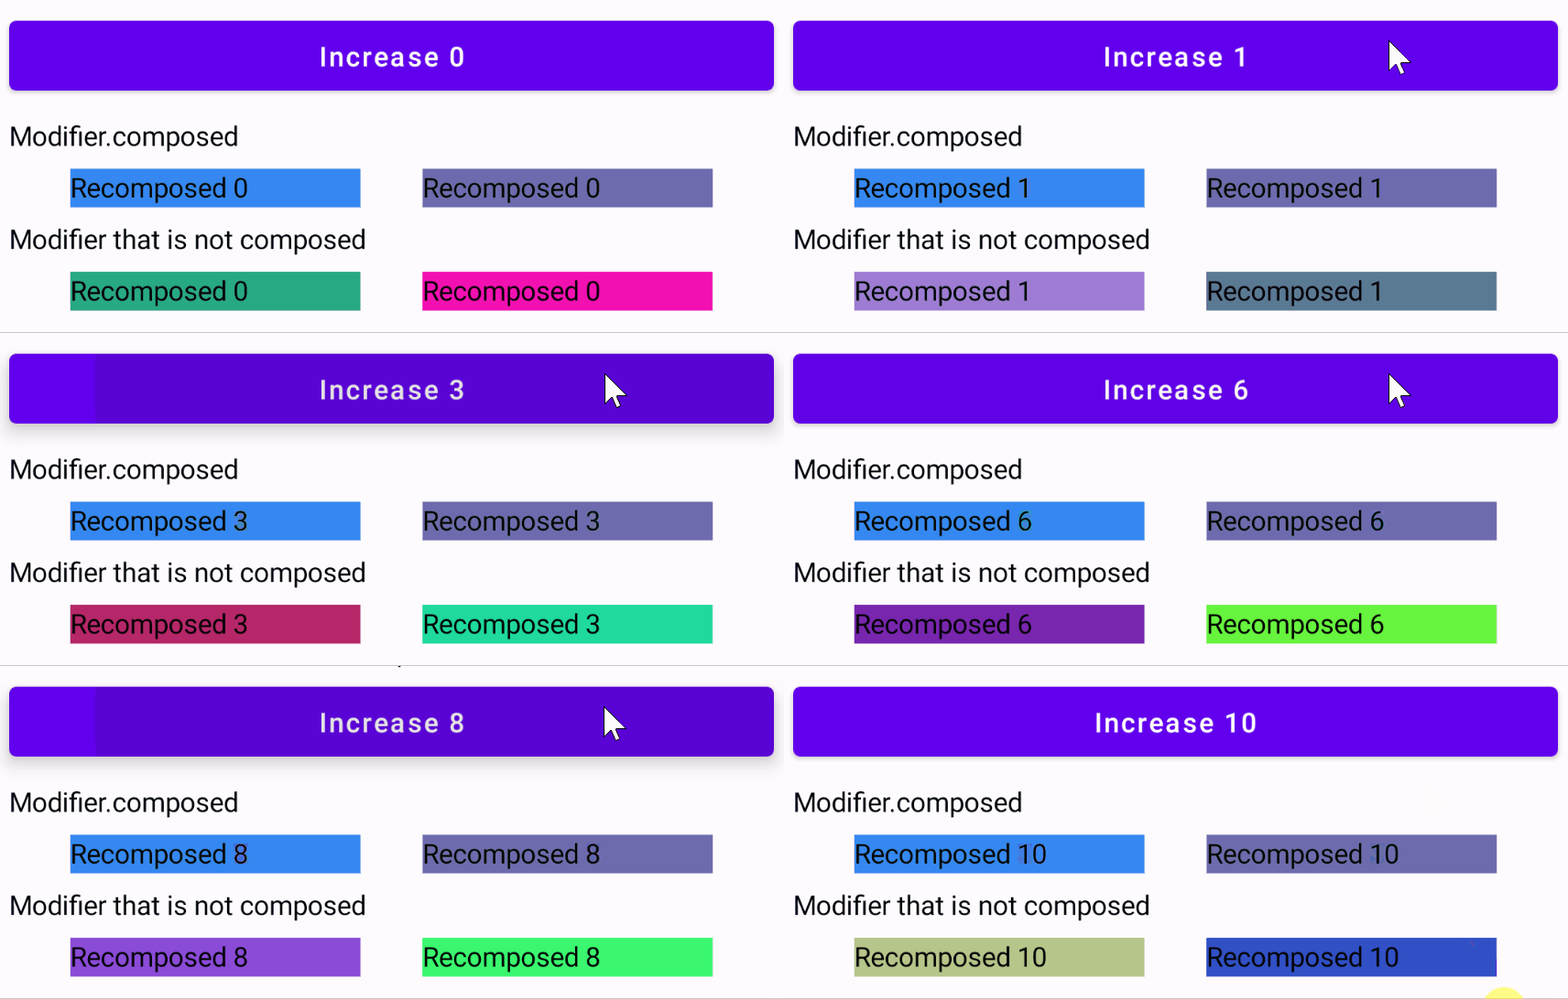
可以运行下面的例子,来感受它和普通Modifier的不同:
@Composable
fun ComposedBackgroundExample() {
    Column(
        modifier = Modifier
            .padding(horizontal = 8.dp)
            .fillMaxWidth(),
        verticalArrangement = Arrangement.spacedBy((8.dp))
    ) {
        var counter by remember { mutableStateOf(0) }
        Button(
            onClick = { counter++ },
            modifier = Modifier.fillMaxWidth()
        ) {
            Text(text = "Increase $counter")
        }
        Text("Modifier.composed")
        Row(
            modifier = Modifier.fillMaxWidth(),
            horizontalArrangement = Arrangement.SpaceEvenly
        ) {
            Box(Modifier
                .composedBackground(150.dp, 20.dp, 0)
                .width(150.dp)) {
                Text(text = "Recomposed $counter")
            }
            Box(Modifier
                .composedBackground(150.dp, 20.dp, 1)
                .width(150.dp)) {
                Text(text = "Recomposed $counter")
            }
        }
        Text("Modifier that is not composed")
        Row(
            modifier = Modifier.fillMaxWidth(),
            horizontalArrangement = Arrangement.SpaceEvenly
        ) {
            Box(Modifier
                .nonComposedBackground(150.dp, 20.dp)
                .width(150.dp)) {
                Text(text = "Recomposed $counter")
            }
            Box(Modifier
                .nonComposedBackground(150.dp, 20.dp)
                .width(150.dp)) {
                Text(text = "Recomposed $counter")
            }
        }
    }
}

// Creates stateful modifier with multiple arguments
fun Modifier.composedBackground(width: Dp, height: Dp, index: Int) = composed(
    // pass inspector information for debug
    inspectorInfo = debugInspectorInfo {
        // name should match the name of the modifier
        name = "myModifier"
        // add name and value of each argument
        properties["width"] = width
        properties["height"] = height
        properties["index"] = index
    },
    // 在factory中返回实现的Modifier对象
    factory = {
        val density = LocalDensity.current
        val color = remember(index) {
            Color(
                red = Random.nextInt(256),
                green = Random.nextInt(256),
                blue = Random.nextInt(256),
                alpha = 255
            )
        }
        // add your modifier implementation here
        Modifier.drawBehind {
            val widthInPx = with(density) { width.toPx() }
            val heightInPx = with(density) { height.toPx() }
            drawRect(color = color, topLeft = Offset.Zero, size = Size(widthInPx, heightInPx))
        }
    }
)

fun Modifier.nonComposedBackground(width: Dp, height: Dp) = this.then(
    Modifier.drawBehind {
        // Without remember this color is created every time item using this modifier composed
        val color = Color(
            red = Random.nextInt(256),
            green = Random.nextInt(256),
            blue = Random.nextInt(256),
            alpha = 255
        )
        val widthInPx = width.toPx()
        val heightInPx = height.toPx()
        drawRect(color = color, topLeft = Offset.Zero, size = Size(widthInPx, heightInPx))
    }
)
可以看到使用 composed 定义的背景属性,可以记住状态,而非 composed 定义的背景属性在每次观察的状态值变化时,都会立即触发背景色改变。
下面的例子使用 composed 自定义了一个应用分段标题栏效果的Modifier属性:
enum class BorderPosition { Start, Center, End }

fun Modifier.segmentedBorder(
    strokeWidth: Dp,
    color: Color,
    borderPos: BorderPosition,
    cornerPercent: Int = 0,
    divider: Boolean = false
) = composed {
    val density = LocalDensity.current
    val strokeWidthPx = density.run { strokeWidth.toPx() }
    Modifier.drawWithContent {
        val width = size.width
        val height = size.height
        val cornerRadius = height * cornerPercent / 100
        drawContent()
        when (borderPos) {
            BorderPosition.Start -> {
                drawLine(
                    color = color,
                    start = Offset(x = width, y = 0f),
                    end = Offset(x = cornerRadius, y = 0f),
                    strokeWidth = strokeWidthPx
                )
                // Top left arc
                drawArc(
                    color = color,
                    startAngle = 180f,
                    sweepAngle = 90f,
                    useCenter = false,
                    topLeft = Offset.Zero,
                    size = Size(cornerRadius * 2, cornerRadius * 2),
                    style = Stroke(width = strokeWidthPx)
                )
                drawLine(
                    color = color,
                    start = Offset(x = 0f, y = cornerRadius),
                    end = Offset(x = 0f, y = height - cornerRadius),
                    strokeWidth = strokeWidthPx
                )
                // Bottom left arc
                drawArc(
                    color = color,
                    startAngle = 90f,
                    sweepAngle = 90f,
                    useCenter = false,
                    topLeft = Offset(x = 0f, y = height - 2 * cornerRadius),
                    size = Size(cornerRadius * 2, cornerRadius * 2),
                    style = Stroke(width = strokeWidthPx)
                )
                drawLine(
                    color = color,
                    start = Offset(x = cornerRadius, y = height),
                    end = Offset(x = width, y = height),
                    strokeWidth = strokeWidthPx
                )
            }
            BorderPosition.Center -> {
                drawLine(
                    color = color,
                    start = Offset(x = 0f, y = 0f),
                    end = Offset(x = width, y = 0f),
                    strokeWidth = strokeWidthPx
                )
                drawLine(
                    color = color,
                    start = Offset(x = 0f, y = height),
                    end = Offset(x = width, y = height),
                    strokeWidth = strokeWidthPx
                )
                if (divider) {
                    drawLine(
                        color = color,
                        start = Offset(x = 0f, y = 0f),
                        end = Offset(x = 0f, y = height),
                        strokeWidth = strokeWidthPx
                    )
                }
            }
            else -> {
                if (divider) {
                    drawLine(
                        color = color,
                        start = Offset(x = 0f, y = 0f),
                        end = Offset(x = 0f, y = height),
                        strokeWidth = strokeWidthPx
                    )
                }
                drawLine(
                    color = color,
                    start = Offset(x = 0f, y = 0f),
                    end = Offset(x = width - cornerRadius, y = 0f),
                    strokeWidth = strokeWidthPx
                )
                // Top right arc
                drawArc(
                    color = color,
                    startAngle = 270f,
                    sweepAngle = 90f,
                    useCenter = false,
                    topLeft = Offset(x = width - cornerRadius * 2, y = 0f),
                    size = Size(cornerRadius * 2, cornerRadius * 2),
                    style = Stroke(width = strokeWidthPx)
                )
                drawLine(
                    color = color,
                    start = Offset(x = width, y = cornerRadius),
                    end = Offset(x = width, y = height - cornerRadius),
                    strokeWidth = strokeWidthPx
                )
                // Bottom right arc
                drawArc(
                    color = color,
                    startAngle = 0f,
                    sweepAngle = 90f,
                    useCenter = false,
                    topLeft = Offset(
                        x = width - 2 * cornerRadius,
                        y = height - 2 * cornerRadius
                    ),
                    size = Size(cornerRadius * 2, cornerRadius * 2),
                    style = Stroke(width = strokeWidthPx)
                )
                drawLine(
                    color = color,
                    start = Offset(x = 0f, y = height),
                    end = Offset(x = width - cornerRadius, y = height),
                    strokeWidth = strokeWidthPx
                )
            }
        }
    }
}

fun Modifier.segmentedClip(borderPos: BorderPosition, cornerPercent: Int = 0) = composed {
    val shape = remember {
        when (borderPos) {
            BorderPosition.Start ->
                RoundedCornerShape(topStartPercent = cornerPercent, bottomStartPercent = cornerPercent)
            BorderPosition.End ->
                RoundedCornerShape(topEndPercent = cornerPercent, bottomEndPercent = cornerPercent)
            else -> RectangleShape
        }
    }
    Modifier.clip(shape)
}
使用方式:
@Composable
fun SegmentBorderExample() {
    val titles = listOf("歌曲", "专辑", "电台", "热门")
    Row(Modifier.padding(horizontal = 8.dp)) {
        titles.forEachIndexed { index, title ->
            val borderPos = when (index) {
                0 -> BorderPosition.Start
                titles.size - 1 -> BorderPosition.End
                else -> BorderPosition.Center
            }
            Box(
                contentAlignment = Alignment.Center,
                modifier = Modifier.weight(1f).height(48.dp)
                    .segmentedClip(borderPos = borderPos, cornerPercent = 50)
                    .segmentedBorder(
                        strokeWidth = 3.dp,
                        color = Color.Magenta,
                        borderPos = borderPos,
                        cornerPercent = 50,
                        divider = true
                    )
                    .clickable {
                        // TODO:
                    }
                    .padding(4.dp)
            ) {
                Text(text = title, fontSize = 18.sp)
            }
        }
    }
}
显示效果:
Modifier.layout() 自定义
可以利用 Modifier.layout() 自定义一些布局相关的属性,如组件的位置偏移、大小限制、或者padding等。
例如:
// 自定义类似Modifier.offset()类似的效果
fun Modifier.myOffset(x : Dp = 0.dp, y : Dp = 0.dp) = layout { measurable, constraints ->
    val placeable = measurable.measure(constraints)
    layout(placeable.width, placeable.height) {
        placeable.placeRelative(x.roundToPx(), y.roundToPx()) //设置偏移 支持RTL
        // placeable.place(0, 0) // 不支持RTL使用这个即可
    }
}
// 使用:
@Composable
fun LayoutModifierExample() {
    Box(Modifier.background(Color.Red)) {
        Text(text = "Offset", Modifier.myOffset(5.dp))
    }
}
// 自定义和Modifier.padding()类似的效果
fun Modifier.myPadding(myPadding : Dp) = layout { measurable, constraints ->
    val padding = myPadding.roundToPx()
    val placeable = measurable.measure(constraints.copy(
        maxWidth = constraints.maxWidth - padding * 2,
        maxHeight = constraints.maxHeight - padding * 2
    ))
    val width =  placeable.width + padding * 2
    val height = placeable.height + padding * 2
    layout(width, height) {
        placeable.placeRelative(padding, padding)
    }
}
// 使用:
@Composable
fun LayoutModifierExample3() {
    Box(Modifier.background(Color.Green)){
        Text(text = "padding", Modifier.myPadding(10.dp))
    }
}
类似的我们也可以尝试模仿DrawModifier的相关属性自己写出类似的东西。
modifierElementOf 自定义
例如:
@OptIn(ExperimentalComposeUiApi::class)
class Circle(var color: Color) : DrawModifierNode, Modifier.Node() {
    override fun ContentDrawScope.draw() {
        drawCircle(color)
    }
}
@OptIn(ExperimentalComposeUiApi::class)
fun Modifier.circle(color: Color) = this then modifierElementOf(
    key = color,
    create = { Circle(color) },
    update = { it.color = color },
    definitions = {
        name = "circle"
        properties["color"] = color
    }
)
@Preview
@Composable
fun ModifierElementOfExample() {
    Box(Modifier.size(100.dp).circle(Color.Red))
}
@ExperimentalComposeUiApi
class VerticalOffset(var padding: Dp) : LayoutModifierNode, Modifier.Node() {
    override fun MeasureScope.measure(
        measurable: Measurable,
        constraints: Constraints
    ): MeasureResult {
        val paddingPx = padding.roundToPx()
        val placeable = measurable.measure(constraints.offset(vertical = -paddingPx))
        return layout(placeable.width, placeable.height + paddingPx) {
            placeable.placeRelative(0, paddingPx)
        }
    }
}
@OptIn(ExperimentalComposeUiApi::class)
fun Modifier.verticalOffset(padding: Dp) = this then modifierElementOf(
    key = padding,
    create = { VerticalOffset(padding) },
    update = { it.padding = padding },
    definitions = {
        name = "verticalPadding"
        properties["padding"] = padding
    }
)

@Preview
@Composable
fun VerticalOffsetExample() {
    Box(Modifier.size(100.dp).background(Color.Gray).verticalOffset(20.dp)) {
        Box(Modifier.fillMaxSize().background(Color.DarkGray))
    }
}
class SizeLoggerNode(var id: String) : LayoutAwareModifierNode, Modifier.Node() {
    override fun onRemeasured(size: IntSize) {
        println("The size of $id was $size")
    }
}

@OptIn(ExperimentalComposeUiApi::class)
fun Modifier.logSize(id: String) = this then modifierElementOf(
    key = id,
    create = { SizeLoggerNode(id) },
    update = { it.id = id },
    definitions = {
        name = "logSize"
        properties["id"] = id
    }
)

@Preview
@Composable
fun PositionLoggerPreview() {
    Box(Modifier.size(100.dp).logSize("box"))
}
modifierElementOf主要用于创建一个ModifierNodeElement对象,它用于绑定到Modifier.Node实例上面。
Modifier在Compose模块中所处的位置
Compose的库分为好几个模块,从上到下总共分为4层,上层依赖下层的,而每一层都可以单独使用。
| Compose模块 | package | 说明 |
|---|---|---|
| Material | androidx.compose.material | 提供基于Material Design设计主题的内置组件,如Button、Text、Icon等 |
| Foundation | androidx.compose.foundation | 为下面的UI层提供一些基础的Composable组件,如Row、Column、Box等布局类的组件,以及特定手势识别等,这些Composable可以支持跨平台通用 |
| UI | androidx.compose.ui | 包含很多模块如ui-text、ui-graphics、ui-tooling等,该层为上层的Composable提供运行基础,Composable的测量、布局、绘制、事件处理等都是在该层,而Modifier的管理就是位于该层 |
| Runtime | androidx.compose.runtime | 提供对Compose的UI树的管理能力,自动重组UI,通过diff驱动界面刷新等 |
Modifier链的构建过程
Modifier 实际上是个接口,它有三个直接子类:
- Modifier伴生对象: 我们在代码中使用 Modifier.xxx() 时,第一个开头的Modifier就是这个伴生对象, 当第一次调用Modifier的属性时,都是调用的这个伴生对象的then函数,它的then直接返回传入的Modifier对象。Modifier伴生对象默认没有任何效果,相当于提供一个白板,然后你再往上面加效果。
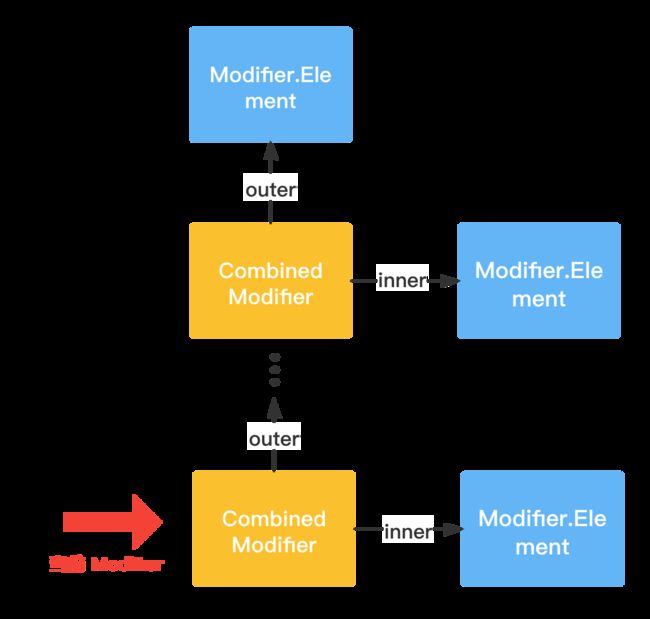
- CombinedModifier: 用于合成 Modifier 链中的每个 Modifier 结点,如果在伴生对象Modifier后面连续调用,则第二个开始的then函数会返回一个CombinedModifier对象,它将左边的Modifier对象作为outer(即当前调用者),右边的Modifie对象作为inner(即新设置的属性)进行合并。
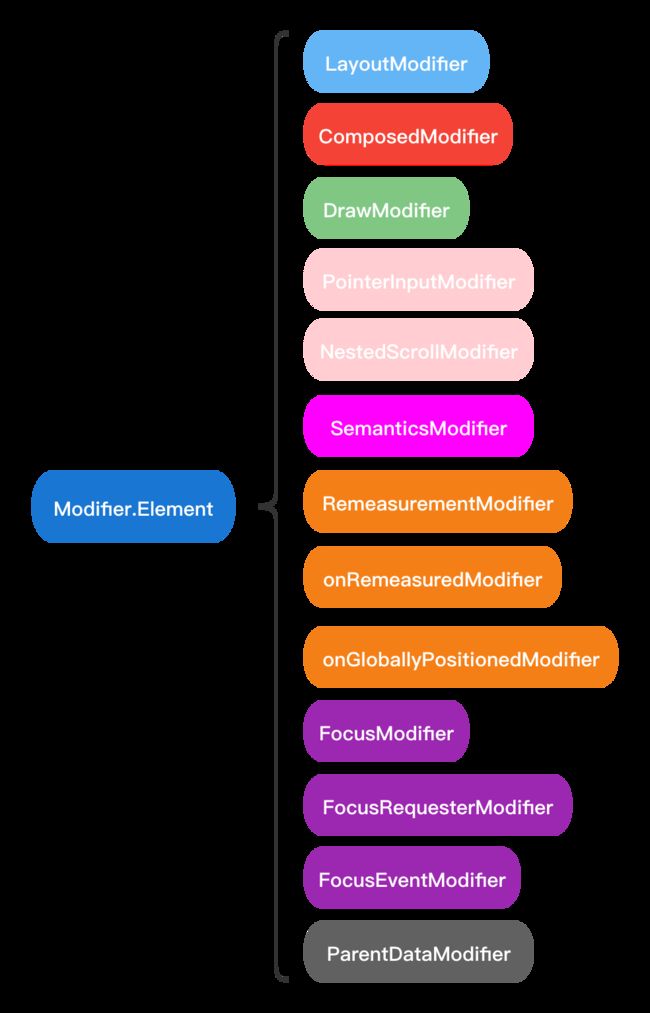
- Modifier.Element内部子接口: 所有的其他类型的Modifier都是实现了该接口的子类(为方便合成CombinedModifier而存在)。
CombinedModifier 定义如下:
class CombinedModifier(
    internal val outer: Modifier,
    internal val inner: Modifier
) : Modifier {
	...
}
then函数如下:
interface Modifier {
	...
	infix fun then(other: Modifier): Modifier =
    	if (other === Modifier) this else CombinedModifier(this, other)
   	...
    companion object : Modifier {
        ...
        // 伴生对象的then返回传入的Modifier对象
        override infix fun then(other: Modifier): Modifier = other
    }
}
可以看到Modifier 接口的then返回的是CombinedModifier,其伴生对象的then返回的是传入的Modifier 。
例如 Modifier.size() 返回的是一个 SizeModifier,它是 LayoutModifier 的子类,而 LayoutModifier 实现了 Modifier.Element 接口
@Stable
fun Modifier.size(size: Dp) = this.then(
    SizeModifier(
       ...
    )
)
private class SizeModifier( ...) : LayoutModifier {
 	...
}
interface LayoutModifier : Modifier.Element {
	...
}
如果对 Modifier 连续调用then函数就会形成一个 Modifier 链条,例如如下代码:
Modifier
    .size(100.dp)
    .background(Color.Red)
    .padding(10.dp)
    .pointerInput(Unit) {
      ...
    }
会形成如下的链条:
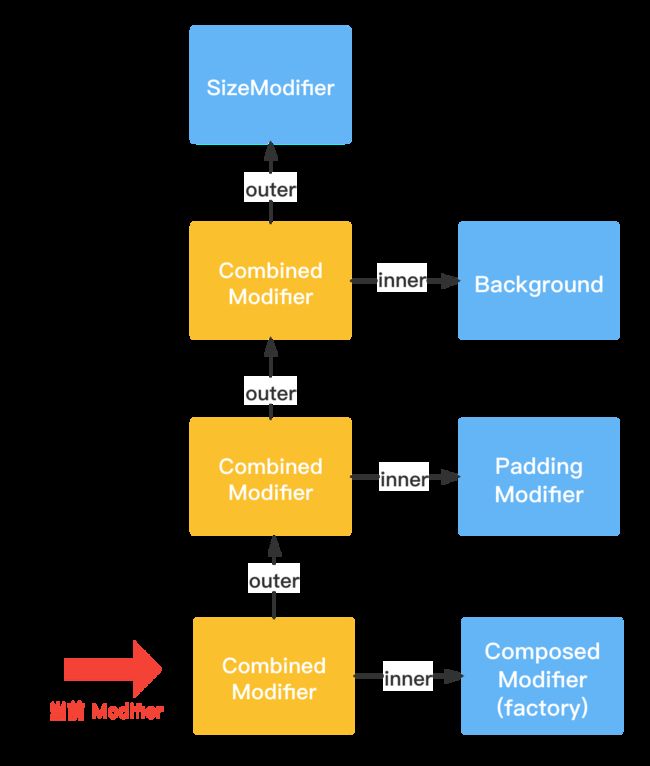
所以Modifier 链条本质上是一个通过CombinedModifier连接起来的Modifier.Element链表:
另外,在Modifier接口中有两个重要的操作方法:
interface Modifier {
    fun <R> foldIn(initial: R, operation: (R, Element) -> R): R
    fun <R> foldOut(initial: R, operation: (Element, R) -> R): R
}
Compose就是通过 foldIn() 与 foldOut() 专门来遍历 Modifier 链的,例如对于上面链条的代码执行 foldIn() 和 foldOut() :
- foldIn(): 正向遍历 Modifier 链,SizeModifier-> Background -> PaddingModifier -> ComposedModifier
- foldOut(): 反向遍历 Modifier 链, ComposedModifier -> PaddingModifier -> Background ->SizeModifier
通过跟踪源码可以发现,我们调用的所有Composable组件最终都是调用了一个叫Layout的Composable:
@Composable
@UiComposable
inline fun Layout(
    modifier: Modifier = Modifier,
    measurePolicy: MeasurePolicy
) {
    ...
    val materialized = currentComposer.materialize(modifier) // 重点
    ReusableComposeNode<ComposeUiNode, Applier<Any>>(
        factory = ComposeUiNode.Constructor,
        update = {
           ...
        },
    )
}
继续跟进 Composer.materialize() 可以发现源码中使用了 foldIn() 方法进行遍历:
fun Composer.materialize(modifier: Modifier): Modifier {
        ...
    val result = modifier.foldIn<Modifier>(Modifier) { acc, element ->
        acc.then(
            if (element is ComposedModifier) {
                val factory = element.factory as Modifier.(Composer, Int) -> Modifier
                val composedMod = factory(Modifier, this, 0) // 生产 Modifier
                materialize(composedMod) // 递归处理
            } else element
        )
    }
        ...
    return result
}
这里对 ComposedModifier 进行了特殊判断,因为 composed() 返回的 ComposedModifier 包含一个 可以构建 Modifier 的工厂函数 ,而这里想做的是将 Modifier 链中的所有 ComposedModifier 摊平,让其 factory 内部产生的 Modifier 也能加入到 Modifier 链中。
Modifier测量绘制原理初探
Compose通过ComposeView挂接到传统View视图体系中,ComposeView是一个ViewGroup,它的直接子View是一个AndroidComposeView对象(它也是一个ViewGroup),然后在AndroidComposeView中管理着一棵由LayoutNode组成的UI树,每个Composable最终都对应着LayoutNode树中的一个节点。

在Activity的onCreate方法中调用的setContent方法:
public fun ComponentActivity.setContent(
    parent: CompositionContext? = null,
    content: @Composable () -> Unit
) {
    val existingComposeView = window.decorView
        .findViewById<ViewGroup>(android.R.id.content)
        .getChildAt(0) as? ComposeView
    // 已存在ComposeView就直接调用其setContent方法,否则就创建一个
    if (existingComposeView != null) with(existingComposeView) {
        setParentCompositionContext(parent)
        setContent(content)
    } else ComposeView(this).apply {
        ...
        setContent(content) // 重点
        ...
        // 调用Activity的setContentView方法将自身添加进去
        setContentView(this, DefaultActivityContentLayoutParams)
    }
}
查看setContent方法,其中调用createComposition方法创建一个Composition对象来管理Compose的UI树:
class ComposeView @JvmOverloads constructor(
 	...
) : AbstractComposeView(context, attrs, defStyleAttr) {
    /**
     * Set the Jetpack Compose UI content for this view.
     * Initial composition will occur when the view becomes attached to a window or when
     * [createComposition] is called, whichever comes first.
     */
    fun setContent(content: @Composable () -> Unit) {
        shouldCreateCompositionOnAttachedToWindow = true
        this.content.value = content // 保存onCreate中setContent的lambda返回的Composable组件
        if (isAttachedToWindow) {
            createComposition() // 重点
        }
    }
}
在createComposition()方法中会调用ensureCompositionCreated()方法,实际上当ComposeView被首次创建时,并不会直接调用createComposition()方法,而是在onAttachedToWindow()方法中调用了ensureCompositionCreated()方法:
abstract class AbstractComposeView @JvmOverloads constructor(
    ...
) : ViewGroup(context, attrs, defStyleAttr) {
   override fun onAttachedToWindow() {
        super.onAttachedToWindow()
        previousAttachedWindowToken = windowToken
        if (shouldCreateCompositionOnAttachedToWindow) {
            ensureCompositionCreated()
        }
    }
 	fun createComposition() {
        ...
        ensureCompositionCreated()
	}
    private fun ensureCompositionCreated() {
        if (composition == null) {
            try {
                creatingComposition = true
                composition = setContent(resolveParentCompositionContext()) {
                    Content() // 返回保存的onCreate中填写的Composable组件
                }
            } finally {
                creatingComposition = false
            }
        }
    }
}
继续跟进这个在onAttachedToWindow()方法中的setContent方法,发现它是一个扩展函数:
// Wrapper.android.kt
internal fun AbstractComposeView.setContent(
    parent: CompositionContext,
    content: @Composable () -> Unit
): Composition {
    GlobalSnapshotManager.ensureStarted()
    // 创建AndroidComposeView添加到ComposeView当中,且AbstractComposeView只能有一个child
    val composeView =
        if (childCount > 0) {
            getChildAt(0) as? AndroidComposeView
        } else {
            removeAllViews(); null
        } ?: AndroidComposeView(context).also { addView(it.view, DefaultLayoutParams) }
    return doSetContent(composeView, parent, content)
}

private fun doSetContent(
    owner: AndroidComposeView,
    parent: CompositionContext,
    content: @Composable () -> Unit
): Composition {
    ...
    val original = Composition(UiApplier(owner.root), parent) // 创建Composition用来管理UI树
    val wrapped = ...
    wrapped.setContent(content)
    return wrapped
}
注意到,这里创建Composition时,传入了一个owner.root参数,从名字就可以猜出来,它就是整棵LayoutNode树的根节点:
	//AndroidComoseView.android.kt
    override val root = LayoutNode().also {
        it.measurePolicy = RootMeasurePolicy
        it.density = density
        // Composed modifiers cannot be added here directly
        it.modifier = Modifier
            .then(semanticsModifier)
            .then(rotaryInputModifier)
            .then(_focusManager.modifier)
            .then(keyInputModifier)
    }
	//AndroidComoseView.android.kt
	private val measureAndLayoutDelegate = MeasureAndLayoutDelegate(root)
	override fun onMeasure(widthMeasureSpec: Int, heightMeasureSpec: Int) {
	     ...
		 measureAndLayoutDelegate.updateRootConstraints(constraints) // 更新根节点的约束条件,同时会将root添加到relayoutNodes中
         measureAndLayoutDelegate.measureOnly()
         ...
 	}
 	override fun onLayout(changed: Boolean, l: Int, t: Int, r: Int, b: Int) {
        measureAndLayoutDelegate.measureAndLayout(resendMotionEventOnLayout) // 遍历relayoutNodes中的节点执行measureAndLayout
        ...
    }
代理类的measureAndLayout方法会遍历保存在其relayoutNodes集合中的每个节点(该集合保存了所有需要进行测量和布局的LayoutNode节点,包括root在内),然后执行其doRemeasure和place方法。
     // MeasureAndLayoutDelegate.kt
    fun measureAndLayout(onLayout: (() -> Unit)? = null): Boolean {
        performMeasureAndLayout {
            if (relayoutNodes.isNotEmpty()) {
                relayoutNodes.popEach { layoutNode ->
                    val sizeChanged = remeasureAndRelayoutIfNeeded(layoutNode)
                    ...
                }
            }
        }
        ...
    }
    private fun remeasureAndRelayoutIfNeeded(layoutNode: LayoutNode): Boolean {
        var sizeChanged = false
        ...
        sizeChanged = doRemeasure(layoutNode, constraints)
       	...
       	layoutNode.replace()
        ...
    }
Compose的测量绘制分为三个阶段:重组、布局、绘制

其中Layout阶段包含了我们在传统View中的测量和布局的概念,最后一步就是用Canvas进行绘制。
看一下 doRemeasure() 方法:
    // MeasureAndLayoutDelegate.kt
    private fun doRemeasure(layoutNode: LayoutNode, constraints: Constraints?): Boolean {
        val sizeChanged = if (constraints != null) {
            layoutNode.remeasure(constraints) // 重点
        } else {
            layoutNode.remeasure()
        }
        ...
    }
可以看到这里将约束条件传给了 layoutNode 中的 remeasure() 方法中:
	// LayoutNode.kt
	private val measurePassDelegate
        get() = layoutDelegate.measurePassDelegate
    internal val layoutDelegate = LayoutNodeLayoutDelegate(this)

    internal fun remeasure(
        constraints: Constraints? = layoutDelegate.lastConstraints
    ): Boolean {
        return if (constraints != null) {
            ...
            measurePassDelegate.remeasure(constraints) // 重点
        } else {
            false
        }
    }
    // LayoutNodeLayoutDelegate.kt
    inner class MeasurePassDelegate : Measurable, Placeable(), AlignmentLinesOwner {
    	...
    	remeasure(constraints)
    }
    fun remeasure(constraints: Constraints): Boolean {
        ...
        performMeasure(constraints)
        ...
    }
   private fun performMeasure(constraints: Constraints) {
        ...
        layoutNode.requireOwner().snapshotObserver.observeMeasureSnapshotReads(
            layoutNode,
            affectsLookahead = false
        ) {
            outerCoordinator.measure(constraints) // 重点
        }
        if (layoutState == LayoutState.Measuring) {
            markLayoutPending()
        }
    }
这里的outerCoordinator是LayoutNode中NodeChain中的对象:
internal class LayoutNodeLayoutDelegate(
    private val layoutNode: LayoutNode,
) {
    val outerCoordinator: NodeCoordinator
        get() = layoutNode.nodes.outerCoordinator
}
// LayoutNode.kt
internal val nodes = NodeChain(this)
NodeChain是一个链表结构,其中的head和tail分别是Modifier.Node类型:
// NodeChain.kt
internal class NodeChain(val layoutNode: LayoutNode) {
    internal val innerCoordinator = InnerNodeCoordinator(layoutNode)
    internal var outerCoordinator: NodeCoordinator = innerCoordinator
    internal val tail: Modifier.Node = innerCoordinator.tail
    internal var head: Modifier.Node = tail
    ....
}
其中的 NodeCoordinator 是用来辅助Ndode节点处理测量和布局的,其中包含measure和placeAt的方法逻辑。NodeChain链表上的每一个Node都会对应的绑定一个NodeCoordinator 对象来辅助处理。
那么NodeChain这个链表什么时候会被更新呢,我们可以在LayoutNode中看到其成员对象modifier的set方法被覆写了:
    // LayoutNode.kt
    override var modifier: Modifier = Modifier
        set(value) {
            ...
            field = value
            nodes.updateFrom(value)
 			...
        }
这里调用了NodeChain的updateFrom方法,该方法将根据Modifier链来更新对应的NodeChain,也就是说每当有Modifier对象被设置到LayoutNode上面时,都会调用updateFrom方法进行更新对应的NodeChain。
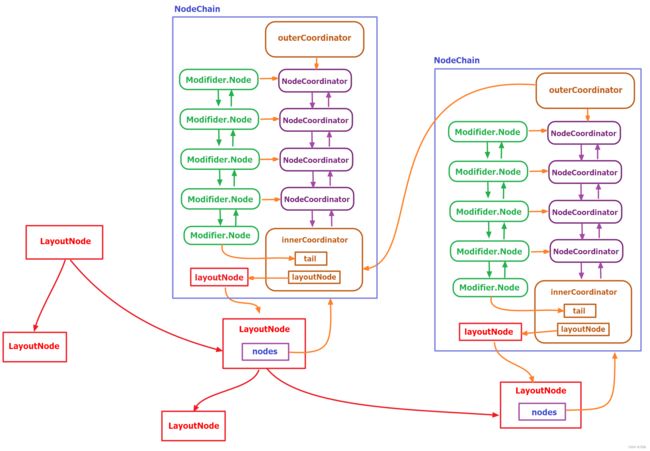
在updateFrom方法中,会调用Modifier.fillVector方法先将嵌套的Modifier按顺序进行展平成一个数组,随后根据展平结果将Modifier封装成Modifier.Node再串成一个双向链表。每个Composable对应的LayoutNode都拥有一个NodeChain链表,而NodeChain链表中的每个Modifier.Node节点都持有一个NodeCoordinator辅助对象。每当Modifier链更新时,会同步更新该链表,同时会同步每个Modifier.Node对应的NodeCoordinator。
Modifier.fillVector方法如下:
private fun Modifier.fillVector(
    result: MutableVector<Modifier.Element>
): MutableVector<Modifier.Element> {
    val stack = MutableVector<Modifier>(result.size).also { it.add(this) }
    while (stack.isNotEmpty()) {
        when (val next = stack.removeAt(stack.size - 1)) {
            is CombinedModifier -> {
                stack.add(next.inner)
                stack.add(next.outer)
            }
            is Modifier.Element -> result.add(next)
            else -> next.all {
                result.add(it)
                true
            }
        }
    }
    return result
}
注意,从1.3.0+版本开始,Compose中不再使用foldIn foldOut方法对Modifier进行遍历了,在1.3.0之前的版本LayoutNode源码中是通过foldOut遍历+头插法处理,而现在是通过fillVector方法处理达到类似的效果。
在进行测量时,Compose会遍历处理这个链表的每个Node对应的NodeCoordinator 的measure方法,对于布局也是类似,会调用placeAt方法。
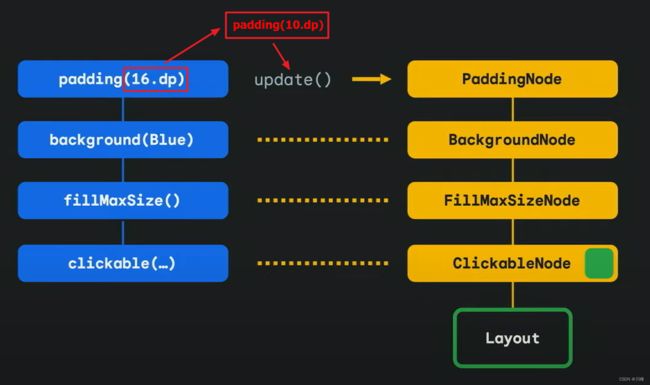
所以我们可以得到的结论是每个 Composable 组件最终对应一个 LayoutNode 节点,而每个 LayoutNode 节点则关联了一连串的 Modifier.Node 节点。
而 Modifier.Node 节点具体是以双向链表的形式挂到每一个 LayoutNode 节点上面的。
由于Modifier是以NodeChain链表的形式挂到LayoutNode上面的,所以在重组时,如果只是更改了Modifier属性,将只会更新该Modifier对应在NodeChain链表中的某个Node节点,而不是重建整个Node链。
Modifier链的顺序对结果的影响
首先我们要明确的一点是所有跟尺寸相关的Modifier修饰符只会影响 Compose 的布局阶段,而跟颜色背景形状相关的Modifier修饰符则只会影响 Compose 绘制阶段。

也就是说,我们可以将Modifier修饰符主要分成两类来看,LayoutModifier 和 DrawModifier (当然可以是其他的类型,这里以这两类为例)。前者影响尺寸大小,后者影响背景形状等。
对于 LayoutModifier 来说Modifier的执行顺序是按照从左到右,左边修饰符的尺寸将影响右边的修饰符。可组合对象的最终大小取决于作为参数传递的所有修饰符。修饰符将从左到右更新约束,然后从右到左返回大小。(如果左边的约束条件更加严格的话,则右边的尺寸将受到左边的约束)
例如来看如下代码的执行结果:
Box(Modifier.border(1.dp, Color.Red).size(32.dp).padding(8.dp).border(1.dp, Color.Blue))

首先会绘制一个32dp大小的红色边框,接着会将【32dp大小的约束】向右边传递,然后会在32dp的内部添加8dp的边距,接着将【32dp大小且8dp内边距的约束】继续传给Box组件,并在上面绘制出一个32dp-8dp*2=16dp大小的蓝色边框。
如果现在把 .size() 和 .padding() 的顺序交换一下:
Box(Modifier.border(1.dp, Color.Red).padding(8.dp).size(32.dp).border(1.dp, Color.Blue))

可以看到,结果是先应用了8dp的间距,在8dp的内部再显示了32dp大小的蓝色边框,或者可以理解为在32dp大小的基础之上添加了8dp的外间距,所以红色边框的大小是32dp+8dp*2=48dp。
对于 DrawModifier 来说,从执行顺序上看是从左到右,但生效结果的顺序是从右到左,是逆序的,即后执行的先生效。
但这样的顺序也有好处,来看下面这个例子:
@Composable
fun MyFancyButton(modifier: Modifier = Modifier) {
 Text(
   text = "Ok",
   modifier = modifier
     .clickable(onClick = { /*do something*/ })
     .background(Color.Blue, RoundedCornerShape(4.dp))
     .padding(8.dp)
 )
}
只要将modifier作为Composable的参数传入,当前组件就允许其父组件对其添加额外的Modifier属性来修饰,例如父组件额外设置一个padding,因为最后添加的Modifier属性会先生效,因此组件内部的边框不会受到外部的影响。
再来看几个例子,以加深理解
下面的调用链会先绘制红色背景,后绘制蓝色背景,因此后绘制的蓝色会盖住红色背景,所以最终效果是一个50dp大小的蓝色块:
Box(Modifier.background(Color.Red).background(Color.Blue).size(50.dp))

而下面的代码调用链的结果会是40dp的蓝色块盖在80dp的红色块之上:
Box(Modifier.background(Color.Red).requiredSize(80.dp).background(Color.Blue).requiredSize(40.dp))

如果将上面代码中的 requiredSize(80.dp) 和 requiredSize(40.dp) 对换位置:
Box(
    Modifier.background(Color.Gray).fillMaxSize(), // 规定父组件的大小才能看出效果
    contentAlignment = Alignment.Center
) {
	Box(Modifier.background(Color.Red).requiredSize(40.dp).background(Color.Blue).requiredSize(80.dp))
}
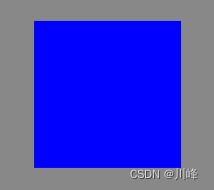
这将会得到一个80dp的蓝色块,这是因为requiredSize属性不会使用左边传入的constraints约束条件进行约束,该多大就是多大,因此是80dp的蓝色块盖在40dp的红色块之上。
如果此时再将requiredSize换成size:
Box(Modifier.background(Color.Red).size(40.dp).background(Color.Blue).size(80.dp))
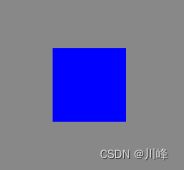
这将会得到一个40dp的蓝色块,因为此时左边的约束条件会传递给右边,而左边的约束条件更严格。或者从效果上也可以理解为是80dp的蓝色块上裁剪出一块40dp的大小。
OnRemeasuredModifier 和 OnPlacedModifier
OnRemeasuredModifier: Composable的remeasure方法执行完毕被回调,每次测量之后调用,可以用来获取测量后的尺寸大小。类比原生View的onMeasure()。
@Composable
fun OnRemeasuredModifierExample() {
    Box(
        Modifier.background(Color.Gray).size(200.dp),
        contentAlignment = Alignment.Center
    ) {
        Text(text = "AAAAAAAAAAAAdddddddddddddddddddddddddddddddddddddd",
            Modifier.then(object : OnRemeasuredModifier {
                override fun onRemeasured(size: IntSize) {
                    println(size)
                }
            })
        )
    }
}
可以使用Modifier.onSizeChanged来达到同样的效果,因为其内部就是基于OnRemeasuredModifier 封装实现的。
@Composable
fun OnRemeasuredModifierExample() {
    Box(
        Modifier.background(Color.Gray).size(200.dp),
        contentAlignment = Alignment.Center
    ) {
        Text(text = "BBBBBBBBBBBhhhhhhhhhhhhhh",
             Modifier.onSizeChanged { size ->
                  println(size)
             }
        )
    }
}
OnPlacedModifier: 可以拿到坐标、尺寸等信息,类比原生View的onLayout()。它与OnRemeasuredModifier相比,它获得的信息更全,但是OnRemeasuredModifier发生的更早。
@Composable
fun OnPlacedModifierExample() {
    Box(
        Modifier.background(Color.Gray).size(200.dp),
        contentAlignment = Alignment.Center
    ) {
        Text(text = "AAA",
            Modifier.onPlaced { layoutCoordinates ->
                val posInParent = layoutCoordinates.positionInParent()
                val posInWindow = layoutCoordinates.positionInWindow()
                val posInRoot = layoutCoordinates.positionInRoot()
                val size = layoutCoordinates.size
                val parentLayCoordinates = layoutCoordinates.parentLayoutCoordinates
                println("posInParent: $posInParent")
                println("posInWindow: $posInWindow")
                println("posInRoot: $posInRoot")
                println("size: $size")
                println("parentLayCoordinates.size: ${parentLayCoordinates?.size}")
            }
        )
    }
}
注意OnRemeasuredModifier和OnPlacedModifier都是用来获取通知的,并不是用来执行measure或layout操作,而是在这些操作执行完毕后被通知的。
OnGloballyPositionedModifier
当内容的全局位置可能发生变化时,会回调Modifier的 onGloballyPositioned 方法,并回传LayoutCoordinates 对象。注意,当坐标最终确定时,它将在组合之后被调用。
使用方式也很简单:
@Composable
fun MyComposable() {
    var text by remember { mutableStateOf("") }
    Column(modifier = Modifier
        .fillMaxWidth()
        .height(300.dp)
        .border(2.dp, Color.Red)
        .onGloballyPositioned {
            val positionInParent: Offset = it.positionInParent()
            val positionInRoot: Offset = it.positionInRoot()
            val positionInWindow: Offset = it.positionInWindow()
            text = "positionInParent: $positionInParent\n" +
                        "positionInRoot: $positionInRoot\n" +
                        "positionInWindow: $positionInWindow"
        }
    ) {
        Text(text = text)
    }
}
当LayoutCoordinates可用时,这个回调将至少被调用一次,并且每次元素在窗口中的位置发生变化时都会被调用。但是,不能保证在每次修改元素相对于屏幕的位置发生变化时都调用它。例如,系统可以在不触发回调的情况下移动窗口内的内容。如果您正在使用LayoutCoordinates来计算屏幕上的位置,而不仅仅是在窗口内,则可能不会收到回调。
ParentDataModifier
ParentDataModifier: 一个继承自Modifier.Element的接口,它是一个可以为父布局提供数据的修饰符。可以在测量和布局期间通过IntrinsicMeasurable.parentData 读取到设置的数据值。parentData 通常用于通知父类如何测量和定位子类布局。
interface ParentDataModifier : Modifier.Element {
    fun Density.modifyParentData(parentData: Any?): Any?
}
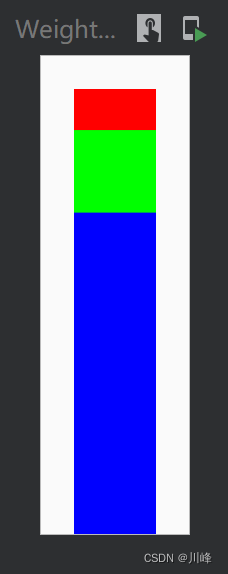
例如,以下代码利用ParentDataModifier实现了一个简易版的Row/Column中的weight属性效果:
// 自定义weight
interface VerticalScope {
    @Stable
    fun Modifier.weight(weight: Float) : Modifier
}
class WeightParentData(val weight: Float=0f) : ParentDataModifier {
    override fun Density.modifyParentData(parentData: Any?) = this@WeightParentData
}
object VerticalScopeInstance : VerticalScope {
    @Stable
    override fun Modifier.weight(weight: Float): Modifier = this.then(
        WeightParentData(weight)
    )
}

@Composable
fun WeightedVerticalLayout(
    modifier: Modifier = Modifier,
    content: @Composable VerticalScope.() -> Unit
) {
    val measurePolicy = MeasurePolicy { measurables, constraints ->
        val placeables = measurables.map {it.measure(constraints)}
        // 获取各weight值
        val weights = measurables.map {
            (it.parentData as WeightParentData).weight
        }
        val totalHeight = constraints.maxHeight
        val totalWeight = weights.sum()
        // 宽度:最宽的一项
        val width = placeables.maxOf { it.width }
        layout(width, totalHeight) {
            var y = 0
            placeables.forEachIndexed() { i, placeable ->
                placeable.placeRelative(0, y)
                // 按比例设置大小
                y += (totalHeight * weights[i] / totalWeight).toInt()
            }
        }
    }
    Layout({ VerticalScopeInstance.content() }, modifier, measurePolicy)
}

@Composable
fun WeightedVerticalLayoutExample() {
    WeightedVerticalLayout(Modifier.padding(16.dp).height(200.dp)) {
        Box(modifier = Modifier.width(40.dp).weight(1f).background(Color.Red))
        Box(modifier = Modifier.width(40.dp).weight(2f).background(Color.Green))
        Box(modifier = Modifier.width(40.dp).weight(7f).background(Color.Blue))
    }
}
@Preview(showBackground = true)
@Composable
fun WeightedVerticalLayoutExamplePreview() {
    WeightedVerticalLayoutExample()
}
运行效果:
参考资料:
- 图解Modifier
- Compose Modifiers deep dive
- ParentData
- 《Jetpack Compose从入门到实战》- 机械工业出版社 - 2022年9月
