Element-ui 动态Table表格
最近在做相关需求,感觉太多的重复代码,网上也很多这种动态的,写的很好,所以我借鉴了很多大佬的动态table表格,结合需求,完成了我自己需要的table。
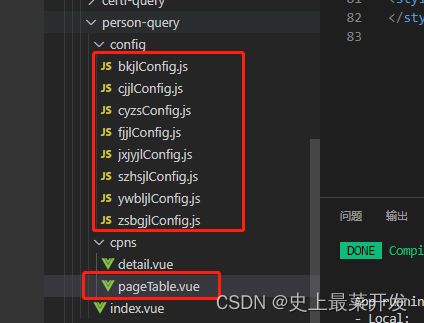
一、创建相关文件
1.config文件夹相关配置文件
2.一个用来配置的’pageTable.vue’文件

二、pageTable文件里面的内容
<template>
  <div class="container">
    <el-table :data="tableData" border style="width: 100%">
    <!-- 这里是否要添加前面的序号123456 -->
      <el-table-column label="序号" type="index" width="50" fixed="left"></el-table-column>
      <div v-for="(col, index) in cols" :key="index">
      <!-- 这里判断是什么类型 -->
        <template v-if="col.type == 'input'">
          <el-table-column
            :prop="col.prop"
            :label="col.label"
            :width="col.width"
            align="center"
            show-overflow-tooltip
          >
          </el-table-column>
        </template>
        <!-- 这里用了字典 -->
        <template v-else-if="col.type == 'select'">
          <el-table-column
            :prop="col.prop"
            :label="col.label"
            :width="col.width"
            align="center"
            show-overflow-tooltip
          >
            <template slot-scope="scope">
              <template v-for="(item, index) in dictObj[col.dict]" >
                <span :key="index" v-if="scope.row[col.prop] == item.code">{{ item.name }}</span>
              </template>
            </template>
          </el-table-column>
        </template>
        <template v-else-if="col.type == 'datePicker'">
          <el-table-column
            :prop="col.prop"
            :label="col.label"
            :width="col.width"
            align="center"
            show-overflow-tooltip
          >
          <template slot-scope="scope">
            <span v-if="scope.row[col.prop]">{{ scope.row[col.prop].split(" ")[0] }}</span>
          </template>
          </el-table-column>
        </template>
      </div>
      <!-- 这里可以根据需看有没有需要操作按钮的 -->
      <el-table-column
      fixed="right"
      label="操作"
      width="100">
      <template slot-scope="scope">
        <el-button @click="handleClick(scope.row)" type="text" size="small">查看</el-button>
        <el-button type="text" size="small">编辑</el-button>
      </template>
    </el-table-column>
    </el-table>
  </div>
</template>

<script>
import { mapState } from "vuex";
export default {
  name: "pageTable",
  props: {
  	// 接收展示数据
    tableData: {
      type: Array,
      default() {
        return [];
      },
    },
    // 接收配置项的数据
    cols: {
      type: Array,
      default() {
        return [];
      },
    },
  },
  data() {
    return {};
  },
  computed: {
  // 我这里是要用到字段,所以引入了vuex
    ...mapState({
      dictObj: (state) => state.dictionaryValueManagement.dictObj,
    }),
  },
  methods: {
      handleClick(row) {
        console.log(row);
      }
    },
};
</script>
三、配置项config相关
其实table 表格里面的align也可以动态,我这里偷懒了,直接在pageTable写死居中了
export const bkjlConfig = {
  cols: [
    {
      width: '150',  // 宽度
      type: 'select',  // 类型
      prop: 'manageposttype',  // prop接收数据
      label: '分期', // label名
      dict: 'manageposttype'  //  匹配是哪一个字典
    },
    {
      width: '200',
      type: 'input',
      prop: 'issuingauthority',
      label: '机构',
    },
    {
      width: '150',
      type: 'select',
      prop: 'manageposttype',
      label: '岗位类别',
      dict: 'manageposttype'
    },
    {
      width: '200',
      type: 'select',
      prop: 'careertreecode',
      label: '岗位名称',
      dict: 'careertreecode'
    },
    {
      width: '150',
      type: 'datePicker',
      prop: 'manageposttype',
      label: '报名时间',
    },
    {
      width: '150',
      type: 'select',
      prop: 'validStatus',
      label: '审核状态',
      dict: 'validStatus'
    },
    {
      width: '',
      type: 'input',
      prop: 'appliConditions',
      label: '详细信息',
    },
  ]
}
四、在需要的地方使用
<!-- 我就不显示那么多了 -->
 <div class="pageContainerCon">
      <el-collapse v-model="activeNames" @change="handleChange">
        <el-collapse-item title="从业证书" name="1">
          <PageTable :tableData="tableData1" :cols="cyzsConfig.cols"></PageTable>
        </el-collapse-item>
        <el-collapse-item title="报考记录" name="2">
          <PageTable :tableData="tableData7" :cols="bkjlConfig.cols"></PageTable>
        </el-collapse-item>
        <el-collapse-item title="业务办理记录" name="3">
          <PageTable
            :tableData="tableData1"
            :cols="ywbljlConfig.cols"
          ></PageTable>
        </el-collapse-item>
        <el-collapse-item title="证书变更记录" name="4">
          <PageTable
            :tableData="tableData1"
            :cols="zsbgjlConfig.cols"
          ></PageTable>
        </el-collapse-item>
      </el-collapse>
    </div>
<script>
import PageTable from "./pageTable.vue";
import { cyzsConfig } from "../config/cyzsConfig.js";
import { bkjlConfig } from "../config/bkjlConfig.js";
import { jxjyjlConfig } from "../config/jxjyjlConfig.js";
import { mapState } from "vuex";

export default {
  name: "Detail",
  components: {
    PageTable,
  },
  props: {
    ryid: {
      type: String,
      default() {
        return "";
      },
    },
  },
  data() {
    return {
      formData: {},
      xlForm: {},
      activeNames: ["1", "2", "3", "4", "5", "6", "7", "8"],
      url: "https://fuss10.elemecdn.com/e/5d/4a731a90594a4af544c0c25941171jpeg.jpeg",
      tableData: [],
      tableData1: [],
      tableData5:[],
      tableData7:[],
      cyzsConfig: cyzsConfig,
      bkjlConfig: bkjlConfig,
      jxjyjlConfig: jxjyjlConfig,

    };
  },
  computed: {
    ...mapState({
      dictObj: (state) => state.dictionaryValueManagement.dictObj,
    }),
  },
  methods: {
    handleChange(val) {
      console.log(val);
    },
  },
};
</script>
大概就是这么用吧,可能后续有继续优化更新。