k8s安装
一、准备步骤:
步骤1.关闭三台设备selinux和设置防火墙
selinux需要将修改/etc/selinux/config文件,将SELINUX设置为disable;
# This file controls the state of SELinux on the system.
# SELINUX= can take one of these three values:
#     enforcing - SELinux security policy is enforced.
#     permissive - SELinux prints warnings instead of enforcing.
#     disabled - No SELinux policy is loaded.
SELINUX=disabled
# SELINUXTYPE= can take one of three two values:
#     targeted - Targeted processes are protected,
#     minimum - Modification of targeted policy. Only selected processes are protected.
#     mls - Multi Level Security protection.
SELINUXTYPE=targeted
关闭防火墙
步骤2.修改hosts文件,保证三台设备能够通过域名访问
vim /etc/hosts 尾部加入
172.20.10.8 node1
172.20.10.11 node2
172.20.10.10 node3
步骤3:三台设备上关闭SWAP
swapoff -a ; sed -i '/swap/d' /etc/fstab
步骤4:三台设备配置yum源
wget ftp://ftp.rhce.cc/k8s/* -P /etc/yum.repos.d/
我还做了一步这个
iptables -F && iptables -t nat -F && iptables -t mangle -F && iptables -X二、安装Docker,作为kubernetes的runtime:
步骤1:在三台设备上安装docker-ce版本,并启动
yum install docker-ce -y

systemctl enable docker --now
我没做这步操作,我之前就已经安装好了docker了
步骤2:设置镜像加速器,使用阿里云的即可
cat > /etc/docker/daemon.json <三、K8S安装
步骤1:三台设备上设置iptables相关属性
设置系统参数:设置允许路由转发,不对bridge的数据进行处理
cat < /etc/sysctl.d/k8s.conf
net.bridge.bridge-nf-call-ip6tables = 1
net.bridge.bridge-nf-call-iptables = 1
net.ipv4.ip_forward = 1
EOF
步骤2:三台设备上安装K8s,并启动服务
yum install -y kubelet-1.21.0-0 kubeadm-1.21.0-0 kubectl-1.21.0-0 --disableexcludes=kubernetes

systemctl restart kubelet ; systemctl enable kubelet
通过如下命令可以查看有哪些版本的k8s
yum list --showduplicates kubeadm --disableexcludes=kubernetes
这里Node2 3都执行成功了,但是node1报错了。报错内容如下
从 https://mirrors.aliyun.com/kubernetes/yum/doc/yum-key.gpg 检索密钥
kubernetes/signature                                                                | 1.4 kB  00:00:00 !!!
https://mirrors.aliyun.com/kubernetes/yum/repos/kubernetes-el7-x86_64/repodata/repomd.xml: [Errno -1] repomd.xml signature could not be verified for kubernetes
正在尝试其它镜像。


 One of the configured repositories failed (Kubernetes),
 and yum doesn't have enough cached data to continue. At this point the only
 safe thing yum can do is fail. There are a few ways to work "fix" this:

     1. Contact the upstream for the repository and get them to fix the problem.

     2. Reconfigure the baseurl/etc. for the repository, to point to a working
        upstream. This is most often useful if you are using a newer
        distribution release than is supported by the repository (and the
        packages for the previous distribution release still work).

     3. Run the command with the repository temporarily disabled
            yum --disablerepo=kubernetes ...

     4. Disable the repository permanently, so yum won't use it by default. Yum
        will then just ignore the repository until you permanently enable it
        again or use --enablerepo for temporary usage:

            yum-config-manager --disable kubernetes
        or
            subscription-manager repos --disable=kubernetes

     5. Configure the failing repository to be skipped, if it is unavailable.
        Note that yum will try to contact the repo. when it runs most commands,
        so will have to try and fail each time (and thus. yum will be be much
        slower). If it is a very temporary problem though, this is often a nice
        compromise:

            yum-config-manager --save --setopt=kubernetes.skip_if_unavailable=true

failure: repodata/repomd.xml from kubernetes: [Errno 256] No more mirrors to try.
https://mirrors.aliyun.com/kubernetes/yum/repos/kubernetes-el7-x86_64/repodata/repomd.xml: [Errno -1] repomd.xml signature could not be verified for kubernetes
处理报错的办法
编辑 /etc/yum.repos.d/k8s.repo 文件
修改一下参数:
repo_gpgcheck=0
然后重试yum update,就解决了。
这边是禁用了GPG key的验证机制。
步骤3:在master上初始化集群(这里node1是master)
方法一
在master上的核心组件,例如api-server、scheduler、kubelet、etcd、scheduler等都是以容器的方式运行,由于默认的国外镜像站点可能无法访问,所以这里修改为阿里云镜像下载,同时需要指定版本和pod的网段地址:
kubeadm init --kubernetes-version=v1.21.0 \
--apiserver-advertise-address=172.20.10.8 \
--image-repository registry.aliyuncs.com/google_containers \
--service-cidr=10.1.0.0/16 \
--pod-network-cidr=10.244.0.0/16
kubernetes-version:具体安装的实际版本;apiserver-advertise-address:master机器的IP
遇到报错1
error execution phase preflight: [preflight] Some fatal errors occurred:
	[ERROR NumCPU]: the number of available CPUs 1 is less than the required 2
	[ERROR Mem]: the system RAM (972 MB) is less than the minimum 1700 MB
	[ERROR CRI]: container runtime is not running: output: fatal error: runtime: out of memory
CPU至少改成2(我这里是虚拟机)
遇到报错2
[preflight] Pulling images required for setting up a Kubernetes cluster
[preflight] This might take a minute or two, depending on the speed of your internet connection
[preflight] You can also perform this action in beforehand using 'kubeadm config images pull'
error execution phase preflight: [preflight] Some fatal errors occurred:
	[ERROR ImagePull]: failed to pull image registry.aliyuncs.com/google_containers/coredns/coredns:v1.8.0: output: Error response from daemon: pull access denied for registry.aliyuncs.com/google_containers/coredns/coredns, repository does not exist or may require 'docker login': denied: requested access to the resource is denied
, error: exit status 1
[preflight] If you know what you are doing, you can make a check non-fatal with `--ignore-preflight-errors=...`
To see the stack trace of this error execute with --v=5 or higher
自己用docker把他拉下来打标成k8s要的格式
docker pull coredns/coredns查看docker拉下来的镜像
docker images | grep coredns打标签,修改名称
docker tag coredns/coredns:latest registry.aliyuncs.com/google_containers/coredns/coredns:v1.8.0删除多余镜像
docker rmi coredns/coredns:latest然后重新执行init命令
成功后能看到。把这个记下来,workernode加入的时候就是执行这个
kubeadm join 172.20.10.8:6443 --token h1m3yu.gogvg6fbuszmrcf9 \
	--discovery-token-ca-cert-hash sha256:d31af86b367811c348c34a107ad116c72565b1626042902f9cd2ae77155255be
执行docker images看一下是不是k8s要的镜像都下来了
方法二
这是最后搞不起,我全部删了重来用的方法。发现真香。
1.在所有节点重置k8s
kubeadm reset
2.在所有节点删除kubectl
rm -fr ~/.kube/
3.在所有节点启用ipvs
modprobe -- ip_vs
modprobe -- ip_vs_rr
modprobe -- ip_vs_wrr
modprobe -- ip_vs_sh
modprobe -- nf_conntrack_ipv4
4.在master节点导出并修改配置文件
cd /app/k8s/
kubeadm config print init-defaults --kubeconfig ClusterConfiguration > kubeadm.yml
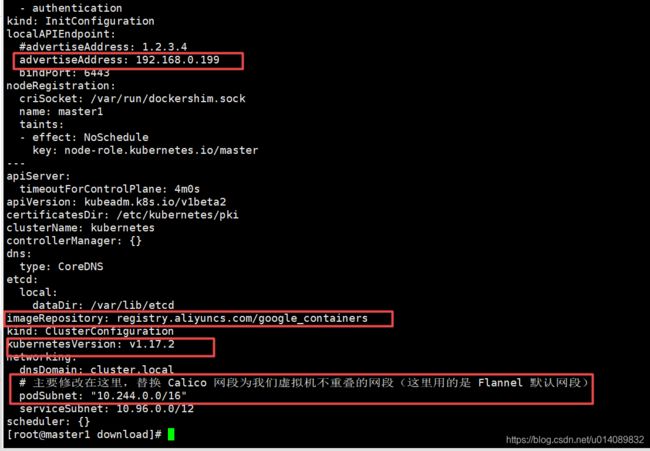
主要修改配置文件的几个属性:advertiseAddress imageRepository kubernetesVersion podSubnet
name: node1 这个是改成自己master机器得hostname
5.kubeadm 初始化
kubeadm init --config=kubeadm.yml
步骤4:在master上创建k8s认证文件
上一步初始化完成后会有提示信息
Your Kubernetes control-plane has initialized successfully!

To start using your cluster, you need to run the following as a regular user:

  mkdir -p $HOME/.kube
  sudo cp -i /etc/kubernetes/admin.conf $HOME/.kube/config
  sudo chown $(id -u):$(id -g) $HOME/.kube/config

Alternatively, if you are the root user, you can run:

  export KUBECONFIG=/etc/kubernetes/admin.conf

You should now deploy a pod network to the cluster.
Run "kubectl apply -f [podnetwork].yaml" with one of the options listed at:
  https://kubernetes.io/docs/concepts/cluster-administration/addons/

Then you can join any number of worker nodes by running the following on each as root:

kubeadm join 172.20.10.8:6443 --token abcdef.0123456789abcdef --discovery-token-ca-cert-hash sha256:6ba467e705abb23d8350d0e768b5bf6c0634d650e69b9d3aec58908a458e8bbf
我先用root用户执行了那个export
然后转成普通用户执行
  mkdir -p $HOME/.kube
  sudo cp -i /etc/kubernetes/admin.conf $HOME/.kube/config
  sudo chown $(id -u):$(id -g) $HOME/.kube/config
验证是否成功
kubectl get node步骤5:两台worker noeds加入集群
在node2和node3执行这个命令
kubeadm join 172.20.10.8:6443 --token h1m3yu.gogvg6fbuszmrcf9 --discovery-token-ca-cert-hash sha256:d31af86b367811c348c34a107ad116c72565b1626042902f9cd2ae77155255be 完成后在master节点也就是Node1上执行能看到有node2和node3了
kubectl get nodes查看kubelet日志
journalctl -xeu kubelet 或者
vi /var/log/messagesjoin时遇到报错3
Unfortunately, an error has occurred:
	timed out waiting for the condition

This error is likely caused by:
	- The kubelet is not running
	- The kubelet is unhealthy due to a misconfiguration of the node in some way (required cgroups disabled)

If you are on a systemd-powered system, you can try to troubleshoot the error with the following commands:
	- 'systemctl status kubelet'
	- 'journalctl -xeu kubelet'
error execution phase kubelet-start: timed out waiting for the condition
这其实就是在说kubelet启动不起来。原因有很多种。恶心死了。
原因是1:基础镜像pause的拉取地址需要单独设置,否则还是会从k8s.gcr.io来拉取,导致init的时候卡住,并最终失败。
解决方案:
打一个k8s.gcr.io/pause:3.1的Tag
docker pull registry.aliyuncs.com/google_containers/pause:3.1docker tag registry.aliyuncs.com/google_containers/pause:3.1 k8s.gcr.io/pause:3.1
然后docker rmi 删除掉不要的那个
遇到报错
[WARNING IsDockerSystemdCheck]: detected "cgroupfs" as the Docker cgroup driver. The recommended driver is "systemd". Please follow the guide at https://kubernetes.io/docs/setup/cri/解决方法:
编辑docker配置文件/etc/docker/daemon.json
加入"exec-opts": ["native.cgroupdriver=systemd"]
变成这样:
重启docker
systemctl daemon-reload
systemctl restart docker
设置完成后执行命令可以看到Cgroup Driver为systemd
docker info | grep Cgroup
然后重启kubelet
systemctl restart kubelet
查看是否重启好了
systemctl status kubelet -l
注意,这里节点修改了daemon.json后,导致kubelet和docker的驱动程序不一致,导致kubelet启动不起来。需要修改vi /var/lib/kubelet/kubeadm-flags.env将kubelet和docker 的驱动程序改成一致。
KUBELET_KUBEADM_ARGS="--cgroup-driver=systemd --network-plugin=cni --pod-infra-container-image=registry.aliyuncs.com/google_containers/pause:3.4.1"注意,修改kubelet的驱动用systemd只需要在master节点上面改,worker上面是不需要改的,master是systemd,那worker在join的时候只需要把docker的配置改成systemd就行了。
重启
systemctl daemon-reload
systemctl restart kubelet
遇到报错4
error execution phase preflight: [preflight] Some fatal errors occurred:
	[ERROR FileAvailable--etc-kubernetes-kubelet.conf]: /etc/kubernetes/kubelet.conf already exists
	[ERROR FileAvailable--etc-kubernetes-pki-ca.crt]: /etc/kubernetes/pki/ca.crt already exists
[preflight] If you know what you are doing, you can make a check non-fatal with `--ignore-preflight-errors=...`
To see the stack trace of this error execute with --v=5 or higher
在节点上先执行kubeadm reset命令,清理kubeadm的操作,然后再重新执行join 命令
join时遇到报错5
[kubelet-check] Initial timeout of 40s passed.
[kubelet-check] It seems like the kubelet isn't running or healthy.
[kubelet-check] The HTTP call equal to 'curl -sSL http://localhost:10248/healthz' failed with error: Get "http://localhost:10248/healthz": dial tcp [::1]:10248: connect: connection refused.
[kubelet-check] It seems like the kubelet isn't running or healthy.
[kubelet-check] The HTTP call equal to 'curl -sSL http://localhost:10248/healthz' failed with error: Get "http://localhost:10248/healthz": dial tcp [::1]:10248: connect: connection refused.
[kubelet-check] It seems like the kubelet isn't running or healthy.
[kubelet-check] The HTTP call equal to 'curl -sSL http://localhost:10248/healthz' failed with error: Get "http://localhost:10248/healthz": dial tcp [::1]:10248: connect: connection refused.
[kubelet-check] It seems like the kubelet isn't running or healthy.
[kubelet-check] The HTTP call equal to 'curl -sSL http://localhost:10248/healthz' failed with error: Get "http://localhost:10248/healthz": dial tcp [::1]:10248: connect: connection refused.
[kubelet-check] It seems like the kubelet isn't running or healthy.
[kubelet-check] The HTTP call equal to 'curl -sSL http://localhost:10248/healthz' failed with error: Get "http://localhost:10248/healthz": dial tcp [::1]:10248: connect: connection refused.
也是因为没启动好,需要看日志。我遇到的情况是worker在join的时候报这个错:
一个原因是master是systemd的,worker需要把docker改成systemd。
另一个原因是要把master上的 /etc/cni/net.d 目录下的文件拷贝到有问题的节点上:
scp server4:/etc/cni/net.d/* /etc/cni/net.d/
也尝试过解决方法:
修改文件/usr/lib/systemd/system/kubelet.service.d/10-kubeadm.conf文件(并且再在/etc/systemd/system/kubelet.service.d下加一个一摸一样的文件)
加入
Environment="KUBELET_SYSTEM_PODS_ARGS=--pod-manifest-path=/etc/kubernetes/manifests --allow-privileged=true --fail-swap-on=false"systemctl daemon-reload
systemctl restart kubelet
屁用没用。
步骤6:让集群ready
在master上执行kubectl get nodes可以看到
最开始看到的是NotReady,原因是各个Pod之间无法通信,需要安装CNI网络插件,它才会变成ready
这里安装calico:
mkdir -p /app/k8s/
cd /app/k8s
wget https://docs.projectcalico.org/v3.10/manifests/calico.yamlvi calico.yaml
搜索192.168.0.0,修改为初始化集群时pod的10.244.0.0/16:
- name: CALICO_IPV4POOL_CIDR value: "10.244.0.0/16"calico.yaml 文件添加以下二行
   - name: IP_AUTODETECTION_METHOD
     value: "interface=ens33"  # ens 根据实际网卡开头配置,支持正则表达式
配置示例如下
            - name: CLUSTER_TYPE
              value: "k8s,bgp"
            - name: IP_AUTODETECTION_METHOD
              value: "interface=ens33"
            # Auto-detect the BGP IP address.
            - name: IP
              value: "autodetect"
            # Enable IPIP
            - name: CALICO_IPV4POOL_IPIP
              value: "Always"
修改保存后在master设备上使用如下命令安装calico
kubectl apply -f calico.yaml
安装完成后kubectl get nodes查看重新查看noeds状态可以看到STATUS为Ready.
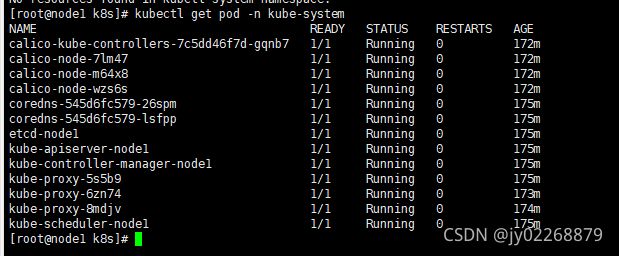
kubectl get pod --all-namespaces
这里发现有两个coredns用不了,ready是0
查看一下这个pod启动不了的原因
kubectl describe pods -n kube-system coredns-545d6fc579-26spmEvents:
Type Reason Age From Message
---- ------ ---- ---- -------
Normal Scheduled 9m41s default-scheduler Successfully assigned kube-system/coredns-545d6fc579-26spm to node1
Warning FailedCreatePodSandBox 9m40s kubelet Failed to create pod sandbox: rpc error: code = Unknown desc = [failed to set up sandbox container "2477eab022533dc31bd14cac85a1e528e6f5fc7e1897ecf2ebdbf0dbb7762783" network for pod "coredns-545d6fc579-26spm": networkPlugin cni failed to set up pod "coredns-545d6fc579-26spm_kube-system" network: error getting ClusterInformation: Get https://[10.96.0.1]:443/apis/crd.projectcalico.org/v1/clusterinformations/default: x509: certificate signed by unknown authority (possibly because of "crypto/rsa: verification error" while trying to verify candidate authority certificate "kubernetes"), failed to clean up sandbox container "2477eab022533dc31bd14cac85a1e528e6f5fc7e1897ecf2ebdbf0dbb7762783" network for pod "coredns-545d6fc579-26spm": networkPlugin cni failed to teardown pod "coredns-545d6fc579-26spm_kube-system" network: error getting ClusterInformation: Get https://[10.96.0.1]:443/apis/crd.projectcalico.org/v1/clusterinformations/default: x509: certificate signed by unknown authority (possibly because of "crypto/rsa: verification error" while trying to verify candidate authority certificate "kubernetes")]
Normal SandboxChanged 7m15s (x12 over 9m40s) kubelet Pod sandbox changed, it will be killed and re-created.
Normal Pulled 7m14s kubelet Container image "registry.aliyuncs.com/google_containers/coredns/coredns:v1.8.0" already present on machine
Normal Created 7m14s kubelet Created container coredns
Normal Started 7m14s kubelet Started container coredns
Warning Unhealthy 4m31s (x18 over 7m13s) kubelet Readiness probe failed: HTTP probe failed with statuscode: 503
能够看到它是启动好了的,是running,但是 Readiness probe failed: HTTP probe failed with statuscode: 503
主要报错信息为:活动探测失败:HTTP探测失败,状态码为:503 这个信息对我来说完全没用
查看pod的日志,输入”kubectl logs -f coredns-545d6fc579-26spm -n kube-system“命令:
E0906 03:59:02.443437       1 reflector.go:138] pkg/mod/k8s.io/[email protected]/tools/cache/reflector.go:167: Failed to watch *v1.EndpointSlice: failed to list *v1.EndpointSlice: endpointslices.discovery.k8s.io is forbidden: User "system:serviceaccount:kube-system:coredns" cannot list resource "endpointslices" in API group "discovery.k8s.io" at the cluster scope
[INFO] plugin/ready: Still waiting on: "kubernetes"
[INFO] plugin/ready: Still waiting on: "kubernetes"
[INFO] plugin/ready: Still waiting on: "kubernetes"
[INFO] plugin/ready: Still waiting on: "kubernetes"
[INFO] plugin/ready: Still waiting on: "kubernetes"
[INFO] plugin/ready: Still waiting on: "kubernetes"
E0906 03:59:55.023149       1 reflector.go:138] pkg/mod/k8s.io/[email protected]/tools/cache/reflector.go:167: Failed to watch *v1.EndpointSlice: failed to list *v1.EndpointSlice: endpointslices.discovery.k8s.io is forbidden: User "system:serviceaccount:kube-system:coredns" cannot list resource "endpointslices" in API group "discovery.k8s.io" at the cluster scope
这是coredns的一个bug, 需要修改coredns角色权限。使用下面命令进行编辑
kubectl edit clusterrole system:coredns编辑内容如下,可以在最后面追加
- apiGroups:
  - discovery.k8s.io
  resources:
  - endpointslices
  verbs:
  - list
  - watch
查看pod
kubectl get pod -n kubctl-system终于搞好了,这里卡了我几天。我还是FQ找到解决方法的。见鬼了真是。
查看集群各组件状态
kubectl get cs这里又扯精儿了。哎。
修改kube-scheduler.yaml文件和kube-controller-manager.yaml文件,把里面的port=0注释掉
vi /etc/kubernetes/manifests/kube-scheduler.yaml
vi /etc/kubernetes/manifests/kube-controller-manager.yaml
每台master重启kubelet
systemctl restart kubelet.service
再查看状态
kubectl get cs
还是一样的问题没解决。靠


