【实战】CentOS7.9配置DNS服务器
最近想整个DNS服务器玩玩,让解析网站稍微快一点,之前搞的Windows Server,但是感觉这个太重量级了,简单是简单但是占用的资源比较大,而且服务器一般都是Linux系统,这回我就想在CentOS上整一把,虽然CSDN上类似的文章很多,但是很多文章要么就是太旧了,要么就是搞得太复杂,我决定再重写一篇,尽量言简意赅。
主要参考:https://www.linuxidc.com/Linux/2019-03/157277.htm
1、安装DNS服务器——Bind(Berkeley Internet Name Domain)
在root权限下输入:
yum -y install bind
2、进入/etc下,找到named.conf并编辑(如果没有vim请自行安装)
vim /etc/named.conf
需要修改:(左边是修改好的,右边是原来的,作用是让这个DNS服务器让所有电脑都能使用访问)
完整配置如下:
//
// named.conf
//
// Provided by Red Hat bind package to configure the ISC BIND named(8) DNS
// server as a caching only nameserver (as a localhost DNS resolver only).
//
// See /usr/share/doc/bind*/sample/ for example named configuration files.
//
// See the BIND Administrator's Reference Manual (ARM) for details about the
// configuration located in /usr/share/doc/bind-{version}/Bv9ARM.html

options {
	listen-on port 53 { any; };
	listen-on-v6 port 53 { any; };
	directory 	"/var/named";
	dump-file 	"/var/named/data/cache_dump.db";
	statistics-file "/var/named/data/named_stats.txt";
	memstatistics-file "/var/named/data/named_mem_stats.txt";
	recursing-file  "/var/named/data/named.recursing";
	secroots-file   "/var/named/data/named.secroots";
	allow-query     { any; };

	/*
	 - If you are building an AUTHORITATIVE DNS server, do NOT enable recursion.
	 - If you are building a RECURSIVE (caching) DNS server, you need to enable
	   recursion.
	 - If your recursive DNS server has a public IP address, you MUST enable access
	   control to limit queries to your legitimate users. Failing to do so will
	   cause your server to become part of large scale DNS amplification
	   attacks. Implementing BCP38 within your network would greatly
	   reduce such attack surface
	*/
	recursion yes;

	dnssec-enable yes;
	dnssec-validation yes;

	/* Path to ISC DLV key */
	bindkeys-file "/etc/named.root.key";

	managed-keys-directory "/var/named/dynamic";

	pid-file "/run/named/named.pid";
	session-keyfile "/run/named/session.key";
};

logging {
        channel default_debug {
                file "data/named.run";
                severity dynamic;
        };
};

zone "." IN {
	type hint;
	file "named.ca";
};

include "/etc/named.rfc1912.zones";
include "/etc/named.root.key";
3、定下自己的域名,以及需要绑定的IP
我需要绑定的IP:192.168.0.211,这里面是一个Nginx服务器,后面用${ip}代替
需要绑定的域名是:dctant.com,后面用${domain}来代替。
4、创建.zone文件
创建一个名为named.${domain}.com.zone这个文件,我这边叫named.dctant.com.zone,具体为什么要这么命名,我也是参考网上的,算一个命名规范吧,事实上随便怎么命名都行,但是最好按规范来。
填入以下内容:
$TTL 1D
@       IN SOA  ${domain}. admin.${domain} (
                                        0       ; serial
                                        1D      ; refresh
                                        1H      ; retry
                                        1W      ; expire
                                        3H )    ; minimum
@       IN      NS      ns1.${domain}.
ns1     IN      A       ${ip}
www     IN      A       ${ip}
这里各个参数的具体含义请看我文章起始处的参考链接,里面有说明,这里由于篇幅所限就不介绍了。
注意:这里的${domain}和${ip}替换为自己的域名和IP,建议使用编辑器全局替换,而不是自己一个个改!!
5、上传这个文件到/etc目录下
将这个文件上传到/etc目录下
6、编辑/etc/named.rfc1912.zones这个文件
在结尾添加一段
zone "${domain}" IN {
        type master;
        file "/etc/named.${domain}.zone";
        allow-update { none; };
};
这样你刚才创建的named.${domain}.com.zone这个文件就和DNS服务器的配置文件关联上了。
还是这句话,记得替换${domain}和${ip}为自己的域名和IP!
完整的/etc/named.rfc1912.zones文件如下:
// named.rfc1912.zones:
//
// Provided by Red Hat caching-nameserver package
//
// ISC BIND named zone configuration for zones recommended by
// RFC 1912 section 4.1 : localhost TLDs and address zones
// and http://www.ietf.org/internet-drafts/draft-ietf-dnsop-default-local-zones-02.txt
// (c)2007 R W Franks
//
// See /usr/share/doc/bind*/sample/ for example named configuration files.
//

zone "localhost.localdomain" IN {
	type master;
	file "named.localhost";
	allow-update { none; };
};

zone "localhost" IN {
	type master;
	file "named.localhost";
	allow-update { none; };
};

zone "1.0.0.0.0.0.0.0.0.0.0.0.0.0.0.0.0.0.0.0.0.0.0.0.0.0.0.0.0.0.0.0.ip6.arpa" IN {
	type master;
	file "named.loopback";
	allow-update { none; };
};

zone "1.0.0.127.in-addr.arpa" IN {
	type master;
	file "named.loopback";
	allow-update { none; };
};

zone "0.in-addr.arpa" IN {
	type master;
	file "named.empty";
	allow-update { none; };
};

zone "${domain}" IN {
        type master;
        file "/etc/named.${domain}.zone";
        allow-update { none; };
};
7、启动DNS服务器
输入命令:
systemctl start named.service
查看DNS服务器运行状态:
systemctl status named.service
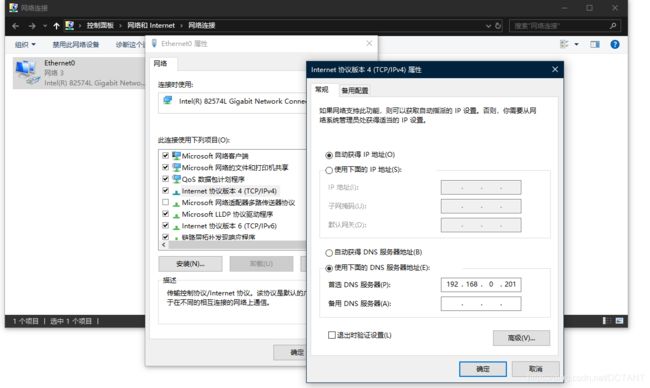
8、配置电脑使用该DNS服务器
我这个DNS服务器的IP地址是:192.168.0.201
随便找个同一个局域网下的电脑,将它的网络适配器的IPV4的DNS改为:
然后保存即可。
9、测试DNS服务器效果
输入www.dctant.com,即可连接到192.168.0.211上的Nginx服务器了
10、如果要编辑DNS的配置文件
如果我想把192.168.0.211映射到abc.dctant.com,该怎么做呢?
只需要在named.dctant.com.zone最后加一行
abc IN A 192.168.0.211
即可。
然后重启DNS服务器:
systemctl restart named.service
11、设置DNS服务开机自启
输入命令:
systemctl enable named.service
这样重启后DNS服务也会自动启动。
写在最后:我发现DNS服务完全不需要搞什么反向解析,照样可以完成DNS服务器的所有功能。


