在Windows上 ciphey安装(详细版)
文章目录
-
前言
一、不想卸载原有的python版本?
二、安装步骤
1.安装python
2.创建虚拟环境vnev
3.在ciphey的虚拟环境中进行激活
4.安装ciphey
三、参数列表
总结
前言
提示:安装了好几次,但是都没安装成功,我使用了三个电脑python版本3.11--3.10--3.9的版本都不行
例如:
 Installing build dependencies ... done
  Getting requirements to build wheel ... error
  error: subprocess-exited-with-error

  × Getting requirements to build wheel did not run successfully.
  │ exit code: 1
  ╰─> [20 lines of output]
      Traceback (most recent call last):
        File "C:\Users\Administrator\AppData\Local\Programs\Python\Python311\Lib\site-packages\pip\_vendor\pyproject_hooks\_in_process\_in_process.py", line 353, in
          main()
...

        File "", line 34, in
      RuntimeError: Python version 2.7 or 3.4+ is required.
      [end of output]

  note: This error originates from a subprocess, and is likely not a problem with pip.
error: subprocess-exited-with-error

× Getting requirements to build wheel did not run successfully.
│ exit code: 1
╰─> See above for output.

note: This error originates from a subprocess, and is likely not a problem with pip.
提示:
我查看了我的python版本,是3.11,显然已经大于3.4,为什么还会报错呢?
我找到了这个回答RuntimeError: Python version 2.7 or 3.4+ is required even if I already have 3.10.6 version · Issue #19 · bradylowe/labelpc (github.com)原来是因为版本检查中比对版本的时候是逐个字符比较("4">"1"),因此判定3.10是小于3.4的
一、不想卸载原有的python版本?
示例:想安装但是又不想卸载原有的python版本,最后看部分博客使用了,就使用虚拟环境venv,或者python的其他虚拟环境
二、安装步骤
1.安装python
下载python3.8.9版本
选择自定义安装,安装的时候不要勾选添加到环境变量add path,会影响原来版本的使用
2.创建虚拟环境vnev
注意:虚拟环境文件夹应该与python安装在同一文件夹中。可以使用命令python --version来确认python的安装路径。
假设python安装在F盘的ciphey目录下,要在这个目录中执行以下命令:
python -m venv test_venv3.在ciphey的虚拟环境中进行激活
在F:\Lucy\Misc\ciphey\test_venv\Scripts目录下,双击activate.bat进行激活。
4.安装ciphey
代码如下(示例):
#先更新 python.exe -m pip install --upgrade pip -i https://pypi.mirrors.ustc.edu.cn/simple/ #在安装pip.exe install ciphey -i https://pypi.mirrors.ustc.edu.cn/simple/
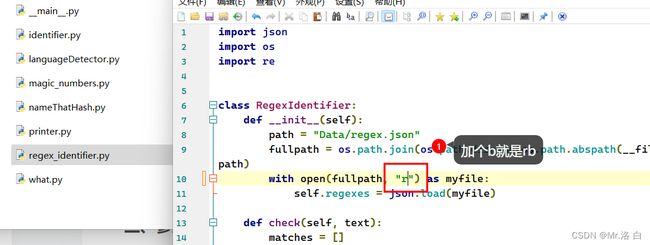
会报错:
解决方法:
先退到:
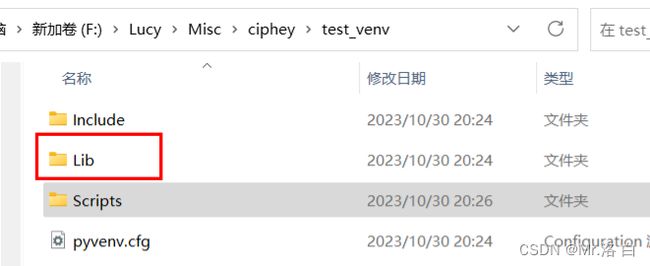
进到:F:\Lucy\Misc\ciphey\test_venv\Lib\site-packages\pywhat
三、参数列表
ciphey --help
用法: ciphey [选项] [TEXT_STDIN]

  Ciphey - 自动解密工具

  文档地址: https://github.com/Ciphey/Ciphey/wiki

  Discord (这里支持,我们大部分时间都在线):
  https://discord.ciphey.online/

  GitHub: https://github.com/ciphey/ciphey

 cipher是一种使用智能人工智能的自动解密工具
和自然语言处理。输入加密文本,获取解密文本


例如:
	基本用法: ciphey -t "aGVsbG8gbXkgbmFtZSBpcyBiZWU="

选项:
  -t, --text TEXT            您想要解密的密文。
  -q, --quiet                减少冗长的显示,直接给结果
  -g, --greppable            只输出答案(对于grep很有用)
  -v, --verbose
  -C, --checker TEXT         使用给定的检查器
  -c, --config TEXT          使用给定的配置文件。默认为
                             appdirs.user_config_dir('ciphey',
                             'ciphey')/'config.yml'

  -w, --wordlist TEXT        使用给定的密码字典
  -p, --param TEXT           将参数传递给语言检查器
  -l, --list-params BOOLEAN  列出所选模块的参数
  --searcher TEXT            选择要使用的搜索算法
  -b, --bytes                强制密码使用二进制模式作为输入
  --default-dist TEXT        设置默认的字符/字节分布
  -m, --module PATH          从给定路径添加模块
  -A, --appdirs              输出密码到想要的文件位置

  -f, --file FILENAME
  --help                     显示此帮助消息并退出。
总结
以上就是今天安装ciphey内容,本文仅仅简单介绍了一种安装ciphey的方法!
应该是够详细了


