MyBatis-Plus实现数据库curd操作(项目实践,Springboot项目)
目录
- 1、 mp是什么
- 实例:
- 2、 mp实现添加查询
-
- ①、主键策略
- ②、添加实体
- ③、添加mapper
-
- 实现元对象处理器接口
- ④、添加测试类,进行功能测试:(查询操作)
- ⑥、插入操作
- 3、 mp自动填充乐观锁
- 4、查询
-
- ①、通过多个id批量查询
- ②、简单查询
- ③、分页查询
-
- 编写分页代码
- 5、删除
- 6、 mp逻辑删除
-
- ①、物理删除和逻辑删除
- ②、逻辑删除的使用场景:
- ③、逻辑删除实现流程
- ④、 测试逻辑删除后的查询
1、 mp是什么
MyBatis-Plus (简称MP )是一个MyBatis 的增强工具,在MyBatis 的基础上只做增强不做改变,为简化开发、提高效率而生。
润物无声,
只做增强不做改变,引入它不会对现有工程产生影响,如丝般顺滑。
效率至上
只需简单配置,即可快速进行CRUD操作,从而节省大量时间。·
丰富功能
热加载、代码生成、分页、性能分析等功能一应俱全。
实例:
- 创建一个数据库“mybatis-plus”
创建表 :USER
/*
 Navicat Premium Data Transfer

 Source Server         : diao
 Source Server Type    : MySQL
 Source Server Version : 50547
 Source Host           : localhost:3306
 Source Schema         : mybatis-plus

 Target Server Type    : MySQL
 Target Server Version : 50547
 File Encoding         : 65001

 Date: 30/03/2021 10:59:08
*/

SET NAMES utf8mb4;
SET FOREIGN_KEY_CHECKS = 0;

-- ----------------------------
-- Table structure for user
-- ----------------------------
DROP TABLE IF EXISTS `user`;
CREATE TABLE `user`  (
  `id` bigint(20) NOT NULL AUTO_INCREMENT COMMENT '主键ID',
  `name` varchar(30) CHARACTER SET utf8 COLLATE utf8_bin NULL DEFAULT NULL COMMENT '姓名',
  `age` int(11) NULL DEFAULT NULL COMMENT '年龄',
  `email` varchar(50) CHARACTER SET utf8 COLLATE utf8_bin NULL DEFAULT NULL COMMENT '邮箱',
  `create_time` datetime NULL DEFAULT NULL COMMENT '更新时间',
  `update_time` datetime NULL DEFAULT NULL COMMENT '创建时间',
  PRIMARY KEY (`id`) USING BTREE
) ENGINE = MyISAM AUTO_INCREMENT = 1376726698870448131 CHARACTER SET = utf8 COLLATE = utf8_bin ROW_FORMAT = Dynamic;

-- ----------------------------
-- Records of user
-- ----------------------------
INSERT INTO `user` VALUES (1369908479702650881, '咩咩', 5, '[email protected]', NULL, NULL);
INSERT INTO `user` VALUES (5, 'ww', 25, '[email protected]', NULL, NULL);
INSERT INTO `user` VALUES (3, 'atname', 24, '[email protected]', NULL, NULL);
INSERT INTO `user` VALUES (1369908484551266306, '咩咩', 25, '[email protected]', NULL, NULL);
INSERT INTO `user` VALUES (1369900396372877314, '咩咩', 5, '[email protected]', NULL, NULL);
INSERT INTO `user` VALUES (4, '22', 22, '22', NULL, NULL);
INSERT INTO `user` VALUES (1376725874945585154, 'lucy', 20, '[email protected]', '2021-03-30 02:40:01', '2021-03-30 02:40:01');
INSERT INTO `user` VALUES (1376726698870448130, '喜洋洋', 10, '[email protected]', '2021-03-30 02:43:18', '2021-03-30 02:43:18');

SET FOREIGN_KEY_CHECKS = 1;
- 引入依赖在pom.xml中引入
      <!-- mysql依赖-->
        <dependency>
            <groupId>mysql</groupId>
            <artifactId>mysql-connector-java</artifactId>
            <optional>true</optional>
        </dependency>

        <!--lombok用来简化实体类-->
        <dependency>
            <groupId>org.projectlombok</groupId>
            <artifactId>lombok</artifactId>
            <optional>true</optional>
        </dependency>
- idea中安装lombok插件
(1)2019版本安装lombok插件
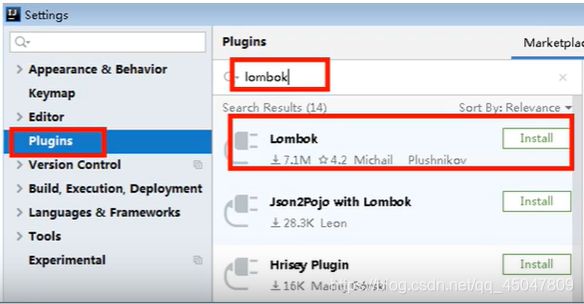
(2)2018版本安装lombok插件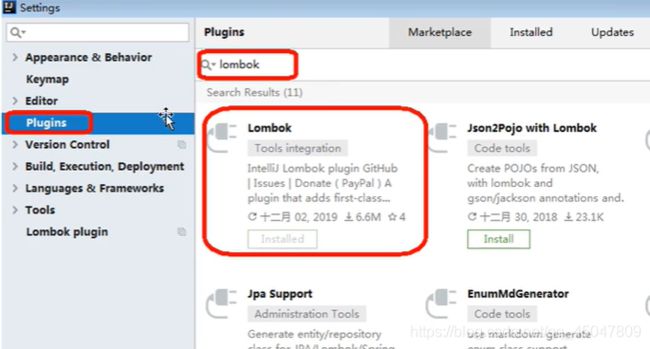
在application.properties配置文件中添加 MySQL 数据库的相关配置:,
(1)spring boot 2.0(内置jdbc5驱动)。
#mysql数据库连接
spring.datasource.driver-class-name=com.mysql.jdbc.Driver
spring.datasource.url=jdbc:mysql://localhost:3306/mybatis_plus?characterEncoding=utf-8&useSSL=false
spring.datasource.username=root
spring.datasource.password=root
(2)spring boot 2.1及以上(内置jdbc8驱动)。
注意: driver和url的变化
spring.datasource.driver-class-name=com.mysql.cj.jdbc.Driver
spring.datasource.url=jdbc:mysql://localhost:3306/mybatis_plus?serverTimezone=GMT%2B8
spring.datasource.name=root
spring.datasource.password=root
注意:
1、这里的url使用了?serverTimezone=GMT%2B8后缀,因为8.0版本的jdbc.驱动需要添加这个后缀,否则运行测试用例报告如下错误:
我的这样子写
#端口号
server.port=8090
# 应用名称
spring.application.name=demomptest
spring.datasource.url=jdbc:mysql://localhost/mybatis-plus?characterEncoding=utf-8&useSSL=false&serverTimezone=UTC
spring.datasource.username=root
spring.datasource.password=root
spring.datasource.driver-class-name=com.mysql.cj.jdbc.Driver

#查看sql输出日志
#mybatis日志
mybatis-plus.configuration.log-impl=org.apache.ibatis.logging.stdout.StdOutImpl
主方法入口:
import org.mybatis.spring.annotation.MapperScan;
import org.springframework.boot.SpringApplication;
import org.springframework.boot.autoconfigure.SpringBootApplication;
import springfox.documentation.swagger2.annotations.EnableSwagger2;

@SpringBootApplication
@MapperScan("com.dyq.demomptest.mapper") //mapper扫描
@EnableSwagger2
public class DemomptestApplication {

    public static void main(String[] args) {
        SpringApplication.run(DemomptestApplication.class, args);
        System.out.println("运行成功!");
    }
}
2、 mp实现添加查询
①、主键策略
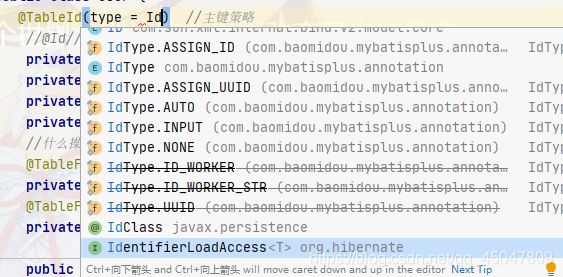
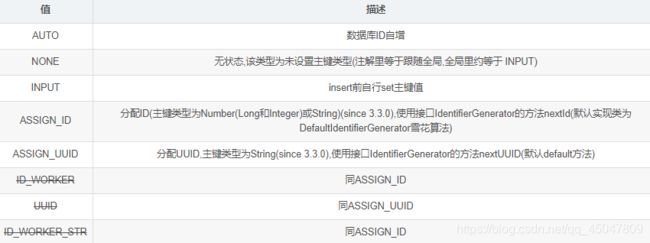
1、MyBatis-Plus默认的主键策略是:ASSIGN_ID (使用了雪花算法)
@TableId(type = IdType.ASSIGN_ID)
private String id;
2、需要在创建数据表的时候设置主键自增,实体字段中配置 @TableId(type = IdType.AUTO)
@TableId(type = IdType.AUTO)
private Long id;
要想影响所有实体的配置,可以设置全局主键配置
3、全局设置主键生成策略
mybatis-plus.global-config.db-config.id-type=auto
1、自动增长 AUTO INCREMENT将表中的主键逐渐加1,到一定数量后分表操作,下张表的主键为上张表的最后一个数+1开始增长;
优点:自动排序 缺点:换表的时候得找到上一张表得最后一个主键值2、UUID 每次会随机生成一个唯一的值优点 :换表的时候不用考虑获取其他值,可以直接随机生成 缺点:排序不方便
3、redis实现 redis的原子操作 优点: 不依赖数据库,性能优于数据库 数字天然排序,对分页或者需要排序的结果很有帮助
缺点:需要编码和配置工作量较大
②、添加实体
创建包 entity 编写实体类 User.java(此处使用了 Lombok 简化代码)
@Data //这个是lombk的,可以免去get和set
public class User {
  // @TableId(type = IdType.ASSIGN_ID)  //主键策略
    //@Id//底层为雪花算法
    private Long id;
    private String name;
    private Integer age;
    private String email;
    //什么操作的时候设置值,实体上增加字段并添加自动填充注解
    @TableField(fill = FieldFill.INSERT)    //增加时时间修改
    private Date createTime;  //create_time
    @TableField(fill = FieldFill.INSERT_UPDATE)//修改时时间修改
    private Date updateTime;  //update_time

    public User(Long id, String name, Integer age, String email) {
        this.id = id;
        this.name = name;
        this.age = age;
        this.email = email;
    }

    public User() {  //无参构造器

    }
}
③、添加mapper
创建包 mapper 编写Mapper 接口: UserMapper.java
@Repository  //IDEA在 userMapper 处报错,因为找不到注入的对象,因为类是动态创建的,但是程序可以正确的执行。为了避免报错,可以在 dao 层 的接口上添加 @Repository 注解

public interface UserMapper extends BaseMapper<User> {
}
实现元对象处理器接口
新建包hander,包下面新建一个MyMeta0bjectHandler类,实现FieldFill.INSERT_UPDATE,FieldFill.INSERT的方法。
import com.baomidou.mybatisplus.core.handlers.MetaObjectHandler;

import org.apache.ibatis.reflection.MetaObject;
import org.springframework.stereotype.Component;

import java.util.Date;

/**
 * @Description: $
 * @Author: dyq
 * @Date: $
 */

@Component  //注意:不要忘记添加 @Component 注解
public class MyMeta0bjectHandler  implements MetaObjectHandler {
    //mp执行添加操作时,这个方法就执行了
    @Override
    public void insertFill(MetaObject metaObject) {
        this.setFieldValByName("createTime",new Date(),metaObject);
        this.setFieldValByName("updateTime",new Date(),metaObject);
    }         //根据名称设置属性属性值      属性名          值
    //mp执行修改操作时,这个方法就执行了
    @Override
    public void updateFill(MetaObject metaObject) {
        this.setFieldValByName("updateTime",new Date(),metaObject);
    }
}
④、添加测试类,进行功能测试:(查询操作)
@SpringBootTest
class DemomptestApplicationTests {

    @Autowired
    private UserMapper userMapper;

 @Test
    public void findAll() {
        List<User> users = userMapper.selectList(null);
        System.out.println(users);
    }
}
⑥、插入操作
//添加
@Test
public void testAdd() {
    User user = new User();
    user.setName("lucy");
    user.setAge(20);
    user.setEmail("[email protected]");
    int insert = userMapper.insert(user);
    System.out.println(insert);
}
数据库表:
注意:数据库插入id值默认为:全局唯一id
3、 mp自动填充乐观锁
主要适用场景:当要更新一条记录的时候,希望这条记录没有被别人更新,也就是说实现线程安全的数据更新。
乐观锁实现方式:
取出记录时,获取当前version
更新时,带上这个version
执行更新时, set version = newVersion where version = oldVersion
如果version不对,就更新失败
乐观锁实现流程
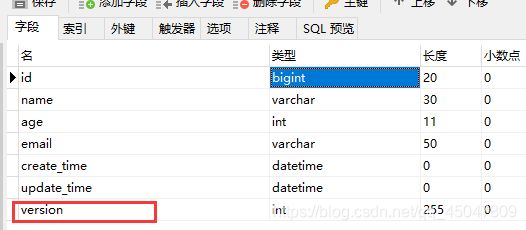
1、在表添加字段作为版本号,在表对应实体类添加版本号属性
数据库添加一个字段
2、实体添加 @Version 注解
@TableField(fill = FieldFill.INSERT)  //增加时修改值
@Version
private Integer version;
3、配置乐观锁插件
@Configuration
@MapperScan("com.atguigu.demomptest.mapper")
public class MpConfig {

    //乐观锁插件
    @Bean
    public OptimisticLockerInnerInterceptor optimisticLockerInnerInterceptor(){
        return new OptimisticLockerInnerInterceptor();
    }

}
4、修改MyMeta0bjectHandler类:

5、在DemomptestApplicationTests类中做测试:
先做一遍增加,version增加后默认值为1,取新增加的id值
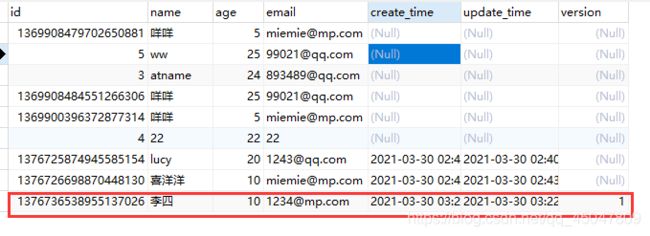
在测试类中添加代码,运行测试
 //测试乐观锁
    @Test
    public void  versiontest(){
        //根据id查询
        User user = userMapper.selectById(1376736538955137026L); //括号里的是id
        //修改
        user.setName("张飒");
        user.setVersion(user.getVersion()+1);
        userMapper.updateById(user);
    }
结果:李四修改成了张枫,version=2
![]()
4、查询
①、通过多个id批量查询
测试类中添加测试代码
//多个id查询
    @Test
    public void  selectByIds(){
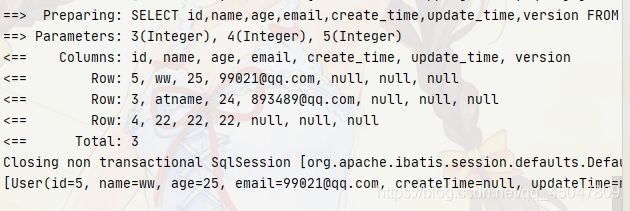
        List<User>  users = userMapper.selectBatchIds(Arrays.asList(3,4,5));
        System.out.println(users);
    }
②、简单查询
测试类中添加代码:
//简单条件查询
    @Test
    public void  selectByIds1(){
        Map<String, Object> map = new HashMap<>();
        map.put("name","喜洋洋");
        map.put("age",10);
        List<User> users = userMapper.selectByMap(map);
        System.out.println(users);
    }
③、分页查询
1、在MpConfig配置类中加入分页插件
//分页插件

//    public PaginationInterceptor paginationInterceptor(){
//        return new PaginationInterceptor();
//    } //这个插件已经过时
@Bean
    public PaginationInnerInterceptor PaginationInnerInterceptor(){
        return new PaginationInnerInterceptor();
    }
编写分页代码
 //分页查询
    @Test
    public void selectpage(){
        /**
         * 分页构造函数
         *
         * @param current 当前页
         * @param size    每页显示条数
         */
        Page<User> page = new Page(2,3);
        Page<User> userPage = userMapper.selectPage(page, null);
        //返回对象得到分页所有数据
        long pages = userPage.getPages(); //总页数
        long current = userPage.getCurrent(); //当前页
        List<User> records = userPage.getRecords(); //查询数据集合
        long total = userPage.getTotal(); //总记录数
        boolean hasNext = userPage.hasNext();  //下一页
        boolean hasPrevious = userPage.hasPrevious(); //上一页

        System.out.println("总页数:"+pages);
        System.out.println("当前页"+current);
        System.out.println("查询数据集合"+records);
        System.out.println("总记录数"+total);
        System.out.println("下一页"+hasNext);
        System.out.println("上一页"+hasPrevious);
    }
5、删除
测试类中添加三种基本删除:
//删除
    @Test
    public  void  deleteTest(){
        int i = userMapper.deleteById(4L);
        System.out.println("删除"+i+"条记录!");
    }
    //批量删除
    @Test
    public void  deleteTests(){
        int i = userMapper.deleteBatchIds(Arrays.asList(3,4,5));
        System.out.println("删除"+i+"条记录!");
    }
    //条件删除
    @Test
    public void testDeleteByMap() {
        HashMap<String, Object> map = new HashMap<>();
        map.put("name", "lucy");
        map.put("age", 20);
        int result = userMapper.deleteByMap(map);
        System.out.println(result);
    }
6、 mp逻辑删除
①、物理删除和逻辑删除
物理删除:真实删除,将对应数据从数据库中删除,之后查询不到此条被删除数据
逻辑删除:假删除,将对应数据中代表是否被删除字段状态修改为“被删除状态”,之后在数据库中仍旧能看到此条数据记录
②、逻辑删除的使用场景:
可以进行数据恢复
有关联数据,不便删除
③、逻辑删除实现流程
1、数据库修改
添加 deleted字段
ALTERTABLE `user` ADD COLUMN `deleted` boolean DEFAULT false
2、实体类修改
添加deleted 字段,并加上 @TableLogic 注解
@TableLogic
private Integer deleted;
3、配置类中设置默认值
this.setFieldValByName("delete",0,metaObject);
测试类代码:
//逻辑删除
    @Test
    public void testLogicDelete() {
        int result = userMapper.deleteById(1369908479702650881L); //选一个id
        System.out.println(result);
    }
4、测试后发现,数据并没有被删除,deleted字段的值由0变成了1
测试后分析打印的sql语句,是一条update
④、 测试逻辑删除后的查询
MyBatis Plus中查询操作也会自动添加逻辑删除字段的判断

全代码在这:https://download.csdn.net/download/qq_45047809/16237903
