pod资源限制,探针,指定资源
文章目录
- 资源限制
-
- 重启策略:Pod在遇到故障之后重启的动作
- 测试重启策略脚本
- 健康检查:又称为探针(Probe)
- 指定资源创建
资源限制
Pod和Container的资源请求和限制:

spec.containers[].resources.limits.cpu   //cpu上限

spec.containers[].resources.limits.memory  //内存上限

spec.containers[].resources.requests.cpu  //创建时分配的基本CPU资源

spec.containers[].resources.requests.memory //创建时分配的基本内存资源
我们创建一个资源限制
[root@localhost ~]# vim pod2.yaml
apiVersion: v1
kind: Pod
metadata:
  name: frontend
spec:
  containers:
  - name: db
    image: mysql
    env:
    - name: MYSQL_ROOT_PASSWORD
      value: "password"
    resources:
      requests:
        memory: "64Mi"
        cpu: "250m"
      limits:
        memory: "128Mi"
        cpu: "500m"
  - name: wp
    image: wordpress
    resources:
      requests:
        memory: "64Mi"
        cpu: "250m"
      limits:
        memory: "128Mi"
        cpu: "500m"
发布资源
[root@localhost ~]# kubectl apply -f pod2.yaml
查看具体事件
[root@localhost demo]# kubectl describe pod frontend

Events:
  Type    Reason     Age    From                     Message
  ----    ------     ----   ----                     -------
  Normal  Scheduled  11m    default-scheduler        Successfully assigned default/frontend to 192.168.136.30
  Normal  Pulling    11m    kubelet, 192.168.136.30  pulling image "mysql"
  Normal  Pulled     10m    kubelet, 192.168.136.30  Successfully pulled image "mysql"
  Normal  Created    10m    kubelet, 192.168.136.30  Created container
  Normal  Started    10m    kubelet, 192.168.136.30  Started container
  Normal  Pulling    10m    kubelet, 192.168.136.30  pulling image "wordpress"
  Normal  Pulled     7m30s  kubelet, 192.168.136.30  Successfully pulled image "wordpress"
  Normal  Created    7m29s  kubelet, 192.168.136.30  Created container
  Normal  Started    7m27s  kubelet, 192.168.136.30  Started container
查看节点资源
[root@localhost ~]# kubectl describe node 192.168.136.30

  Namespace                  Name                                     CPU Requests  CPU Limits  Memory Requests  Memory Limits
  ---------                  ----                                     ------------  ----------  ---------------  -------------
  default                    frontend                                 500m (50%)    1 (100%)    128Mi (14%)      256Mi (29%)
  default                    my-tomcat-7cd4fdbb5b-bb4qx               0 (0%)        0 (0%)      0 (0%)           0 (0%)
  default                    nginx-7697996758-w4z29                   0 (0%)        0 (0%)      0 (0%)           0 (0%)
  kube-system                kubernetes-dashboard-7dffbccd68-6bqvn    50m (5%)      100m (10%)  100Mi (11%)      300Mi

Allocated resources:
  (Total limits may be over 100 percent, i.e., overcommitted.)
  Resource  Requests     Limits
  --------  --------     ------
  cpu       550m (55%)   1100m (110%)
  memory    228Mi (26%)  556Mi (63%)
Events:     <none>
查看node节点资源状态
[root@localhost ~]# kubectl get pods
NAME                         READY   STATUS    RESTARTS   AGE
frontend                     2/2     Running   0          30m
查看命名空间
[root@localhost ~]# kubectl get ns
NAME          STATUS   AGE
default       Active   5d2h
kube-public   Active   5d2h
kube-system   Active   5d2h
重启策略:Pod在遇到故障之后重启的动作
1:Always:当容器终止退出后,总是重启容器,默认策略
2:OnFailure:当容器异常退出(退出状态码非0)时,重启容器
3:Never:当容器终止退出,从不重启容器。
(注意:k8s中不支持重启Pod资源,只有删除重建)
查看策略
[root@localhost demo]# kubectl edit deploy

 restartPolicy: Always
测试重启策略脚本
[root@localhost k8s]# vim pod3.yaml
apiVersion: v1
kind: Pod
metadata:
  name: foo
spec:
  containers:
  - name: busybox
    image: busybox
    args:
    - /bin/sh
    - -c
    - sleep 8; exit 3
sleep休眠
exit 退出
发布资源
[root@localhost demo]# kubectl apply -f pod3.yaml
查看状态(不停的在重启)
[root@localhost k8s]# kubectl get pods -w
foo   1/1   Running   0     37s
foo   0/1   Error   0     45s
foo   1/1   Running   1     58s
foo   0/1   Error   1     66s
foo   0/1   CrashLoopBackOff   1     77s
foo   1/1   Running   2     80s
foo   0/1   Error   2     88s
完成状态不会进行重启
[root@localhost demo]# vim pod3.yaml
apiVersion: v1
kind: Pod
metadata:
  name: foo
spec:
  containers:
  - name: busybox
    image: busybox
    args:
    - /bin/sh
    - -c
    - sleep 10;exit 3
  restartPolicy: Never
开启服务(完成状态不会进行重启)
[[root@localhost ~]# kubectl apply -f pod3.yaml
健康检查:又称为探针(Probe)
(注意:)规则可以同时定义
livenessProbe 如果检查失败,将杀死容器,根据Pod的restartPolicy来操作。
ReadinessProbe 如果检查失败,kubernetes会把Pod从service endpoints中剔除。
Probe支持三种检查方法:
httpGet 发送http请求,返回200-400范围状态码为成功。
exec 执行Shell命令返回状态码是0为成功。
tcpSocket 发起TCP Socket建立成功
创建探针服务
[root@localhost ~]# vim pod4.yaml
apiVersion: v1
kind: Pod
metadata:
  labels:
    test: liveness
  name: liveness-exec
spec:
  containers:
  - name: liveness
    image: busybox
    args:
    - /bin/sh
    - -c
    - touch /tmp/healthy; sleep 30; rm -rf /tmp/healthy;sleep 30
    livenessProbe:
      exec:
        command:
        - cat
        - /tmp/healthy
      initialDelaySeconds: 5
      periodSeconds: 5
开启服务
[root@localhost ~]# kubectl apply -f pod4.yaml
查看服务(我看到不停的在重启探针)
[root@localhost ~]# kubectl get pods
NAME                     READY   STATUS    RESTARTS   AGE
liveness-exec            0/1     CrashLoopBackOff   6          18m
指定资源创建
[root@localhost ~]vim pod5.yamll
apiVersion: v1
kind: Pod
metadata:
  name: pod-example
  labels:
    app: nginx
spec:
  nodeName: 192.168.136.40
  containers:
  - name: nginx
    image: nginx:1.15

[root@localhost ~]# kubectl create -f pod5.yaml
我们看到没有经过调度直接指定地址
[root@localhost ~]# kubectl describe pod pod-example
Events:
  Type    Reason   Age    From                     Message
  ----    ------   ----   ----                     -------
  Normal  Pulling  3m42s  kubelet, 192.168.136.40  pulling image "nginx:1.15"
  Normal  Pulled   3m13s  kubelet, 192.168.136.40  Successfully pulled image "nginx:1.15"
  Normal  Created  3m12s  kubelet, 192.168.136.40  Created container
  Normal  Started  3m12s  kubelet, 192.168.136.40  Started container
定义别名
[root@localhost ~]# kubectl label nodes 192.168.136.40 kgc=a
[root@localhost ~]# kubectl label nodes 192.168.136.30 kgc=b
[root@localhost ~]# kubectl get nodes --show-labels  (查看别名)
NAME             STATUS   ROLES    AGE    VERSION   LABELS
192.168.136.30   Ready       5d6h   v1.12.3   beta.kubernetes.io/arch=amd64,beta.kubernetes.io/os=linux,kgc=b,kubernetes.io/hostname=192.168.136.30
192.168.136.40   Ready       5d6h   v1.12.3   beta.kubernetes.io/arch=amd64,beta.kubernetes.io/os=linux,kgc=a,kubernetes.io/hostname=192.168.136.40
创建别名资源
[root@localhost ~]# vim pod6.yaml
apiVersion: v1
kind: Pod
metadata:
  name: pod-example
  labels:
    app: nginx
spec:
  nodeSelector:
    kgc: b
  containers:
  - name: nginx
    image: nginx:1.15

root@localhost ~]# kubectl apply -f pod6.yaml
查看地址
[root@localhost ~]# kubectl get pods -o wide
pod-example              1/1     Running            0          62s     172.17.27.4   192.168.136.30
查看是否经过调度
[root@localhost ~]# kubectl describe pod pod-example
Events:
  Type    Reason     Age    From                     Message
  ----    ------     ----   ----                     -------
  Normal  Scheduled  2m33s  default-scheduler        Successfully assigned default/pod-example to 192.168.136.30
  Normal  Pulling    2m26s  kubelet, 192.168.136.30  pulling image "nginx:1.15"
  Normal  Pulled     112s   kubelet, 192.168.136.30  Successfully pulled image "nginx:1.15"
  Normal  Created    112s   kubelet, 192.168.136.30  Created container
  Normal  Started    111s   kubelet, 192.168.136.30  Started container
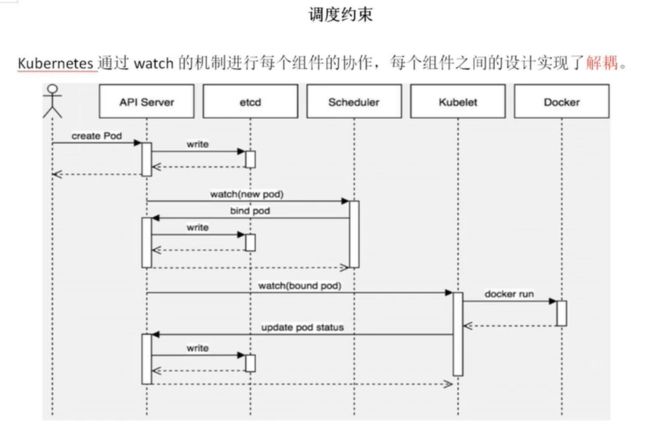
调度过程
- 首先用户通过 Kubernetes 客户端 Kubectl 提交创建 Pod 的 Yaml 的文件,向Kubernetes 系统发起资源请求,该资源请求被提交到
- Kubernetes 系统中,用户通过命令行工具 Kubectl 向 Kubernetes 集群即 APIServer 用 的方式发送“POST”请求,即创建 Pod 的请求。
- APIServer 接收到请求后把创建 Pod 的信息存储到 Etcd 中,从集群运行那一刻起,资源调度系统 Scheduler 就会定时去监控 APIServer
- 通过 APIServer 得到创建 Pod 的信息,Scheduler 采用 watch 机制,一旦 Etcd 存储 Pod 信息成功便会立即通知APIServer
- APIServer会立即把Pod创建的消息通知Scheduler,Scheduler发现 Pod 的属性中 Dest Node 为空时(Dest Node=””)便会立即触发调度流程进行调度。
- 而这一个创建Pod对象,在调度的过程当中有3个阶段:节点预选、节点优选、节点选定,从而筛选出最佳的节点
-节点预选:基于一系列的预选规则对每个节点进行检查,将那些不符合条件的节点过滤,从而完成节点的预选
-节点优选:对预选出的节点进行优先级排序,以便选出最合适运行Pod对象的节点
-节点选定:从优先级排序结果中挑选出优先级最高的节点运行Pod,当这类节点多于1个时,则进行随机选择
机制,一旦 Etcd 存储 Pod 信息成功便会立即通知APIServer
5. APIServer会立即把Pod创建的消息通知Scheduler,Scheduler发现 Pod 的属性中 Dest Node 为空时(Dest Node=””)便会立即触发调度流程进行调度。
6. 而这一个创建Pod对象,在调度的过程当中有3个阶段:节点预选、节点优选、节点选定,从而筛选出最佳的节点
-节点预选:基于一系列的预选规则对每个节点进行检查,将那些不符合条件的节点过滤,从而完成节点的预选
-节点优选:对预选出的节点进行优先级排序,以便选出最合适运行Pod对象的节点
-节点选定:从优先级排序结果中挑选出优先级最高的节点运行Pod,当这类节点多于1个时,则进行随机选择

