springboot整合mybatis实现增删改查
springboot简单介绍
Spring Boot是由Pivotal团队提供的全新框架,其设计目的是用来简化新Spring应用的初始搭建以及开发过程。该框架使用了特定的方式来进行配置,从而使开发人员不再需要定义样板化的配置。通过这种方式,Spring Boot致力于在蓬勃发展的快速应用开发领域(rapid application development)成为领导者。
环境配置
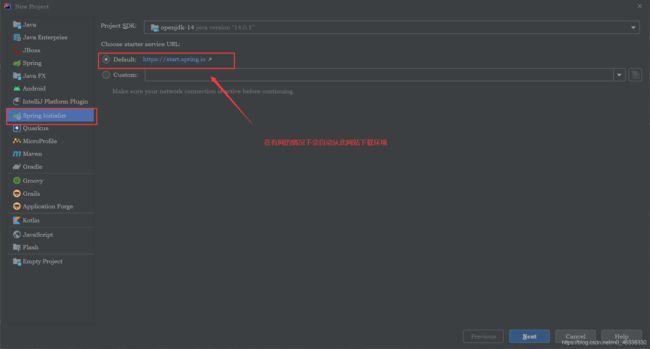
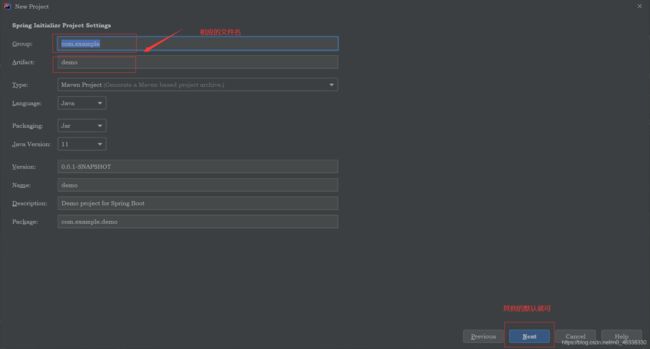

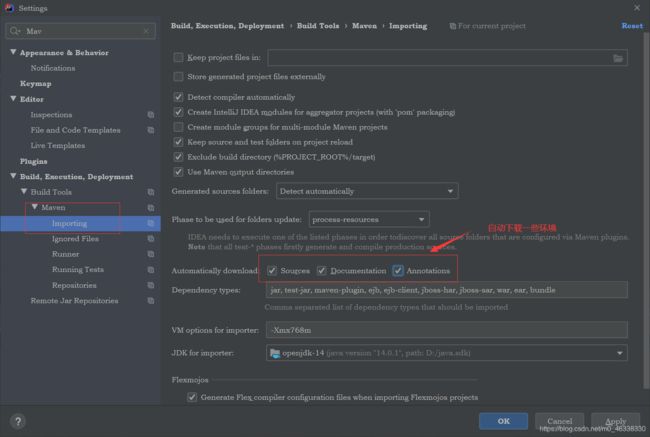
搭建流程
项目结构

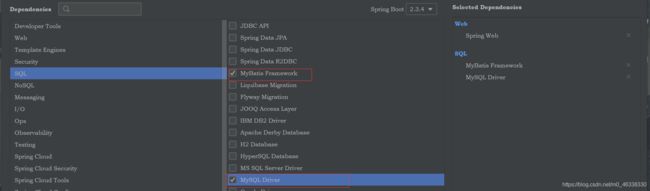
引入相关的相关依赖
在pom文件内对相关依赖进行操作
<?xml version="1.0" encoding="UTF-8"?>
<project xmlns="http://maven.apache.org/POM/4.0.0" xmlns:xsi="http://www.w3.org/2001/XMLSchema-instance"
         xsi:schemaLocation="http://maven.apache.org/POM/4.0.0 http://maven.apache.org/xsd/maven-4.0.0.xsd">
    <modelVersion>4.0.0</modelVersion>


    <groupId>com.iot</groupId>
    <artifactId>demo</artifactId>
    <version>0.0.1-SNAPSHOT</version>
    <packaging>jar</packaging>


    <name>demo</name>
    <description>Demo project for Spring Boot</description>
    <parent>
        <groupId>org.springframework.boot</groupId>
        <artifactId>spring-boot-starter-parent</artifactId>
        <version>2.0.2.RELEASE</version>
        <relativePath/> <!-- lookup parent from repository -->
    </parent>


    <properties>
        <project.build.sourceEncoding>UTF-8</project.build.sourceEncoding>
        <project.reporting.outputEncoding>UTF-8</project.reporting.outputEncoding>
        <java.version>1.8</java.version>
    </properties>

    <dependencies>
        <dependency>
            <groupId>org.springframework.boot</groupId>
            <artifactId>spring-boot-starter</artifactId>
        </dependency>
        <dependency>
            <groupId>org.springframework.boot</groupId>
            <artifactId>spring-boot-starter-test</artifactId>
            <scope>test</scope>
        </dependency>

        <dependency>
            <groupId>org.springframework.boot</groupId>
            <artifactId>spring-boot-starter-web</artifactId>
        </dependency>

        <dependency>
            <groupId>org.mybatis.spring.boot</groupId>
            <artifactId>mybatis-spring-boot-starter</artifactId>
            <version>1.1.1</version>
        </dependency>

        <dependency>
            <groupId>mysql</groupId>
            <artifactId>mysql-connector-java</artifactId>
        </dependency>


	<dependency>
            <groupId>org.apache.tomcat.embed</groupId>
            <artifactId>tomcat-embed-jasper</artifactId>
            <scope>priveded</scope>
        </dependency>


        <dependency>
            <groupId>org.springframework.boot</groupId>
            <artifactId>spring-boot-devtools</artifactId>
            <optional>true</optional>
        </dependency>
    </dependencies>

    <build>
        <plugins>
            <plugin>
                <groupId>org.springframework.boot</groupId>
                <artifactId>spring-boot-maven-plugin</artifactId>
                <configuration>
                    <fork>true</fork>
                </configuration>
            </plugin>
        </plugins>
    </build>
</project>
自己需要引入的依赖在里进行操作,其他的系统默认设置好的。
配置properties或yml文件
以properties文件为例
#关闭默认模板引擎
spring.thymeleaf.cache=false
spring.thymeleaf.enabled=false

#数据库信息
spring.datasource.url=jdbc:mysql://localhost:3306/data?useSSL=false&&serverTimezone=UTC
spring.datasource.username=root//用户名可以自设
spring.datasource.password=pr140412312//密码自己设定
spring.datasource.driver-class-name=com.mysql.cj.jdbc.Driver


spring.jpa.properties.hibernate.hbm2ddl.auto=update
spring.jpa.properties.hibernate.dialect=org.hibernate.dialect.MySQL5InnoDBDialect
spring.jpa.show-sql= true
此文件可以更加快捷的连接数据库,和规定端口号等一系列操作
正式搭建项目
User层
package com.iot.demo.bean;


public class User {
  private int id;
  private String name;
  private String password;
  private int age;

    public int getId() {
        return id;
    }

    public void setId(int id) {
        this.id = id;
    }

    public String getName() {
        return name;
    }

    public void setName(String name) {
        this.name = name;
    }

    public String getPassword() {
        return password;
    }

    public void setPassword(String password) {
        this.password = password;
    }

    public int getAge() {
        return age;
    }

    public void setAge(int age) {
        this.age = age;
    }
}
UserMapper
package com.iot.demo.mapper;

import java.util.List;


import org.apache.ibatis.annotations.Delete;
import org.apache.ibatis.annotations.Insert;
import org.apache.ibatis.annotations.Mapper;
import org.apache.ibatis.annotations.Param;
import org.apache.ibatis.annotations.Select;
import org.apache.ibatis.annotations.Update;

import com.iot.demo.bean.User;


@Mapper
public interface UserMapper {

    /**
     * 全部用户查询
     * @return
     */
    @Select("SELECT ID,NAME,PASSWORD,AGE FROM USER")
    List<User> findAll();

    /**
     * 新增用户
     */
    @Insert("INSERT INTO USER(NAME,PASSWORD,AGE)VALUES(#{name}, #{password}, #{age})")
    int  addUser(@Param("name") String name,@Param("password")String password, @Param("age") int age);

    /**
     * 修改用户
     */
    @Update("UPDATE USER SET NAME=#{name}, PASSWORD=#{password}, AGE=#{age} WHERE ID=#{id}")
    int updateUser(@Param("name") String name,@Param("password")String password, @Param("age") int age);//多参数传入

    /**
     * 删除用户
     */

    @Delete("DELETE FROM USER WHERE ID=#{id}")
    int deleteUser(@Param("id") int id);

    /**
     *查找某用户
     */
    @Select("SELECT * FROM user WHERE name LIKE #{name}")
    List<User> findById(@Param("name") String name);
}
UserService层
package com.iot.demo.service;

import java.util.List;

import org.springframework.beans.factory.annotation.Autowired;
import org.springframework.stereotype.Service;
import org.springframework.transaction.annotation.Transactional;
import com.iot.demo.bean.User;
import com.iot.demo.mapper.UserMapper;


@Service
public class UserService {
    @Autowired
    private UserMapper userMapper;


    /**
     * 获取全部的用户
     * @return
     */

    public List<User> findAll() {
        return userMapper.findAll();
    }

    /**
     * 添加用户
     * @return
     */

    @Transactional
    public int addUser(String name,String password,int age) {
        return userMapper.addUser(name,password,age);
    }

    /**
     * 修改用户
     * @return
     */
    @Transactional
    public int updateUser(String name,String password,int age) {
        return userMapper.updateUser(name,password,age);
    }

    /**
     * 删除用户
     * @return
     */

    @Transactional
    public int deleteUser(int id) {
        return userMapper.deleteUser(id);
    }

    /**
     * 查询指定用户
     * @return
     */
    @Transactional
    public List<User> findById(String name) {
        return userMapper.findById(name);
    }
}
UserController层
package com.iot.demo.controller;


import java.util.List;


import org.springframework.beans.factory.annotation.Autowired;
import org.springframework.stereotype.Controller;//多用于前端网页的跳转
import org.springframework.ui.Model;
import org.springframework.web.bind.annotation.RequestMapping;//将特定的URL映射到指定的方法


import com.iot.demo.bean.User;
import com.iot.demo.service.UserService;
import org.springframework.web.bind.annotation.RequestMethod;
import org.springframework.web.bind.annotation.ResponseBody;//返回值被解析成json,所有返回值返回到页面
import org.springframework.web.bind.annotation.RestController;//只能注解类,return返回值将被转换成json,字符串除外返回页面


@RestController
public class UserController {
    @Autowired
    private UserService userService;

    @RequestMapping("/listUser")//嵌入某个网页
    public List<User> listUser(Model model) {
        List<User> users = userService.findAll();
        model.addAttribute("users", users);//返回一个对象,或list

        return users;
    }
    @RequestMapping("/toAdd")
    public int toAdd(Model model,String name,String password,int age){
        int adds = userService.addUser(name,password,age);
        model.addAttribute("adds",adds);

        return adds;
    }
    @RequestMapping("/upDate")
    public int upDate(Model model,String name,String password,int age){
        int update = userService.updateUser(name, password, age);#
        model.addAttribute("update",update);

        return update#;
    }
    @RequestMapping("/toDelete")
    public int toDelete(Model model,int id){
        int del = userService.deleteUser(id);
        model.addAttribute("del",del);

        return del;
    }
    @RequestMapping("/findId")
    public List<User> findId(Model model,String name){
        List<User> find = userService.findById(name);
        model.addAttribute("find",find);

        return find;
    }
}
出现的一些注释的用法
@ResponseBody
用该注解修饰的函数,会将结果直接填充到HTTP的响应体中,一般用于构建RESTful的api;
@Controller
用于定义控制器类,在spring 项目中由控制器负责将用户发来的URL请求转发到对应的服务接口(service层),多用于跳转到前端页面。
@RequestMapping
提供路由信息,负责URL到Controller中的具体函数的映射,改变一个接口用于接收数据。
@Autowired
调用上面定义好的接口
@Service
一般用于修饰service层的组件。