c ++函数功能查询器_C ++ 17新功能和技巧
c ++函数功能查询器
目录 (Table of Contents)
Introduction
介绍
Settings an integrated development environment (IDE)
设置集成开发环境(IDE)
Structure binding
结构绑定
'if' and 'switch' statements with initializers
带有初始化程序的'if'和'switch'语句
Constexpr lambdas and capturing *this by value
Constexpr lambdas并按值捕获* this
if constexpr
如果constexpr
__has_include
__has_include
Using attribute namespaces without repetition
使用属性名称空间而不重复
Attributes 'nodiscard', 'fallthrough', 'maybe_unused'
属性“ nodiscard”,“ fallthrough”,“ maybe_unused”
std::string_view
std :: string_view
Nested 'namespaces'
嵌套的“命名空间”
String Conversions
字符串转换
Over-aligned dynamic memory allocation
过度对齐的动态内存分配
Fold expressions
折叠式
'inline' variables
“内联”变量
Library additions
图书馆增加
Filesystem
文件系统
Parallel Algorithms
并行算法
Features that have been removed from C++17
已从C ++ 17中删除的功能
Summary
摘要
介绍 (Introduction)
In this article, we will talk about the new features of the new C++17 standard.
在本文中,我们将讨论新的C ++ 17标准的新功能。
The article presents real examples that will help a beginner in the new standard of the language to understand faster how to apply new features in practice.
本文提供了真实的示例,这些示例将帮助使用该语言新标准的初学者更快地了解如何在实践中应用新功能。
The code in the sections was tested in Visual Studio 2017.
本节中的代码已在Visual Studio 2017中进行了测试。

(You can click on the image to view the enlarged, original image here.)
(您可以单击图像在此处查看放大的原始图像。)
设置集成开发环境(IDE) (Settings an Integrated Development Environment (IDE))
Regardless of the IDE, you will most likely have to configure it to work with the latest C ++ standard.
无论使用哪种IDE,您都极有可能必须对其进行配置以使其与最新的C ++标准兼容。
I work with Visual Studio 2017, so I’ll show you how to set it up to work with the new standard:
我使用Visual Studio 2017,因此我将向您展示如何设置它以与新标准一起使用:
设置C ++版本 (Set C++ Version)
To set on compiler option for the Visual Studio project, follow these steps:
要为Visual Studio项目设置编译器选项,请按照下列步骤操作:
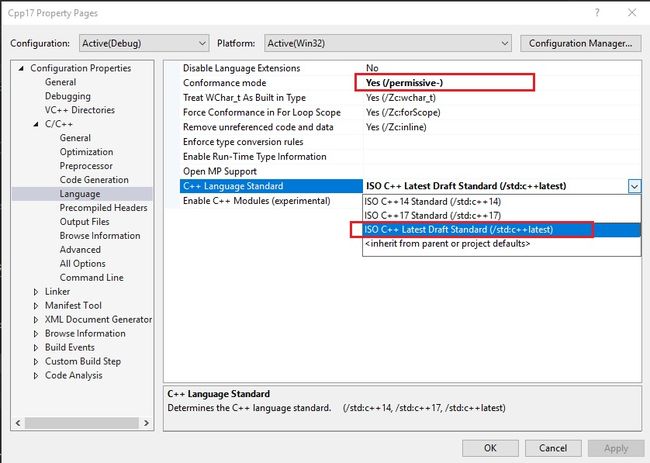
- In the Solution Explorer window, right-click the project name, and then choose Properties to open the project Property Pages dialog (or press ALT + ENTER). 在“解决方案资源管理器”窗口中,右键单击项目名称,然后选择“属性”以打开项目的“属性页”对话框(或按ALT + ENTER键)。
- Select the Configuration properties > C/C++ > Language property page. 选择配置属性> C / C ++>语言属性页面。
In the property list, select the drop-down for the "Conformance mode" property, and then choose /permissive.
在属性列表中,选择“ 一致性模式 ”属性的下拉列表,然后选择/ permissive 。
It will disable non-standard C++ extensions and will enable standard conformance in VS2017.
它将禁用非标准C ++扩展,并在VS2017中启用标准一致性。
In the property list, select the drop-down for the "C++ Language Standard" property, and then choose /std:c++17 or /std:c++latest.
在属性列表中,选择“ C ++语言标准 ”属性的下拉列表,然后选择/ std:c ++ 17或/ std:c ++ latest 。
Press the "OK" button to save your changes.
按“ 确定 ”按钮保存更改。
To enable the latest features of the new standard, you can also take a different approach:
要启用新标准的最新功能,您还可以采用其他方法:
- Open the project's Property Pages dialog box. 打开项目的“属性页”对话框。
Select "Configuration Properties"-> "C/C++"->"Command Line".
选择“ 配置属性 ”->“ C / C ++ ”->“ 命令行 ”。
Add to "Additional Options" textbox following param: /std:c++17 or /std:c++latest
在参数后添加到“ 其他选项 ”文本框: / std:c ++ 17或/ std:c ++ latest
Press the "OK" button to save your changes.
按“ 确定 ”按钮保存更改。

结构绑定 (Structure Binding)
Multiple return values from functions are not a new concept in programming and similar functionality is present in many other programming languages. C++17 comes with a new feature (structured bindings) that provides functionality similar to the multiple return values provided in other languages.
函数的多个返回值并不是编程中的新概念,并且许多其他编程语言中也存在类似的功能。 C ++ 17带有一项新功能(结构化绑定),其功能类似于其他语言提供的多个返回值。
In the following example, I want to provide an overview of some of the options that we have in the old C++ standard, in the modern standard (C++11/14) and today in C++17 to return multiple values from functions:
在下面的示例中,我想概述一下旧的C ++标准,现代的标准(C ++ 11/14)和今天的C ++ 17中从函数返回多个值的一些选项。 :
  1  #include
  2  #include  // std::tie
  3
  4  const double PI = 3.14159265;
  5
  6  void calculateSinCos(const double param, double & resSin, double & resCos)
  7  {
  8       resSin = sin(param * PI / 180.0); // converting degrees to radians
  9       resCos = cos(param * PI / 180.0); // converting degrees to radians
 10  }
 11
 12  std::pair calculateSinCos(const double param)
 13  {
 14       return { sin(param * PI / 180.0), cos(param * PI / 180.0) };
 15  }
 16
 17  std::tuple calculateSinCos_Tuple(const double param)
 18  {
 19       return std::make_tuple(sin(param * PI / 180.0),
 20              cos(param * PI / 180.0));  // packing values into tuple
 21  }
 22
 23  int main()
 24  {
 25       double param { 90.0 };
 26       double resultSin { 0.0 };
 27       double resultCos { 0.0 };
 28
 29       //C++98
 30       calculateSinCos(param, resultSin, resultCos);
 31       std::cout << "C++98 : sin(" << param << ") = " <<
 32       resultSin << ", cos(" << param << ") = "
 33       << resultCos << "\n";
 34
 35       //C++11
 36       const auto resSinCos(calculateSinCos(param));
 37       std::cout << "C++11 : sin(" << param << ") = " <<
 38       resSinCos.first << ", cos(" << param << ") = "
 39       << resSinCos.second << "\n";
 40
 41       //C++11
 42       std::tie(resultSin, resultCos) = calculateSinCos(param);
 43       std::cout << "C++11 : sin(" << param << ") = " <<
 44       resultSin << ", cos(" << param << ") = "
 45       << resultCos << "\n";
 46
 47       // C++17
 48       auto[a, b] =  calculateSinCos(param);
 49       std::cout << "C++17 :
 50       sin(" << param << ") = " << a << ",
 51       cos(" << param << ") = " << b << "\n";
 52
 53       // C++17
 54       auto[x, y] =
 55          calculateSinCos_Tuple(param); // std::make_tuple(sin(val), cos(val));
 56       std::cout << "C++17 :
 57       sin(" << param << ") = " << x << ",
 58       cos(" << param << ") = " << y << "\n";
 59  }
Let's look at the above code:
让我们看一下上面的代码:
In this approach:
在这种方法中:
calculateSinCos(param, resultSin, resultCos);we used the oldest and possibly still most common method - using the OUTPUT params passed as reference can be used to "return" values to the caller.
我们使用了最古老且可能仍是最常见的方法-使用作为参考传递的OUTPUT参数可以将值“返回”给调用者。
Consider the different way to access multiple values returned from functions:
考虑访问从函数返回的多个值的不同方法:
const auto resSinCos(calculateSinCos(param));Accessing the individual values of the resulting
std::pairbyresSinCos.firstandresSinCos.secondwas not very expressive, since we can easily confuse the names, and it’s hard to read.通过
resSinCos.first和resSinCos.second访问生成的std::pair的各个值并不是很容易表达,因为我们很容易混淆名称,而且很难阅读。Alternatively, before C++17, it would be possible to use
std::tieto unpack a tuple/pair to achieve a similar effect:或者,在C ++ 17之前,可以使用
std::tie解开一个元组/对,以达到类似的效果:std::tie(resultSin, resultCos) = calculateSinCos(param);This approach demonstrates how to unpack the resulting pair into two variables. Notice, this example shows all the power of
std::tie, but nonetheless, thestd::tieis less powerful than structured bindings, because we must first define all the variables we want to bind.该方法演示了如何将结果对分解为两个变量。 注意,此示例显示了
std::tie所有功能,但是std::tie的功能不如结构化绑定,因为我们必须首先定义要绑定的所有变量。Structured binding is a new functionality of C++17, making the code even more readable, expressive and concise.
结构化绑定是C ++ 17的一项新功能 ,使代码更具可读性,表达力和简洁性。
auto[a, b] = calculateSinCos(param);Notice, the variables
aandbare not references; they are aliases (or bindings) to the generated object member variables. The compiler assigns a unique name to the temporary object.注意,变量
a和b不是引用; 它们是生成的对象成员变量的别名(或绑定)。 编译器为临时对象分配一个唯一的名称。In C++11, the
std::tuplecontainer has been added to build a tuple that contains multiple return values. But neither C++11 nor C++14 does support an easy way to get elements in astd::tupledirectly from the tuple (Of course, we can unpack a tuple usingstd::tie, but we still need to understand the type of each object and how many objects are this tuple. Phew, how painful it is...)在C ++ 11中,已添加
std::tuple容器以构建包含多个返回值的元组。 但是C ++ 11和C ++ 14都不支持直接从元组中获取std::tuple元素的简单方法(当然,我们可以使用std::tie解开元组的std::tie,但是我们仍然需要了解每个对象的类型以及该元组有多少个对象。Ph,这是多么痛苦...)C++17 fixes this flaw, and the structured bindings allow us to write code as follows:
C ++ 17修复了此缺陷,结构化绑定使我们可以编写如下代码 :
auto[x, y] = calculateSinCos_Tuple(param);
Let's see the output of the above code of structure binding:
让我们看一下上面的结构绑定代码的输出:

As we can see, different approaches show the same result....
我们可以看到,不同的方法显示出相同的结果。
带有初始化程序的“ if”和“ switch”语句 ('if' and 'switch' Statements with Initializers)
Good programming style limits the scope of variables. Sometimes, it is required to get some value, and only if it meets a certain condition can it be processed further.
好的编程风格会限制变量的范围。 有时,需要获得一定的价值,并且只有在满足特定条件的情况下,才能对其进行进一步处理。
For this purpose, C++17 provides a new version of the 'if' statement with initializer.
为此,C ++ 17提供了带有初始化程序的' if '语句的新版本。
if (init; condition)
Let's see how the 'if' condition worked before the new C++17 standard:
让我们看看' if '条件在新的C ++ 17标准之前如何工作:
#include

int getValueOfNumber() {

	return 5;
}

int main() {

	int num = getValueOfNumber();
	if (num > 100) {
		std::cout << "The value of the num is greater than 100" << std::endl;
	}
	else {
		std::cout << "The value of the num is less than or equal to 100" << std::endl;
	}

	std::cout << "num =" << num << std::endl;
}
Please notice that the num value is visible inside the if and else statements, as well as OUTSIDE the scope conditions.
请注意, num值在if和else语句以及范围条件之外均可见。
Now, in C++17, we can write:
现在,在C ++ 17中,我们可以编写:
#include

int getValueOfNumber() {

     return 5;
}

int main() {

	if (auto num = getValueOfNumber(); num > 100) {
		std::cout << "The value of the num is greater than 100" << std::endl;
	}
	else {
		std::cout << "The value of the num is less than or equal to 100" << std::endl;
	}

	std::cout << "num =" << num;
}
If we try to compile the above code, we will get the following error:
如果我们尝试编译以上代码,则会收到以下错误:
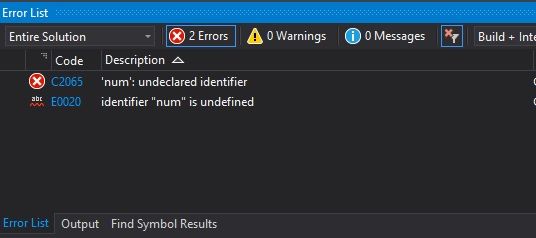
Now, num is visible only INSIDE the if and else statements, so accessing a variable outside the scope of if/else causes an error...
现在, num仅在if和else语句内部可见,因此访问if / else范围之外的变量会导致错误...
The same applies to switch statements.
这同样适用于switch语句。
C++17 provides new version of the 'switch' statement with initializers.
C ++ 17提供了带有初始化程序的新版本的' switch '语句。
switch (init; condition)
Let's see how the 'switch' condition worked before the new C++17 standard:
让我们看看在新的C ++ 17标准之前' switch '条件是如何工作的:
#include
#include
#include

int getRandomValueBetween_1_and_2() {
     srand(time(NULL));
     return rand() % 2 + 1; // // value in the range 1 to 2
}

int main() {

     int num = getRandomValueBetween_1_and_2();
     switch (num) {
     case 1:
          std::cout << "num = 1 \n"; break;
     case 2:
          std::cout << "num = 2 \n"; break;
     default:
          std::cout << "Error value in num ! \n";
     }

     std::cout << "Value output outside the 'switch': num =" << num << std::endl;
}
Please notice that the num value is visible inside the switch statements, as well as OUTSIDE the scope conditions.
请注意, num值在switch语句内部以及范围条件之外均可见。
Now, in C++17, we can write:
现在,在C ++ 17中,我们可以编写:
#include
#include
#include

int getRandomValueBetween_1_and_2() {
     srand(time(NULL));
     return rand() % 2 + 1; // value in the range 1 to 2
}

int main() {

     switch (auto num(getRandomValueBetween_1_and_2()); num) {
     case 1:
          std::cout << "num = 1 \n"; break;
     case 2:
          std::cout << "num = 2 \n"; break;
     default:
          std::cout << "Error value in num ! \n";
     }

     std::cout << "Value output outside the 'switch': num =" << num << std::endl;
}
If we try to compile the above code, we will get the following error:
如果我们尝试编译以上代码,则会收到以下错误:
Now, num is visible only INSIDE the switch statements, so accessing a variable outside the scope of switch causes an error...
现在,num仅在switch语句内部可见,因此访问switch范围之外的变量会导致错误...
Due to the described mechanism, the scope of the variable remains short. Before C++17, this could only be achieved with additional {curly braces}.
由于所描述的机制,该变量的范围仍然很短。 在C ++ 17之前,只能通过附加的{curly braces}来实现。
The short lifetimes reduce the number of variables in scope, keeping code clean and making refactoring easier.
较短的生命周期减少了作用域中的变量数量,从而保持了代码的整洁并使重构更加容易。
Thus, this new C++17 feature is very useful for further use.
因此,此新的C ++ 17功能对于进一步使用非常有用。
Constexpr Lambdas和捕获* this by Value (Constexpr Lambdas and Capturing *this by Value)
As it is written here: "In C++11 and later, a lambda expression—often called a lambda—is a convenient way of defining an anonymous function object (a closure) right at the location where it is invoked or passed as an argument to a function. Typically, lambdas are used to encapsulate a few lines of code that are passed to algorithms or asynchronous methods. This article defines what lambdas are, compares them to other programming techniques, describes their advantages, and provides a basic example."
就像这里写的那样:“在C ++ 11和更高版本中,lambda表达式(通常称为lambda)是一种在调用或传递匿名函数对象(即闭包)的位置处定义匿名函数对象(闭包)的便捷方法。通常,lambda用于封装传递给算法或异步方法的几行代码本文定义了lambda,将其与其他编程技术进行比较,描述它们的优势,并提供一个基本示例。 ”
C++17 offers two significant improvements to lambda expressions:
C ++ 17对lambda表达式进行了两项重大改进:
constexpr lambdas
constexpr lambdas
capture of *this
捕获* this
constexpr lambdas (constexpr lambdas)
Lambda expressions are a short form for writing anonymous functors introduced in C++11, which have become an integral part of modern C++ standard. Using the constexpr keyword, also introduced in C++11, we can evaluate the value of a function or variable at compile time. In C++17, these two entities are allowed to interact together, so lambda can be invoked in the context of a constant expression.
Lambda表达式是编写C ++ 11中引入的匿名函子的一种简短形式,匿名函子已成为现代C ++标准不可或缺的一部分。 使用也在C ++ 11中引入的constexpr关键字,我们可以在编译时评估函数或变量的值。 在C ++ 17中,允许这两个实体一起交互,因此可以在常量表达式的上下文中调用lambda。
For example:
例如:
constexpr auto my_val {foo()};
Declaring the variable my_val with the constexpr modifier will ensure that the function object it stores will be created and initialized at compile time.
使用constexpr修饰符声明变量my_val将确保在编译时创建并初始化存储的函数对象。
In the definition of a lambda expression, we can use the optional constexpr parameter:
在lambda表达式的定义中,我们可以使用可选的constexpr参数:
[capture clause] (parameter list) mutable costexpr exception-specification -> return-type
{

}
If we explicitly mark the lambda expression with the constexpr keyword, then the compiler will generate an error when this expression does not meet the criteria of the constexpr function. The advantage of using constexpr functions and lambda expressions is that the compiler can evaluate their result at compile time if they are called with parameters that are constant throughout the process. This will result in less code in the binary later. If we do not explicitly indicate that lambda expressions are constexpr, but these expressions meet all the required criteria, then they will be considered constexpr anyway, only implicitly.
如果我们用constexpr关键字显式标记lambda表达式,则当该表达式不符合constexpr函数的条件时,编译器将生成错误。 使用constexpr函数和lambda表达式的优点是,如果在整个过程中使用不变的参数调用它们,则编译器可以在编译时评估其结果。 稍后将减少二进制代码的数量。 如果我们没有明确指出lambda表达式是constexpr ,但是这些表达式满足所有必需的条件,则无论如何,它们都将被视为constexpr ,只是隐式地。
For example:
例如:
constexpr auto NvalueLambda = [](int n) { return n; }; // implicitly constexpr
If we want the lambda expression to be constexpr, then it is better to explicitly set it as such, because in case of errors the compiler will help us identify them by printing error messages.
如果我们希望lambda表达式为constexpr ,则最好将其设置为这样,因为在发生错误的情况下,编译器将通过打印错误消息来帮助我们识别它们。
Let's look at an example demonstrating how C++17 evaluates statically (at compile time) lambda expressions and functions:
让我们看一个示例,该示例演示C ++ 17如何静态(在编译时)评估lambda表达式和函数:
#include

constexpr int Increment(int value) {
	return [value] { return value + 1; }();
};

constexpr int Decrement(int value) {
	return [value] { return value - 1; }();
};

constexpr int AddTen(int value) {
	return [value] { return value + 10; }();
};

int main() {

	constexpr auto SumLambda    = [](const auto &a, const auto &b)
                                    { return a + b; };            // implicitly constexpr
	constexpr auto NvalueLambda = [](int n) { return n; };        // implicitly constexpr
	constexpr auto Pow2Lambda   = [](int n) { return n * n; };    // implicitly constexpr

	auto Add32Lambda = [](int n)
	{
		return 32 + n;
	};

	auto GetStr = [](std::string s)
	{
		return "Hello" + s;
	};

	constexpr std::string(*funcPtr)(std::string) = GetStr;

	static_assert(13 == SumLambda(8,5),   "SumLambda does not work correctly");
	static_assert(12 == NvalueLambda(12), "NvalueLambda does not work correctly");
	static_assert(42 == Add32Lambda(10),  "Add32Lambda does not work correctly");
	static_assert(25 == Pow2Lambda(5),    "Pow2Lambda does not work correctly");
	static_assert(11 == Increment(10),    "Increment does not work correctly");
	static_assert( 9 == Decrement(10),    "Decrement does not work correctly");
	static_assert(25 == AddTen(15),       "AddTen does not work correctly");

	constexpr int resultAdd32 = Add32Lambda(10);  // implicitly constexpr

	std::cout << "SumLambda(8,5)   = " << SumLambda(8, 5)  << std::endl;
	std::cout << "NvalueLambda(12) = " << NvalueLambda(12) << std::endl;
	std::cout << "Add32Lambda(10)  = " << Add32Lambda(10)  << std::endl;
	std::cout << "Pow2Lambda(5)    = " << Pow2Lambda(5)    << std::endl;
	std::cout << "Increment(10)    = " << Increment(10)    << std::endl;
	std::cout << "Decrement(10)    = " << Decrement(10)    << std::endl;
	std::cout << "DAddTen(15)      = " << AddTen(15)       << std::endl;
	std::cout << "funcPtr("" World"") = " <<
	funcPtr(" World").c_str() << std::endl;

	return 0;
}
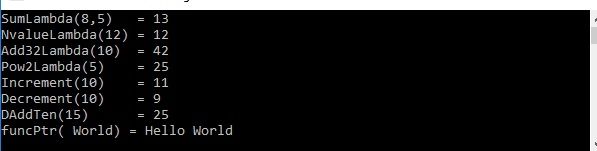
As we can see in the last few lines of the program, the static_assert function performs compile-time assertion checking. Static assertions are a way to check if a condition is true when the code is compiled. If it isn’t, the compiler is required to issue an error message and stop the compiling process. Thus, we check the lambda expressions at the compile time! If the condition is TRUE, the static_assert declaration has no effect. If the condition is FALSE, the assertion fails, the compiler displays the error message and the compilation fails.
正如我们在程序的最后几行中所看到的, static_assert函数执行编译时断言检查。 静态断言是一种在编译代码时检查条件是否为true 。 如果不是,则要求编译器发出错误消息并停止编译过程。 因此,我们在编译时检查了lambda表达式! 如果条件为TRUE ,则static_assert声明无效。 如果条件为FALSE ,则断言失败,编译器显示错误消息,并且编译失败。
Since all our lambda expressions follow the rules, no errors produced. The program compiles well and executing the program, we will see the following output:
由于我们所有的lambda表达式都遵循规则,因此不会产生任何错误。 该程序可以很好地编译并执行该程序,我们将看到以下输出:
通过值捕获* this (Capturing *this by Value)
In C++17, we can use 'this' pointer inside lambda-expressions used by member functions of a class, to capture a copy of the entire object of the class.
在C ++ 17中,我们可以在类的成员函数使用的lambda表达式内使用' this '指针,以捕获类的整个对象的副本。
For example, the syntax of a lambda expression might be as follows:
例如,lambda表达式的语法可能如下:
auto my_lambda = [*this]() { };
Let's imagine that we need to implement a class that will do complex arithmetic operations. It will have a member function that will add the number 10 to the original value, and will also display the result of addition.
假设我们需要实现一个将执行复杂算术运算的类。 它将具有一个成员函数,该函数会将数字10加到原始值,并且还将显示加法结果。
To do this, we implement the following code:
为此,我们实现以下代码:
#include

class ArithmeticOperations {

     public:
          ArithmeticOperations(const int val = 0) : m_sum(val) {}

          void addTen() {
               auto addTenLambda = [this]() { m_sum += 10;
               std::cout << "\nFrom 'addTenLambda' body : the value of m_sum =
                            " << m_sum << "\n\n"; };
               addTenLambda();
          }

          int getSum() {
               return m_sum;
          }

     private:
          int m_sum;
};

int main() {
     ArithmeticOperations oper;

     std::cout << "Before calling addTen() value of m_sum = " << oper.getSum() << '\n';
     oper.addTen();
     std::cout << "After  calling addTen() value of m_sum = " << oper.getSum() << '\n';

     return 0;
}

As we can see in ArithmeticOperations::addTen, we use a lambda expression that captures 'this' pointer. By capturing the 'this' pointer, we effectively give the lambda expression access to all members that the surrounding member function has access to.
如我们在ArithmeticOperations::addTen ,我们使用了一个lambda表达式来捕获' this '指针。 通过捕获“ this ”指针,我们有效地给了lambda表达式访问周围成员函数有权访问的所有成员的权限。
That is, function call operator of addTenLambda will have access to all protected and private members of ArithmeticOperations, including the member variable m_sum.
也就是说, addTenLambda函数调用运算符将有权访问ArithmeticOperations所有protected成员和private成员,包括成员变量m_sum 。
Therefore, we can see that after calling addTenLambda in the addTen function, the value of m_sum has changed.
因此,我们可以看到,打完电话后addTenLambda在addTen功能,价值m_sum发生了变化。
However, maybe someone wants to not change the original value of the data member, but just get the result of adding 10 to our previous value.
但是,也许有人不想更改数据成员的原始值,而只是获得将10加到我们先前的值上的结果。
And then, we can take advantage of the new C++17 functionality - capturing a copy of the original object, and carry out operations to change the values of class members already with this copy.
然后,我们可以利用新的C ++ 17功能-捕获原始对象的副本,并执行操作以更改此副本已经具有的类成员的值。
#include

class ArithmeticOperations {

public:
     ArithmeticOperations(const int val = 0) : m_sum(val) {}

     void addTen_CaptureCopy() {
          auto addTenLambdaCopy = [*this]() mutable
          { m_sum += 10; std::cout << "\nFrom 'addTenLambdaCopy'
           body : the value of m_sum = " << m_sum << "\n\n"; };
          addTenLambdaCopy();
     }

     int getSum() {
          return m_sum;
     }

private:
     int m_sum;
};

int main() {
     ArithmeticOperations oper;

     std::cout << "Before calling addTen_CaptureCopy() value of m_sum =
                  " << oper.getSum() << '\n';
     oper.addTen_CaptureCopy();
     std::cout << "After  calling addTen_CaptureCopy() value of m_sum =
                  " << oper.getSum() << "\n\n";
     return 0;
}

In the example above, we reference a lambda expression with explicitly capture *this to get a copy of this and have access to all data members of original object.
在上面的示例中,我们引用了一个lambda表达式, *this表达式具有显式捕获*this的副本,并可以访问原始对象的所有数据成员。
After capturing, we used the lambda expression body to modify the m_sum member of copy of the original this.
捕获后,我们使用lambda表达式主体修改了原始this的副本的m_sum成员。
Thus, after adding 10 to (* this).m_sum directly in the lambda expression, we show the new value of (* this).m_sum on the screen.
因此,添加后10到(* this).m_sum直接在lambda表达式,我们显示的新值(* this).m_sum在屏幕上。
However, when we access getSum() from the main function, we get the m_sum value of the original object that was not changed. That is the difference!
但是,当我们从主函数访问getSum() ,我们将获得未更改的原始对象的m_sum值。 那是区别!
This technique can be used, for example, in cases where it is likely that the lambda expression will outlive the original object. For example, when using asynchronous calls and parallel processing.
例如,在lambda表达式有可能超过原始对象的情况下,可以使用此技术。 例如,当使用异步调用和并行处理时。
如果constexpr (if constexpr)
In C++17, the expressions 'if constexpr' appeared. The new feature works just like regular if-else constructs. The difference between them is that the value of a conditional expression is determined at compile time.
在C ++ 17中,出现了' if constexpr '表达式。 新功能的工作方式与常规if - else结构相同。 它们之间的区别在于条件表达式的值是在编译时确定的。
To better illustrate what a great innovation 'if constexpr' constructs are for C++17, let's look at how similar functionality was implemented with std::enable_if in previous language standards:
为了更好地说明if constexpr构造是针对C ++ 17的重大创新,让我们看看在以前的语言标准中如何使用std :: enable_if实现类似的功能:
#include
#include

template
std::enable_if_t::value, void>
TypeParam_Cpp11(T x) {
     std::cout << "TypeParam_Cpp11: int : " << x << std::endl;
}

template
std::enable_if_t::value, void>
TypeParam_Cpp11(T x) {
     std::cout << "TypeParam_Cpp11: double : " << x << std::endl;
}

template
std::enable_if_t::value, void>
TypeParam_Cpp11(T x) {
     std::cout << "TypeParam_Cpp11: std::string : " << x << std::endl;
}

int main() {
     TypeParam_Cpp11(5.9);
     TypeParam_Cpp11(10);
     TypeParam_Cpp11(std::string("577"));

     return 0;
}
The output of the above code is as follows:
上面代码的输出如下:

Implementations of the three above TypeParam_Cpp11 functions look simple. Only functions complicate the following expressions std::enable_if_t (C++14 adds a variation of std::enable_if_t. It's just an alias for accessing the ::type inside std::enable_if_t) If condition is true (i.e., only if std::is_same is true, and so T and U is the same type), std::enable_if has a public member typedef type, otherwise, std::enable_if_t does not refer to anything. Therefore, the condition can only be true for one of the three implementations at any given time.
上面三个TypeParam_Cpp11函数的实现看起来很简单。 只有函数使以下表达式std::enable_if_t 复杂化(C ++ 14添加了std::enable_if_t的变体。它只是访问std::enable_if_t内部::type的别名)如果条件为true (即,仅当std::is_same为true ,并且T和U为相同类型时), std::enable_if才具有public成员typedef类型,否则, std::enable_if_t不会引用任何内容。 因此,在任何给定时间,条件仅对于三个实现之一才为true 。
When the compiler sees different template functions with the same name and must select one of them, an important principle comes into play: it is indicated by the abbreviation SFINAE (Substitution Failure Is Not An Error). In this case, this means that the compiler does not generate an error if the return value of one of the functions cannot be inferred based on an invalid template expression (that is, std::enable_if_t when the condition is false). It will simply continue working and try to process other function implementations. That’s the whole secret. Uff... so much fuss!
当编译器看到具有相同名称的不同模板函数并且必须选择其中之一时,一个重要的原则就会起作用:缩写为SFINAE(替代失败不是错误)表明了这一点。 在这种情况下,这意味着如果不能基于无效的模板表达式(即条件为false时的std::enable_if_t )来推断函数之一的返回值,则编译器不会生成错误。 它只会继续工作并尝试处理其他功能实现。 那就是全部秘密。 ff ...大惊小怪!
Now let's change the above implementation using the new C++17 feature, that is, the ‘if constexpr’ expressions, which allows us to simplify the code by making decisions at compile time:
现在,让我们改变使用新的C ++ 17的功能,也就是“上面的实现if constexpr 的表情,这让我们通过使在编译时决定,以简化代码:
#include
#include

template
void TypeParam_Cpp17(T x)   {
     if constexpr (std::is_same_v) {
          std::cout << "TypeParam_Cpp17: int : " << x << std::endl;
     }
     else if constexpr (std::is_same_v) {
          std::cout << "TypeParam_Cpp17: double : " << x << std::endl;
     }
     else if constexpr (std::is_same_v) {
          std::cout << "TypeParam_Cpp17: std::string : " << x << std::endl;
     }
}

int main() {

     TypeParam_Cpp17(5.9);
     TypeParam_Cpp17(10);
     TypeParam_Cpp17(std::string("577"));

     return 0;
}
The output of the above code:
上面代码的输出:

The above example uses conditional judgment. The constexpr-if-else block, which has several conditions, completes the branching judgment at compile time. To determine the type of the argument 'x', the TypeParam function uses the expression std::is_same_v. The expression std::is_same_v is evaluated to the boolean value true if A and B are of the same type, otherwise the value is false.
上面的示例使用了条件判断。 具有多个条件的constexpr - if - else块在编译时完成分支判断。 为了确定参数' x '的类型, TypeParam函数使用表达式std::is_same_v 。 如果A和B的类型相同,则表达式std::is_same_v的布尔值std::is_same_v true,否则为false 。
At large, all run-time code generated by the compiler from a program will not contain additional branches related to the 'if constexpr' conditions. It may seem that these mechanisms work the same way as the #if and #else preprocessor macros, which are used to substitute text, but in this construct, the whole code does not even need to be syntactically correct. Branches of the 'if constexpr' construct must be syntactically valid, but unused branches need not be semantically correct.
通常,编译器从程序生成的所有运行时代码都不会包含与' if constexpr '条件相关的其他分支。 看起来这些机制的工作方式与#if和#else预处理程序宏(用于替换文本)的工作方式相同,但是在此结构中,整个代码甚至不需要在语法上正确。 ' if constexpr '构造的分支必须在语法上有效,但是未使用的分支不必在语义上正确。
__has_include (__has_include)
C++ 17 has a new feature for testing available headers. The new standard makes it possible to use macro constant preprocessor tokens or preprocessing expressions __has_include to check whether a given header exists.
C ++ 17具有测试可用标头的新功能。 新标准使使用宏常量预处理器令牌或预处理表达式__has_include可以检查给定的标头是否存在。
To avoid re-including the same file and infinite recursion, header protection is usually used:
为了避免重新包含相同的文件和无限递归,通常使用标头保护:
#ifndef MyFile_H
#define MyFile_H
// contents of the file here
#endif
However, we can now use the constant expression of the preprocessor as follows:
但是,我们现在可以使用预处理器的常量表达式,如下所示:
#if __has_include ()
#if __has_include ("header_name")
For example, in cases where we need to write portable code and at compile time check which of the headers we need to get, depending on the operating system, instead of using code like this:
例如,在需要编写可移植代码并在编译时检查的情况下,取决于操作系统,我们需要获取哪个标头,而不是使用像这样的代码:
#ifdef _WIN32
#include
#define the_windows 1
#endif

#if (defined(linux) || defined(__linux) || defined(__linux__) ||
     defined(__GNU__) || defined(__GLIBC__)) && !defined(_CRAYC)
#include
#endif

#include

int main() {
#ifdef the_windows
	std::cout << "This OS is Windows";
#else
	std::cout << "This OS is Linux";
#endif
	return 0;
}
In С++17, we can use __has_include() macro for the same purpose:
在С++ 17中,我们可以将__has_include()宏用于相同的目的:
#if __has_include()
#include
#define the_windows 1
#endif

#if __has_include()
#include
#endif

#include

int main() {
#ifdef the_windows
     std::cout << "This OS is Windows";
#else
     std::cout << "This OS is Linux";
#endif
     return 0;
}
不重复使用属性命名空间 (Using Attribute Namespaces Without Repetition)
In C++17, when using “non-standard” attributes, the rules were slightly optimized.
在C ++ 17中,当使用“非标准”属性时,对规则进行了一些优化。
In C++11 and C++14, if we need to write several attributes, it was necessary to specify an attached prefix for EACH namespace, something like this:
在C ++ 11和C ++ 14中,如果我们需要编写几个属性,则必须为EACH名称空间指定一个附加的前缀,如下所示:
[[ rpr::kernel, rpr::target(cpu,gpu) ]] // repetition
int foo() {
     /* .....*/
     return 0;
}
Of course, the code above seems a bit cluttered and bloated. Therefore, the International Organization for Standardization decided to simplify the case in which it is necessary to use several attributes together.
当然,上面的代码似乎有点混乱和肿。 因此,国际标准化组织决定简化必须同时使用多个属性的情况。
In C++17, we no longer have to add prefix for each namespace with subsequent attributes being used together.
在C ++ 17中,我们不再需要为每个名称空间添加前缀,并且随后的属性一起使用。
For example, using this innovation, the code shown above will look much clearer and more understandable:
例如,使用此创新,上面显示的代码将看起来更加清晰和易于理解:
[[using rpr: kernel, target(cpu,gpu)]] // without repetition
int foo() {
     /* .....*/
     return 0;
}
属性“ nodiscard”,“ fallthrough”,“ maybe_unused” (Attributes 'nodiscard', 'fallthrough', 'maybe_unused')
In C++11, common attributes were added to the language allowing the compiler to provide additional information about characters or expressions in the code.
在C ++ 11中,通用属性已添加到该语言中,从而允许编译器提供有关代码中字符或表达式的其他信息。
In the past, leading compilers have proposed their own mechanisms for this, such as:
过去,领先的编译器为此提出了自己的机制,例如:
__attribute__(deprecated)in GNU GCC and LLVM/Clang__attribute__(deprecated)在GNU GCC和LLVM / Clang中__declspec(deprecated)in Visual C++__declspec(deprecated)在Visual C ++中
Generic attributes, which are also series of attribute specifiers, allow us to express the same in a way that is independent of the compiler.
通用属性也是一系列属性说明符,它使我们能够以与编译器无关的方式来表达相同的内容。
C ++ 17中的新属性 (New Attributes in C++17)
In C++17, three new attributes got into the standard, which allow us to control the appearance of various compiler warnings.
在C ++ 17中,该标准引入了三个新属性,它们使我们能够控制各种编译器警告的出现。
fallthroughis placed before thecasebranch in theswitchand indicates that operator break is intentionally omitted at this point, that is, the compiler should not warn of fallthrough.fallthrough在switch的case分支之前放置,指示此时有意省略了运算符break,即,编译器不应警告fallthrough。void Test_With_fallthrough_Attribute(int num_version) { switch (num_version) { case 1998: std::cout << "c++ 98"; break; case 2011: std::cout << "c++ 11" << std::endl; break; case 2014: std::cout << "c++ 14" << std::endl; case 2017: std::cout << "c++ 17" << std::endl; [[fallthrough]];// No warning! The hint to the compiler case 2020: std::cout << "c++ 20" << std::endl; break; default: std::cout << "Error!" << std::endl; break; } }Nevertheless, the Microsoft C++ compiler currently does not warn on fallthrough behavior, so this attribute has no effect on compiler behavior.
但是,Microsoft C ++编译器当前不会警告掉线行为,因此此属性对编译器行为没有影响。
nodiscardindicates that the value returned by the function cannot be ignored and must be stored in some variablenodiscard表示该函数返回的值不能忽略,必须存储在某个变量中Let's look at the following example:
让我们看下面的例子:
int Test_Without_nodiscard_Attribute() {
     return 5;
}

[[nodiscard]] int Test_With_nodiscard_Attribute() {
     return 5;
}

int main() {
     Test_Without_nodiscard_Attribute();
     Test_With_nodiscard_Attribute();
     return 0;
}
After compilation, the following warning will be returned to call
Test_With_nodiscard_Attribute ()on the function:编译后,将在函数上返回以下警告以调用
Test_With_nodiscard_Attribute ():"
warning C4834: discarding return value of function with 'nodiscard' attribute", as shown in the following image:“
warning C4834: discarding return value of function with 'nodiscard' attribute”,如下图所示:
What it means is that you can force users to handle errors.
这意味着您可以强制用户处理错误。
Let's fix the above code:
让我们修复上面的代码:
int Test_Without_nodiscard_Attribute() { return 5; } [[nodiscard]] int Test_With_nodiscard_Attribute() { return 5; } int main() { Test_Without_nodiscard_Attribute(); int res = Test_With_nodiscard_Attribute(); return 0; }maybe_unusedcauses the compiler to suppress warnings about a variable that is not used in some compilation modes (for example, the function return code is only checked in assert).maybe_unused使编译器禁止显示某些编译模式中未使用的变量的警告(例如,仅在assert中检查函数返回代码)。Let's look at the following example:
让我们看下面的例子:
[[maybe_unused]] void foo() { std::cout <<
"Hi from foo() function \n"; } // Warning suppressed for function not called

int main() {

     [[maybe_unused]] int x = 10; // Warning suppressed for x

     return 0;
}
In the above example, the function
foo ()and the local variable 'x' are not used, however warning about unused variables will be suppressed.在上面的示例中,未使用函数
foo ()和局部变量'x',但是将取消有关未使用变量的警告。In Visual Studio 2017 version 15.3 and later (available with /std:c++17) [[maybe_unused]] specifies that a variable, function, class, typedef, non-static data member, enum, or template specialization may be intentionally not used.
在Visual Studio 2017版本15.3和更高版本(与/ std:c ++ 17一起提供)中,[[maybe_unused]]指定可能故意不指定变量,函数,类,typedef,非静态数据成员,枚举或模板的特殊化用过的。
The compiler does not warn when an entity marked [[maybe_unused]] is not used.
当未使用标记为[[maybe_unused]]的实体时,编译器不会发出警告。
std :: string_view (std::string_view)
C++17 brings us a new type called std::string_view, a type defined in the string_view header, added to the Standard Library.
C ++ 17为我们带来了一个名为std :: string_view的新类型,该类型在string_view标头中定义,已添加到标准库中。
Due to the performance of this type, it is recommended to use it instead of const std::string& for input string parameters. Values of this type will act analogously to values of type const std::string only with one major difference: the strings they encapsulate can never be modified through their public interface. In other words, std::string_view gives us the ability to refer to an existing string in a non-owning way, we can view but not touch the characters of std::string_view (while there is nothing wrong with using const std::string_view &, we can as well pass std::string_view by value because copying these objects is cheap).
由于这种类型的性能,建议使用它代替const std::string&作为输入字符串参数。 此类型的值将类似于const std::string类型的值,但有一个主要区别: 它们封装的字符串永远不能通过其公共接口进行修改 。 换句话说, std::string_view使我们能够以非所有权方式引用现有字符串,我们可以查看但不能触摸std::string_view的字符(尽管使用const std::string_view并没有错。 const std::string_view &,我们也可以按值传递std::string_view ,因为复制这些对象很便宜。
Let's take a look at the following example:
让我们看下面的例子:
#include
#include
#include

void func_str(const std::string & s) {
     std::cout << "s =" << s.data() << std::endl;
}

void func_str_view(std::string_view  s) {
     std::cout << "s =" << s.data() << std::endl;
}

int main() {
     std::string str ("abcdefghijklmnopqrstuvwxyz0123456789ABCDEFGHIJKLMNOPQRSTUVWXYZ");

	auto t1 = std::chrono::high_resolution_clock::now();
	func_str(str);
	auto t2 = std::chrono::high_resolution_clock::now();
	auto duration1 = std::chrono::duration_cast(t2 - t1).count();
	std::cout << "The processing time of func_str(str) is " << duration1 << " ticks\n\n";

	auto t3 = std::chrono::high_resolution_clock::now();
	func_str_view(str);
	auto t4 = std::chrono::high_resolution_clock::now();
	auto duration2 = std::chrono::duration_cast(t4 - t3).count();
	std::cout << "The processing time of func_str_view(str) is " << duration2 << " ticks\n\n";

     return 0;
}
Let's take a look at the output of the above code:
让我们看一下上面代码的输出:

Of course on your machine, the output may be different, but in any case, the above example shows that the function using std::string_view is much faster. Note the func_str_view function accepting some string, but does not need ownership, it clearly reflects the intention: the function gets an overview of the string. The func_str_view function will also work with const char * arguments, because std::string_view is a thin view of a character array, holding just a pointer and a length. Therefore, this allows us to provide just one method that can efficiently take either a const char*, or a std::string, without unnecessary copying of the underlying array.
当然,在您的计算机上,输出可能会有所不同,但是无论如何,以上示例显示了使用std::string_view的函数要快得多。 注意func_str_view函数接受一些string ,但是不需要所有权,它清楚地反映了意图:该函数获得string的概述。 func_str_view函数也可以使用const char *参数,因为std::string_view是字符数组的精简视图,仅包含指针和长度。 因此,这使我们能够提供一种方法,该方法可以有效地采用const char*或std::string ,而不必复制基础数组。
For example, we can call a function this way:
例如,我们可以这样调用函数:
func_str_view("abcdefghijklmnopqrstuvwxyz0123456789ABCDEFGHIJKLMNOPQRSTUVWXYZ");
This func_str_view function doesn't own anything, it just looks at the string and does not involve any heap allocations and deep copying of the character array.
这个func_str_view函数不拥有任何东西,它仅查看string ,并且不涉及任何堆分配和字符数组的深层复制。
That’s why this function works much faster than func_str.
这就是为什么此函数比func_str快得多的func_str 。
Meanwhile, std::string_view also has a number of limitations compared to its "kinsman" - std::string:
同时,与"kinsman" - std::string相比, std::string_view也有许多限制:
std::string_viewknows nothing of null-terminationstd::string_view知道空终止Unlike
std::string,std::string_viewdoes not support thec_str ()function, which will give us an array of characters with anull-terminated. Of course,std::string_viewhas thedata()function, but likedata()ofstd::string, this does not guarantee that the character array will benull-terminated.与
std::string不同,std::string_view不支持c_str ()函数,该函数将为我们提供一个以null终止的字符数组。 当然,std::string_view具有data()函数,但是像std::stringdata()一样,这不能保证字符数组将以null终止。Therefore, to call a function with a
string null-terminated argument:因此,要调用以
string null终止的参数的函数:func_str_view_c_str("aaaaabbbbbccccc");We need to create a temporarystringstringstd::stringin the function body, for example, like this:std::string,例如:void func_str_view_c_str(std::string_view s) { std::cout << "s = " << std::string(s).c_str() << std::endl; // string_view does not provide a c_str() }Returning
std::string_viewfrom a function can lead to a problem of dangling pointers:从函数返回
std::string_view会导致指针悬空的问题:Let's look at the following example:
让我们看下面的例子:
#include#include class StringMngr { std::string m_str; public: StringMngr(const char* pstr = "Test") :m_str(pstr) {} std::string_view GetSubString() const { return m_str.substr(1u); // substring starts at index 1 till the end } }; int main() { StringMngr str_mgr; std::cout << "str_mgr.GetSubString() = " << str_mgr.GetSubString(); return 0; } The output of the above code is as shown below:
上面代码的输出如下所示:

How does the above code work? What could be the problem?
上面的代码如何工作? 可能是什么问题呢?
We just want to give the right to review the
substring, but the problem is thatstd::string::substr()returns a temporary object of typestd::string.我们只想授予查看
substring的权利,但是问题是std::string::substr()返回一个类型为std::string的临时对象。And the method returns an overview (i.e., view) of the time line, which will disappear by the time the overview can be used.
并且该方法返回时间线的概览(即视图),该概览将在使用概览时消失。
The correct solution would be to explicitly convert to
std::string_viewbefore callingsubstr:正确的解决方案是在调用
substr之前显式转换为std::string_view:std::string_view GetSubString() const { return std::string_view(m_str).substr(1u); }After modifying the
GetSubString()function, we get the expected output:修改
GetSubString()函数后,我们将获得预期的输出:
The
substr()method forstd::string_viewis more correct: it returns an overview of the substring without creating a temporary copy.std::string_view的substr()方法更正确:它返回子字符串的概述,而不创建临时副本。The real problem is that, ideally, the
std::string::substr()method should returnstd::string_view.真正的问题是,理想情况下,
std::string::substr()方法应返回std::string_view。And this is just one aspect of the more general problem of dangling references that has not been resolved in C++.
这只是C ++中尚未解决的悬挂引用更普遍问题的一方面。
嵌套的“命名空间” (Nested 'namespaces')
Namespaces are used to organize code into logical groups, to group different entities such as: classes, methods and functions under a name. In addition, namespaces designed to prevent name collisions that can occur especially when your code base includes multiple libraries. All identifiers at namespace scope are visible to one another without qualification. OK, this is understandable, and before C++17, we used namespaces like this:
命名空间用于将代码组织为逻辑组,以将不同的实体分组,例如:名称下的类,方法和函数。 此外,命名空间旨在防止可能发生名称冲突的情况,特别是当您的代码库包含多个库时。 命名空间范围内的所有标识符都是彼此可见的,而没有资格。 好的,这是可以理解的,在C ++ 17之前,我们使用如下命名空间:
#include

namespace CompanyABC
{
     class Transport
     {
     public:
          void foo() { std::cout << "foo()"; }
     };

     void goHome1() { std::cout << "goHome1()"; }
     void startGame() { std::cout << "goHome1()"; }
}
Things are getting interesting when we use two or more nested namespaces.
当我们使用两个或多个嵌套的名称空间时,事情变得越来越有趣。
Before C++ 17, we used the following namespace format:
在C ++ 17之前,我们使用以下名称空间格式:
#include

namespace CompanyDEF {
     namespace  GroundTransportation {
          namespace HeavyTransportation {

               class Transport {
               public:
                    void foo() { std::cout << "foo() \n"; }
               };

               void goHome() { std::cout << "goHome() \n"; }
          } // HeavyTransportation

          void startGame() { std::cout << "startGame() \n"; }

     } // roundTransportation

} // CompanyDEF
Entities are created and called as follows:
实体的创建和调用如下:
CompanyDEF::GroundTransportation::HeavyTransportation::Transport trnsprt;
trnsprt.foo();

CompanyDEF::GroundTransportation::HeavyTransportation::goHome();
CompanyDEF::GroundTransportation::startGame();
Starting with C++17, nested namespaces can be written more compactly:
从C ++ 17开始,可以更紧凑地编写嵌套名称空间:
#include

namespace CompanyDEF {
     namespace  GroundTransportation {
          namespace HeavyTransportation {

               class Transport {
               public:
                    void foo() { std::cout << "foo() \n"; }
               };

               void goHome() { std::cout << "goHome() \n"; }
          } // HeavyTransportation

          void startGame() { std::cout << "startGame() \n"; }

     } // roundTransportation

} // CompanyDEF
Entities are created and called as follows:
实体的创建和调用如下:
using namespace CompanyDEF::GroundTransportation::HeavyTransportation;
using namespace CompanyDEF::GroundTransportation::HeavyTransportation;
using namespace CompanyDEF::GroundTransportation;

Transport trnsprt;
trnsprt.foo();

goHome();
startGame();
字符串转换 (String Conversions)
Of course, in previous standards of C++, there were always string conversion functions, such as: std::atoi, std::atol, std::atoll, std::stoi, std::stol, std::stoll, std::sprintf, std::snprintf, std::stringstream, std::sscanf, std::strtol, std::strtoll, std::stringstream, std::to_string, etc. Unfortunately, these features are not efficient enough in terms of performance. It is generally believed that the above functions are slow for complex string processing, such as for efficient processing of complex data formats such as JSON or XML. Especially when such data formats are used for communication over a network where high bandwidth is a critical factor.
当然,在以前的C ++标准中,总是存在字符串转换函数,例如: std::atoi , std::atol , std::atoll , std::stoi , std::stol , std::stoll , std::sprintf , std::snprintf , std::stringstream , std::sscanf , std::strtol , std::strtoll , std::stringstream , std::to_string等。不幸的是,这些功能在性能方面。 通常认为,对于复杂的字符串处理,例如对于诸如JSON或XML的复杂数据格式的有效处理,上述功能很慢。 尤其是当此类数据格式用于通过高带宽成为关键因素的网络进行通信时。
In C++17, we get two sets of functions: from_chars and to_chars, which allow low-level string conversions and significantly improve performance.
在C ++ 17中,我们得到了两套函数: from_chars和to_chars ,这让低级别的字符串转换和显著提高性能。
For example, Microsoft reports that C++17 floating-point to_chars() has been improved for scientific notation, it is approximately 10x as fast as sprintf_s() “%.8e” for floats, and 30x as fast as sprintf_s() “%.16e” for doubles. This uses Ulf Adams’ new algorithm, Ryu.
例如,Microsoft报告说,C ++ 17 floating-point to_chars()已改进为科学记数法,对于float s,它的速度大约是sprintf_s() “%.8e” 10倍,而速度是sprintf_s() “%.8e” 30 sprintf_s() “%.16e”为double s。 这使用了Ulf Adams的新算法Ryu。
Let's look at an example of how, using std::from_chars, we can convert strings to integers and floating-points numbers:
让我们看一个示例,该示例如何使用std::from_chars将字符串转换为整数和浮点数:
#include
#include
#include
#include  // from_chars

int main()
{
	std::cout << "---------------------------------------------------------------------------------------------------\n";
	std::cout << "Let's demonstrate string conversion to integer using the 'std::from_chars' function " << std::endl;
	std::cout << "---------------------------------------------------------------------------------------------------\n";

	std::array arrIntNums = { std::string("-123"),
                              std::string("-1234"),
                              std::string("-12345"),
                              std::string("-1234567890987654321"),
                              std::string("123"),
                              std::string("1234"),
                              std::string("1234567890"),
                              std::string("1234567890987654321")};
	int stored_int_value { 0 };
	for (auto& e : arrIntNums)
	{
		std::cout << "Array element = " << e << std::endl;
		const auto res = std::from_chars(e.data(), e.data() + e.size(),
                         stored_int_value /*, int base = 10*/);

		switch (res.ec)
		{
			case std::errc():
				std::cout << "Stored value: " << stored_int_value << ",
                Number of characters = " << res.ptr - e.data() << std::endl;
				break;
			case std::errc::result_out_of_range:
				std::cout << "Result out of range!
                Number of characters = " << res.ptr - e.data() << std::endl;
				break;
			case std::errc::invalid_argument:
				std::cout << "Invalid argument!" << std::endl;
				break;
			default:
				std::cout << "Error: res.ec = " << int(res.ec) << std::endl;
		}
	}

	std::cout << "\n---------------------------------------------------------------------------------------------------";
	std::cout << "\nLet's demonstrate string conversion to double using the 'std::from_chars' function ";
	std::cout << "\n---------------------------------------------------------------------------------------------------\n";

	std::array arrDoubleNums = { std::string("4.02"),
                                 std::string("7e+5"),
                                 std::string("A.C"),
                                 std::string("-67.90000"),
                                 std::string("10.9000000000000000000000"),
                                 std::string("20.9e+0"),
                                 std::string("-20.9e+1"),
                                 std::string("-10.1") };
	double stored_dw_value { 0.0 };
	for (auto& e : arrDoubleNums)
	{
		std::cout << "Array element = " << e << std::endl;
		const auto res = std::from_chars(e.data(), e.data() + e.size(),
                         stored_dw_value, std::chars_format::general);

		switch (res.ec)
		{
		case std::errc():
			std::cout << "Stored value: " << stored_dw_value << ",
                 Number of characters = " << res.ptr - e.data() << std::endl;
			break;
		case std::errc::result_out_of_range:
			std::cout << "Result out of range! Number of characters = "
                      << res.ptr - e.data() << std::endl;
			break;
		case std::errc::invalid_argument:
			std::cout << "Invalid argument!" << std::endl;
			break;
		default:
			std::cout << "Error: res.ec = " << int(res.ec) << std::endl;
		}
	}

	return 0;
}
Note that on the second call to std::from_chars, we use the extra, last std::chars_format::general argument.
请注意,在第二次调用std::from_chars ,我们使用了额外的最后一个std::chars_format::general参数。
The std::chars_format::general (which is defined in header std::to_chars and std::from_chars functions.
所述std::chars_format::general (在报头中定义std::to_chars和std::from_chars功能。
Let's look at the output of the above code, converting strings to an integers and doubles:
让我们看一下上面代码的输出,将字符串转换为整数和双精度:

Now let's do the opposite action, i.e., consider an example of how we can use std::to_chars to convert integers and floating point numbers into strings:
现在让我们做相反的操作,即考虑一个如何使用std::to_chars将整数和浮点数转换为字符串的示例:
#include
#include
#include
#include  // to_chars

int main()
{
     std::cout << "--------------------------------------------------------------------------------------------------------------------\n";
     std::cout << "Let's demonstrate the conversion of long values to a string (5 characters long) using the 'std::to_chars' function " << std::endl;
     std::cout << "--------------------------------------------------------------------------------------------------------------------\n";

     // construction uses aggregate initialization
     std::array arrIntNums = { -123,-1234,-12345, -1234567890, 123, 1234, 1234567890, 987654321};
     std::string stored_str_value{ "00000" };
     for (auto& e : arrIntNums)
     {
          stored_str_value = "00000";
          std::cout << "Array element = " << e << std::endl;
          const auto res = std::to_chars(stored_str_value.data(),
              stored_str_value.data() + stored_str_value.size(), e /*, int base = 10*/);

          switch (res.ec)
          {
               case std::errc():
                    std::cout << "Stored value: " << stored_str_value << ",
                    Number of characters = " << res.ptr - stored_str_value.data() << std::endl;
                    break;
               case std::errc::result_out_of_range:
                    std::cout << "Result out of range! Number of characters = "
                              << res.ptr - stored_str_value.data() << std::endl;
                    break;
               case std::errc::value_too_large:
                    std::cout << "Value too large!" << std::endl;
                    break;
               default:
                    std::cout << "Error: res.ec = " << int(res.ec) << std::endl;
          }

     }

     std::cout << "--------------------------------------------------------------------------------------------------------------------\n";
     std::cout << "Let's demonstrate the conversion of double values to a string (5 characters long) using the 'std::to_chars' function " << std::endl;
     std::cout << "--------------------------------------------------------------------------------------------------------------------\n";

     // construction uses aggregate initialization
     std::array arrDoubleNums = {4.02, 7e+5, 5, -67.90000,
                                 10.9000000000000000000101,20.9e+0,-20.9e+1,-10.1};

     for (auto& e : arrDoubleNums)
     {
          stored_str_value = "00000";
          std::cout << "Array element = " << e << std::endl;
          const auto res = std::to_chars(stored_str_value.data(),
          stored_str_value.data() + stored_str_value.size(), e, std::chars_format::general);

          switch (res.ec)
          {
               case std::errc():
                    std::cout << "Stored value: " << stored_str_value << ",
                    Number of characters = " << res.ptr - stored_str_value.data() << std::endl;
                    break;
               case std::errc::result_out_of_range:
                    std::cout << "Result out of range! Number of characters = "
                              << res.ptr - stored_str_value.data() << std::endl;
                    break;
               case std::errc::value_too_large:
                    std::cout << "Value too large!" << std::endl;
                    break;
               default:
                    std::cout << "Error: res.ec = " << int(res.ec) << std::endl;
          }
     }

     return 0;
}
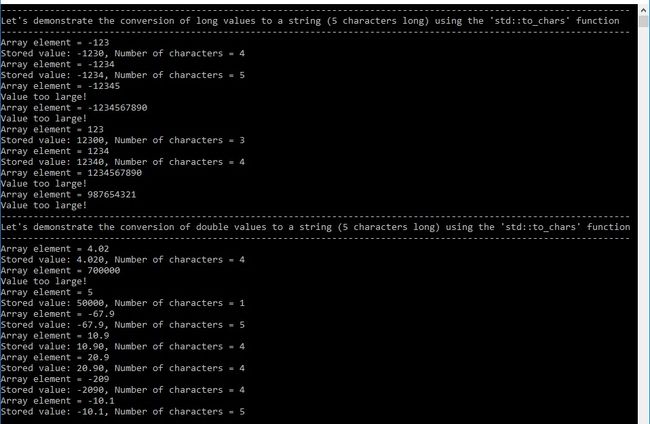
Let's take a look at the output of the above code, which converts long and double values to strings:
让我们看一下上述代码的输出,该输出将long和double值转换为字符串:
过度对齐的动态内存分配 (Over-Aligned Dynamic Memory Allocation)
C++17 introduced dynamic memory allocation for over-aligned data.
C ++ 17引入了针对过度对齐的数据的动态内存分配 。
The /Zc:alignedNew (C++17 over-aligned allocation) article perfectly describes how the compiler and MSVC library support C++17 standard dynamic memory allocation, so I won’t add anything on this issue.
/ Zc:alignedNew(C ++ 17过度对齐的分配)文章完美地描述了编译器和MSVC库如何支持C ++ 17标准动态内存分配,因此在此问题上我不会添加任何内容。
折叠表达式 (Fold Expressions)
C++17 standard introduces a new element of the language syntax - fold expressions. This new syntax is for folding variadic templates parameter pack (variadic template get variable number of arguments and is supported by C++ since the C++11). Using folding helps to avoid cumbersome recursive calls and allows us to apply the operations to all individual arguments of the pack in a compact form. When processing a list of template parameter pack, fold expressions can be used with the following binary operators: +, -, *, /, %, ^, &, |, =, <, >, <<, >>, +=, -=, *=, /=, %=, ^=, &=, |=, <<=, >>=,==, !=, <=, >=, &&, ||, ,, .*, ->*.
C ++ 17标准引入了语言语法的新元素-折叠表达式。 此新语法用于折叠可变参数模板参数包(可变模板获取可变数量的参数,并且自C ++ 11起受C ++支持)。 使用折叠有助于避免繁琐的递归调用,并允许我们以紧凑的形式将操作应用于包的所有单个参数。 处理模板参数包列表时,可将折叠表达式与以下二进制运算符一起使用:+,-,*,/,%,^,&,|,=,<,>,<<,>>,+ = ,-=,* =,/ =,%=,^ =,&=,| =,<< =,>> =,==,!=,<=,> =,&&,||,。 *,-> *。
The syntax for declaring a fold expressions with variadic templates:
使用可变参数模板声明折叠表达式的语法:
template
decltype(auto) summation(T... Values)
{
	// unfolds into the expression Values1 + (Values2 + (Values3 + Values4))...
	return (Values + ...);
}
Let's look at the following example:
让我们看下面的例子:
#include
#include

template
auto Sum_RightHand(Ts ... ts)
{
     return (ts + ...);
}

template
auto Sum_LeftHand(Ts ... ts)
{
     return (... + ts);
}

int main() {

     std::cout << "Sum_RightHand output: \n";
     std::cout << Sum_RightHand(10, 20, 30) << std::endl;
     std::cout << Sum_RightHand(1.5, 2.8, 3.2) << std::endl;
     std::cout << Sum_RightHand(std::string("Hi "), std::string("standard "),
                  std::string("C++ 17")) << std::endl;

     std::cout << "\n";

     std::cout << "Sum_LeftHand output: \n";
     std::cout << Sum_LeftHand(10, 20, 30) << std::endl;
     std::cout << Sum_LeftHand(1.5, 2.8, 3.2) << std::endl;
     std::cout << Sum_LeftHand(std::string("Hi "), std::string("standard "),
                  std::string("C++ 17")) << std::endl;

     return 0;
}
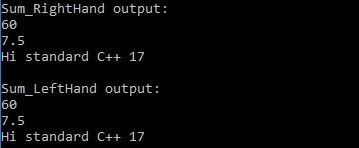
The output of the above code is as shown below:
上面代码的输出如下所示:
In the above code, for both functions, we defined the signature using the template parameter pack:
在上面的代码中,对于这两个函数,我们使用模板参数包定义了签名:
template
模板
Functions unfold all parameters and summarize them using a fold expression.(In the scope of functions, we used the +operator to apply to all values of the parameter pack)
函数展开所有参数并使用fold表达式对其进行汇总(在函数范围内,我们使用+运算符应用于参数包的所有值)
As we can see, Sum_RightHand (ts + ...) and Sum_LeftHand (... + ts) give identical results. However, there is a difference between them, which may matter in other cases: if the ellipsis (...) is on the right side of the operator, an expression is called a right fold. If it is on the left side, it is the left fold.
如我们所见, Sum_RightHand (ts + ...)和Sum_LeftHand (... + ts)给出相同的结果。 但是,它们之间存在差异,在其他情况下这可能很重要:如果省略号(...)位于运算符的右侧,则表达式称为right fold 。 如果在左侧,则为左折 。
In our example, Sum_LeftHand is unfolded as follows:
在我们的示例中, Sum_LeftHand展开如下:
10 + (20 + 30)
10 +(20 + 30)
1.5 + (2.8 + 3.2)
1.5 +(2.8 + 3.2)
"Hi" + ("standard " + "C++ 17")
“ Hi” +(“标准” +“ C ++ 17”)
and the right unary fold with Sum_RightHand is unfolded as follows:
Sum_RightHand的右一元折叠如下所示:
(10 +20) + 30
(10 +20)+ 30
(1.5 + 2.8) + 3.2
(1.5 + 2.8)+ 3.2
("Hi" + "standard ") + "C++ 17"
(“嗨” +“标准”)+“ C ++ 17”
The functions work with different data types: int, double, and std::string, but they can be called for any type that implements the +operator.
这些函数适用于不同的数据类型: int , double和std::string ,但是可以为实现+ operator的任何类型调用它们。
In the above example, we passed some parameters to both functions to get the result of summation. But what happens if we call functions without parameters?
在上面的示例中,我们向这两个函数传递了一些参数以获得求和的结果。 但是,如果我们调用不带参数的函数会发生什么呢?
For example like this:
例如这样:
int main() {

     std::cout << Sum_RightHand() << std::endl;
     return 0;
}
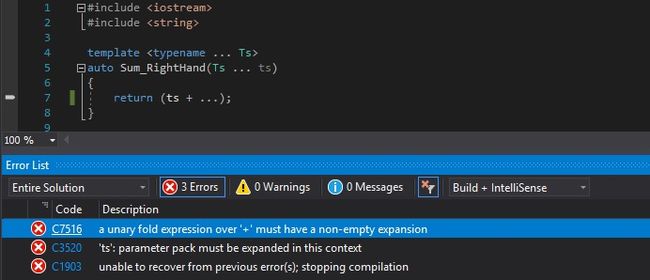
By calling the Sum_RightHand () function without arguments, an arbitrary length parameter pack will not contain values that can be folded, and this results in compilation errors.
通过调用不带参数的Sum_RightHand ()函数,任意长度的参数包将不包含可以折叠的值,这将导致编译错误。
To solve the problem, we need to return a certain value. An obvious solution would be to return zero.
为了解决这个问题,我们需要返回一定的值。 一个明显的解决方案是返回零。
So we can implement it like this:
因此我们可以像这样实现它:
#include
#include

template
auto Sum_RightHand(Ts ... ts) {
     return (ts + ... + 0);
}

template
auto Sum_LeftHand(Ts ... ts) {
     return (0 + ... + ts);
}

int main() {
     std::cout << "Sum_LeftHand()  = " << Sum_LeftHand()  << std::endl;
     std::cout << "Sum_RightHand() = " << Sum_RightHand() << std::endl;
     return 0;
}
The output of the above code:
上面代码的输出:
Note that both fold expressions use the initial value ZERO! When there are no arguments, neutral elements are very important - in our case, adding any number to zeros does not change anything, making 0 a neutral element. Therefore, we can add 0 to any fold expressions using the + or - operators. If the parameter pack is empty, this will cause the function to return the value 0. From a mathematical point of view, this is correct, but in terms of implementation, we need to determine what is right depending on our requirements.
请注意,两个折叠表达式都使用初始值ZERO! 当没有参数时,中性元素非常重要-在我们的例子中,将任何数字加到零不会改变任何内容,使0成为中性元素。 因此,我们可以使用+或-运算符将0添加到任何折叠表达式中。 如果参数包为空,这将导致函数返回值0 。 从数学的角度来看,这是正确的,但是在实现方面,我们需要根据我们的要求确定正确的方法。
“内联”变量 ('inline' Variables)
C++17 standard gives us the ability to declare inline variables.
C ++ 17标准使我们能够声明内联变量 。
This feature makes it much easier to implement header-only libraries (where the full definitions of all macros, functions and classes comprising the library are visible to the compiler in a header file form).
此功能使实现仅标头的库变得容易得多(在此,包含标头库的所有宏,函数和类的完整定义对于标头文件形式的编译器都是可见的)。
Notice the C++11 introduced us to the non-static data member, with which we can declare and initialize member variables in one place:
请注意,C ++ 11向我们介绍了非静态数据成员,通过它我们可以在一个地方声明和初始化成员变量:
class MyDate {

     int m_year   { 2019 };
     int m_month  { 11 };
     int m_day    { 10 };
     std::string strSeason{ "Winter" };
};
However, before C++17, we could not initialize the value of static variables data member directly in the class. We must perform initialization outside of the class.
但是,在C ++ 17之前,我们无法直接在类中初始化静态变量数据成员的值。 我们必须在类之外执行初始化。
Let's look at a simple example of the 'Environment' class, which can be part of a typical header-only library.
让我们看一下“ Environment ”类的简单示例,它可以是典型的仅标头库的一部分。
#include

class Environment {
public:
     static const std::string strVersionOS { "Windows" };
};

Environment environementManager;
Below the class definition, we defined a global class object to access the static data member of the Environment class.
在类定义下面,我们定义了一个全局类对象来访问Environment类的静态数据成员。
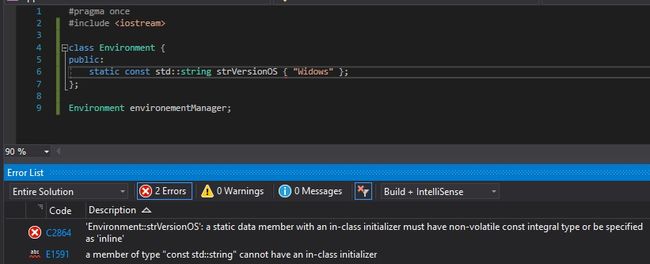
If we try to compile the above file, we get the following error:
如果我们尝试编译上述文件,则会出现以下错误:
What happened here and why is the compiler complaining?
这里发生了什么,为什么编译器会抱怨?
The Environment class contains a static member and at the same time, it is globally accessible itself, which led to a double-defined symbols when included from multiple translation units. When we turned it on multiple C++ source files in order to compile and link them, it didn’t work out.
Environment类包含一个static成员,同时,它本身也是全局可访问的,当从多个翻译单元中包含时,这导致了双重定义的符号。 当我们打开多个C ++源文件以进行编译和链接时,它没有成功。
To fix this error, we need to add the inline keyword, which would not have been possible before C++17:
要解决此错误,我们需要添加inline关键字 ,在C ++ 17之前是不可能的:
#include

class Environment {
     public:
          static const inline std::string strVersionOS { "Widows" };
     };

inline Environment environementManager;
It's all...
都...
Previously, only methods/functions could be declared as inline, but C++17 allows us to declare inline variables as well.
以前,只能将方法/函数声明为内联,但是C ++ 17允许我们也声明内联变量。
In the example above, we made a declaration and definition in one place, but this can be done in different places, for example, like this:
在上面的示例中,我们在一个地方进行了声明和定义,但是可以在不同的地方进行声明,例如:
#include

class Environment {
public:
     static const std::string strVersionOS;
};

inline const std::string  Environment::strVersionOS = "Windows";

inline Environment environementManager;
图书馆增补 (Library Additions)
Many new and useful data types have been added to the Standard Library in C++17, and some of them originated in Boost.
许多新的有用的数据类型已添加到C ++ 17的标准库中,其中一些起源于Boost。
std::byte
std :: byte
std::byte represents a single byte. Developers have traditionally used char (signed or unsigned) to represent bytes, but now there is a type that can be not only a character or an integer.
std::byte表示单个字节。 开发人员传统上使用char (有符号或无符号)表示字节,但是现在存在一种类型,该类型不仅可以是字符,也可以是整数。
However, a std::byte can be converted to an integer and vice versa. The std::byte type is intended to interact with the data warehouse and does not support arithmetic operations, although it does support bitwise operations.
但是,可以将std::byte转换为整数,反之亦然。 std::byte类型旨在与数据仓库交互,尽管它支持按位运算,但不支持算术运算。
To illustrate the above, let's look at the following code:
为了说明上述内容,让我们看下面的代码:
#include
#include

void PrintValue(const std::byte& b) {
     std::cout << "current byte value is " << std::to_integer(b) << std::endl;
}

int main() {
     std::byte bt {2};
     std::cout << "initial value of byte is " << std::to_integer(bt) << std::endl;
     bt <<= 2;
     PrintValue(bt);
}
The output of the above code:
上面代码的输出:

std::variant
std :: variant
A std::variant is a type-safe union that contains the value of one of the alternative types at a given time (there cannot be references, arrays, or 'void' here).
std::variant是类型安全的并集,其中包含给定时间的一种替代类型的值(此处不能有引用,数组或“ void ”)。
A simple example: suppose there is some data where a certain company can be represented as an ID or as a string with the full name of this company. Such information can be represented using a std ::variant containing an unsigned integer or string. By assigning an integer to a std::variable, we set the value, and then we can extract it using std::get, like this:
一个简单的例子:假设有一些数据可以用ID或该公司的全名string表示某个公司。 可以使用包含无符号整数或string的std ::variant表示此类信息。 通过为std::variable分配一个整数,我们可以设置值,然后可以使用std::get提取它,如下所示:
#include
#include

int main() {
     std::variant company;
     company = 1001;

     std::cout << "The ID of company is " << std::get(company) << std::endl;
	return 0;
}
The output of the above code:
上面代码的输出:
If we try to use a member that is not defined in this way (e.g., std::get), the program will throw an exception.
如果我们尝试使用未通过这种方式定义的成员(例如std::get ),则程序将引发异常。
Why use std::variant instead of the usual union? This is mainly because unions are present in the language primarily for compatibility with C and do not work with objects that are not POD types.
为什么要使用std::variant而不是通常的并集? 这主要是因为在语言中存在联合主要是为了与C兼容,并且不适用于不是POD类型的对象。
This means, in particular, that it is not easy to put members with custom copy constructors and destructors in a union. With std::variant, there are no such restrictions.
特别是,这意味着将具有自定义复制构造函数和析构函数的成员放入联合并不容易。 对于std::variant ,没有这样的限制。
std::optional
std ::可选
The type std::optional is an object that may or may not contain a value; this object is useful and convenient to use as the return value of a function when it cannot return a value; then it serves as an alternative, for example, to a null pointer. When working with optional, we gain an additional advantage: now the possibility of a function failure is explicitly indicated directly in the declaration, and since we have to extract the value from optional, the probability that we accidentally use a null value is significantly reduced.
类型std::optional是一个可能包含或可能不包含值的对象; 当无法返回值时,此对象可用作函数的返回值,并且非常有用。 那么它可以替代,例如, null指针。 当使用可选方法时,我们获得了另一个优势:现在,在声明中直接直接指出了函数失败的可能性,并且由于我们必须从可选方法中提取值,因此大大降低了我们意外使用null值的可能性。
Let's take a look at the following example:
让我们看下面的例子:
#include
#include
#include

std::optional StrToInt(const std::string& s) {
     try {
          int val = std::stoi(s);
          return val;
     }
     catch (std::exception&) {
          return {};
     }
}

int main() {

     int good_value = StrToInt("689").value_or(0);
     std::cout << "StrToInt(""689"") returns " << good_value << std::endl;

     int bad_value = StrToInt("hfjkhjjkgdsd").value_or(0);
     std::cout << "StrToInt(""hfjkhjjkgdsd"") returns " << bad_value << std::endl;

     return 0;
}
The output of the above code:
上面代码的输出:
The above example shows a StrToInt function that attempts to turn a string into an integer. By returning std::optional, the StrToInt function leaves the possibility that an invalid string can be passed, which cannot be converted. In the main, we use value_or() function to get the value from std::optional, and if the function fails, it returns the default value of zero (in case the conversion failed).
上面的示例显示了一个StrToInt函数,该函数尝试将string转换为整数。 通过返回std::optional , StrToInt函数StrToInt了可以传递无效string的可能性,该string无法转换。 在main ,我们使用value_or()函数从std::optional获取值,如果函数失败,它将返回默认值零(以防转换失败)。
std::any
std :: any
One another addition to C++17 is the type std::any. std::any provides a type-safe container for a single value of any type, and provides tools that allow you to perform type-safe validation.
C ++ 17的另一项新增功能是std::any类型。 std::any为任何类型的单个值提供类型安全的容器,并提供允许您执行类型安全的验证的工具。
Let's look at the following example:
让我们看下面的例子:
#include
#include
#include
#include

int main() {

     std::vector<std::any> v { 10, 20.2, true, "Hello world!" };

     for (size_t i = 0; i < v.size(); i++) {
          auto& t = v[i].type();

          if (t == typeid(int)) {
               std::cout << "Index of vector : " << i << " Type of value : 'int'\n";
          }
          else if (t == typeid(double)) {
               std::cout << "Index of vector : " << i << " Type of value : 'double'\n";
          }
          else if (t == typeid(bool)) {
               std::cout << "Index of vector : " << i << " Type of value : 'bool'\n";
          }
          else if (t == typeid(char *)) {
               std::cout << "Index of vector : " << i << " Type of value : 'char *'\n";
          }
     }

     std::cout << "\n std::any_cast(v[1]) = " << std::any_cast(v[1])
               << std::endl;

     return 0;
}
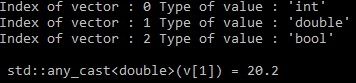
The output of the above code is as follows:
上面代码的输出如下:
In the above code, in the loop, we pass through the elements std::vector. At each iteration, we extract one of the elements of the vector and then try to determine the real type of std::any values.
在上面的代码中,在循环中,我们通过了元素std::vector 。 在每次迭代时,我们提取向量的元素之一,然后尝试确定std::any值的真实类型。
Please notice that std::any_castT value in 'val'. If we need to get a reference to avoid copying complex objects, we need to use the any_cast construct.
请注意, std :: any_cast val ”中内部T值的副本。 如果需要获取引用以避免复制复杂的对象,则需要使用any_cast构造。
But the double type is not a complex object and therefore we can afford to get a copy. This is exactly what we did, in the penultimate line of the above code, in which we got access to an object of type double from v [1].
但是double类型不是一个复杂的对象,因此我们有能力获得一个副本。 这正是我们在上述代码的倒数第二行中所做的,我们可以从v [1]中访问double类型的对象。
文件系统 (Filesystem)
C++17 added a new library designed to greatly simplify working with file systems and their components, such as paths, files, and directories. Since every second program, one way or another, is working with the file system, we have a new functionality that saves us the tedious work with file paths in the file system. After all, some file paths are absolute, while others are relative, and perhaps they are not even direct, because they contain indirect addresses: . (current directory) and .. (parent directory).
C ++ 17添加了一个新的库,该库旨在大大简化文件系统及其组件(例如路径,文件和目录)的使用。 由于每个第二个程序都以某种方式与文件系统一起工作,因此我们拥有一项新功能,可以节省文件系统中文件路径的繁琐工作。 毕竟,有些文件路径是绝对的,而另一些文件路径是相对的,甚至可能不是直接的,因为它们包含间接地址: 。 (当前目录)和.. (父目录)。
For separating directories, the Windows OS uses a backslash (\), while Linux, MacOS, and various Unix-like operating systems use a slash (/)
为了分隔目录,Windows操作系统使用反斜杠(\),而Linux,MacOS和各种类似Unix的操作系统使用斜杠(/)。
The new functionality introduced in C++17 supports the same principle of operation for different operating systems, so we don't need to write different code fragments for portable programs that support different operating systems.
C ++ 17中引入的新功能为不同的操作系统支持相同的操作原理,因此我们不需要为支持不同操作系统的可移植程序编写不同的代码片段。
The following example illustrates working with filesystem::path and filesystem::exists The std::filesystempath class is of utmost importance in situations where we use the library associated with the Filesystem, since most functions and classes are associated with it. The filesystem::exists function allows you to check if the specified file path actually exists.
以下示例说明了使用filesystem :: path和filesystem :: exists的情况std::filesystempath类在我们使用与Filesystem关联的库的情况下至关重要,因为大多数功能和类都与之关联。 filesystem::exists函数使您可以检查指定的文件路径是否实际存在。
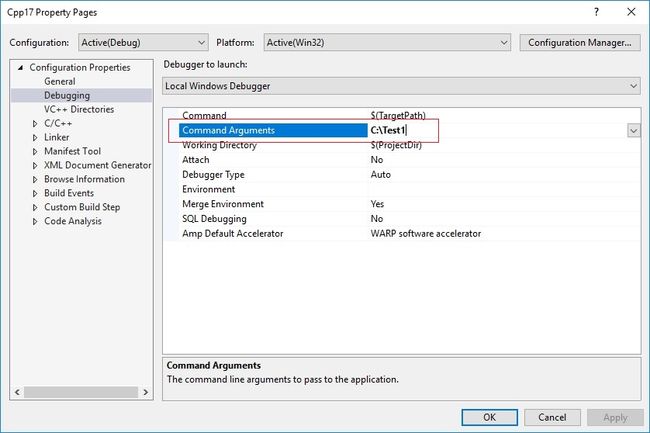
Let's choose properties to open the project Property Pages in Visual Studio and select the Configuration properties > Debugging > Command Arguments and define the command line parameter: "C:\Test1" :
让我们选择属性以在Visual Studio中打开项目的“属性页”,然后选择“配置”属性>“调试”>“命令参数”并定义命令行参数:“ C:\ Test1 ”:
Then run the following code:
然后运行以下代码:
#include
#include

namespace   fs = std::filesystem;

int main(int argc, char *argv[]) {
	if (argc != 2) {
		std::cout << "Usage: " << argv[0] << " \n";
		return 1;
	}

	fs::path path_CmdParam { argv[1] };

	if (fs::exists(path_CmdParam)) {
		std::cout << "The std::filesystem::path " << path_CmdParam << " is exist.\n";
	}
	else {
		std::cout << "The std::filesystem::path " << path_CmdParam << " does not exist.\n";
		return 1;
     }

     return 0;
}
The path 'C:\Test1' does not exist on my machine and therefore the program prints the following output:
我的机器上不存在路径“ C:\ Test1 ”,因此程序将输出以下输出:
In the main function, we check whether the user provided a command-line argument. In case of a negative response, we issue an error message and display on the screen how to work with the program correctly. If the path to the file was provided, we create an instance of the filesystem::path object based on it. We initialized an object of the path class based on a string that contains a description of the path to the file. The filesystem::exists function allows you to check whether the specified file path actually exists. Until now, we can't be sure, because it's possible to create objects of the path class that don't belong to a real file system object. The exists function only accepts an instance of the path class and returns true if it actually exists. This function is able to determine which path we passed to it (absolute or relative), which makes it very usable.
在main函数中,我们检查用户是否提供了命令行参数。 如果响应是否定的,我们将发出错误消息并在屏幕上显示如何正确使用该程序。 如果提供了文件的路径,我们将基于该filesystem::path创建filesystem::path对象的实例。 我们基于包含文件路径描述的字符串初始化了路径类的对象。 filesystem::exists函数使您可以检查指定的文件路径是否实际存在。 到目前为止,我们还不确定,因为可以创建不属于真实文件系统对象的path类对象。 exists函数仅接受path类的实例,如果实际存在则返回true 。 该函数能够确定我们传递给它的路径(绝对路径或相对路径),这使其非常有用。
In addition to the filesystem::exists function, the filesystem module also provides many useful functions for creating, deleting, renaming, and copying:
除了filesystem::exists函数之外, filesystem模块还提供了许多有用的函数来创建,删除,重命名和复制:
filesystem::create_directories to create a directory (even if we need to create several subdirectories)
filesystem :: create_directories创建目录(即使我们需要创建几个子目录)
filesystem::remove - removes a file or an empty directory
filesystem :: remove-删除文件或空目录
filesystem:: remove_all - deletes a file or recursively deletes a directory
filesystem :: remove_all-删除文件或递归删除目录
filesystem::copy, filesystem::copy_file and filesystem::rename is for copying and renaming directories and files using OS tools
filesystem :: copy , filesystem :: copy_file和filesystem :: rename用于使用OS工具复制和重命名目录和文件
filesystem::resize_file to truncate or increase the file size (if the file was previously smaller than the new file size, the file size increases, and the new area looks like it is zero-filled)
filesystem :: resize_file来截断或增加文件大小(如果该文件以前小于新文件大小,则文件大小会增加,并且新区域看起来像是零填充)
In the next example, we will illustrate working with absolute and relative file paths to see the strengths of the path class and its associated helper functions. The path class automatically performs all necessary string conversions. It accepts arguments of both wide and narrow character arrays, as well as the std::string and std::wstring types, formatted as UTF8 or UTF16.
在下一个示例中,我们将说明使用绝对文件路径和相对文件路径,以了解路径类及其关联的辅助函数的优势。 路径类自动执行所有必要的字符串转换。 它接受宽字符数组和窄字符数组的参数,以及格式为UTF8或UTF16的std::string和std::wstring类型的参数。
#include
#include

namespace   fs = std::filesystem;

int main(int argc, char *argv[]) {
     fs::path pathToFile { L"C:/Test/Test.txt" };

     std::cout << "fs::current_path() = "
               << fs::current_path()         << std::endl
               << "fs::absolute (C:\\Test\\Test.txt) = "
               << fs::absolute(pathToFile)   << std::endl

     << std::endl;

     std::cout << "(C:\\Test\\Test.txt).root_name() = "
               << pathToFile.root_name()     << std::endl
               << "(C:\\Test\\Test.txt).root_path() = "
               << pathToFile.root_path()     << std::endl
               << "(C:\\Test\\Test.txt).relative_path() = "
               << pathToFile.relative_path() << std::endl
               << "(C:\\Test\\Test.txt).parent_path() = "
               << pathToFile.parent_path()   << std::endl
               << "(C:\\Test\\Test.txt).filename() = "
               << pathToFile.filename()      << std::endl
               << "(C:\\Test\\Test.txt).stem() = "
               << pathToFile.stem()          << std::endl
               << "(C:\\Test\\Test.txt).extension() = "
               << pathToFile.extension()     << std::endl;

     fs::path concatenateTwoPaths{ L"C:/" };
     concatenateTwoPaths /= fs::path("Test/Test.txt");
     std::cout << "\nfs::absolute (concatenateTwoPaths) = "
               << fs::absolute(concatenateTwoPaths) << std::endl;

     return 0;
}
The output of the above code:
上面代码的输出:
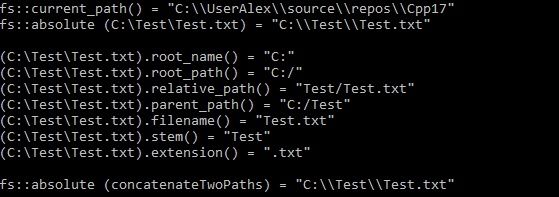
The current_path() function returns the absolute path of the current working directory (in above example, the function returns the home directory on my laptop, since I started the application from there). Next, we perform various manipulations with fs::path pathToFile.
current_path()函数返回当前工作目录的绝对路径(在上面的示例中,该函数返回我的笔记本电脑上的主目录,因为我是从那里启动应用程序的)。 接下来,我们使用fs :: path pathToFile执行各种操作。
The path class has several methods that return info about different parts of the path itself, as opposed to the file system object that it can refer to.
path类有几种方法可以返回有关路径本身不同部分的信息,这与它可以引用的文件系统对象相反。
pathToFile.root_name() returns the root name of the generic-format path
pathToFile。 root_name()返回通用格式路径的根名称
pathToFile.root_path() returns the root path of the path
pathToFile。 root_path()返回路径的根路径
pathToFile.relative_path() returns path relative to root-path
pathToFile。 relative_path()返回相对于根路径的路径
pathToFile.parent_path() returns the path to the parent directory
pathToFile。 parent_path()返回到父目录的路径
pathToFile.filename() returns the generic-format filename component of the path
pathToFile。 filename()返回路径的通用格式文件名部分
pathToFile.stem() returns the filename identified by the generic-format path stripped of its extension
pathToFile。 stem()返回由扩展名去除后的通用格式路径标识的文件名
pathToFile.extension() returns the extension of the filename
pathToFile。 extension()返回文件名的扩展名
In the last three lines (before the return statement), we can see how filesystem::path also automatically normalizes path separators.
在最后三行中(在return语句之前),我们可以看到filesystem::path也如何自动规范化路径分隔符。
We can use a '/' as a directory separator in constructor arguments. This allows us to use the same strings to store paths in both Unix and WINDOWS environments.
我们可以在构造函数参数中使用' / '作为目录分隔符。 这使我们可以使用相同的字符串在Unix和WINDOWS环境中存储路径。
Now let's see how we can use
现在,让我们看看如何使用
Take the following directory:
采取以下目录:
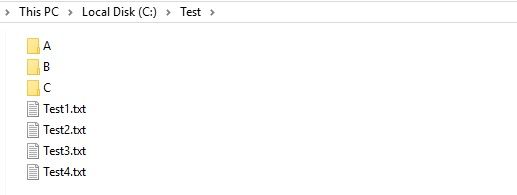
and run the following code:
并运行以下代码:
#include
#include

namespace   fs = std::filesystem;

int main(int argc, char *argv[]) {

	fs::path dir{ "C:\\Test\\" };

	if (!exists(dir)) {
		std::cout << "Path " << dir << " does not exist.\n";
		return 1;
	}

	for (const auto & entry : fs::directory_iterator(dir))
		std::cout << entry.path() << std::endl;

	return 0;
}
The output of the above code:
上面代码的输出:

Pay attention that the for loop uses the std::filesystem::directory_iterator introduced in C++17, which can be used as a LegacyInputIterator that iterates over the directory_entry elements of a directory (but does not visit the subdirectories). Nevertheless, our directory “C:\Test” contains child directories:
请注意, for循环使用C ++ 17中引入的std :: filesystem :: directory_iterator ,它可用作LegacyInputIterator来迭代directory_entry元素(但不访问子目录)。 不过,我们的目录“ C:\ Test ”包含子目录:
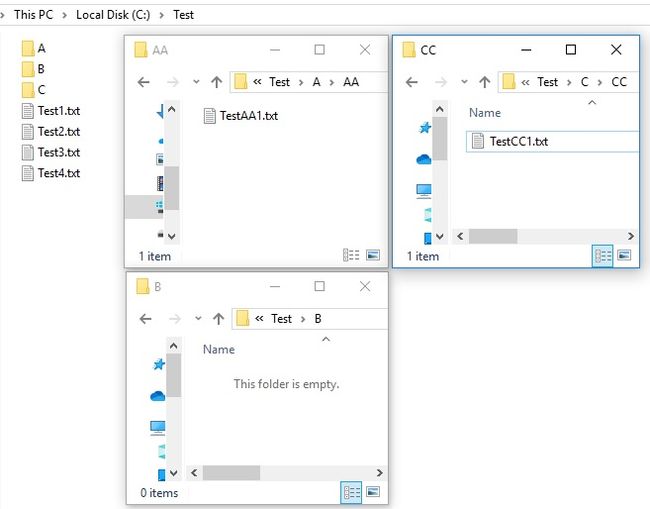
If we change in the above code, fs::directory_iterator to std::filesystem::recursive_directory_iterator:
如果我们将上面的代码更改为fs::directory_iterator到std :: filesystem :: recursive_directory_iterator :
for (const auto & entry : fs::recursive_directory_iterator(dir))
     std::cout << entry.path() << std::endl;
Then we get the following output after running the program:
然后,在运行程序之后,我们将获得以下输出:
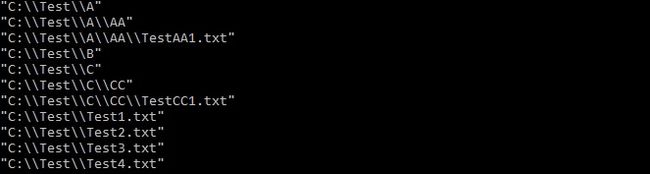
std::filesystem::recursive_directory_iterator is a LegacyInputIterator that iterates over the directory_entry elements of a directory, and, recursively, over the entries of all subdirectories.
std :: filesystem :: recursive_directory_iterator是一个LegacyInputIterator ,它遍历directory_entry元素,并递归遍历所有子目录的条目。
Also, as in the previous case, the iteration order is unspecified, except that each directory entry is visited only once.
同样,与前面的情况一样,没有指定迭代顺序,只是每个目录条目仅被访问一次。
We can also get a list of subdirectories using the std::copy_if algorithm which copies the elements in the range [begin,end) for which ' [](const fs::path& path) ' returns true to the range of 'subdirs' vector, and using construction a std::back_inserter inserts new elements at the end of container 'subdirs' (see code below).
我们还可以使用std :: copy_if算法获取子目录列表,该算法将复制[begin,end)范围内的元素,其中' [](const fs::path& path) '返回true到' subdirs '范围向量,并使用构造函数std::back_inserter在容器“ subdirs ”的末尾插入新元素(请参见下面的代码)。
The std::copy displays the resulting 'subdirs' vector:
std::copy显示生成的' subdirs '向量:
#include
#include
#include
#include

namespace   fs = std::filesystem;

int main(int argc, char *argv[]) {

     fs::path dir{ "C:\\Test\\" };

     if (!exists(dir)) {
          std::cout << "Path " << dir << " does not exist.\n";
          return 1;
     }

     std::cout << "\nLet's show all the subdirectories " << dir << "\n";

     std::vector paths;
     for (const auto & entry : fs::recursive_directory_iterator(dir))
          paths.push_back(entry.path());

     fs::recursive_directory_iterator begin("C:\\Test");
     fs::recursive_directory_iterator end;


     std::vector subdirs;
     std::copy_if(begin, end, std::back_inserter(subdirs), [](const fs::path& path) {
          return fs::is_directory(path);
     });

     std::copy(subdirs.begin(), subdirs.end(),
               std::ostream_iterator(std::cout, "\n"));

     return 0;
}
Below is the output of a recursive traversal of the “C:\Test\” directory, which is presented in the above code:
以下是“ C:\ Test \ ”目录的递归遍历的输出,以上代码显示了该结果:

In C++17, the
在C ++ 17中,
For example, we have the opportunity to get the file size, read or set the last time data was written by a process to a given file, read or set file permissions, etc.
例如,我们有机会获取文件大小,读取或设置进程最后一次将数据写入给定文件的时间,读取或设置文件的权限等。
Let's take a look at the directory from the previous example again:
让我们再次看一下先前示例中的目录:
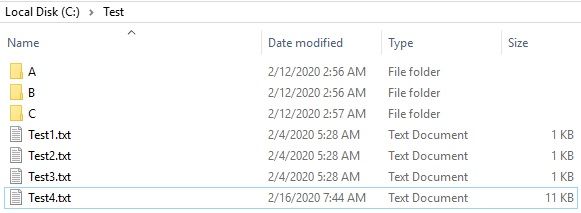
#include
#include
#include

namespace   fs = std::filesystem;

void demo_perms(fs::perms p)
{
     std::cout << ((p & fs::perms::owner_read) != fs::perms::none ? "r" : "-")
          << ((p & fs::perms::owner_write) != fs::perms::none ? "w" : "-")
          << ((p & fs::perms::owner_exec)  != fs::perms::none ? "x" : "-")
          << ((p & fs::perms::group_read)  != fs::perms::none ? "r" : "-")
          << ((p & fs::perms::group_write) != fs::perms::none ? "w" : "-")
          << ((p & fs::perms::group_exec)  != fs::perms::none ? "x" : "-")
          << ((p & fs::perms::others_read) != fs::perms::none ? "r" : "-")
          << ((p & fs::perms::others_write)!= fs::perms::none ? "w" : "-")
          << ((p & fs::perms::others_exec) != fs::perms::none ? "x" : "-")
          << '\n';
}

std::time_t getFileWriteTime(const std::filesystem::path& filename) {
     #if defined ( _WIN32 )
     {
          struct _stat64 fileInfo;
          if (_wstati64(filename.wstring().c_str(), &fileInfo) != 0)
          {
               throw std::runtime_error("Failed to get last write time.");
          }
          return fileInfo.st_mtime;
     }
     #else
     {
          auto fsTime = std::filesystem::last_write_time(filename);
          return decltype (fsTime)::clock::to_time_t(fsTime);
     }
     #endif
}

int main(int argc, char *argv[]) {

	fs::path     file_Test1 { "C:\\Test\\Test1.txt" };
	std::string  line;
	std::fstream myfile(file_Test1.u8string());

	std::cout << "The " << file_Test1 << "contains the following value :  ";
	if (myfile.is_open())
	{
		while (getline(myfile, line)) {
			std::cout << line << '\n';
		}
		myfile.close();
	}
	else {
          std::cout << "Unable to open " << file_Test1 ;
          return 1;
	}

	std::cout << "File size = " << fs::file_size(file_Test1) << std::endl;
	std::cout << "File permissions = ";
	demo_perms(fs::status(file_Test1).permissions());

	std::time_t t = getFileWriteTime(file_Test1);
	std::cout << file_Test1 << " write time is : "
              << std::put_time(std::localtime(&t), "%c %Z") << '\n';

	return 0;
}

In the above code, we can see that with fs::file_size, we can determine the size of the file without reading its contents (as the program output shows, the file contains 5 characters: TEST1, and this is exactly what the fs::file_size function calculated. To read or set file permissions, we use fs::status("C:\Test\Test1.txt").permissions() and the demo_perms function taken from here. To demonstrate the last modification of the file "C:\Test\Test1.txt", we used the getFileWriteTime function. As it is written here: clock::to_time_t (ftime) does not work for MSVC, so the function uses a portable solution for _WIN32 (non-POSIX Windows) and other operating systems.
在上面的代码中,我们可以看到使用fs :: file_size可以确定文件的大小而不读取其内容(如程序输出所示,该文件包含5个字符: TEST1 ,而这正是fs的含义:已计算出:file_size函数。要读取或设置文件许可权,我们使用fs :: status (“ C:\ Test \ Test1.txt ”). Permissions()和从此处获取的demo_perms函数。演示文件的最后修改“ C:\ Test \ Test1.txt ”,我们使用了getFileWriteTime函数。如此处所述: clock::to_time_t (ftime)对MSVC不起作用,因此该函数对_WIN32使用可移植的解决方案(非POSIX Windows )和其他操作系统。
In the next example, we will show information about free space on the file system. The fs::space global function returns an object of type fs::space_info, which describes the amount of free space on the media on which the specified path is located. If we transfer several paths located on the same media, the result will be the same.
在下一个示例中,我们将显示有关文件系统上可用空间的信息。 fs :: space全局函数返回类型为fs :: space_info的对象,该对象描述了指定路径所在的介质上的可用空间量。 如果我们转移位于同一媒体上的多个路径,结果将是相同的。
#include
#include

namespace   fs = std::filesystem;

int main(int argc, char *argv[]) {

     fs::space_info diskC = fs::space("C:\\");

     std::cout << "Let's show information about disk C : \n";

     std::cout << std::setw(15) << "Capacity"
               << std::setw(15) << "Free"
               << std::setw(15) << "Available"
               << "\n"
               << std::setw(15) << diskC.capacity
               << std::setw(15) << diskC.free
               << std::setw(15) << diskC.available
               << "\n";

     return 0;
}
The output of the above code which displays information about free disk space:
上面的代码输出显示有关可用磁盘空间的信息:

The returned fs::space_info object contains three indicators (all in bytes):
返回的fs :: space_info对象包含三个指示符(全部以字节为单位):
Capacity is a total size of the filesystem, in bytes
容量是文件系统的总大小,以字节为单位
Free is a free space on the filesystem, in bytes
Free是文件系统上的可用空间,以字节为单位
Available is a free space available to a non-privileged process (may be equal or less than free)
可用空间是非特权进程可用的可用空间(可能等于或小于可用空间)
并行算法 (Parallel Algorithms)
Support for parallel versions of most universal algorithms has been added to the C++17 standard library to help programs take advantage of parallel execution to improve performance. Almost every computer today has several processor cores, however, by default, in most cases, when calling any of the standard algorithms, only one of these cores is used, and the other cores do not participate in the operation of standard algorithms. C++17 fixes this situation and when processing large arrays or data containers, algorithms can work much faster, distributing the work among all available cores.
对大多数通用算法的并行版本的支持已添加到C ++ 17标准库中,以帮助程序利用并行执行来提高性能。 当今,几乎每台计算机都具有多个处理器核心,但是,默认情况下,在大多数情况下,调用任何标准算法时,仅使用其中一个核心,而其他核心则不参与标准算法的操作。 C ++ 17解决了这种情况,并且在处理大型阵列或数据容器时,算法可以更快地工作,将工作分配到所有可用的内核之间。
So, functions from
因此,
In C++17, the first parameter of the execution policy can take one of 3 values:
在C ++ 17中,执行策略的第一个参数可以采用以下三个值之一:
std::execution::seq for normal sequential execution
正常顺序执行的std :: execution :: seq
std::execution::par for normal parallel execution, in this mode, the programmer must take care to avoid the race state when accessing data, but can use memory allocation, mutex locks, and so on
std :: execution :: par用于正常的并行执行,在这种模式下,程序员必须注意避免访问数据时出现争用状态,但可以使用内存分配,互斥锁等。
std::execution::par_unseq for unsequenced parallel execution, in this mode, the functors passed by the programmer should not allocate memory, block mutexes, or other resources
std :: execution :: par_unseq用于无顺序并行执行,在这种模式下,程序员传递的函子不应分配内存,阻塞互斥量或其他资源
Thus, all we have to do, for instance, to get a parallel version of the std::sort algorithm is tell the algorithm to use the so-called parallel execution policy, and just use one of the following options that is most suitable for a particular case:
因此,我们要做的所有事情,例如,获取std::sort算法的并行版本,是告诉该算法使用所谓的并行执行策略,并且仅使用以下最适合以下选项之一特殊情况:
std::sort(std::execution::par,
begin (name_of_container)), end (name_of_container)); //same thing as the
                                                      //version without an execution policy
std::sort(std::execution::seq,
begin (name_of_container)), end (name_of_container));
std::sort(std::execution::par_unseq,
begin (name_of_container)), end (name_of_container));
Let's look at the following example in which a std::vector of 10,000 integers is sorted by std::sort with and without parallelization:
让我们看下面的示例,其中10,000个整数的std::vector通过std::sort带有和不带有并行化:
#include
#include
#include
#include
#include

using namespace std;
using std::chrono::duration;
using std::chrono::duration_cast;
using std::chrono::high_resolution_clock;

void printVector(const char * pStatus, std::vector &vect)
{
	std::cout << "The vector with " << vect.size() << " elements "
              << pStatus << " sorting : \n";
	for (int val : vect) {
		std::cout << val << " ";
	}
	std::cout << "\n\n";
}

int main() {
	const int numberOfElements = 10000;
	const int numOfIterationCount = 5;

	std::cout << "The number of concurrent threads supported is "
	<< std::thread::hardware_concurrency() << "\n\n";

	std::vector vect(numberOfElements);
	std::generate(vect.begin(), vect.end(), std::rand);

	//printVector("before (original vector)", vect);

	std::cout << "Let's sort the vector using sort() function WITHOUT PARALLELIZATION : \n";
	for (int i = 0; i < numOfIterationCount; ++i) {
		std::vector vec_to_sort(vect);
		//printVector("before", vec_to_sort);
		const auto t1 = high_resolution_clock::now();
		std::sort(vec_to_sort.begin(), vec_to_sort.end());
		const auto t2   = high_resolution_clock::now();
		std::cout << "The time taken to sot vector of integers is : "
		<< duration_cast>(t2 - t1).count() << "\n";
		//printVector("after", vec_to_sort);
	}

	std::cout << "\n\n";
	std::cout << "Let's sort the vector using sort() function
	and a PARALLEL unsequenced policy (std::execution::par_unseq) : \n";
	for (int i = 0; i < numOfIterationCount; ++i) {
		std::vector vec_to_sort(vect);
		// printVector("before", vec_to_sort);
		const auto t1 = high_resolution_clock::now();
		std::sort(std::execution::par_unseq, vec_to_sort.begin(), vec_to_sort.end());
		const auto t2 = high_resolution_clock::now();
		std::cout << "The time taken to sot vector of integers is : "
		<< duration_cast>(t2 - t1).count() << "\n";
		// printVector("after", vec_to_sort);
	}

	std::cout << "\n\n";

	return 0;
}
The output of the above code is as follows:
上面代码的输出如下:
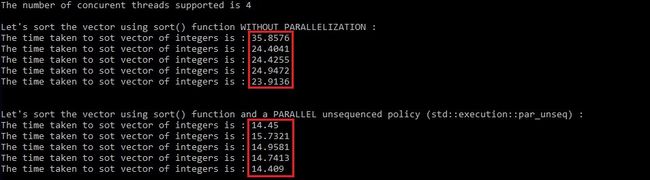
In the above implementation, the parallel version of the algorithm will give a performance gain compared to the serial version only if the size of the range (numberOfElements) exceeds a certain threshold, which can vary depending on the flags of the compilation, platform or equipment. Our implementation has an artificial threshold of 10,000 elements.
在上述实现中,仅当范围大小( numberOfElements )超过某个阈值时,该算法的并行版本才会比串行版本提供性能提升,该阈值可以根据编译,平台或设备的标志而变化。 我们的实现人工设定了10,000个元素的阈值。
We can experiment with different threshold values and range sizes and see how this affects the execution time. Naturally, with only ten elements, we are unlikely to notice any difference.
我们可以尝试使用不同的阈值和范围大小,看看这如何影响执行时间。 自然,只有十个元素,我们不太可能注意到任何差异。
However, when sorting large datasets, parallel execution makes a lot more sense, and the benefits can be significant.
但是,在对大型数据集进行排序时,并行执行更为合理,其好处可能是巨大的。
The algorithms library also defines the for_each() algorithm, which we now can use to parallelize many regular range-based for loops. However, we need to take into account that each iteration of the loop can execute independently of the other, otherwise you may run into data races.
算法库还定义了for_each()算法,我们现在可以使用它来并行化许多基于范围的常规for循环。 但是,我们需要考虑到,循环的每个迭代都可以独立于另一个迭代执行,否则您可能会遇到数据争用。
从C ++ 17删除的功能 (Features That Have Been Removed From C++17)
Trigraphs
三部曲
Trigraphs have been removed from C++17 because they are no longer needed.
Trigraph已从C ++ 17中删除,因为不再需要它们。
In general, trigraphs were invented for terminals in which some characters are missing. As a result, instead of
#define, we can write??= define.通常,为缺少某些字符的终端发明了三边形。 结果,我们可以编写
??= define而不是#define。Trigraphs are replaced with the necessary characters at the very beginning, therefore these entries are equivalent. Instead of '
{', we can write '??<', instead of '}' use '??>'.三字母组合一开始就用必要的字符替换,因此这些条目是等效的。 代替'
{',我们可以写'??<',而不是'}'使用'??>'。They were used in C/C++ in the 80s because the old coding table did not support all the necessary characters ISO/IEC646, such as:
table { border-collapse: collapse; } th, td { border: 1px solid orange; padding: 10px; text-align: left; }它们在80年代用在C / C ++中,因为旧的编码表不支持ISO / IEC646的所有必需字符,例如:
table { border-collapse: collapse; } th, td { border: 1px solid orange; padding: 10px; text-align: left; }crashtable { border-collapse: collapse; } th, td { border: 1px solid orange; padding: 10px; text-align: left; }table { border-collapse: collapse; } th, td { border: 1px solid orange; padding: 10px; text-align: left; }Trigraph Equivalent symbol ??= # ??( [ ??/ \ ??) ] ??' ^ ??< { ??! | ??> } ??- ~ 三部曲 等效符号 ?? = # ??( [ ?? / \ ??) ] ??' ^ ?? < { ??! | ??> } ??- 〜 Visual C++ still supports trigram substitution, but it is disabled by default. For information on how to enable trigram substitution, see here.
Visual C ++仍然支持三字母组合替换,但是默认情况下它被禁用。 有关如何启用三联词替换的信息,请参见此处 。
Removing operator++ for bool
删除布尔运算符++
The operator++ for bool is deprecated and was removed in C++17.
不赞成使用布尔运算符++,并在C ++ 17中将其删除。
Let's look at the following code:
让我们看下面的代码:
#includeint main() { bool b1 = false; b1++; return 0; } After compiling the above code, we get the following errors:
编译完上面的代码后,我们得到以下错误:

- Error (active) E2788: incrementing a bool value is not allowed 错误(活动)E2788:不允许增加布尔值
Compiler Error C2428: 'operation' : not allowed on operand of type '
bool'编译器错误C2428 :'操作':类型'
bool'的操作数上不允许
Remove register keyword
删除注册关键字
The register keyword is deprecated even in the C++11 standard.
即使在C ++ 11标准中, register关键字也不推荐使用。
Only in C++17, it was decided to remove it, because it is not used for new compilers.
仅在C ++ 17中,才决定删除它,因为它不用于新的编译器。
If we declare a register variable, it will just give a hint to the compiler. Can use it or not. Even if we do not declare the variable as register, the compiler can put it in the processor register.
如果我们声明一个寄存器变量,它只会给编译器一个提示。 是否可以使用它。 即使我们不将变量声明为寄存器,编译器也可以将其放入处理器寄存器中。
When writing the following code in Visual Studio 2017 version 15.7 and later: (available with /std:c++17):
在Visual Studio 2017 15.7版和更高版本中编写以下代码时:(适用于/ std:c ++ 17 ):
register int x = 99;We will get the following warning: "
warning C5033: 'register' is no longer a supported storage class"我们将收到以下警告:“
warning C5033: 'register' is no longer a supported storage class”Removing std::auto_ptr
删除std :: auto_ptr
The
std::auto_ptrwas introduced in C++98, has been officially excluded from C ++ since C++17.std::auto_ptr是C ++ 98中引入的,自C ++ 17起已正式从C ++中排除。Let's look at the following code:
让我们看下面的代码:
#include#include int main() { std::auto_ptr p1(new int); return 0; } After compiling the above code, we get the following errors:
编译完上面的代码后,我们得到以下错误:
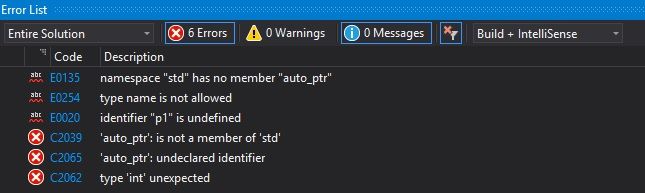
Namespace "
std" has no member"auto_ptr"...命名空间“
std”没有成员"auto_ptr”。Removing dynamic exception specifications
删除动态异常规范
The dynamic exception specification, or throw(optional_type_list) specification, was deprecated in C++11 and removed in C++17, except for
throw(), which is an alias fornoexcept(true).动态异常规范或throw(optional_type_list)规范在C ++ 11中已弃用,在C ++ 17中已删除,但
throw()除外,后者是noexcept(true)的别名。Let's see an example:
让我们来看一个例子:
#includeint foo(int x) throw(int) { if (100 == x) { throw 2; } return 0; } int main() { auto x = foo(100); return 0; } After compilation, the compiler will return the following warning: "warning C5040: dynamic exception specifications are valid only in C++14 and earlier treating as
noexcept(false)"编译之后,编译器将返回以下警告:“ 警告C5040 :动态异常规范仅在C ++ 14及更早版本中视为
noexcept(false)”Removing some deprecated aliases
删除一些不赞成使用的别名
std::ios_base::iostate
std :: ios_base :: iostate
std::ios_base::openmode
std :: ios_base :: openmode
std::ios_base::seekdir
std :: ios_base :: seekdir
Removed allocator from std::function
从 std :: function中 删除了分配器
The following prototypes were removed in C++17:
在C ++ 17中删除了以下原型:
template< class Alloc >
function( std::allocator_arg_t, const Alloc& alloc ) noexcept;

template< class Alloc >
function( std::allocator_arg_t, const Alloc& alloc,std::nullptr_t ) noexcept;

template< class Alloc >
function( std::allocator_arg_t, const Alloc& alloc, const function& other );

template< class Alloc >
function( std::allocator_arg_t, const Alloc& alloc, function&& other );

template< class F, class Alloc >
function( std::allocator_arg_t, const Alloc& alloc, F f );
摘要 (Summary)
Bjarne Stroustrup (creator of C++): "C makes it easy to shoot yourself in the foot; C++ makes it harder, but when you do it blows your whole leg off."
Bjarne Stroustrup(C ++的创建者): “ C使脚上的射击变得容易; C ++使其更难,但是当您这样做时,您的整个腿都发疯了。”
It is my sincere hope that the contents of this article will help someone avoid a "leg wound" :-)
我衷心希望本文的内容能帮助某人避免“腿部受伤” :-)
翻译自: https://www.codeproject.com/Articles/5262072/Cplusplus-17-New-Features-and-Trick
c ++函数功能查询器