微信小程序实现分享海报
实现前的注意事项:
1、使用的是微信小程序官方的canvas组件官方文档地址
2、在canvas中不能绘制网络图片,需要使用wx.getImageInfo({}),文档地址
注意最好在画布绘制之前对图片进行转化,我在绘制画布的过程中转化时获取到的地址一直是空的,感觉这个接口是异步的,设置了async、await也不起作用。
                   wx.getImageInfo({
							src: '网络图片地址',
							success: (res) => {
								console.log(res, res.path, 'res--res');
								this.imgBannerPath = res.path;
							}
						})
3、在canvas中设置文字加粗方法:
//设置加粗显示
	ctx.font =  'normal bold 16px sans-serif';
设置加粗之后下面其他的文字都会加粗,不想加粗的文字,你可以在渲染之前重新设置一下font属性,例如:
    ctx.font =  'normal normal 16px sans-serif';
4、设置文字换行,超出多少隐藏
// 绘制文字自动换行
			drawArticle:function(ctx, kl, width, x, y) {
			      let chr = kl.split('') // 分割为字符串数组
			      let temp = ''
			      let row = []
			      for (let a = 0; a < chr.length; a++) {
			      //canvas measureText()方法在画布上输出文本之前,检查字体的宽度
			        if (ctx.measureText(temp).width < width) {
			          temp += chr[a]
			        } else {
			          a--
			          row.push(temp)
			          temp = ''
			        }
			      }
			      row.push(temp)
				  console.log( row,' row');
			      for (var b = 0; b < row.length; b++) {
			        // 控制最多显示2行,超出两行显示...
					if(row.length>2&&b==1){
					   ctx.fillText(row[b].slice(0, row[b].length - 1) + '...',x, y + b * 20);
					}else{
						if(b<2){
							ctx.fillText(row[b], x, y + b * 20);
						}
					}
			      }
			      let _len = row.length > 2 ? 2 : row.length
			      return y + (_len - 1) * 20
			    },
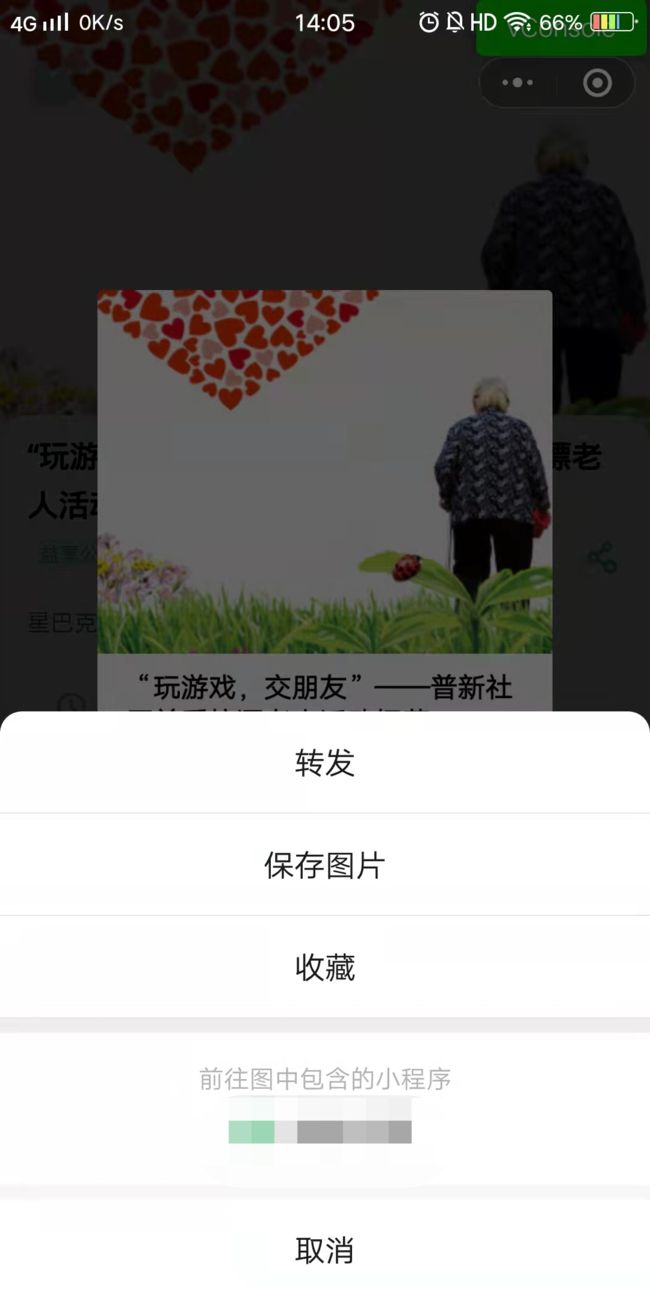
5、分享海报,保存到相册、识别二维码等功能可以不用自己写,直接使用image标签的show-menu-by-longpress属性即可,长按图片就可以触发。
<image :src="posterImg" show-menu-by-longpress="true" class="poster-img"></image>
效果图如下:

6、实现海报的代码如下:
<!-- 分享海报 ,在写的时候要注意canvas初始化的时候是一定要渲染的,要不然海报绘制会不显示的-->
		<view>
			<view class="poster" v-if="posterImg" @click="showPoster=false">
				<image :src="posterImg" show-menu-by-longpress="true" class="poster-img"></image>
				<view style="padding:16rpx 0 24rpx 0;">长按图片保存到相册</view>
				<image @click="showPoster=false" src="../../static/static/imgs/icon_circle-error.png" style="height: 64rpx;width: 64rpx;"></image>
			</view>
			<view class="canvas-box" v-else>
				<canvas canvas-id="myCanvas" style="width: 263px;height:341px;position: fixed;top:99999px;" />
			</view>
		</view>


// 绘制海报
			makeCanvas: function() {
			   //有海报就禁止绘制
				if (this.posterImg) {
					return
				}
				let that = this;
				uni.showLoading({
					title: '海报生成中...',
				})
				var context = uni.createCanvasContext('myCanvas', this);
				context.setFillStyle("#FFFFFF");
				context.fillRect(0, 0, 263, 341);
				context.drawImage(that.imgBannerPath, 0, 0, 263, 210);
				context.setFontSize(16);
				context.setFillStyle('#060606');
				context.font =  'normal bold 16px sans-serif';
				let str = this.info.act_title;
				let width = 263;
				let offsetHeight = this.drawArticle(context, str, width - 40,16, 235)//控制文字自动换行
				context.font =  'normal normal 16px sans-serif';
				context.setFontSize(16);
				context.setFillStyle('#FF8200')
				if(this.info.is_cost == '0'){
					context.fillText('免费', 16, 304);
				}else{
					context.fillText('¥'+this.info.cost, 16, 304);
				}

				context.setFontSize(12);
				context.setFillStyle('#999999');
				context.fillText('长按二维码识别小程序', 16, 323);
				context.drawImage(that.qrCode, 189, 263, 60, 60);
				context.draw(true, function() {
					console.log(context, 'content-------绘制完成');
					uni.canvasToTempFilePath({
						canvasId: 'myCanvas',
						success: function(res) {
							uni.hideLoading();
							let tempFilePath = res.tempFilePath;
							that.posterImg = tempFilePath;
							console.log(res, 'res');

						},
						fail: function(res) {
							uni.hideLoading();
							console.log(res);
						}
					}, that)
				})
			},
绘制的图片在真机上看着会很模糊,实际上在手机上看的话是清除的,所以不用担心这个。
vue中实现分享海报:
我找到了还挺好用的插件,记录一下:
插件官网地址:vue-canvas-poster
使用就非常简单,下面贴个例子:
<template>
  <div>
    <vue-canvas-poster
      :widthPixels="1000"
      :painting="painting"
      @success="success"
      @fail="fail"
    ></vue-canvas-poster>
    <img :src="poster" alt="" style="width:263px;height:361px;">
  </div>
</template>
<script>
export default {
  data() {
    return {
      poster: "",
      painting: {
        width: "263px",
        height: "361px",
        background: "#fff",
        views: [
          {
            type: "image",
            url: require("../imgs/poster.jpg"),
            css: {
              top: "0px",
              left: "0px",
              width: "263px",
              height: "263px",
            },
          },
          {
            type: "text",
            text: "标题",
            css: {
              color: "#333333",
              fontSize: "17px",
              width: "151px",
              maxLines: 2,
              lineHeight: "24px",
              fontWeight: "bold",
              top: "271px",
              left: "12px",
            },
          },
          {
            type: "image",
            url: require("../imgs/default_avatar.png"),
            css: {
              top: "327px",
              left: "12px",
              width: "20px",
              height: "20px",
              borderRadius: "50%",
            },
          },
          {
            type: "text",
            text: "描述",
            css: {
              color: "#666666",
              fontSize: "14px",
              width: "121px",
              maxLines: 1,
              lineHeight: "18px",
              top: "327px",
              left: "35px",
            },
          },
          {
            type: "qrcode",
            content: "https://www.baidu.com", //二维码地址
            css: {
              top: "276px",
              right: "12px",
              color: "#000",
              width: "72px",
              height: "72px",
            },
          },
        ],
      },
    };
  },
  methods: {
    success(src) {
      this.poster = src;
      console.log(src);
    },
    fail(err) {
      console.log("fail", err);
    },
  },
};
</script>
生成带有logo的二维码可以使用vue-qr:
1、安装
npm install vue-qr --save
2、使用
<template>
  <div>
    <vue-qr
    ref='Qrcode'
    :logo-src="logoSrc"
     size="150"
    :margin="0"
    :logoScale=".2"
    :logoMargin="2"
    logoBackgroundColor="white"
    :text="appSrc" />
    <button size='small' @click="downloadImg">下载二维码</button>
  </div>
</template>
<script>

import VueQr from 'vue-qr'
export default {
  data() {
    return {
    }
  },
  methods: {
    downloadImg () {
      const iconUrl = this.$refs['Qrcode'].$el.src;
      console.log(iconUrl,'iconUrl');
    },
  },
};
</script>
还可以使用:Awesome-qr.js
官网地址awesome-qr
 new AwesomeQR({
    text: "AwesomeQR by Makito - Awesome, right now.",
    size: 500,
    logoImage:'',//logo图片
    logoScale:'',//logo大小比例
    logoCornerRadius:'',//圆角大小,默认为8
    logoMargin:'',//标识周围的空白边框, 默认为0
  }).draw().then((dataURL) => {
     console.log(dataURL);
  });