uniapp小程序生成海报图
实现方式:1:使用canvas画图,2:使用Painter实现
一、使用canvas实现
1.在页面中添加canvas标签
// touchstart touchmove touchend 这三个事件的作用是防止canvas 滚动
二、开始画图
async setStopter(){ //画海报
				var _this = this
				ctx = uni.createCanvasContext('posterid')  //创建画笔
				//绘制矩形背景
				this.roundRect(0,0,315,366,5)

				ctx.beginPath()//开始创建一个路径
				ctx.arc(15, 15, 40, 0, 2 * Math.PI)//画一个圆形裁剪区域
				ctx.drawImage("/static/images/posters.png",15,13, 40, 40)//绘制本地图片
				this.canvasFont(14,'#434343','古古怪怪',64,28)
				this.canvasFont(11,'#8c8c8c','古古怪怪给你分享了好物,快来看看吧!',64,46)

				//绘制网络图片
				let baner = await this.downloadImage(_this.itemRoom.picture[0])  //改成自己的图片地址
				if(baner.tempFilePath){
					ctx.save()
					ctx.drawImage(baner.tempFilePath, 0,64,315,177);
					ctx.restore()
				}

				this.canvasFont(16,'#434343','大床房',15,271)
				this.canvasFont(10,'#434343','抢购价:',15,300)
				this.canvasFont(11,'red','¥',54,300)
				this.canvasFont(16,'red','0.01',65,300)
				this.canvasFont(10,'#8c8c8c','199',104,300)

				// //横线
				// ctx.beginPath()
				// ctx.setStrokeStyle('#8C8C8C')
				// ctx.moveTo(102, 297)
				// ctx.lineTo(140, 297)
				// ctx.stroke()

				ctx.drawImage('/static/images/location.png', 15,317,11,11);
				this.canvasFont(10,'#8c8c8c','浙江省杭州市西湖区古墩路598号',28,327)

				ctx.drawImage('/static/images/topchuanlian.png', 222,251,78,78);
				this.canvasFont(10,'#434343','微信扫码了解更多',222,342)

				ctx.draw()

			},
			canvasFont(fs,color,txt,x,y){  //绘制文字
				ctx.setFontSize(fs)
				ctx.setFillStyle(color)
				ctx.fillText(txt,x,y)
			},
			drawRowtext(text, pointX, pointY, rowStrnum, lineHeight) { //绘制多行文本
				//pointX 文本左上角x坐标位置
				//pointY - 左上角y坐标位置
				//rowStrnum - 每行多少个字
				//lineHeight - 行高
				ctx.setFontSize(11)
			    var len = text.length;
			    var n = len / rowStrnum;
			    // console.log(n);
			    var n1 = Math.ceil(n);//向上取整
			    ctx.setFillStyle('#8C8C8C');
			    ctx.setTextBaseline('top')
			    for (var i = 0; i < n1; i++) {
			      ctx.fillText(text.slice(i * rowStrnum, ((i + 1) * rowStrnum)+1), pointX, pointY + i * lineHeight);
			    }
			    return n * lineHeight;
			},
			roundRect(x, y, w, h, r, c = '#fff') { //绘制圆角矩形
			    /**
			     * 绘制圆角矩形
			     * @param {Number} x - 矩形的x坐标
			     * @param {Number} y - 矩形的y坐标
			     * @param {Number} w - 矩形的宽度
			     * @param {Number} h - 矩形的高度
			     * @param {Number} r - 矩形的圆角半径
			     * @param {String} [c = 'transparent'] - 矩形的填充色
				*/
				if (w < 2 * r) { r = w / 2; }
			    if (h < 2 * r) { r = h / 2; }

			    ctx.beginPath();
			    ctx.fillStyle = c;

			    ctx.arc(x + r, y + r, r, Math.PI, Math.PI * 1.5);
			    ctx.moveTo(x + r, y);
			    ctx.lineTo(x + w - r, y);
			    ctx.lineTo(x + w, y + r);

			    ctx.arc(x + w - r, y + r, r, Math.PI * 1.5, Math.PI * 2);
			    ctx.lineTo(x + w, y + h - r);
			    ctx.lineTo(x + w - r, y + h);

			    ctx.arc(x + w - r, y + h - r, r, 0, Math.PI * 0.5);
			    ctx.lineTo(x + r, y + h);
			    ctx.lineTo(x, y + h - r);

			    ctx.arc(x + r, y + h - r, r, Math.PI * 0.5, Math.PI);
			    ctx.lineTo(x, y + r);
			    ctx.lineTo(x + r, y);

			    ctx.fill();
			    ctx.closePath();
			},
			savePoster(){ //保存海报
				uni.canvasToTempFilePath({
				  canvasId: 'posterid',
				  success: function (res) {
					console.log(res)
					uni.saveImageToPhotosAlbum({
					  filePath: res.tempFilePath,
					  success(result) {
						uni.showToast({
						  title: '图片保存成功',
						  icon: 'success',
						  duration: 2000
						})
					  }
					})
				  }
				})
			},
			downloadImage(url) { //绘制网络图片,网络图片需要先缓存到本地再绘制
				return new Promise((resolve, reject) => {
					uni.downloadFile({  // 还可以使用 uni.getImageInfo 方法
						url: url,
						success: (res) => {
							return resolve(res)
						},
						fail: (err) => {
							return reject(err)
						}
					})
				})
			},
二、使用Painter 插件实现
painter git地址:https://github.com/Kujiale-Mobile/Painter
可以在这个演示地址 https://lingxiaoyi.github.io/painter-custom-poster 先布局好,然后复制代码
具体使用步骤:
1.下载painter 将components文件下的 painter 文件复制到自己的项目里,然后再使用的页面进行引入
注意:第三方框架编写的小程序需要放到 wxcomponents或者static文件下,默认会报错
不能放在
"usingComponents": {
	 "painter":"/wxcomponents/painter/painter"
}
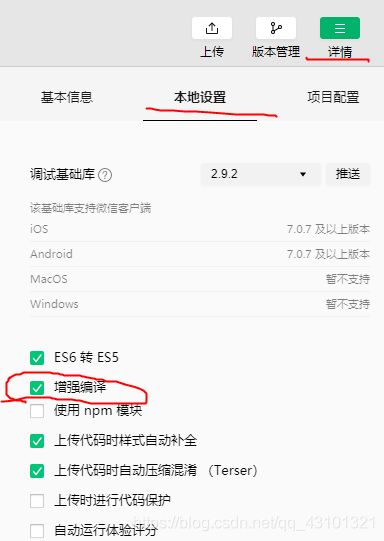
如果使用时遇到这个问题,regeneratorRuntime is not defined,解决方案:勾选增强编译 即可

2.在页面中使用
动态模板:dancePalette ,静态模板:palette
data(){
	return{
		canvasdata:'',
		canvasImgUrl:''
	}
}
设置动态数据
onSelect() { //设置数据的方法,内容较少仅举例方便理解
				var _this = this
		this.canvasdata = {
		 		width:"630rpx",
				height:"732rpx",
				background:'#fff',
				views:[
					{
						type: 'image',
						url: _this.DetailData.avatar,
						css: {
							width: '78rpx',
							height: '78rpx',
							borderRadius: '39rpx',
							top: '30rpx',
							left: '30rpx',
						}
					},
					{
					    "type": "text",
					    "text":  _this.DetailData.nickname,
					    "css": {
					        "color": "#434343",
					        "width": "200rpx",
					        "top": "28rpx",
					        "left": "128rpx",
							"fontSize": "28rpx"
					    }
					}
				]
			}
		},
保存图片
图片地址在 @imgOK 绑定的事件中
onImgOK(e){
	// console.log(e)
	this.canvasImgUrl = e.detail.path
}
在保存的事件中保存图片
savePoster(){ //保存海报
		var _this = this;
		uni.saveImageToPhotosAlbum({
		  filePath: _this.canvasImgUrl,
		  success(result) {
			uni.showToast({
			  title: '图片保存成功',
			  icon: 'none'
			})
		  }
		})
	}