docker从安装到项目部署,超详细。
安装
1.安装命令如下:
curl -fsSL https://get.docker.com | bash -s docker --mirror Aliyun
也可以使用国内 daocloud 一键安装命令:
curl -sSL https://get.daocloud.io/docker | sh
2.查看docker相关信息
[root@VM-0-12-centos ~]# docker version
Client: Docker Engine - Community
 Version:           20.10.2
 API version:       1.41
 Go version:        go1.13.15
 Git commit:        2291f61
 Built:             Mon Dec 28 16:17:48 2020
 OS/Arch:           linux/amd64
 Context:           default
 Experimental:      true

Server: Docker Engine - Community
 Engine:
  Version:          20.10.2
  API version:      1.41 (minimum version 1.12)
  Go version:       go1.13.15
  Git commit:       8891c58
  Built:            Mon Dec 28 16:16:13 2020
  OS/Arch:          linux/amd64
  Experimental:     false
 containerd:
  Version:          1.4.3
  GitCommit:        269548fa27e0089a8b8278fc4fc781d7f65a939b
 runc:
  Version:          1.0.0-rc92
  GitCommit:        ff819c7e9184c13b7c2607fe6c30ae19403a7aff
 docker-init:
  Version:          0.19.0
  GitCommit:        de40ad0
3.配置docker镜像加速
vi /etc/docker/daemon.json
{
  "registry-mirrors": ["https://registry.docker-cn.com"]
}
启动
4.启动 Docker。
$ sudo systemctl start docker
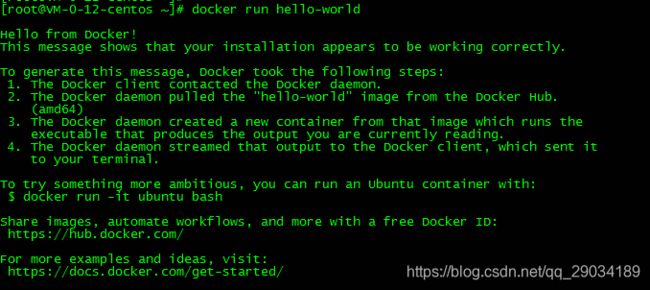
通过运行 hello-world 映像来验证是否正确安装了 Docker Engine-Community 。
$ docker run hello-world
5.启动一个容器
#启动nginx
docker run -d -p 80:80 nginx
#查看当前运行的容器
docker ps
搜索
6.搜索官方容器
官方网站搜索
地址:https://hub.docker.com/
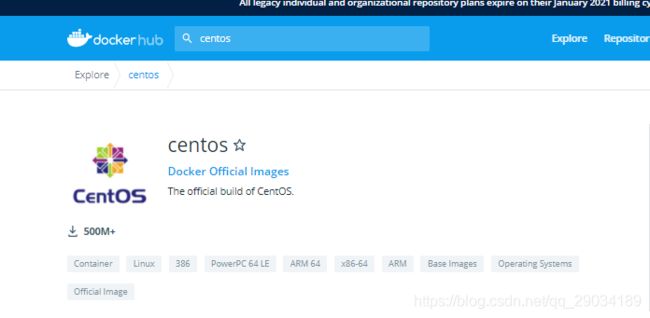
命令搜索 :
docker search centos
[root@VM-0-12-centos ~]# docker search centos
NAME                               DESCRIPTION                                     STARS     OFFICIAL   AUTOMATED
centos                             The official build of CentOS.                   6382      [OK]
ansible/centos7-ansible            Ansible on Centos7                              132                  [OK]
consol/centos-xfce-vnc             Centos container with "headless" VNC session…   125                  [OK]
jdeathe/centos-ssh                 OpenSSH / Supervisor / EPEL/IUS/SCL Repos - …   117                  [OK]
centos/systemd                     systemd enabled base container.                 93                   [OK]
centos/mysql-57-centos7            MySQL 5.7 SQL database server                   87
imagine10255/centos6-lnmp-php56    centos6-lnmp-php56                              58                   [OK]
tutum/centos                       Simple CentOS docker image with SSH access      46
centos/postgresql-96-centos7       PostgreSQL is an advanced Object-Relational …   45
kinogmt/centos-ssh                 CentOS with SSH                                 29                   [OK]
pivotaldata/centos-gpdb-dev        CentOS image for GPDB development. Tag names…   13
guyton/centos6                     From official centos6 container with full up…   10                   [OK]
centos/tools                       Docker image that has systems administration…   7                    [OK]
drecom/centos-ruby                 centos ruby                                     6                    [OK]
pivotaldata/centos                 Base centos, freshened up a little with a Do…   5
mamohr/centos-java                 Oracle Java 8 Docker image based on Centos 7    3                    [OK]
darksheer/centos                   Base Centos Image -- Updated hourly             3                    [OK]
pivotaldata/centos-gcc-toolchain   CentOS with a toolchain, but unaffiliated wi…   3
pivotaldata/centos-mingw           Using the mingw toolchain to cross-compile t…   3
indigo/centos-maven                Vanilla CentOS 7 with Oracle Java Developmen…   1                    [OK]
blacklabelops/centos               CentOS Base Image! Built and Updates Daily!     1                    [OK]
mcnaughton/centos-base             centos base image                               1                    [OK]
pivotaldata/centos7-dev            CentosOS 7 image for GPDB development           0
pivotaldata/centos6.8-dev          CentosOS 6.8 image for GPDB development         0
smartentry/centos                  centos with smartentry                          0                    [OK]
镜像管理
1.根据镜像名称拉取镜像
docker pull
[root@VM-0-12-centos ~]# docker pull centos
Using default tag: latest
latest: Pulling from library/centos
7a0437f04f83: Pull complete
Digest: sha256:5528e8b1b1719d34604c87e11dcd1c0a20bedf46e83b5632cdeac91b8c04efc1
Status: Downloaded newer image for centos:latest
docker.io/library/centos:latest
2.查看当前主机镜像列表
[root@VM-0-12-centos ~]# docker image list
REPOSITORY    TAG       IMAGE ID       CREATED         SIZE
nginx         latest    f6d0b4767a6c   12 days ago     133MB
centos        latest    300e315adb2f   6 weeks ago     209MB
hello-world   latest    bf756fb1ae65   12 months ago   13.3kB
各个选项说明:
REPOSITORY:表示镜像的仓库源
TAG:镜像的标签
IMAGE ID:镜像ID
CREATED:镜像创建时间
SIZE:镜像大小
3.导出镜像
#查看
[root@VM-0-12-centos ~]# docker image list
REPOSITORY    TAG       IMAGE ID       CREATED         SIZE
nginx         latest    f6d0b4767a6c   13 days ago     133MB
centos        latest    300e315adb2f   7 weeks ago     209MB
hello-world   latest    bf756fb1ae65   12 months ago   13.3kB
#导出
[root@VM-0-12-centos ~]# docker image save centos > docker-centos-image.tar.gz
#查看导出镜像
[root@VM-0-12-centos ~]# ll
total 211464
-rw-r--r-- 1 root root 216535040 Jan 26 16:18 docker-centos-image.tar.gz
drwxr-xr-x 3 root root      4096 Jan 21 17:02 nginx
4.镜像删除
#查看
[root@VM-0-12-centos ~]# docker image list
REPOSITORY    TAG       IMAGE ID       CREATED         SIZE
nginx         latest    f6d0b4767a6c   13 days ago     133MB
centos        latest    300e315adb2f   7 weeks ago     209MB
hello-world   latest    bf756fb1ae65   12 months ago   13.3kB
#删除
[root@VM-0-12-centos /]# docker image rm centos:latest
Untagged: centos:latest
Untagged: centos@sha256:5528e8b1b1719d34604c87e11dcd1c0a20bedf46e83b5632cdeac91b8c04efc1
Deleted: sha256:300e315adb2f96afe5f0b2780b87f28ae95231fe3bdd1e16b9ba606307728f55
Deleted: sha256:2653d992f4ef2bfd27f94db643815aa567240c37732cae1405ad1c1309ee9859
[root@VM-0-12-centos /]#
[root@VM-0-12-centos /]# docker image list
REPOSITORY    TAG       IMAGE ID       CREATED         SIZE
nginx         latest    f6d0b4767a6c   13 days ago     133MB
hello-world   latest    bf756
5.导入镜像
#查看镜像包
[root@VM-0-12-centos ~]# ll
total 211464
-rw-r--r-- 1 root root 216535040 Jan 26 16:18 docker-centos-image.tar.gz
drwxr-xr-x 3 root root      4096 Jan 21 17:02 nginx
#导入镜像
[root@VM-0-12-centos ~]# docker image load -i docker-centos-image.tar.gz
2653d992f4ef: Loading layer  216.5MB/216.5MB
Loaded image: centos:latest
#查看镜像
[root@VM-0-12-centos ~]# docker images
REPOSITORY    TAG       IMAGE ID       CREATED         SIZE
nginx         latest    f6d0b4767a6c   13 days ago     133MB
centos        latest    300e315adb2f   7 weeks ago     209MB
hello-world   latest    bf756fb1ae65   12 months ago   13.3kB
6.查看镜像信息
[root@VM-0-12-centos ~]# docker image inspect centos
[
    {
        "Id": "sha256:300e315adb2f96afe5f0b2780b87f28ae95231fe3bdd1e16b9ba606307728f55",
        "RepoTags": [
            "centos:latest"
        ],
        "RepoDigests": [],
        "Parent": "",
        "Comment": "",
        "Created": "2020-12-08T00:22:53.076477777Z",
        "Container": "395e0bfa7301f73bc994efe15099ea56b8836c608dd32614ac5ae279976d33e4",
        "ContainerConfig": {
            "Hostname": "395e0bfa7301",
            "Domainname": "",
            "User": "",
            "AttachStdin": false,
            "AttachStdout": false,
            "AttachStderr": false,
            "Tty": false,
            "OpenStdin": false,
            "StdinOnce": false,
            "Env": [
                "PATH=/usr/local/sbin:/usr/local/bin:/usr/sbin:/usr/bin:/sbin:/bin"
            ],
            "Cmd": [
                "/bin/sh",
                "-c",
                "#(nop) ",
                "CMD [\"/bin/bash\"]"
            ],
            "Image": "sha256:6de05bdfbf9a9d403458d10de9e088b6d93d971dd5d48d18b4b6758f4554f451",
            "Volumes": null,
            "WorkingDir": "",
            "Entrypoint": null,
            "OnBuild": null,
            "Labels": {
                "org.label-schema.build-date": "20201204",
                "org.label-schema.license": "GPLv2",
                "org.label-schema.name": "CentOS Base Image",
                "org.label-schema.schema-version": "1.0",
                "org.label-schema.vendor": "CentOS"
            }
        },
        "DockerVersion": "19.03.12",
        "Author": "",
        "Config": {
            "Hostname": "",
            "Domainname": "",
            "User": "",
            "AttachStdin": false,
            "AttachStdout": false,
            "AttachStderr": false,
            "Tty": false,
            "OpenStdin": false,
            "StdinOnce": false,
            "Env": [
                "PATH=/usr/local/sbin:/usr/local/bin:/usr/sbin:/usr/bin:/sbin:/bin"
            ],
            "Cmd": [
                "/bin/bash"
            ],
            "Image": "sha256:6de05bdfbf9a9d403458d10de9e088b6d93d971dd5d48d18b4b6758f4554f451",
            "Volumes": null,
            "WorkingDir": "",
            "Entrypoint": null,
            "OnBuild": null,
            "Labels": {
                "org.label-schema.build-date": "20201204",
                "org.label-schema.license": "GPLv2",
                "org.label-schema.name": "CentOS Base Image",
                "org.label-schema.schema-version": "1.0",
                "org.label-schema.vendor": "CentOS"
            }
        },
        "Architecture": "amd64",
        "Os": "linux",
        "Size": 209348104,
        "VirtualSize": 209348104,
        "GraphDriver": {
            "Data": {
                "MergedDir": "/var/lib/docker/overlay2/eabb6dc4b0ef71cfd09b049c2ba8f06a1aa107c06b28b3b1e497a3ac830f05a9/merged",
                "UpperDir": "/var/lib/docker/overlay2/eabb6dc4b0ef71cfd09b049c2ba8f06a1aa107c06b28b3b1e497a3ac830f05a9/diff",
                "WorkDir": "/var/lib/docker/overlay2/eabb6dc4b0ef71cfd09b049c2ba8f06a1aa107c06b28b3b1e497a3ac830f05a9/work"
            },
            "Name": "overlay2"
        },
        "RootFS": {
            "Type": "layers",
            "Layers": [
                "sha256:2653d992f4ef2bfd27f94db643815aa567240c37732cae1405ad1c1309ee9859"
            ]
        },
        "Metadata": {
            "LastTagTime": "0001-01-01T00:00:00Z"
        }
    }
]
容器的日常管理
容器的起/停
启动:docker run 容器ID、名称
停止:docker stop 容器ID、名称
#启动容器
[root@VM-0-12-centos ~]# docker run -d -p 80:80 nginx
4e7ccede1ed8d412d76f8b287c6da332fa9b95a8d20f788f60be23c1dd064756
#查看正在运行容器
[root@VM-0-12-centos ~]# docker ps
CONTAINER ID   IMAGE     COMMAND                  CREATED         STATUS         PORTS                NAMES
4e7ccede1ed8   nginx     "/docker-entrypoint.…"   4 seconds ago   Up 4 seconds   0.0.0.0:80->80/tcp   wizardly_black
#停止容器
[root@VM-0-12-centos ~]# docker stop 4e7ccede1ed8
4e7ccede1ed8
#查看正在运行容器,容器成功停止
[root@VM-0-12-centos ~]# docker ps
CONTAINER ID   IMAGE     COMMAND   CREATED   STATUS    PORTS     NAMES
我们也可以使用 -p 标识来指定容器端口绑定到主机端口。
两种方式的区别是:
-P :是容器内部端口随机映射到主机的高端口。
-p : 是容器内部端口绑定到指定的主机端口。

查看正在运行容器*
[root@VM-0-12-centos ~]# docker ps
CONTAINER ID   IMAGE     COMMAND                  CREATED         STATUS         PORTS                NAMES
4e7ccede1ed8   nginx     "/docker-entrypoint.…"   4 seconds ago   Up 4 seconds   0.0.0.0:80->80/tcp   wizardly_black
查看你所有容器(包括未运行的)
[root@VM-0-12-centos ~]# docker ps -a
CONTAINER ID   IMAGE           COMMAND                  CREATED              STATUS                      PORTS                NAMES
1d227b9c6101   centos:latest   "/usr/bin/sleep 20"      About a minute ago   Exited (0) 40 seconds ago                        sad_kepler
4e7ccede1ed8   nginx           "/docker-entrypoint.…"   5 minutes ago        Up 5 minutes                0.0.0.0:80->80/tcp   wizardly_black
454cf03dcd08   centos          "/bin/bash"              7 minutes ago        Exited (0) 7 minutes ago                         gallant_sinoussi
472ea492afb4   nginx           "/docker-entrypoint.…"   27 hours ago         Exited (0) 16 minutes ago                        intelligent_chandrasekhar
bb9439dd68ab   nginx           "/docker-entrypoint.…"   27 hours ago         Created                                          funny_black
7a0859b17541   hello-world     "/hello"                 27 hours ago         Exited (0) 27 hours ago                          pensive_goodall
6dc1c68a198f   hello-world     "/hello"                 27 hours ago         Exited (0) 27 hours ago                          dreamy_golick
进入容器方法
docker run -it #参数:-it 可交互终端
exec 进入容器方法(推荐使用)
#交互模式进入
[root@VM-0-12-centos ~]# docker run -it nginx /bin/bash
#显示ID标识进入成功
root@c7f406006aaa:/#
#exec进入
[root@VM-0-12-centos ~]# docker ps
CONTAINER ID   IMAGE     COMMAND                  CREATED         STATUS         PORTS     NAMES
c7f406006aaa   nginx     "/docker-entrypoint.…"   5 minutes ago   Up 5 minutes   80/tcp    compassionate_raman
#进入容器
[root@VM-0-12-centos ~]# docker exec -it c7f406006aaa /bin/bash
root@c7f406006aaa:/#
退出容器方法
按键:ctrl+p & ctrl+q
docker自定义名称启动
–name
[root@VM-0-12-centos ~]# docker run -d --name new_name_nginx nginx
2c2b57fc5f1b796cec822b0fdfe1acc8f0ff64e5f23650e054ae999a4535ad63
[root@VM-0-12-centos ~]# docker ps
CONTAINER ID   IMAGE     COMMAND                  CREATED         STATUS         PORTS     NAMES
2c2b57fc5f1b   nginx     "/docker-entrypoint.…"   5 seconds ago   Up 4 seconds   80/tcp    new_name_nginx
[root@VM-0-12-centos ~]#
删除所有容器
docker rm -f docker ps -a -q
-f 强制删除
#查看所有容器
[root@VM-0-12-centos ~]# docker ps -a
CONTAINER ID   IMAGE           COMMAND                  CREATED             STATUS                           PORTS     NAMES
2c2b57fc5f1b   nginx           "/docker-entrypoint.…"   About an hour ago   Up About an hour                 80/tcp    new_name_nginx
c7f406006aaa   nginx           "/docker-entrypoint.…"   2 hours ago         Exited (137) About an hour ago             compassionate_raman
6289fad739a7   nginx           "/docker-entrypoint.…"   2 hours ago         Exited (0) 2 hours ago                     n2
ec984eb0a46d   nginx           "/docker-entrypoint.…"   2 hours ago         Exited (0) 2 hours ago                     n1
1d227b9c6101   centos:latest   "/usr/bin/sleep 20"      2 hours ago         Exited (0) 2 hours ago                     sad_kepler
4e7ccede1ed8   nginx           "/docker-entrypoint.…"   2 hours ago         Exited (0) 2 hours ago                     wizardly_black
454cf03dcd08   centos          "/bin/bash"              2 hours ago         Exited (0) 2 hours ago                     gallant_sinoussi
472ea492afb4   nginx           "/docker-entrypoint.…"   28 hours ago        Exited (0) 2 hours ago                     intelligent_chandrasekhar
bb9439dd68ab   nginx           "/docker-entrypoint.…"   29 hours ago        Created
#删除所有容器
[root@VM-0-12-centos ~]# docker rm -f ${docker ps -aq}
-bash: ${docker ps -aq}: bad substitution
#验证
[root@VM-0-12-centos ~]# deocker ps -a
-bash: deocker: command not found
Docker 数据卷的管理
挂载时创建卷
挂载卷
docker run -it -v 宿主机路径:容器路径
#启动一个容器并挂载
docker run -it -v /app:/app --name vmount_cos centos /bin/bash
#查看正在运行容器
[root@VM-0-10-centos /]# docker ps
CONTAINER ID   IMAGE     COMMAND       CREATED          STATUS          PORTS     NAMES
a592f9c45485   centos    "/bin/bash"   14 minutes ago   Up 14 minutes             vmount_cos
#查看容器卷挂载路径
[root@VM-0-10-centos /]# docker inspect vmount_cos

匿名卷、具名卷
匿名:docker run -v 容器内路径 --name niming_centos centos /bin/bash
#匿名挂载
[root@VM-0-10-centos /]# docker run -d -v /r_ni --name niming_centos centos /bin/bash

具名:[root@VM-0-10-centos /]# docker run -d -v 挂载名称:容器内路径
[root@VM-0-10-centos /]# docker run -d -v juming:/r_ju --name juming_centos centos /bin/bash
创建镜像
手动将容器保存为镜像
制作容器

将容器提交为镜像
docker commit 我们制作好的容器名称 制作好镜像名称
#容器制作成镜像
[root@VM-0-10-centos /]# docker commit vmount_cos vim_cos
sha256:8dc9890627272705368ab428a678017fc0a44a5a18d599313196670d25624b16
#查看制作好的镜像
[root@VM-0-10-centos /]# docker images
REPOSITORY   TAG       IMAGE ID       CREATED          SIZE
vim_cos      latest    8dc989062727   38 seconds ago   353MB
centos       latest    300e315adb2f   7 weeks ago      209MB
#启动新的容器并查看我们制作好的功能
[root@VM-0-10-centos /]# docker run -it vim_cos /bin/bash
[root@e87df2087b75 /]# vim
[root@e87df2087b75 /]# vim test.txt
Dockerfile自动构建docker镜像
指令
dockerfile主要组成部分:
基础镜像信息 FROM centos:6.8
制作镜像操作指令RUN yum insatll openssh-server -y
容器启动时执行指令 CMD ["/bin/bash"]
dockerfile常用指令:
FROM 这个镜像的妈妈是谁?(指定基础镜像)
MAINTAINER 告诉别人,谁负责养它?(指定维护者信息,可以没有)
RUN 你想让它干啥(在命令前面加上RUN即可)
ADD 给它点创业资金(COPY文件,会自动解压)
WORKDIR 我是cd,今天刚化了妆(设置当前工作目录)
VOLUME 给它一个存放行李的地方(设置卷,挂载主机目录)
EXPOSE 它要打开的门是啥(指定对外的端口)
CMD 奔跑吧,兄弟!(指定容器启动后的要干的事情)
dockerfile其他指令:
COPY 复制文件
ENV 环境变量
ENTRYPOINT 容器启动后执行的命令*
容器分层:
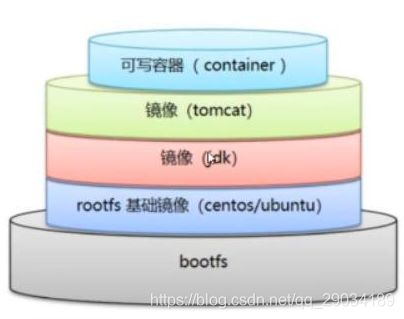
Dockerfile结构:

使用Dockerfile构建一个tomcat镜像,用来发布项目
编写Dcokerfile
vi Dockerfile
#基于sentos7系统构建镜像
FROM centos:7
#作者信息
MAINTAINER wjf<252717286@qq.com>
#将本地 jdk上传至容器 COPY 本地路径 >>容器路径
COPY ./jdk /usr/java/jdk
COPY ./tomcat_web /usr/local/tomcat_web
#配置环境
ENV JAVA_HOME /usr/java/jdk
ENV JRE_HOME $JAVA_HOME/jre
ENV CLASSPATH .:$JAVA_HOME/lib:$JRE_HOME/lib
ENV PATH $PATH:$JAVA_HOME/bin
#分配jvm运行大小
ENV CATALINA_OPTS -Xms128m -Xmx1024m -XX:PermSize=64M -XX:MaxPermSize=512M
#指定对外暴露的端口
EXPOSE 8091
#创建
RUN cd /usr/local/tomcat_web/logs && echo "1" >>count.txt
#启动容器后打印日志,每个人的日志地址不一样,根据自己路径来
ENTRYPOINT /usr/local/tomcat_web/bin/startup.sh && tail -F /usr/local/tomcat_web/logs/catalina.out
使用Dockerfile构建镜像
sudo docker build -t wjf_tomcat:v1 --rm=true .
#如果改变了Dockerfile名字,则需要指定 -f 文件名称
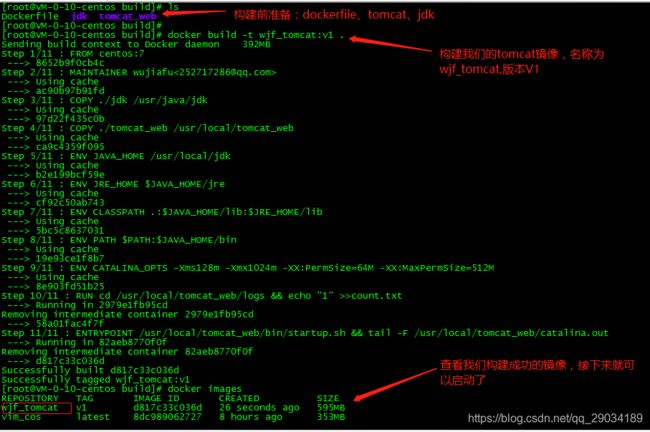
运行我们自己镜像
sudo docker run -p 8091:8091 --name --name wjf_tomcat01 wjf_tomcat:v1
如果想后台运行 可以在run后加 -d 参数即:sudo docker run -d -p 8091:8091 --name wjf_tomcat01 wjf_tomcat:v1 其余参数不解释,因为我们改过tomcat端口为8091,所以这里用8091

Docker网络
docker默认采用桥接方式进行网络通信,宿主机能够直接访问容器,容器也能直接访问宿主机,他们处于同一网关。
Docker网络类型关系
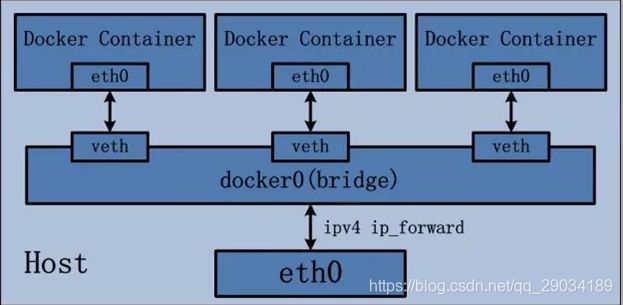
网络类型说明

同一个宿主机(服务器),多个容器互连
docker run --link 要连接容器名称
[root@VM-0-10-centos ~]# docker run --name d3 --link d1  -it centos
#查看映射关系
[root@9b8a70c798c2 /]# cat /etc/hosts
127.0.0.1       localhost
::1     localhost ip6-localhost ip6-loopback
fe00::0 ip6-localnet
ff00::0 ip6-mcastprefix
ff02::1 ip6-allnodes
ff02::2 ip6-allrouters
172.18.0.2      d1 ed9ceb35153e
172.18.0.4      9b8a70c798c2
部署项目
至此,,我们就可以用docker容器发布自己的项目了,构建成自己的镜像,下面就准备开始实战
前端部署
利用Dockerfile构建ngnix镜像来部署vue包
1.先下载一个nginx镜像,运行。
#下载一个nginx镜像
[root@VM-0-10-centos ~]# docker pull nginx
#运行镜像并设置端口
[root@VM-0-10-centos ~]# docker run -d -p 80:80 nginx
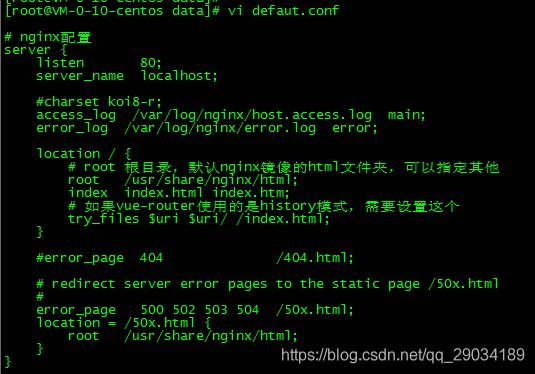
创建nginx配置文件:
default.conf
# nginx配置
server {
    listen       80;
    server_name  localhost;

    #charset koi8-r;
    access_log  /var/log/nginx/host.access.log  main;
    error_log  /var/log/nginx/error.log  error;

    location / {
        # root 根目录,默认nginx镜像的html文件夹,可以指定其他
        root   /usr/share/nginx/html;
        index  index.html index.htm;
        # 如果vue-router使用的是history模式,需要设置这个
        try_files $uri $uri/ /index.html;
    }

    #error_page  404              /404.html;

    # redirect server error pages to the static page /50x.html
    #
    error_page   500 502 503 504  /50x.html;
    location = /50x.html {
        root   /usr/share/nginx/html;
    }
}
把配置文件上传到容器
#上传配置文件
docker cp defaut.conf c0682e96a4df:/etc/nginx/conf.d/default.conf
#上传打包好的vue代码到容器,也可以使用卷挂载
[root@VM-0-10-centos data]# docker cp webapp c0682e96a4df:/usr/share/nginx/html/
#到容器/usr/share/nginx/html移动文件
root@c0682e96a4df:/usr/share/nginx/html# mv -f ./webapp/* ./
#重启容器
[root@VM-0-10-centos data]# docker restart c0682e96a4df
Dockerfile制作镜像部署我们的项目
首先创建一个Dockerfile文件
Dockerfile
#构建基础镜像
FROM nginx
#作者
MAINTAINER wjf
#拷贝本地vue包到nginx发布目录
COPY webapp/ /usr/share/nginx/html/
#拷贝我们创建配置文件覆盖nginx配置
COPY defaut.conf /etc/nginx/conf.d/default.conf
docker build -t website_web:1 .


运行我们自己构建的镜像,以后我们就可以把我们的镜像交给别人部署了
docker run -d --name image_web -p 8080:80 website_web:1

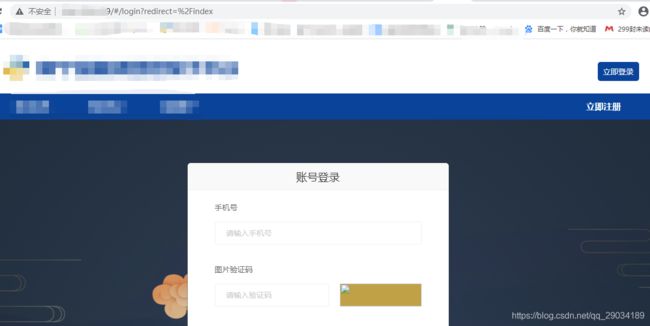
测试连接8080,成功。
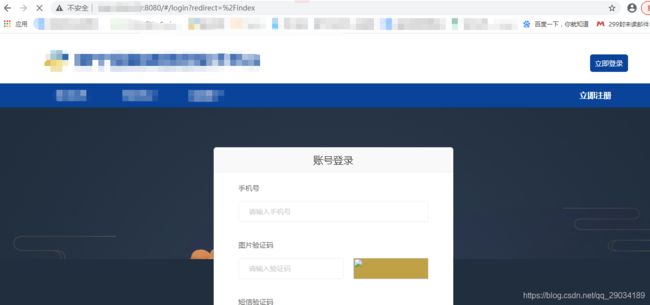
后端部署
利用jdk基础镜像构建部署我们的jar包
Dockerfile:
#基础镜像,jdk8
FROM openjdk:8u212-jre
#作者
MAINTAINER wjf
#将我们后端打包好的jar复制进容器当中
COPY febs-server-website.jar /febs/febs-server-website.jar
#容器启动运行我们的jar包
ENTRYPOINT ["java", "-Xmx256m", "-jar", "/febs/febs-server-website.jar"]
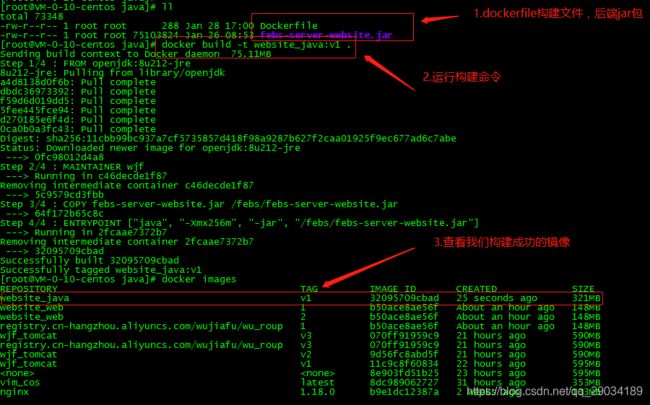
[root@VM-0-10-centos java]# docker build -t website_java:v1 .
docker run --name website_java -d registry.cn-hangzhou.aliyuncs.com/wujiafu/wu_roup/website_java:v1
至此,我们docker服务搭建发布已经完成。


