Elasticsearch7.10搜索引擎RestHighLevelClient高级客户端整合Springboot基础教程
目录
一. 基本概念介绍
二. Elasticsearch服务端安装
三. Http rest api简单使用介绍
四. 整合到Springboot及使用RestHighLevelClient高级客户端
五. 后续
网络上关于Elasticsearch搜索引擎的教程不少, 但大多数都是比较老旧的, 甚至包括Elasticsearch官网的教程也是很久没有更新, 再加上Elasticsearch本身升级过程中不断的抛弃老旧概念, 新版本完全不兼容旧版本, 所以老旧教程给新入门的童鞋带来很多困惑.
这里使用当前Elasticsearch最新版本7.10.2结合Springboot2.X版本, 使用http rest api接口和RestHighLevelClient高级客户端封装的一些常用接口给新到的童鞋一些参考.
一. 基本概念介绍
本文侧重于讲述Elasticsearch的基本使用, 关于它的特性和基本概念, 您可以通过官网或其他网络文章了解. 这里只指出与本文有关的一些重要概念.
- index:索引
在7.0以前的版本中类似于数据库中的database概念, 由于在7.0版本后移除了type(或者或type只能为_doc这一种类型), 现在的index类似于数据库中的表(table). - document:文档
类似于数据库中的一条记录 - mapping:映射
类似于数据库中的表结构, es中mapping可以支持动态映射, dynamic属性有true, false, strict 3种类型的值 - field:字段
类似于数据库中的column字段, 字段类型后面会介绍
二. Elasticsearch服务端安装
Elasticsearch官网下载相应操作系统最新版本压缩包, 解压即可, 无需任何额外配置. Elasticsearch运行环境依赖java, 必须先配置好java环境.
以Windows为例: 解压至D:\Apps\elasticsearch-7.10.2
启动: 执行bin目录下的.\elasticsearch.bat 即可启动. 默认http端口为9200, tcp端口为9300
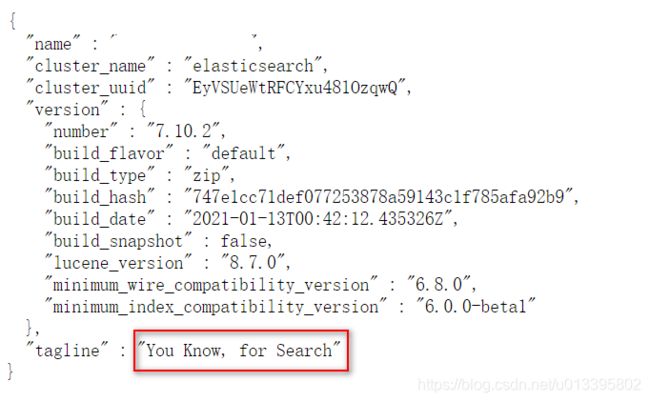
启动成功后在浏览器地址栏输入 localhost:9200, 出现以下信息:
从GitHub上下载相同版本号的ik分词器插件: https://github.com/medcl/elasticsearch-analysis-ik, 解压后复制到elasticsearch/plugins目录下, 重启elasticsearch即可生效.
三. Http rest api简单使用介绍
elasticsearch.rest
### 查看索引 ${index}
GET {
  {esClusterNode}}/index_user
Accept: application/json


### 创建索引 ${index} 指定设置和映射 address字段使用IK分词器分词
### analyzer和search_analyzer的区别:
### 在创建索引,指定analyzer,ES在创建时会先检查是否设置了analyzer字段,如果没定义就用ES预设的
### 在查询时,指定search_analyzer,ES查询时会先检查是否设置了search_analyzer字段,
### 如果没有设置,还会去检查创建索引时是否指定了analyzer,还是没有还设置才会去使用ES预设的
### ES分析器主要有两种情况会被使用:
### 1. 插入文档时,将text类型的字段做分词然后插入倒排索引,此时就可能用到analyzer指定的分词器
### 2. 在查询时,先对要查询的text类型的输入做分词,再去倒排索引搜索,此时就可能用到search_analyzer指定的分词器
PUT {
  {esClusterNode}}/index_user
Content-Type: application/json

{
  "settings": {
    "number_of_shards": 3,
    "number_of_replicas": 2
  },
  "mappings": {
    "properties": {
      "id": {
        "type": "keyword"
      },
      "name": {
        "type": "keyword"
      },
      "age": {
        "type": "integer"
      },
      "sex": {
        "type": "keyword"
      },
      "email": {
        "type": "keyword"
      },
      "address": {
        "type": "text",
        "analyzer": "ik_max_word",
        "search_analyzer": "ik_max_word"
      }
    }
  }
}

### 删除索引 ${index}
DELETE {
  {esClusterNode}}/index_user
Content-Type: application/x-www-form-urlencoded


### 查看映射 ${index}/_mapping
GET {
  {esClusterNode}}/index_user/_mapping
Content-Type: application/x-www-form-urlencoded


### 新增映射 ${index}/_mapping
PUT {
  {esClusterNode}}/index_user/_mapping
Content-Type: application/json

{
  "properties": {
    "score": {
      "type": "float"
    }
  }
}

### 新增文档 ${index}/_doc 自动生成ID(不推荐) 这里的ID是指es注解_id, 不是自定义的id字段
POST {
  {esClusterNode}}/index_user/_doc
Content-Type: application/json

{
  "id": "100001",
  "name": "张三",
  "age": 23,
  "sex": "男",
  "email": "[email protected]",
  "address": "广东省深圳市龙华新区民治工业园29号"
}

### 搜索文档 ${index}/_search 查询全部文档
GET {
  {esClusterNode}}/index_user/_search
Content-Type: application/json

{
  "query": {
    "match_all": {}
  }
}

### 查看文档 ${index}/_doc/${_id}
GET {
  {esClusterNode}}/index_user/_doc/-MVMlXcBnpDI88FS39oA
Accept: application/json

### 新增文档 ${index}/_doc/${_id} 指定ID 推荐
POST {
  {esClusterNode}}/index_user/_doc/100002
Content-Type: application/json

{
  "id": "100002",
  "name": "李四",
  "age": 45,
  "sex": "男",
  "email": "[email protected]",
  "address": "广东省深圳市龙华新区民治工业园27号"
}

### 查看文档 ${index}/_doc/${_id}
GET {
  {esClusterNode}}/index_user/_doc/100002
Accept: application/json

### 更新文档 ${index}/_doc/${_id} ID不存在则新增
PUT {
  {esClusterNode}}/index_user/_doc/100002
Content-Type: application/json

{
  "id": "100002",
  "name": "李四",
  "age": 35,
  "sex": "男",
  "email": "[email protected]",
  "address": "广东省广州市越秀区中心工业园81号"
}

### 删除文档 ${index}/_doc/${_id}
DELETE {
  {esClusterNode}}/index_user/_doc/6WoDdncBA_HwaxaTfHFC
Content-Type: application/json


### 搜索文档 ${index}/_search 查询全部文档
GET {
  {esClusterNode}}/index_user/_search
Content-Type: application/json

{
  "query": {
    "match_all": {}
  }
}

### 搜索文档 ${index}/_search 查询关键字
GET {
  {esClusterNode}}/index_user/_search
Content-Type: application/json

{
  "query": {
    "match": {
      "address": "广东省"
    }
  }
}

### 搜索文档 ${index}/_search 查询关键字
GET {
  {esClusterNode}}/index_user/_search
Content-Type: application/json

{
  "query": {
    "match": {
      "age": "23"
    }
  }
}

### 搜索文档 ${index}/_search 查询关键字 关键字也会被分词 例如, 输入深圳市, 匹配市会按 深圳市 深圳 市 进行搜索
GET {
  {esClusterNode}}/index_user/_search
Content-Type: application/json

{
  "query": {
    "match": {
      "address": "深圳市"
    }
  }
}

### 搜索文档 ${index}/_search 查询关键字 模糊查找 query match 高亮显示
GET {
  {esClusterNode}}/index_user/_search
Content-Type: application/json

{
  "query": {
    "match": {
      "address": "广东省深圳市龙华新区民治工业园"
    }
  },
  "highlight": {
    "fields": {
      "address": {}
    }
  }
}

### 搜索文档 ${index}/_search 查询关键字 精确查找 query term 高亮显示
GET {
  {esClusterNode}}/index_user/_search
Content-Type: application/json

{
  "query": {
    "term": {
      "address": "广州"
    }
  },
  "highlight": {
    "fields": {
      "address": {}
    }
  }
}

### 查看分词结果GET /${index}/_doc/${id}/_termvectors?fields=${fields_name}
GET {
  {esClusterNode}}/index_user/_doc/100002/_termvectors?fields=address
Accept: application/json
四. 整合到Springboot及使用RestHighLevelClient高级客户端
1. 为Springboot项目pom.xml添加elasticsearch及RestHighLevelClient高级客户端依赖
            org.elasticsearch.client
            elasticsearch-rest-high-level-client
            ${elasticsearch.version}


            org.elasticsearch.client
            elasticsearch-rest-client
            ${elasticsearch.version}


            org.elasticsearch
            elasticsearch
            ${elasticsearch.version}
版本均选择7.10.2 这里不推荐使用spring-boot-starter-data-elasticsearch, starter难以控制elasticsearch及其依赖项的版本号.
elasticsearch-rest-high-level-client高级客户端依赖于elasticsearch-rest-client低级客户端, 由于elasticsearch版本间的兼容性非常差, 所以为避免出现一些意向不到的问题, 请保证elasticsearch, elasticsearch-rest-high-level-client, elasticsearch-rest-client, 如果后续需要使用ik分词器, kibana, logstash 使用同一个版本号.
2. 配置RestHighLevelClient高级客户端
- 添加集群配置文件
多个集群节点之间以英文逗号 , 分隔, 如 cluster-nodes: localhost:9200,localhost:9201
# es搜索引擎
elasticsearch:
cluster-nodes: localhost:9200- RestHighLevelClient实例配置
elasticsearch已经实现了负载均衡功能, 具体如何实现的, 资料很少.
ElasticSearchConfig.java
import lombok.extern.slf4j.Slf4j;
import org.apache.http.HttpHost;
import org.elasticsearch.client.RestClient;
import org.elasticsearch.client.RestHighLevelClient;
import org.springframework.beans.factory.annotation.Value;
import org.springframework.context.annotation.Bean;
import org.springframework.context.annotation.Configuration;

import java.util.Arrays;

/**
 * Elasticsearch配置
 *
 * @author Aylvn
 * @date 2021-02-03
 */
@Slf4j
@Configuration
public class ElasticSearchConfig {

    @Value("${elasticsearch.cluster-nodes}")
    private String clusterNodes;

    @Bean
    public RestHighLevelClient restHighLevelClient() {
        String[] nodes =