linux+python3.6.8+uwsgi+postgresql+django部署web服务器
linux+python3.6.8+uwsgi+postgresql+django部署web服务器
- 1.查看系统信息
- 2.配置postgresql数据库
-
- 2-1.安装postgresql数据库
- 2-2.设置密码
- 2-3.修改postgresql数据库配置文件
- 3.Python虚拟环境
-
- 激活虚拟环境
- 4.Django
-
- 4-1.Python 安装Django
- 4-2.创建Django项目
- 4-3.配置Django
- 5.uwsgi
-
- 5-1.Python3 安装uwsgi插件
- 5-2.编辑uwsgi.ini
- 5-3.启动uwsgi应用程序
- 6.nginx
-
- 6-1.安装nginx
- 6-2.修改nginx.配置文件
- 6-3.编辑nginx配置
- 6-4.重启nginx
- 7.测试
1.查看系统信息
我这是使用华为云服务器
cat /etc/redhat-release
# CentOS Linux release 7.9.2009 (Core)
cat /proc/version
# Linux version 3.10.0-1160.92.1.el7.x86_64 ([email protected])
# (gcc version 4.8.5 20150623 (Red Hat 4.8.5-44) (GCC) ) #1 SMP Tue Jun 20 11:48:01 UTC 2023
2.配置postgresql数据库
2-1.安装postgresql数据库
# 安装yum源
yum install -y https://download.postgresql.org/pub/repos/yum/reporpms/EL-7-x86_64/pgdg-redhat-repo-latest.noarch.rpm
# 安装postgresql 12
yum install -y postgresql12-server
# 数据库初始化
/usr/pgsql-12/bin/postgresql-12-setup initdb
# 设置开机自启动数据库
systemctl enable postgresql-12
# 启动数据库
systemctl start postgresql-12
# 重启数据库
systemctl restart postgresql-12
# 开闭数据库
systemctl stop postgresql-12
2-2.设置密码
# 设置密码方便 Navicat登录 等
su postgres
$ psql
psql (12.16)
Type "help" for help.
# 设置 用户postgres 的登录密码
postgres=# ALTER USER postgres WITH PASSWORD '密码';
2-3.修改postgresql数据库配置文件
vim /var/lib/pgsql/12/data/postgresql.conf    # 完毕如下图
# 第60行  把‘localhost’ 改为 ‘*’
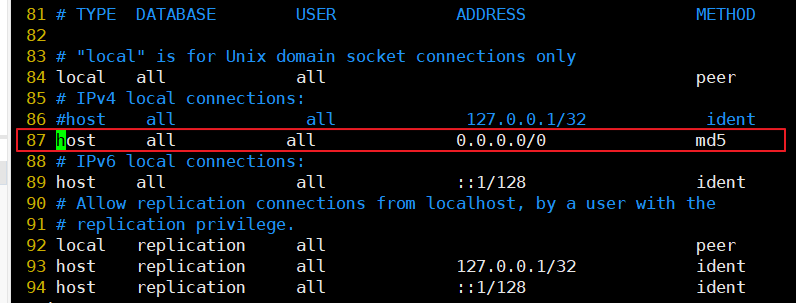
vim /var/lib/pgsql/12/data/pg_hba.conf   # 完毕如下图
# 配置后可以使用本地Navicat登录
3.Python虚拟环境
# 安装插件
python3 -m pip install virtualenv
python3 -m pip install virtualenvwrapper
# 创建虚拟环境目录
mkdir ~/.virtualenvs

# 配置虚拟环境目录
vim ~/.bashrc   # 完毕如下图

# 在末尾添加如下内容
export WORKON_HOME=$HOME/.virtualenvs    # 虚拟环境目录路径
export VIRTUALENVWRAPPER_PYTHON=/usr/bin/python3
export VIRTUALENVWRAPPER_VIRTUALENV=/usr/local/bin/virtualenv
source /usr/local/bin/virtualenvwrapper.sh
# virtualenvwrapper.sh文件不知道全路径可以使用
# find -name /

source ~/.bashrc
# 创建虚拟化 env368py
mkvirtualenv -p /usr/bin/python3 env368py
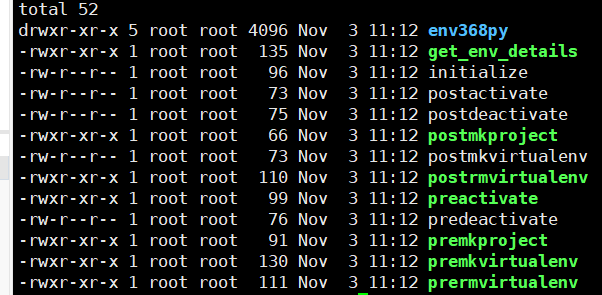
ll ~/.virtualenvs/   # 完毕如下图
激活虚拟环境
source ~/.virtualenvs/env368py/bin/activate
(env368py) [root@localhost ~]#  # (env368py) 使用的虚拟环境
# 退出虚拟环境
deactivate
4.Django
4-1.Python 安装Django
source ~/.virtualenvs/env368py/bin/activate # 如果已经在虚拟环境下,不用执行
# 在虚拟环境下。安装Django == 3.1.1 和 uWSGI
pip install django==3.1.1
# python 连接 postgresql数据库中间件
pip install psycopg2
4-2.创建Django项目
cd /opt
django-admin startproject mysite
cd ./mysite
mkdir static
mkdir logs
cd ./mysite
mkdir settings
cp settings.py setings/test.py     # 测试服务器配置文件
cp settings.py setings/local.py    # 本地开发配置文件
cp settings.py setings/live.py     # 正式服务器配置文件
cd /opt/mysite
4-3.配置Django
vim /opt/mysite/mysite/settings/test.py  # 重新定义配置文件

# 添加或者修改如下内容
import os
# 数据连接
DATABASES = {
    'default': {
        'ENGINE': 'django.db.backends.postgresql_psycopg2',
        'NAME': 'test',
        'USER': 'postgres',
        'PASSWORD': '填写上面数据库密码',
        'HOST': '127.0.0.1',
        'PORT': '5432'
    }
}
# 模板目录
TEMPLATES = [
    {
        'BACKEND': 'django.template.backends.django.DjangoTemplates',
        'DIRS': [os.path.join(BASE_DIR, 'templates')]  # django=3.2.27时 必须‘../templates’,以为路径不对
        ,
        'APP_DIRS': True,
        'OPTIONS': {
            'context_processors': [
                'django.template.context_processors.debug',
                'django.template.context_processors.request',
                'django.contrib.auth.context_processors.auth',
                'django.contrib.messages.context_processors.messages',
            ],
        },
    },
]
# 静态文件
STATICFILES_DIRS = [
    os.path.join(BASE_DIR, '../statics'),
]
# 日志
ERROR_LOG = os.path.join(BASE_DIR, 'logs', 'error.log')
INFO_LOG = os.path.join(BASE_DIR, 'logs', 'mysite.log')
LOGGING = {
    'version': 1,
    'disable_existing_loggers': False,
    'formatters': {   # 日志器格式
        'verbose': {
            'format': '{levelname} {asctime} {module} {process:d} {thread:d} {message}',
            'style': '{',
        },
        'simple': {
            'format': '{asctime}- {levelname} {message}',
            'style': '{',
        },
        'standard': {
            'format': '%(asctime)s [%(module)s:%(funcName)s] [%(levelname)s]- %(message)s'}  #日志格式
    },
    'handlers': {     # 日志器处理器
        'console': {
            'level': 'INFO',
            'class': 'logging.StreamHandler',
            'formatter': 'simple'
        },

        'default': {
            'level': 'INFO',
            'class': 'logging.handlers.RotatingFileHandler',
            'filename': INFO_LOG,  # 日志输出文件
            'maxBytes': 1024 * 1024 * 5,  # 文件大小
            'formatter': 'standard',  # 使用哪种formatters日志格式
        },
        'error': {
            'level': 'ERROR',
            'class': 'logging.handlers.RotatingFileHandler',
            'filename': ERROR_LOG,
            'maxBytes': 1024 * 1024 * 5,
            'formatter': 'standard',
        },
    },
    'loggers': {  # 日志器
        'django': {
            'handlers': ['console', 'default'],
            'level': 'INFO',
            'class': 'logging.FileHandler',
            'filename': INFO_LOG,
            'propagate': True,
        },
        'django.request': {
            'handlers': ['default'],
            'level': 'ERROR',
            'propagate': False,
        },
    }
}
5.uwsgi
5-1.Python3 安装uwsgi插件
yum -y install python3-devel
source ~/.virtualenvs/env368py/bin/activate  # 如果已经在虚拟环境下,不用执行

pip install uWSGI  # 如果报错可能是python3-devel没安装
# yum -y install python3-devel
5-2.编辑uwsgi.ini
[root@localhost ~]# vim /opt/mysite/uwsgi.ini
# 在新建文件中添加一下代码
[uwsgi]
socket=127.0.0.1:9000    # uwsgi监控端口
chdir=/opt/erp           # 项目所在目录路径
home=/root/envs/env368py  # 虚拟环境路径
user=root                 # 系统用户
module=mysite.wsgi     # wsgi.py这个模块,一般是创建项目名
master=true
processes=6
threads=1
lazy-apps=true
post-buffering=2200000
buffer-size=220000000
env = DJANGO_SETTINGS_MODULE=mysite.settings.test  # Django配置文件
enable-threads=true
pidfile=uwsgi.pid                     # uwsgi进程id
daemonize=/opt/erp/logs/uwsgi.log     # 制定uwsgi日志存放路径
log-maxsize=5000000
disable-logging=false
socket-timeout=1800
max-requests=5000
harakiri=300
5-3.启动uwsgi应用程序
uwsgi --ini /opt/mysite/uwsgi.ini
6.nginx
6-1.安装nginx
yum install -y nginx
nginx -t   # 检查语法
6-2.修改nginx.配置文件
vim /etc/nginx/nginx.conf

# 修改nginx.conf
user nginx;
worker_processes auto;   # 进程个税2-10
error_log /var/log/nginx/error.log;   # nginx错误日志路径
pid /run/nginx.pid;      # 进程id
include /usr/share/nginx/modules/*.conf;
events {
    worker_connections 1024;
}
http {
    log_format  main  '$remote_addr - $remote_user [$time_local] "$request" '
                      '$status $body_bytes_sent "$http_referer" '
                      '"$http_user_agent" "$http_x_forwarded_for"';
    access_log  /var/log/nginx/access.log  main;
    sendfile            on;
    tcp_nopush          on;
    tcp_nodelay         on;
    keepalive_timeout   65;
    types_hash_max_size 4096;
    include             /etc/nginx/mime.types;
    default_type        application/octet-stream;
    gzip  on;
    gzip_min_length 1k;
    gzip_buffers 32 4k;
    gzip_comp_level 6;
    #gzip_types text/plain application/x-javascript text/css application/xml;
    gzip_types text/plain application/javascript application/x-javascript text/css application/xml text/javascript application/x-httpd-php image/jpeg image/gif image/png;
    gzip_vary on;
    client_header_buffer_size 128k;
    client_body_buffer_size 1m;
    proxy_buffer_size 32k;
    proxy_buffers 64 32k;
    proxy_busy_buffers_size 1m;
    proxy_temp_file_write_size 512k;
    include /etc/nginx/conf.d/*.conf;
}
6-3.编辑nginx配置
vim /etc/nginx/conf.d/uwsgi.conf
# 辑nginx-uwsgi配置
upstream erp_server{
server 127.0.0.1:9000;
}
server {
listen 8008; # 监听端口 80
server_name mysite.com; # 是域名,也可以是公网ip地址慎用
#include ssl_certificate.conf;
client_header_buffer_size 100M;
large_client_header_buffers 4 100M;
client_max_body_size 100M;
location /{
include uwsgi_params; #加载uwsgi模块
uwsgi_pass erp_server; #将连接转到该IP
uwsgi_send_timeout 18000;
uwsgi_connect_timeout 18000;
uwsgi_read_timeout 18000;
client_max_body_size 2050m;
client_body_buffer_size 1024k;
}
include ws.conf;
}
vim /etc/nginx/ws.conf
# 添加一下内容
set $injected '';
set $injected_ga ' ';
sub_filter '


