vue3 + element plus+ts 实现穿梭框右侧数据上下移动功能
vue3 + element plus+ts 实现穿梭框右侧数据上下移动功能
技术栈
最近在迁移老的vue2项目至vue3,并且同时使用ts,有段时间没更新了。
用啥都一样,只要你会学,用啥啥都行。
不会学也是,用啥都一样,用啥啥不行。
需求
实现element plus中的穿梭框(即el-transfer)右侧数据上下移动功能。
我知道网上有很多类似的例子,但是vue3+ts+element plus就我这一个,能复制总比你自己写要快,对吧。
字看不懂的话看图:
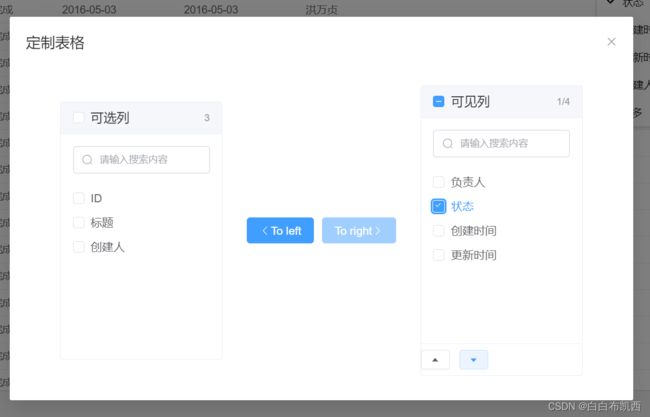
懂了吧。
实现思路
(给中级开发看的,中级开发看完这段应该就会了)
- 打开el-transfer标签内的target-order="push"属性,这是基本,默认是顺序是original,你怎么操作数据顺序都不会变的;
- el-transfer的v-model属性绑定的值就是右侧部分的列表(不要管官方KPI文档怎么写,它就是右侧部分的数据数组),换言之,你改变了v-model绑定的数组中元素的顺序,右侧部分内容的顺序就变了,简单吧。
- right-check-change方法中,你可以获取到右侧部分选中的项的key值组成的数组;
- 比较坑的一点是,你拿到的只是key值(不是索引),你需要操作一下,根据key值取到相应的索引;
- 最后的小技巧,也是逻辑核心的一句话,上移就是当前元素和前一个元素调换位置,下移就是当前元素和下一个元素调换位置;
- 处理下边界值,即在最上面不能上移和在最下面不能下移的情况,搞定。
简单吧,估计大学里前几节编程课就教会你数组怎么互换两个元素了。
示例代码
(给初级小白看的,是在不会你就把这一大段复制进去,我假数据都帮你造好了,先让页面效果出来,慢慢研究)
// An highlighted block
<template>
    <div style="text-align: center">
        <el-transfer v-model="rightValue" style="text-align: left; display: inline-block" filterable target-order="push"
            @right-check-change="rightCheckChange" :render-content="renderFunc" :titles="['可选列', '可见列']"
            :button-texts="['To left', 'To right']" :format="{
                noChecked: '${total}',
                hasChecked: '${checked}/${total}',
            }" :data="data" @change="handleChange">
            <!-- <template #left-footer>
                <el-button class="transfer-footer" size="small">Operation</el-button>
            </template> -->
            <template #right-footer>
                <el-button class="transfer-footer" size="small" @click="moveUp"><el-icon>
                        <CaretTop />
                    </el-icon></el-button>
                <el-button class="transfer-footer" size="small" @click="moveDown"><el-icon>
                        <CaretBottom />
                    </el-icon></el-button>
            </template>
        </el-transfer>
    </div>
</template>

<script lang="ts" setup>
import { ref } from 'vue'
import type { VNode, VNodeProps } from 'vue'

interface Option {
    key: number
    label: string
    disabled: boolean
}

const generateData = (): Option[] => {
    return [
        {
            key: 1,
            label: 'ID',
            disabled: false,
        },
        {
            key: 2,
            label: '标题',
            disabled: false,
        },
        {
            key: 3,
            label: '负责人',
            disabled: false,
        },
        {
            key: 4,
            label: '状态',
            disabled: false,
        },
        {
            key: 5,
            label: '创建时间',
            disabled: false,
        },
        {
            key: 6,
            label: '更新时间',
            disabled: false,
        },
        {
            key: 7,
            label: '创建人',
            disabled: false,
        },
    ]
}

const data = ref(generateData())
const rightValue = ref<number[]>([])

const renderFunc = (
    h: (type: string, props: VNodeProps | null, children?: string) => VNode,
    option: Option
) => {
    //自定义渲染函数,可在这里处理每一项的显示内容
    return h('span', null, option.label)
}
const handleChange = (
    value: number | string,
    direction: 'left' | 'right',
    movedKeys: string[] | number[]
) => {
    console.log(value, direction, movedKeys)
    console.log('rightValue', rightValue)
}

const selectRightValue = ref<number[]>([]) //右侧被选中的元素的key值组成的数组
const rightCheckChange = (arr: Array<number>) => {
	//右侧选中元素触发的时间
    console.log('右侧选中', arr)
    selectRightValue.value = arr
}

const moveUp = () => {
    console.log('选中', selectRightValue.value[0])
    if (selectRightValue.value?.length === 1) {
        let selectKey = rightValue.value.indexOf(selectRightValue.value[0]) //右侧数组被选中的元素的索引index
        console.log(selectKey)
        if (selectKey === 0) {
            window.alert('已经在最顶部,不能再上移')
        } else {
            let temp = rightValue.value[selectKey - 1];
            rightValue.value.splice(selectKey - 1, 1, rightValue.value[selectKey])
            rightValue.value.splice(selectKey, 1, temp)
            console.log('123', rightValue.value)
        }
    } else {
        window.alert('只能且必须选中一项要移动的列')
    }
}
const moveDown = () => {
    if (selectRightValue.value?.length === 1) {
        let selectKey = rightValue.value.indexOf(selectRightValue.value[0]) //右侧数组被选中的元素的索引index
        console.log(selectKey)
        if (
            selectKey + 1 === rightValue.value.length
        ) {
            window.alert('已经在最底部,不能再下移')
        } else {
            let temp = rightValue.value[selectKey + 1];
            rightValue.value.splice(selectKey + 1, 1, rightValue.value[selectKey])
            rightValue.value.splice(selectKey, 1, temp)
            console.log('123', rightValue.value)
        }
    } else {
        window.alert('只能且必须选中一项要移动的列')
    }
}
</script>

<style>
.transfer-footer {
    margin-left: 15px;
    padding: 6px 5px;
}
</style>
别觉得简单,我知道很简单,两句至理名言奉上:
虚怀若谷不代表你没有本事。
眼高手低最后出丑的是自己。