k8s-kubeadm安装1.25.5
准备环境:
想体验下新的版本
| 主机名 | IP | 资源 |
| k8s-master | 192.168.1.191 | 2u2G内存20G磁盘 |
| k8s-node | 192.168.1.192 | 2u2G内存20G磁盘 |
1 修改主机名,配置hosts文件
# 修改主机名
hostnamectl set-hostname k8s-master
hostnamectl set-hostname k8s-node
# 修改hosts文件
cat >> /etc/hosts << EOF
192.168.1.191 k8s-master
192.168.1.192 k8s-node
EOF
2 关闭防火墙、selinux和交换空间
# 关闭卸载防火墙
systemctl stop firewalld
systemctl disable firewalld

# 关闭selinux
# 临时关闭
setenforce 0
# 永久禁用
sed -i 's/^SELINUX=enforcing$/SELINUX=disabled/' /etc/selinux/config

# 关闭swap交换空间
# 临时关闭;关闭swap主要是为了性能考虑
swapoff -a
# 可以通过这个命令查看swap是否关闭了
free
# 永久关闭
sed -ri 's/.*swap.*/#&/' /etc/fstab
3 时间同步
yum install ntpdate -y && ntpdate time.windows.com4 开启路由转发
1、加载 br_netfilter模块
modprobe br_netfilter
2、内核参数写到文件中
cat > /etc/sysctl.d/docker.conf << EOF
net.bridge.bridge-nf-call-ip6tables = 1
net.bridge.bridge-nf-call-iptables = 1
net.ipv4.ip_forward = 1
EOF
3、加载参数
sysctl -p /etc/sysctl.d/docker.conf
5 开启ipvs
# 集群小可以不开启ipvs

vi /etc/sysconfig/modules/ipvs.modules

#!/bin/bash
ipvs_modules="ip_vs ip_vs_lc ip_vs_wlc ip_vs_rr ip_vs_wrr ip_vs_lblc ip_vs_lblcr ip_vs_dh ip_vs_sh ip_vs_nq ip_vs_sed ip_vs_ftp nf_conntrack"
for kernel_module in ${ipvs_modules}; do
 /sbin/modinfo -F filename ${kernel_module} > /dev/null 2>&1
 if [ 0 -eq 0 ]; then
 /sbin/modprobe ${kernel_module}
 fi
done


chmod 755 /etc/sysconfig/modules/ipvs.modules && bash /etc/sysconfig/modules/ipvs.modules && lsmod | grep ip_vs
6 安装containerd
# k8s 1.25已经启用docker

# 先安装一些常见的依赖包
yum install -y yum-utils device-mapper-persistent-data lvm2 wget net-tools nfs-utils lrzsz gcc gcc-c++ make cmake libxml2-devel openssl-devel curl curl-devel unzip sudo ntp libaio-devel wget vim ncurses-devel autoconf automake zlib-devel python-devel epel-release openssh-server socat ipvsadm conntrack ntpdate

# 增加yum源地址
yum-config-manager --add-repo  http://mirrors.aliyun.com/docker-ce/linux/centos/docker-ce.repo

# 安装 containerd
yum install containerd -y

# 启动 containerd
systemctl start  containerd && systemctl enable containerd

# 创建 containerd 配置文件
mkdir -p /etc/containerd
containerd config default > /etc/containerd/config.toml
# 修改容器镜像地址
grep sandbox_image  /etc/containerd/config.toml
sed -i "s#registry.k8s.io/pause#registry.aliyuncs.com/google_containers/pause#g" /etc/containerd/config.toml
grep sandbox_image  /etc/containerd/config.toml
# 修改containerd systemdCgroup
grep SystemdCgroup  /etc/containerd/config.toml
sed -i 's#SystemdCgroup = false#SystemdCgroup = true#g' /etc/containerd/config.toml
# 重启containerd
systemctl restart containerd
7 安装k8s组件
# 配置yum源
cat > /etc/yum.repos.d/kubernetes.repo << EOF
[kubernetes]
name=Kubernetes
baseurl=https://mirrors.aliyun.com/kubernetes/yum/repos/kubernetes-el7-x86_64
enabled=1
gpgcheck=0
repo_gpgcheck=0
gpgkey=https://mirrors.aliyun.com/kubernetes/yum/doc/yum-key.gpg https://mirrors.aliyun.com/kubernetes/yum/doc/rpm-package-key.gpg
EOF
# 安装 disableexcludes=kubernetes:禁掉除了这个kubernetes之外的别的仓库,不指定会安装最新版本的
# 指定版本号kubectl-1.25.2
yum install -y kubelet kubeadm kubectl disableexcludes=kubernetes
# 设置开机启动 --now:立刻启动服务
systemctl enable --now kubelet


# k8s 设置容器进行时
crictl config runtime-endpoint /run/containerd/containerd.sock
前1-7步骤master和node节点都需要执行一遍
8 初始化集群
方法一
# 通过命令初始化集群配置
kubeadm init \
--apiserver-advertise-address=192.168.1.191 \
--image-repository registry.aliyuncs.com/google_containers \
--kubernetes-version v1.25.2 \
--service-cidr=10.96.0.0/16 \
--pod-network-cidr=10.244.0.0/16 \
方法二
# 可以通过yaml 文件初始化集群
# 获取yaml文件
kubeadm config print init-defaults > init.default.yaml
# 修改yaml文件
vim init.default.yaml

apiVersion: kubeadm.k8s.io/v1beta3
bootstrapTokens:
- groups:
  - system:bootstrappers:kubeadm:default-node-token
  token: abcdef.0123456789abcdef
  ttl: 24h0m0s
  usages:
  - signing
  - authentication
kind: InitConfiguration
localAPIEndpoint:
  // 指定k8smaster使用那个网口通讯,不指定默认使用有网关的接口
  advertiseAddress: 192.168.1.191
  bindPort: 6443
nodeRegistration:
  # 设置用containerd做容器进行时
  criSocket: /run/containerd/containerd.sock
  imagePullPolicy: IfNotPresent
  // master主机名
  name: k8s-master
  taints: null
---
apiServer:
  timeoutForControlPlane: 4m0s
apiVersion: kubeadm.k8s.io/v1beta3
certificatesDir: /etc/kubernetes/pki
clusterName: kubernetes
controllerManager: {}
dns: {}
etcd:
  local:
    dataDir: /var/lib/etcd
// 镜像下载地址,改为阿里源
imageRepository: registry.aliyuncs.com/google_containers
kind: ClusterConfiguration
// k8s版本
kubernetesVersion: 1.25.2
networking:
  dnsDomain: cluster.local
  // 指定pod地址范围
  podSubnet: 10.244.0.0/16
  // 指定service地址范围
  serviceSubnet: 10.96.0.0/16

scheduler: {}
// 开始ipvs, 如果使用IPtables可以不开启
---
apiVersion: kubeproxy.config.k8s.io/v1alpha1
kind: KubeProxyConfiguration
mode: ipvs
// 设置k8scgroup 为systemd
---
apiVersion: kubelet.config.k8s.io/v1beta1
kind: KubeletConfiguration
cgroupDriver: systemd

# 通过yaml文件初始化集群
kubeadm init --config=init.default.yaml
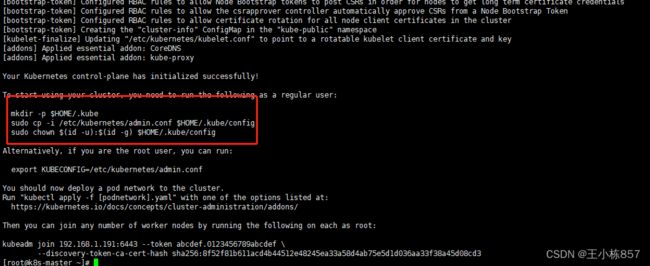
9 master 添加证书,扩容一个node节点
# master 节点安装完毕后,复制授权证书到home文件夹中
  mkdir -p $HOME/.kube
  sudo cp -i /etc/kubernetes/admin.conf $HOME/.kube/config
  sudo chown $(id -u):$(id -g) $HOME/.kube/config
# 在node 节点执行kubeadm join加入集群
kubeadm join 192.168.1.191:6443 --token abcdef.0123456789abcdef \
	--discovery-token-ca-cert-hash sha256:8f52f81b611acd4b44512e48245ea33a58d4ab75e5d1d036aa33f38a45d08cd3

# 使用命令查看集群节点
kubectl get nodes

# 获得新的token
kubeadm token create --print-join-command

# 通过标签给新加入的节点设置个角色
kubectl label node k8s-node node-role.kubernetes.io/work=work
设置标签后
10 安装网络插件 calico
kubectl apply -f "https://docs.projectcalico.org/manifests/calico.yaml"11 测试集群是否能正常使用
# 创建pod
kubectl create deployment my-web --image=nginx
# 创建service
kubectl expose deployment my-web --port=80 --target-port=80 --type=NodePort

# 运行个pod测试是否可以ping通百度
kubectl run busybox --image busybox:1.28 --restart=Never --rm -it busybox -- sh
问题:
刚开始配置集群时一直报错后来百度后才知道原来k8s已经弃用了docker
[etcd] Creating static Pod manifest for local etcd in "/etc/kubernetes/manifests"
[wait-control-plane] Waiting for the kubelet to boot up the control plane as static Pods from directory "/etc/kubernetes/manifests". This can take up to 4m0s
[kubelet-check] Initial timeout of 40s passed.

Unfortunately, an error has occurred:
	timed out waiting for the condition

This error is likely caused by:
	- The kubelet is not running
	- The kubelet is unhealthy due to a misconfiguration of the node in some way (required cgroups disabled)

If you are on a systemd-powered system, you can try to troubleshoot the error with the following commands:
	- 'systemctl status kubelet'
	- 'journalctl -xeu kubelet'


