四、基于kubeadm安装kubernetes1.25集群第三篇
接上篇:https://blog.csdn.net/u011837804/article/details/128355649
1、安装 kubeadm、kubelet 和 kubectl
1.1、配置yum源
cat > /etc/yum.repos.d/kubernetes.repo << EOF
[kubernetes]
name=Kubernetes
baseurl=https://mirrors.aliyun.com/kubernetes/yum/repos/kubernetes-el7-x86_64/
enabled=1
gpgcheck=0
repo_gpgcheck=0
gpgkey=https://mirrors.aliyun.com/kubernetes/yum/doc/yum-key.gpg https://mirrors.aliyun.com/kubernetes/yum/doc/rpm-package-key.gpg
EOF
1.2、安装
你需要在每台机器上安装以下的软件包:
-
kubeadm:用来初始化集群的指令。 -
kubelet:在集群中的每个节点上用来启动 Pod 和容器等。 -
kubectl:用来与集群通信的命令行工具。
命令:
sudo yum install -y kubelet-1.25.0 kubeadm-1.25.0 kubectl-1.25.0

sudo systemctl enable --now kubelet

kubeadm version
实例:
2、初始化master节点(192.168.13.60)
在master节点服务器上执行以下命令:
kubeadm init \
--apiserver-advertise-address=192.168.13.60(master节点IP) \
--image-repository registry.aliyuncs.com/google_containers \
--kubernetes-version v1.25.0 \
--service-cidr=10.10.0.0/12 \
--pod-network-cidr=172.17.0.0/16 \
--ignore-preflight-errors=all \
--cri-socket unix:///var/run/cri-dockerd.sockkubelet启动失败原因:CRI v1 runtime API is not implemented for end
原因是:cri-dockerd 仍然只支持 v1alpha2。Kubelet 在 1.26 ( kubernetes/kubernetes#110618 ) 中移除了对 v1alpha2 的支持。
注意: kubernetes1.26和cri-docker不兼容,导致kubelet启动失败,需要更换1.25
(2)、执行命令超时:Initial timeout of 40s passed.
这个时候执行 kubectl version 命令,可以看到:The connection to the server localhost:8080 was refused - did you specify the right host or port?
解决办法:
vim /etc/profile 在底部增加新的环境变量 export KUBECONFIG=/etc/kubernetes/admin.conf
然后执行 source /etc/profile
如果执行成功,最后会有这一段
[kubelet-finalize] Updating "/etc/kubernetes/kubelet.conf" to point to a rotatable kubelet client certificate and key
[addons] Applied essential addon: CoreDNS
[addons] Applied essential addon: kube-proxy

Your Kubernetes control-plane has initialized successfully!

To start using your cluster, you need to run the following as a regular user:

  mkdir -p $HOME/.kube
  sudo cp -i /etc/kubernetes/admin.conf $HOME/.kube/config
  sudo chown $(id -u):$(id -g) $HOME/.kube/config

Alternatively, if you are the root user, you can run:

  export KUBECONFIG=/etc/kubernetes/admin.conf

You should now deploy a pod network to the cluster.
Run "kubectl apply -f [podnetwork].yaml" with one of the options listed at:
  https://kubernetes.io/docs/concepts/cluster-administration/addons/

Then you can join any number of worker nodes by running the following on each as root:

kubeadm join 192.168.13.60:6443 --token 3ggk0l.plfnen3vqw3iwee0 \
	--discovery-token-ca-cert-hash sha256:f876e746171ac520d6cd66897e2dd6a703e950cafff98584a23407a4e72abfdd
3、初始化worker节点
3.1、在worker节点上执行命令,将worker加入到集群中
3.2、查看集群节点信息(所有的命令必须都在k8s-master节点中执行)
命令:
kubectl get node -o wide4、安装网络插件calico
4.1、下载yml文件
wget https://docs.projectcalico.org/manifests/calico.yaml --no-check-certificate
修改定义pod网络CALICO_IPV4POOL_CIDR的值和kubeadm init pod-network-cidr的值一致
## 取消注释
- name: CALICO_IPV4POOL_CIDR
  value: "172.17.0.0/16"
3.2、然后自行修改,建议大家使用我修改过的yml直接使用
下载地址:https://download.csdn.net/download/u011837804/87315867
3.3、在k8s-master节点执行命令安装calico插件
kubectl apply -f calico.yaml
4、测试 kubernetes 集群
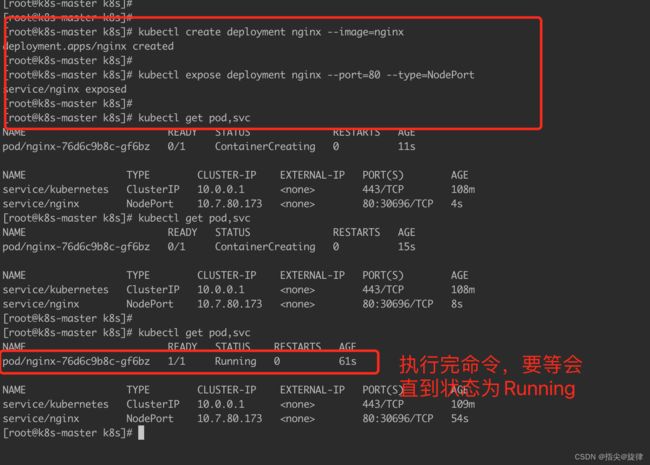
以nginx为例,在k8s-master上执行以下命令
kubectl create deployment nginx --image=nginx
kubectl expose deployment nginx --port=80 --type=NodePort
kubectl get pod,svc
以任意节点IP访问:http://node节点IP:30696 (注意:30696是上述图中service/nginx的端口,是随机生成的)


