C#设计模式_结构形设计模式
C#设计模式_结构形设计模式
- 结构设计模式简介
-
- 结构型设计模式:关注类与类之间的关系
- 结构性设计模式的几大类
- 组合的三种方式
- 适配器模式
- 代理模式
- 装饰器模式
- 外观模式(Facade Pattern)
- 组合模式
- 桥接模式
- 享元模式
-
- 享元模式的要素:
- 优缺点优点:
- 缺点: 提高了系统的复杂度,需要分离出外部状态和内部状态,而且外部状态具有固有化的性质,不应该随着内部状态的变化而变化,否则会造成系统的混乱。
- 总结使用场景:
结构设计模式简介
结构型设计模式:关注类与类之间的关系
/// 纵向关系:继承≈≈实现 超强关联
/// 横向关系:>组合>聚合>关联>依赖
/// 依赖是出现在方法内部
/// 另外三个是用语义区分的,可能都是一个属性
/// Person类 有个大脑Header属性 组合(同生共死)
/// Person类 有个手/脚 聚合(成人)
/// Person类 有个iPhone属性 关联(非必须)
/// 组合优于继承,结构型设计模式的核心
结构性设计模式的几大类
/// 适配器模式:解决重构的问题,新东西和旧系统不吻合,通过继承/组合进行适配
/// 代理模式:通过代理完成对业务类的访问,包一层方便任意功能扩展
/// 装饰器模式:通过组合+继承,完成对象功能动态扩展
/// 外观模式,组合模式,桥接模式,享元模式
///
/// 多种结构型设计模式其实都是用组合包一层,然后加功能,
/// 解决不同的问题,然后有不同的侧重点,也有不同的规范
//组合优于继承?
//二者都会先构造一个RedisHelper,但是继承是强侵入,父类的东西子类必须有
//灵活性,继承只为一个类服务;组合可以面向抽象为多个类型服务
组合的三种方式
···
private RedisHelper _RedisHelper = new RedisHelper();//属性注入  声明写死      一定有
public RedisHelperObject(RedisHelper redisHelper)//构造函数 可以替换(需要抽象)  一定有(不考虑其他构造函数)
{
    this._RedisHelper = redisHelper;
}

public void SetObject(RedisHelper redisHelper)//方法注入 可以替换(需要抽象)  不一定有
{
    this._RedisHelper = redisHelper;
}
适配器模式
public class RedisHelper
{
    Public RedisHelper()
    {
        Console.WriteLine($"构造RedisHelper");
    }
    public void AddRedis()
    {
        Console.WriteLine("This is {0} Add", this.GetType().Name);
    }
    public void DeleteRedis()
    {
        Console.WriteLine("This is {0} Delete", this.GetType().Name);
    }
    public void UpdateRedis()
    {
        Console.WriteLine("This is {0} Update", this.GetType().Name);
    }
    public void QueryRedis()
    {
        Console.WriteLine("This is {0} Query", this.GetType().Name);
    }
}

public class RedisHelperInherit : RedisHelper, IHelper
{
    public RedisHelperInherit()
    {
        Console.WriteLine($"构造{this.GetType().Name}");
    }
    public void Add()
    {
        base.AddRedis();
    }
    public void Delete()
    {
        base.DeleteRedis();
    }
    public void Query()
    {
        base.QueryRedis();
    }
    public void Update()
    {
        base.UpdateRedis();
    }
}
//继承 既满足现有的规范调用,又没有修改RedisHelper
//类适配器模式
Console.WriteLine("*****************************");
{
    IHelper helper = new RedisHelperInherit();
    helper.Add();
    helper.Delete();
    helper.Update();
    helper.Query();
}
代理模式
///
/// 业务接口
///
public interface ISubject
{
///
/// get
///
///
/// do
///
void DoSomething();
}
===
///
/// 一个耗时耗资源的对象方法
/// 一个第三方封装的类和方法
///
public class RealSubject : ISubject
{
    public RealSubject()
    {
        Thread.Sleep(2000);
        long lResult = 0;
        for (int i = 0; i < 100000000; i++)
        {
            lResult += i;
        }
        Console.WriteLine("RealSubject被构造。。。");
    }
    ///
    /// 火车站查询火车票
    ///
    public bool GetSomething()
    {
        Console.WriteLine("坐车去火车站看看余票信息。。。");
        Thread.Sleep(3000);
        Console.WriteLine("到火车站,看到是有票的");
        return true;
    }
    ///
    /// 火车站买票
    ///
    public void DoSomething()
    {
        Console.WriteLine("开始排队。。。");
        Thread.Sleep(2000);
        Console.WriteLine("终于买到票了。。。");
    }
}
====
///
/// 包一层:没有什么技术问题是包一层不能解决的,如果有,就再包一层
/// 比如来个日志记录,可以避免修改业务类,只需要修改代理类
/// 再来个异常处理
/// 再来个性能提升--缓存结果-单例
///
/// 通过代理,能够为对象扩展功能(不是增加业务)而不去修改原始业务类,也就是包了一层,我的地盘听我的
///
public class ProxySubject : ISubject
{
    //组合一下
    private static ISubject _Subject = new RealSubject();
    public void DoSomething()
    {
        try
        {
            Console.WriteLine("prepare DoSomething...");
            _Subject.DoSomething();
        }
        catch (Exception ex)
        {
            Console.WriteLine(ex.Message);
            throw ex;
        }
    }
    private static Dictionary ProxyDictionary = new Dictionary();
    public bool GetSomething()
    {
        try
        {
            Console.WriteLine("prepare GetSomething...");
            string key = "Proxy_GetSomething";
            bool bResult = false;
            if (!ProxyDictionary.ContainsKey(key))
            {
                bResult = _Subject.GetSomething();
                ProxyDictionary.Add(key, bResult);
            }
            else
            {
                bResult = ProxyDictionary[key];
            }
            return bResult;
        }
        catch (Exception ex)
        {
            Console.WriteLine(ex.Message);
            throw ex;
        }
    }
}
装饰器模式
抽象类
往现有类的功能中添加功能,并可以指定先后顺序
public abstract class AbstractStudent
{
    public int Id { get; set; }
    public string Name { get; set; }
    public abstract void Study();
}
===
 ///
    /// 一个普通的vip学员,学习vip课程
    ///
    public class StudentVip : AbstractStudent
    {
        ///
        /// 付费  上课前要预习
        /// 上课学习
        ///
        public override void Study()
        {
            Console.WriteLine("{0} is a vip student studying .net Vip", base.Name);
        }
    }
===
///
/// 继承+组合
/// 装饰器的基类
/// 也是一个学员,继承了抽象类
///
public class BaseStudentDecorator : AbstractStudent
{
    private AbstractStudent _Student = null;//用了组合加override
    public BaseStudentDecorator(AbstractStudent student)
    {
        this._Student = student;
    }
    public override void Study()
    {
        this._Student.Study();
        //Console.WriteLine("******************************");
        //基类装饰器必须是个空的行为  会重复
    }
}
===
///
/// 父类是BaseStudentDecorator,爷爷类AbstractStudent
///
public class StudentCommentDecorator : BaseStudentDecorator
{
    public StudentCommentDecorator(AbstractStudent student)
        : base(student)//表示父类的构造函数
    {
    }
    public override void Study()
    {
        base.Study();
        Console.WriteLine("点评");

    }
}
===
///
/// 父类是BaseStudentDecorator,爷爷类AbstractStudent
///
public class StudentHomeworkDecorator : BaseStudentDecorator
{
    public StudentHomeworkDecorator(AbstractStudent student)
        : base(student)//表示父类的构造函数
    {
    }
    public override void Study()
    {
        base.Study();
        Console.WriteLine("巩固练习");

    }
}
===
///
    /// 父类是BaseStudentDecorator,爷爷类AbstractStudent
    ///
    public class StudentPayDecorator : BaseStudentDecorator
    {
        public StudentPayDecorator(AbstractStudent student)
            : base(student)//表示父类的构造函数
        {
        }
        public override void Study()
        {
            Console.WriteLine("付费");
            base.Study();
        }
    }
===
///
/// 父类是BaseStudentDecorator,爷爷类AbstractStudent
///
public class StudentPreviewDecorator : BaseStudentDecorator
{
    public StudentPreviewDecorator(AbstractStudent student)
        : base(student)//表示父类的构造函数
    {
    }
    public override void Study()
    {
        Console.WriteLine("预习");
        base.Study();
    }
}
===
///
/// 父类是BaseStudentDecorator,爷爷类AbstractStudent
///
public class StudentRegDecorator : BaseStudentDecorator
{
    public StudentRegDecorator(AbstractStudent student)
        : base(student)//表示父类的构造函数
    {
    }
    public override void Study()
    {
        Console.WriteLine("注册");
        base.Study();
    }
}
===
///
/// 父类是BaseStudentDecorator,爷爷类AbstractStudent
///
public class StudentUpdateDecorator : BaseStudentDecorator
{
    public StudentUpdateDecorator(AbstractStudent student)
        : base(student)//表示父类的构造函数
    {
    }
    public override void Study()
    {
        base.Study();
        Console.WriteLine("课程免费升级");
    }
}
===
///
/// 父类是BaseStudentDecorator,爷爷类AbstractStudent
///
public class StudentVideoDecorator : BaseStudentDecorator
{
    public StudentVideoDecorator(AbstractStudent student)
        : base(student)//表示父类的构造函数
    {
    }
    public override void Study()
    {
        base.Study();
        Console.WriteLine("视频代码回看");
    }
}
实现
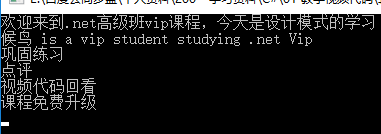
AbstractStudent student = new StudentVip()
{
    Id = 381,
    Name = "候鸟"
};

student = new StudentHomeworkDecorator(student);
student = new StudentCommentDecorator(student);
student = new StudentVideoDecorator(student);
student = new StudentUpdateDecorator(student);

student.Study();
返回结果
外观模式(Facade Pattern)
外观模式属于结构型模式,它隐藏了系统的复杂性,并向客户端提供了一个客户端可以访问系统的接口。
为子系统中的一组接口提供了一个统一的访问接口,这个接口使得子系统更容易被访问或者使用。
角色:
1、外观角色(Facade)
外观模式的核心,它被客户角色调用,它熟悉子系统的各项功能,可以在内部根据需求预定几种功能的组合;
2、子系统角色(SubSystem)
实现了子系统的功能,它内部可以有系统内的相互交互,也可以由供外界调用的接口。
示例:

命名空间FacadePattern中包含外观类Facade,提供公开的Handle方法,Haikwan是海关类,可以通过Apply方法从后台取得一个加密的完税凭证JSON数据,Decrypt类为解密类,可以解密海关的JSON数据,TaxProof则是完税凭证类,可以将JSON反序列化成一个对象,FileStore则将完税凭证数据持久化到文件中。本案例尝试通过一个从海关获取数据、解密、反序列化、保存到文件的完整流程来向大家简明扼要的阐述外观模式的使用。
namespace FacadePattern
public class Haikwan {

    public string Apply(Uri uri) {
        Console.WriteLine($"Apply some data from {uri.ToString()}!");
        return Const.TEMPLET_HAIKWAN;
    }
}
海关类Haikwan,包含一个Apply方法可以从海关的后台获取一个加密的JSON数据。
public class Decrypt {
    public string Decipher(string ciphertext) {
        Console.WriteLine("Deciphering ciphertext!");
        Console.WriteLine(Const.LINE_BREAK);
        Console.WriteLine(ciphertext);
        Console.WriteLine(Const.LINE_BREAK);
        return ciphertext;
    }
}
解密类Decrypt,将加密的JSON数据用Decipher方法解密成原始JSON数据。
public class TaxProof {

    public string TaxNo { get; private set; }

    public decimal Money { get; private set; }

    public DateTime PaymentData { get; private set; }

    public void Deserialize(string plaintext) {
        Console.WriteLine("Creating TaxProof Instance from plaintext!");
        TaxNo = "287361039374492-A01";
        Money = 1986.1020m;
        PaymentData = new DateTime(2018, 07, 20);
    }
}
TaxProof完税凭证类,将JSON数据反序列化成实体对象,以便使用类的面向对象语言的优势进行后续的处理。
本例中没有真正实现反序列化的动作,仅仅作为一个演示使用了Hard Code。在实际开发过程中,推荐使用Newtonsoft.Json来处理序列化和反序列化。
public class FileStore {

    public void Store(TaxProof taxProof) {
        Console.WriteLine("Saving taxProof instance to file!");
        Console.WriteLine($"TaxProof.TaxNo = {taxProof.TaxNo},");
        Console.WriteLine($"TaxProof.Money = {taxProof.Money},");
        Console.WriteLine($"TaxProof.PaymentData = {taxProof.PaymentData}!");
        Console.WriteLine(Const.LINE_BREAK);
    }
}
FileStore文件保存类,将完税凭证数据持久化到文件中。
public class Facade {

    private Haikwan _haikwan = null;
    private Decrypt _decrypt = null;
    private TaxProof _taxProof = null;
    private FileStore _fileStore = null;

    public Facade() {
        _haikwan = new Haikwan();
        _decrypt = new Decrypt();
        _taxProof = new TaxProof();
        _fileStore = new FileStore();
    }

    public void Handle(Uri uri) {
        var ciphertext = _haikwan.Apply(uri);
        var plaintext = _decrypt.Decipher(ciphertext);
        _taxProof.Deserialize(plaintext);
        _fileStore.Store(_taxProof);
    }
}
Facade外观类,这是外观模式的核心类,首先在内部维持对海关类Haikwan、解密类Decrypt、完税凭证类TaxProof、文件保存类FileStore的引用,并在构造函数中创建它们,公开的Handle方法处理一个完整的从海关获取数据到持久化文件的完整流程。
public class Const {

    public const string TEMPLET_HAIKWAN = "{\r\n" +
        "  \"Haikwan\": {\r\n" +
        "    \"TaxNo\": \"287361039374492-A01\",\r\n" +
        "    \"Money\": 1986.1020,\r\n" +
        "    \"PaymentData\": \"\\/Date(1532099596)\\/\"\r\n" +
        "  }\r\n" +
        "}";

    public const string LINE_BREAK =
        "-------------------------------------------------------------";

    public const string HAIKWAN_URI =
        "http://@copyright#www.customs.gov.cn";
}
Const常量类,统一管理本案例中用到的字符串资源。实际开发过程中不应当出现此类,请参考2017年阿里发布的《阿里巴巴Java开发手册》,此规则对C#开发者来说也应当遵守。
public class Program {

    private static Facade _facade = null;

    public static void Main(string[] args) {
        _facade = new Facade();
        _facade.Handle(new Uri(Const.HAIKWAN_URI));

        Console.ReadKey();
    }
}
调用方的代码,仅仅需要一行代码就完成了一个完整的流程。以下是这个案例的输出结果:
Apply some data from http://@copyright/#www.customs.gov.cn!
Deciphering ciphertext!
-------------------------------------------------------------
{
  "Haikwan": {
    "TaxNo": "287361039374492-A01",
    "Money": 1986.1020,
    "PaymentData": "\/Date(1532099596)\/"
  }
}
-------------------------------------------------------------
Creating TaxProof Instance from plaintext!
Saving taxProof instance to file!
TaxProof.TaxNo = 287361039374492-A01,
TaxProof.Money = 1986.1020,
TaxProof.PaymentData = 2018-07-20 00:00:00!
-------------------------------------------------------------
优点:
1、实现了子系统与客户端之间的松耦合关系;
2、客户端屏蔽了子系统组件,减少了客户端所需处理的对象数目,并使得子系统使用起来更加容易。
缺点:
1、不符合开闭原则,如果要修改某一个子系统的功能,通常外观类也要一起修改;
2、没有办法直接阻止外部不通过外观类访问子系统的功能,因为子系统类中的功能必须是公开的(根据需要决定是否使用internal访问级别可解决这个缺点,但外观类需要和子系统类在同一个程序集内)。
使用场景:
1、设计初期阶段,应该有意识的将不同层分离,层与层之间建立外观模式;
2、开发阶段,子系统越来越复杂,增加外观模式提供一个简单的调用接口;
3、维护一个大型遗留系统的时候,可能这个系统已经非常难以维护和扩展,但又包含非常重要的功能,为其开发一个外观类,以便新系统与其交互。
作者:无痕的过往
来源:CSDN
原文:https://blog.csdn.net/qq_31116753/article/details/81127910
版权声明:本文为博主原创文章,转载请附上博文链接!
组合模式
组合模式,又称之为“部分-整体”模式,属于对象结构型模式。在介绍组合模式之前,先来看一张图片。

这是我们操作系统中资源管理器的目录结构,其中有四个文件夹,四个文件。在组合模式中,文件夹就相当于容器构件,因为它可以容纳其他文件或者文件夹。而文件就相当于叶子构件,因为它不能再包含任何文件或者文件夹。我们都知道,文件和文件夹的区别是很大的,不同的文件区别也是很大的。我们在处理这些文件或者文件夹的时候会针对不同的部分进行不同的处理,会很麻烦。而组合模式关注的是,如何统一的处理这些所有的文件或者文件夹。处理的方法就是把它们当成统一的一个对象来处理。
定义:组合多个对象形成树形结构以表示具有部分-整体关系的层次结构。组合模式可以让客户端可以统一的对待单个对象和组合对象。
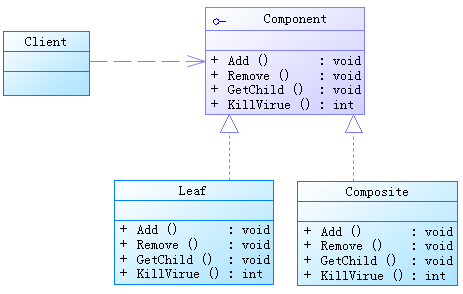
所以组合模式中包含三种角色:
- Component(抽象构件):它是所有叶子构件和容器构件的共同父类,里面声明了叶子构件和容器构件的所有方法。
- Leaf(叶子构件):这是叶子构件,对于从父类中继承过来的容器构件的方法,由于它不能实现,可以抛出异常。
- Composite(容器构件):这是容器构件,主要处理从父类那里继承过来的容器构件的方法
下面是组合模式的类图:
现在假设我们要开发一个文件管理系统,对文件进行管理和杀毒。由于对文件夹和对文件的处理不一致,所以现在使用组合模式来设计这个系统
首先我们为所有文件和文件夹抽象出一个共同的父类AbstractFile
//抽象构件,它是叶子和容器共同的父类,并且声明了叶子和容器的所有方法
abstract class AbstractFile
{
public abstract void Add(AbstractFile file);//新增文件
public abstract void Delete(AbstractFile file);//删除文件
public abstract AbstractFile GetChildFile(int i);//获取子构件(可以使文件,也可以是文件夹)
public abstract void KillVirue();//对文件进行杀毒
}
然后是继承AbstractFile的文件和文件夹
class Folder:AbstractFile//文件夹
{
    private List fileList = new List();
    private string name;
    public Folder(string name)
    {
        this.name = name;
    }

    public string Name
    {
        get { return name; }
        set { name = value; }
    }

    public override void Add(AbstractFile file)
    {
        fileList.Add(file);
    }

    public override void Delete(AbstractFile file)
    {
        fileList.Remove(file);
    }

    public override AbstractFile GetChildFile(int i)
    {
        return fileList[i] as AbstractFile;
    }

    public override void KillVirue()
    {
        Console.WriteLine("对文件夹{0}进行杀毒",name);
        foreach (AbstractFile obj in fileList)
        {
            obj.KillVirue();
        }
    }
}
class ImageFile:AbstractFile//图片文件
{
    private string name;

    public string Name
    {
        get { return name; }
        set { name = value; }
    }

    public ImageFile(string name)
    {
        this.name = name;
    }

    public override void Add(AbstractFile file)
    {
        Console.WriteLine("对不起,不支持该方法");
    }

    public override void Delete(AbstractFile file)
    {
        Console.WriteLine("对不起,不支持该方法");
    }

    public override AbstractFile GetChildFile(int i)
    {
        Console.WriteLine("对不起,不支持该方法");
        return null;
    }

    public override void KillVirue()
    {
        //模拟杀毒
        Console.WriteLine("已经对{0}进行了杀毒", name);
    }
}
class TextFile:AbstractFile//文本文件
{
    private string name;

    public string Name
    {
        get { return name; }
        set { name = value; }
    }
    public TextFile(string name)
    {
        this.name = name;
    }
    public override void Add(AbstractFile file)
    {
        Console.WriteLine("对不起,不支持该方法");
    }
    public override void Delete(AbstractFile file)
    {
        Console.WriteLine("对不起,不支持该方法");
    }
    public override AbstractFile GetChildFile(int i)
    {
        Console.WriteLine("对不起,不支持该方法");
        return null;
    }
    public override void KillVirue()
    {
        //模拟杀毒
        Console.WriteLine("已经对{0}进行了杀毒", name);
    }
}
最后是我们的客户端程序代码
class Program
{
    static void Main(string[] args)
    {
        AbstractFile file1, file2, folder1,file3, folder2, folder3;
        folder1 = new Folder("我的视频");
        folder2 = new Folder("我的图片");
        folder3 = new Folder("我的资料");

        file1 = new TextFile("文本1");

        file2 = new ImageFile("图像2");
        file3 = new TextFile("文本2");
        folder1.Add(file1);
        folder2.Add(file2);
        folder2.Add(file3);
        folder2.KillVirue();
        Console.ReadLine();
    }
}
从客户端代码中可以看出,我们对文件和文件夹进行了不同的操作,来看看运行结果吧
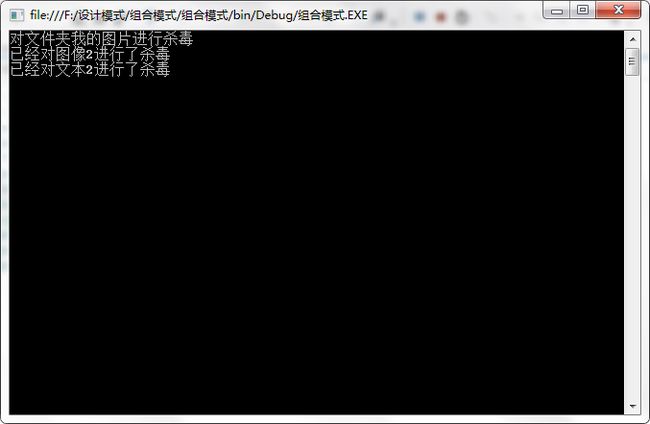
组合模式使用面向对象思想实现树形结构的构建和处理,描述了如何将容器对象和叶子对象递归组合,实现简单高效的统一管理。由于在实际开发中树形结构用的非常多,所以组合模式也是应用特别广泛的一种设计模式。它的缺点是,在对文件或者文件夹进行操作时,无法对文件或文件夹进行精确控制。
作者:猫霸
来源:CSDN
原文:https://blog.csdn.net/bhdxmaomi/article/details/50679795
桥接模式
桥接模式,从字面意思上说就是用一条桥梁来链接两个不同的事物。专业一点讲,就是当一个类存在独立变化的两个维度的时候,可以将这两个维度分离出,设计成独立的继承结构,使他们可以独立扩展。桥接模式用一种巧妙的方式(用抽象关联代替传统的多重继承)解决了多重继承存在的问题。
假如说现在要开发一个图像浏览系统,要求可以显示JPG,PNG,GIF等格式的图像,同时系统要跨平台,要求能在Windows,Unix,Linux等操作系统下面展示,不同的操作系统可以把不同的图片转换成像素矩阵,然后在系统中显示,这个时候我们可以理解成浏览系统(类)里面有两个独立变换的维度,一个是图像格式,一个操作系统,他们都可以独立扩展。这个时候为了保证系统的扩展性和灵活性,就可以采用桥接模式来连接这两个独立变化的维度。如果把这两个维度写在一起,用传统的继承方式解决的话,系统的扩展性会很差。
接下来看看系统的类图吧

我们给不同格式的图片抽象了一个父类,给不同的操作系统抽象了一个父类,客户端针对Image编程,一般情况下Image类是抽象类。然后看一下具体的代码吧
显示Image类和它的子类的代码
abstract class Image//客户端针对它编程
{
    protected ImageImp imp;
    public void SetImage(ImageImp imp)
    {
        this.imp = imp;
    }
    public abstract void ShowImage();
}
class GIFImage:Image
{
    public override void ShowImage()
    {
        imp.DoPaint();//调用不同的操作系统的中函数来绘制像素矩阵
        Console.WriteLine("像素矩阵绘制完毕了,格式为GIF");
    }
}
class BMPImage:Image
{
    public override void ShowImage()
    {
        imp.DoPaint();//调用不同的操作系统的中函数来绘制像素矩阵
        Console.WriteLine("像素矩阵绘制完毕了,格式为BMP");
    }
}
class JPGImage:Image
{
    public override void ShowImage()
    {
        imp.DoPaint();//调用不同的操作系统的中函数来绘制像素矩阵
        Console.WriteLine("像素矩阵绘制完毕了,格式为JPG");
    }
}
class PNGImage:Image
{
    public override void ShowImage()
    {
        imp.DoPaint();//调用不同的操作系统的中函数来绘制像素矩阵
        Console.WriteLine("像素矩阵绘制完毕了,格式为BMP");
    }
}
然后是操作系统的父类和不同的操作系统
interface ImageImp
{
    void DoPaint();
}
class WindowsImp:ImageImp
{
    public void DoPaint()
    {
        Console.WriteLine("在windows操作系统中显示图像啦!");
    }
}
class UnixImp:ImageImp
{
    public void DoPaint()
    {
        Console.WriteLine("在Unix操作系统中显示图像啦!");
    }
}
class LinuxImp:ImageImp
{
    public void DoPaint()
    {
        Console.WriteLine("在Linux操作系统中显示图像啦!");
    }
}
最后使我们的客户端代码,客户端通过反射动态加载图像类和操作系统类,并以接口或者抽象类的方式返回。
class Program
{
    static void Main(string[] args)
    {
        Image img;
        ImageImp imp;
        string imageType = ConfigurationManager.AppSettings["imageName"];
        string osType = ConfigurationManager.AppSettings["osName"];
        img = Assembly.Load("桥接模式").CreateInstance(imageType) as Image;
        imp = Assembly.Load("桥接模式").CreateInstance(osType) as ImageImp;
        img.SetImage(imp);
        img.ShowImage();
        Console.ReadLine();
    }
}
来看看运行结果吧
在Image子类中,我们设置了操作系统为Linux系统,然后调用Linux的DoPaint方法绘制像素矩阵,最后在系统中显示,但让我们只是简单模拟了一下。这样的话,通过在Image类中保留一个ImageImp类的引用(也即是抽象关联)来使这两个独立变化的维度产生联系,并且可以独立扩展。
桥接模式就介绍到这里了。桥接模式的适用场景就是当系统中存在两个独立变化的维度,并且要求我们独立对他们进行扩展而相互之间不受影响。并且它将方法的实现延迟到子类中去。但桥接模式的使用要求我们必须准确的识别出这两个独立变化的维度,这是非常困难的,并且需要有一定的经验积累。
作者:猫霸
来源:CSDN
原文: https://blog.csdn.net/bhdxmaomi/article/details/50678753
享元模式
在软件开发中,当我们需要对某些对象重复创建,且最终只需要得到单一结果。如果使用一般思维,那我们将浪费很多内存空间,为此,我们引入享元模式。
所谓享元模式即共享对象,该模式利用先前创建的已有对象,通过某种规则去判断当前所需对象是否可以利用原有对象做相应修改后得到想要的效果,如果可以,则只需要修改该对象的某些属性以达到要求,否则,则创建新对象。享元模式(Flyweight Pattern)主要用于减少创建对象的数量,以减少内存占用和提高性能
享元模式的要素:
- 抽象享元(Flyweight):它是所有具体享元类的抽象基类,为其子类规定出需要实现的公共接口;
- 具体享元(Concrete Flyweight):具体享元类实现了抽象享元类所规定的接口;
- 享元工厂(FlyweightFactoiy):享元工厂类负责创建和管理享元对象。
下面举个例子
例如:在游戏中敌人的生成,生成的敌人往往是不同的,生成的位置不同,颜色不通等。下面,我们假设生成的是同一种敌人,但是它的y坐标不固定。
命名空间享元模式中包含AbEnemy充当抽象享元,Enemy类充当具体享元,FactoyEnemy工厂类充当享元工厂。本案例通过使用享元模式来实现敌人的生成。
下面使用代码实现享元模式:
1.创建抽像享元AbEnemy
public abstract class AbEnemy{
    public string color;
    public int x;
    public int y;
    public AbEnemy()
    {
        color = "红";
        x = 100;
    }

    public override string ToString()
    {
        return string.Format("生成{0}颜色的敌人,位置在X为{1},Y为{2}", color, x, y);
    }
}
2.创建具体享元
public class Enemy:AbEnemy{
    public Enemy(int posY)
    {
        y = posY;
    }
}
3.创建一个工厂,生成基于给定信息的实体类的对象
public class FactoyEnemy{
    private Dictionary EnemyList;
    public FactoyEnemy()
    {
        EnemyList = new Dictionary();
        EnemyList.Add(1, new Enemy(100));
        EnemyList.Add(2, new Enemy(200));
    }
    public Enemy GetEnemy(int num)
    {
        return EnemyList[num] as Enemy;
    }
}
4.使用该工厂,通过传递颜色信息来获取实体类的对象
class Program{
    static void Main(string[] args)
    {
        FactoyEnemy factoryEnemy = new FactoyEnemy();
        Enemy enemy = factoryEnemy.GetEnemy(1);
        Console.WriteLine(enemy.ToString());
        enemy = factoryEnemy.GetEnemy(2);
        Console.WriteLine(enemy.ToString());
        Console.ReadKey();
    }
}
整合后的代码:
using System;using System.Collections.Generic;using System.Linq;using System.Text;using System.Threading.Tasks;
namespace 享元模式{
   public abstract class AbEnemy
    {
        public string color;
        public int x;
        public int y;
        public AbEnemy()
        {
            color = "红";
            x = 100;
        }

        public override string ToString()
        {
            return string.Format("生成{0}颜色的敌人,位置在X为{1},Y为{2}", color, x, y);
        }
    }

    public class Enemy:AbEnemy    {
        public Enemy(int posY)
        {
            y = posY;
        }
    }

    public class FactoyEnemy
    {
        private Dictionary EnemyList;
        public FactoyEnemy()
        {
            EnemyList = new Dictionary();
            EnemyList.Add(1, new Enemy(100));
            EnemyList.Add(2, new Enemy(200));
        }
        public Enemy GetEnemy(int num)
        {
            return EnemyList[num] as Enemy;
        }
    }

    class Program
    {
        static void Main(string[] args)
        {
            FactoyEnemy factoryEnemy = new FactoyEnemy();
            Enemy enemy = factoryEnemy.GetEnemy(1);
            Console.WriteLine(enemy.ToString());
            enemy = factoryEnemy.GetEnemy(2);
            Console.WriteLine(enemy.ToString());
            Console.ReadKey();
        }
    }
}
优缺点优点:
大大减少对象的创建,降低系统的内存,使效率提高。
缺点: 提高了系统的复杂度,需要分离出外部状态和内部状态,而且外部状态具有固有化的性质,不应该随着内部状态的变化而变化,否则会造成系统的混乱。
总结使用场景:
- 一个系统中有大量的对象;
- 这些对象耗费大量的内存;
- 这些对象中的状态大部分都可以被外部化;
- 这些对象可以按照内部状态分成很多的组,当把外部对象从对象中剔除时,每一个组都可以仅用一个对象代替;
- 软件系统不依赖这些对象的身份。
作者: 懒人下蛋
来源:CSDN
原文: https://blog.csdn.net/shirln/article/details/86266741