【Arduino环境下驱动合宙esp32c3单片机基本外设】
【esp32c3基本外设驱动】
- 1. GPIO调试
-
- 1.1 源码分享
- 2.2 实验效果
- 2. ADC调试
-
- 2.1 源码分享
- 2.2 实验效果
- 3. WS2812驱动
-
- 3.1 源码分享
- 3.2 实验效果
- 4. 旋转编码器
-
- 4.1 源码分享
- 4.2 测试效果
- 5. SSD1306屏幕驱动
-
- 5.1 源码分享
- 5.2 测试效果
- 6. 双cpu同时工作测试
-
- 6.1 源码分享
- 6.2 测试效果
- 7. BLE蓝牙和安卓端蓝牙数据交互实验
-
- 7.1 源码分享
- 7.2 实验效果
- 8. Servo调试
-
- 8.1 源码分享
- 8.2 实验效果
- 9. 总结
![]()
本教程是参加FastBond2活动主题4 - 测量仪器中的【Arduino环境下驱动合宙esp32c3单片机基本外设】。
围绕FastBond2阶段1——基于ESP32C3开发的简易IO调试设备项目需求开发。
设计目标:
- 多种数字和模拟信号的输入输出:用户可以选择不同的输入输出模式,并通过设备的操作界面进行设置。例如,用户可以选择某个GPIO口作为模拟输入引脚,然后通过设备的操作界面设置输入的电压值,以模拟外部信号的输入,达到调试简易传感器读取和执行器输出功能。
- 支持PWM输出、舵机控制特性:用户可以选择某个GPIO口作为PWM输出引脚,并通过设备的操作界面设置PWM输出的频率和占空比。用户还可以选择某个GPIO口作为舵机控制引脚,并通过设备的操作界面设置舵机的角度。
- 因此系统具有一定的电流输出能力、信号辨识能力和显示交互功能。
1. GPIO调试
![]()
查看对应D5LED匹配IO13和蜂鸣器,源码修改如下,即可实现呼吸灯效果
1.1 源码分享
/*
  Fade

  This example shows how to fade an LED on pin 9 using the analogWrite()
  function.

  The analogWrite() function uses PWM, so if you want to change the pin you're
  using, be sure to use another PWM capable pin. On most Arduino, the PWM pins
  are identified with a "~" sign, like ~3, ~5, ~6, ~9, ~10 and ~11.

  This example code is in the public domain.

  https://www.arduino.cc/en/Tutorial/BuiltInExamples/Fade
*/

int led = 13;         // the PWM pin the LED is attached to
int brightness = 0;  // how bright the LED is
int fadeAmount = 5;  // how many points to fade the LED by

// the setup routine runs once when you press reset:
void setup() {
  // declare pin 9 to be an output:
  pinMode(led, OUTPUT);
}

// the loop routine runs over and over again forever:
void loop() {
  // set the brightness of pin 9:
  analogWrite(led, brightness);

  // change the brightness for next time through the loop:
  brightness = brightness + fadeAmount;

  // reverse the direction of the fading at the ends of the fade:
  if (brightness <= 0 || brightness >= 255) {
    fadeAmount = -fadeAmount;
  }
  // wait for 30 milliseconds to see the dimming effect
  delay(30);
}
它使用analogWrite()函数来控制连接到引脚9上的LED的亮度变化。代码使用了一个for循环来逐步改变LED的亮度,直到达到最大或最小亮度为止,然后反转亮度的变化方向。该程序设置了一个延时来允许人眼看到LED逐渐变亮或变暗的效果。
2.2 实验效果
板载LED灯会呈现呼吸效果
2. ADC调试
![]()
在文件实例基础中选择AnalogRead
查看对应模拟量端口匹配IO00~01,源码修改如下,即可实现A0、A1端口读取模拟量并打印效果
2.1 源码分享
void setup() {
  // initialize serial communication at 115200 bits per second:
  Serial.begin(115200);

  //set the resolution to 12 bits (0-4096)
  analogReadResolution(12);
}

void loop() {
  // read the analog / millivolts value for pin 2:
  int analogValue = analogRead(0);
  int analogVolts = analogReadMilliVolts(1);

  // print out the values you read:
  Serial.printf("ADC analog value = %d\n",analogValue);
  Serial.printf("ADC millivolts value = %d\n",analogVolts);

  delay(100);  // delay in between reads for clear read from serial
}
在setup()函数中,初始化串口通信模块,设置波特率为115200bps,同时设置模数转换器(Analog-to-Digital Converter,ADC)的分辨率到12位。
在loop()函数中:
- 读取从板子的第1个模拟端口(analog pin 1)获得模拟值,并存储在变量analogValue中;
- 将该模拟值转换成mV,并存储在变量analogVolts中;
- 输出两个值到串口中;
- 延时100ms,以防止误读。
2.2 实验效果
IO00接光敏电阻,手掌适当遮罩可发现其变化,可用铅笔触碰IO01,看其变化,打印效果如下
![]()
3. WS2812驱动
![]()
安装WS2812FX和 FastLED库,打开WS2812FX里面的ws2812fx_custom_FastLED例程,我连接IO18,选择合适数量这里是4
3.1 源码分享
/*
Demo sketch showing how to use the functions and features of the FastLED
library to create custom effects. For this example we're going to implement
Mark Kriegsman's Fire2012 effect from the FastLED examples folder here:
https://github.com/FastLED/FastLED/tree/master/examples/Fire2012
The basic idea is to use FastLED to create the LED color data, then
copy the data to the ws2812fx instance for display.
Keith Lord - 2018
LICENSE
The MIT License (MIT)
Copyright (c) 2018 Keith Lord
Permission is hereby granted, free of charge, to any person obtaining a copy
of this software and associated documentation files (the "Software"), to deal
in the Software without restriction, including without limitation the rights
to use, copy, modify, merge, publish, distribute, sub-license, and/or sell
copies of the Software, and to permit persons to whom the Software is
furnished to do so, subject to the following conditions:
The above copyright notice and this permission notice shall be included in
all copies or substantial portions of the Software.
THE SOFTWARE IS PROVIDED "AS IS", WITHOUT WARRANTY OF ANY KIND, EXPRESS OR
IMPLIED, INCLUDING BUT NOT LIMITED TO THE WARRANTIES OF MERCHANTABILITY,
FITNESS FOR A PARTICULAR PURPOSE AND NONINFRINGEMENT. IN NO EVENT SHALL THE
AUTHORS OR COPYRIGHT HOLDERS BE LIABLE FOR ANY CLAIM, DAMAGES OR OTHER
LIABILITY, WHETHER IN AN ACTION OF CONTRACT, TORT OR OTHERWISE, ARISING FROM,
OUT OF OR IN CONNECTION WITH THE SOFTWARE OR THE USE OR OTHER DEALINGS IN
THE SOFTWARE.
CHANGELOG
2018-05-13 initial version
*/
#include "FastLED.h" // be sure to install and include the FastLED lib
#include 定义了数字灯的数量NUM_LEDS和LED引脚编号LED_PIN。
使用FastLED库中的WS2812FX初始化led控制器,配置颜色模式、亮度、速度等参数。
在loop()函数中,调用service()函数更新led状态。
在myCustomEffect()函数中,运行Fire2012算法并返回动画速度,该速度基于ws2812fx的速度设置。
Fire2012是一个简单的模拟火焰燃烧效果的算法,它包括四个步骤:冷却、上升和扩散热量、随机产生火花和渲染温度到颜色。
在Fire2012()函数中:
- 对每个像素点进行降温操作;
- 让每个像素点的热量向上传递并扩散;
- 随机产生新火花;
- 根据热量计算像素点的颜色,并修改ws2812fx的状态。
3.2 实验效果
ws2812会来回显示不同灯光效果
4. 旋转编码器
![]()
安装Encoder库,点击例程NoInterrupts
修改源码,端口为IO06/IO07
4.1 源码分享
#define ENCODER_DO_NOT_USE_INTERRUPTS
#include 设置串口波特率为9600bps。
在setup()函数中,初始化Serial通信模块,准备用于输出调试信息。
在loop()函数中:
- 调用myEnc.read()方法读取编码器的当前位置,得到新的位置值newPos;
- 如果newPos与上一时刻的位置值position不同,则更新position为newPos; 输出更新后的position值;
- 如果对程序进行任何形式的延迟处理,编码器只能跟踪非常慢的动作。您可以取消此行的注释来查看延迟对您的编码器的影响程度。
4.2 测试效果
打开串口旋转编码器,有打印数值变化
5. SSD1306屏幕驱动
![]()
安装 U8g2库,打开FontTest例程,修改SCL为IO05,SDA为IO04
5.1 源码分享
/*
UpdateArea.ino
Demonstration for the UpdateDisplayArea command
Universal 8bit Graphics Library (https://github.com/olikraus/u8g2/)
Copyright (c) 2016, [email protected]
All rights reserved.
Redistribution and use in source and binary forms, with or without modification,
are permitted provided that the following conditions are met:
* Redistributions of source code must retain the above copyright notice, this list
of conditions and the following disclaimer.
* Redistributions in binary form must reproduce the above copyright notice, this
list of conditions and the following disclaimer in the documentation and/or other
materials provided with the distribution.
THIS SOFTWARE IS PROVIDED BY THE COPYRIGHT HOLDERS AND
CONTRIBUTORS "AS IS" AND ANY EXPRESS OR IMPLIED WARRANTIES,
INCLUDING, BUT NOT LIMITED TO, THE IMPLIED WARRANTIES OF
MERCHANTABILITY AND FITNESS FOR A PARTICULAR PURPOSE ARE
DISCLAIMED. IN NO EVENT SHALL THE COPYRIGHT HOLDER OR
CONTRIBUTORS BE LIABLE FOR ANY DIRECT, INDIRECT, INCIDENTAL,
SPECIAL, EXEMPLARY, OR CONSEQUENTIAL DAMAGES (INCLUDING, BUT
NOT LIMITED TO, PROCUREMENT OF SUBSTITUTE GOODS OR SERVICES;
LOSS OF USE, DATA, OR PROFITS; OR BUSINESS INTERRUPTION) HOWEVER
CAUSED AND ON ANY THEORY OF LIABILITY, WHETHER IN CONTRACT,
STRICT LIABILITY, OR TORT (INCLUDING NEGLIGENCE OR OTHERWISE)
ARISING IN ANY WAY OUT OF THE USE OF THIS SOFTWARE, EVEN IF
ADVISED OF THE POSSIBILITY OF SUCH DAMAGE.
*/
#include 5.2 测试效果
上传代码,滑动显示U8g2
6. 双cpu同时工作测试
ESP32-C3 系列芯片,搭载 RISC-V 32 位单核处理器。不过可以跑多线程,下面就是两个线程。程序中避免有过多的延迟函数
6.1 源码分享
int testdata0 = 10;
int testdata1 = 0;

void CpuLoop(void *pvParameters){
  while(1){
    Serial.println("cpu1 "+String(testdata0));
    testdata1 ++;
    if(testdata1 == 10)
    testdata1 = 0;
    delay(2000);
  }

  vTaskDelete(NULL);
}
void setup() {
    Serial.begin(9600);
    xTaskCreatePinnedToCore(CpuLoop,    //具体实现的函数
                            "CPU_LOOP",  //任务名称
                            8192,       //堆栈大小
                            NULL,       //输入参数
                            1,          //任务优先级
                            NULL,       //
                            1           //核心  0\1
                            );
}

void loop() {
  Serial.println("cpu0 "+String(testdata1));
  testdata0 --;
  if(testdata0 == 0)
    testdata0 = 10;
  delay(1000);
}
设置串口波特率为9600bps。
在setup()函数中创建一个名为“CPU_LOOP”的任务,并将其实现的函数appCpuLoop()、堆栈大小为8192、输入参数为空、优先级为1、绑定到核心1上进行运行。
在CpuLoop()函数中,当while循环条件为真时,持续执行循环体内的内容。首先打印出字符串“Cpu1”和变量testdata0相加的结果,然后让testdata1自增1,如果testdata1等于10,则将其值设为0;最后延时2000毫秒后继续下一次循环。
在loop()函数中,打印出字符串“cpu0”和变量testdata1相加的结果,然后让testdata0自减1,如果testdata0等于0,则将其值设为10;最后延时1000毫秒后继续下一次循环。
6.2 测试效果
打开串口显示两个内核运行效果
![]()
7. BLE蓝牙和安卓端蓝牙数据交互实验
ESP32低功耗(BLE)蓝牙实验.
调试工具
安卓系统BLE调试工具:BLEAssist
APP下载地址:http://www.wch.cn/downloads/BLEAssist_ZIP.html
首先安装BLE调试助手
![]()
安装后打开,下拉刷新蓝牙,连接对应蓝牙
![]()
在第三项中选择查看和发送数据
![]()
7.1 源码分享
#include 设置串口波特率为115200bps。
在setup()函数中:
- 使用BLEDevice类初始化Bluetooth Low Energy设备,并设定其名称为"ESP32 BLE Test";
- 创建并返回一个服务器对象,并将其回调函数设置为MyServerCallbacks类型的实例;
- 使用BLEServer类创建一个服务,并使用SERVICE_UUID定义该服务的唯一标识符;
- 在创建的服务中添加一个特性,该特性具有可写属性,其唯一标识符为CHARACTERISTIC_UUID_RX;
- 将可写特性的回调函数设置为MyCallbacks类型的实例; 启动创建的服务; 启动广告活动。
在loop()函数中:
- 检查设备是否已连接。如果设备已连接,则按照以下步骤执行: 清空BLEbuf数组;
- 定义一个字符串message_c,其中包含字符’s’和变量i的当前值,两者之间用空格分隔,并在其末尾添加换行符;
- 将message_c转换为字符指针类型,并复制到BLEbuf数组中; 设置特性值为BLEbuf数组的内容;
- 调用notify()方法向应用程序发送数据; 打印已经发送的数据;
延迟1000ms后继续下一次循环。
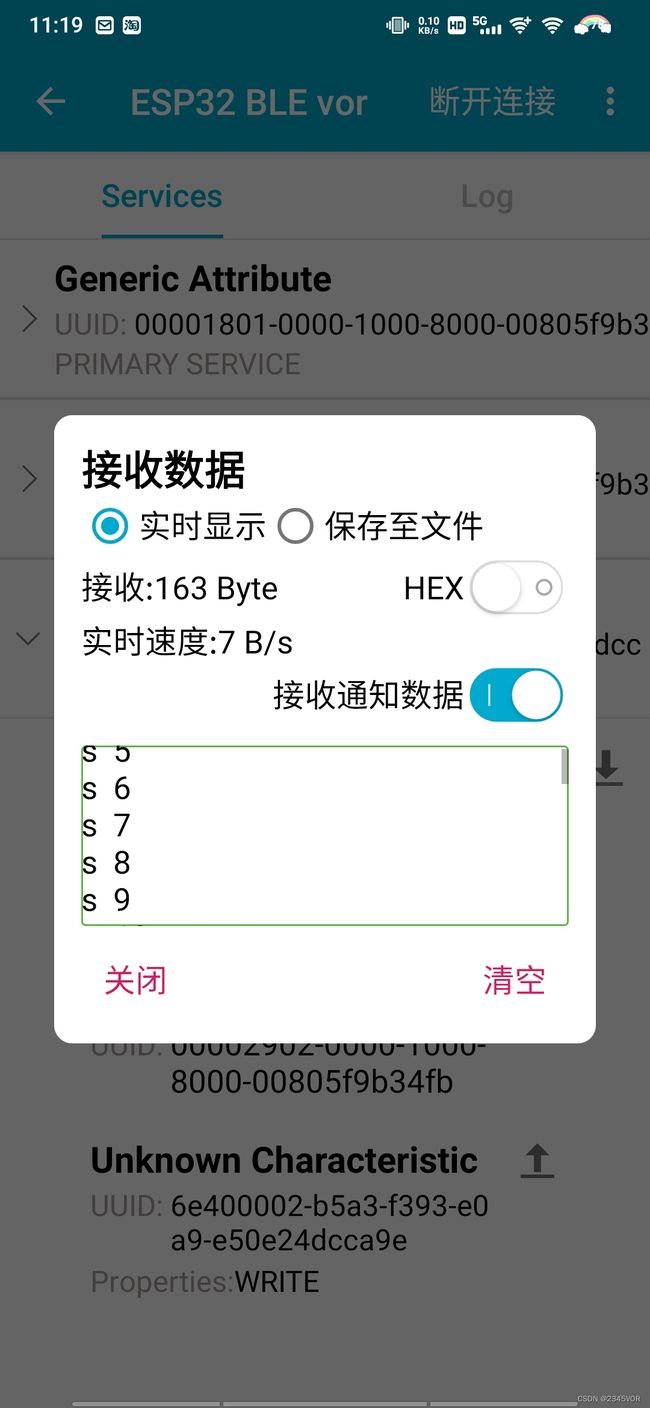
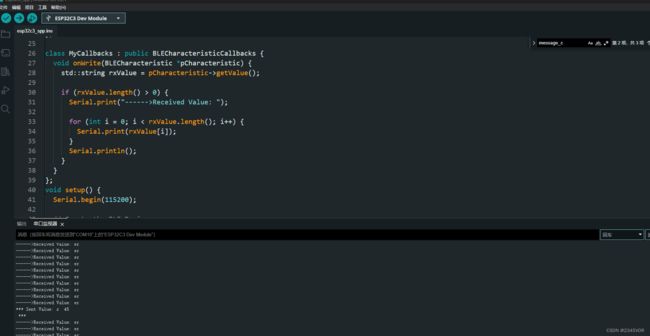
7.2 实验效果
-
esp32c3发送数据,手机接收数据


-
esp32c3接收数据,手机发送数据


8. Servo调试
![]()
安装库《ESP32Servo》
打开库的Sweep例程,修改端口为19
8.1 源码分享
/* Sweep
by BARRAGAN
This example code is in the public domain.
modified 8 Nov 2013
by Scott Fitzgerald
modified for the ESP32 on March 2017
by John Bennett
see http://www.arduino.cc/en/Tutorial/Sweep for a description of the original code
* Different servos require different pulse widths to vary servo angle, but the range is
* an approximately 500-2500 microsecond pulse every 20ms (50Hz). In general, hobbyist servos
* sweep 180 degrees, so the lowest number in the published range for a particular servo
* represents an angle of 0 degrees, the middle of the range represents 90 degrees, and the top
* of the range represents 180 degrees. So for example, if the range is 1000us to 2000us,
* 1000us would equal an angle of 0, 1500us would equal 90 degrees, and 2000us would equal 1800
* degrees.
*
* Circuit: (using an ESP32 Thing from Sparkfun)
* Servo motors have three wires: power, ground, and signal. The power wire is typically red,
* the ground wire is typically black or brown, and the signal wire is typically yellow,
* orange or white. Since the ESP32 can supply limited current at only 3.3V, and servos draw
* considerable power, we will connect servo power to the VBat pin of the ESP32 (located
* near the USB connector). THIS IS ONLY APPROPRIATE FOR SMALL SERVOS.
*
* We could also connect servo power to a separate external
* power source (as long as we connect all of the grounds (ESP32, servo, and external power).
* In this example, we just connect ESP32 ground to servo ground. The servo signal pins
* connect to any available GPIO pins on the ESP32 (in this example, we use pin 18.
*
* In this example, we assume a Tower Pro MG995 large servo connected to an external power source.
* The published min and max for this servo is 1000 and 2000, respectively, so the defaults are fine.
* These values actually drive the servos a little past 0 and 180, so
* if you are particular, adjust the min and max values to match your needs.
*/
#include 这个程序是用来控制servo电机转动的一个示例程序,在ESP32上可以工作。在代码中,servoPin被定义为ESP32-S2和ESP32-S3的19号引脚,以及ESP32-C3的7号引脚。这可以通过条件编译选项CONFIG_IDF_TARGET_ESP32S2或CONFIG_IDF_TARGET_ESP32S3选择要使用的硬件平台,然后定义对应的引脚号。如果没有这些选项,那么就使用默认的18号引脚。
在setup函数中,我们调用了ESP32PWM::allocateTimer()函数分配了所有可用的定时器资源,并设置了伺服电机的频率为标准的50Hz。接着通过myservo.attach(servoPin, 1000, 2000)命令把电机连接到指定的引脚上,并且设置了最小和最大周期分别为1000和2000微秒。这样可以让电机在一个准确的0~180度范围内转动。
在主循环中,pos变量被用来记录电机的位置角度。外层for循环会让电机从0度转到180度,而内层for循环则让电机再从180度转回0度,每次移动1度,并等待15ms的时间,让电机有足够的时间到达指定的角度位置。
8.2 实验效果
esp32c3会控制舵机来回转动180度
9. 总结
本教程是参加FastBond2活动主题4 - 测量仪器中的【Arduino环境下驱动合宙esp32c3单片机基本外设】。
围绕FastBond2阶段1——基于ESP32C3开发的简易IO调试设备项目需求开发。
这次fastbond2活动提供了How to make自主设计的机会,而且给到各种技术支持,非常值得大学生们来参加活动。现在是阶段二实物验证阶段,我会用博客和视频慢慢记录这一次次有趣的开发过程。