springboot整合mybatis等框架
SpringBoot是Spring项目的脚手架工程
SpringBoot特点:
-
一键打包运行
内嵌Tomcat,插件
提供内置starter启动器,简化配置
不需要xml配置
SpringBoot快速入门
构造 spring-web项目 步骤:

1.添加依赖
   spring-boot-starter-web

   指定springboot项目的父工程
   spring-boot-starter-parent
       |-spring-boot-dependencies

2.创建控制器Controller - 业务控制器
     |-DispatcherServlet前端控制器

3. 启动SpringBoot项目

   在一个比较浅的包下,创建一个启动类App

   @SpringBootApplication -- 组合注解[- @SpringBootConfiguration-@Configuration
                                       @EnableAutoConfiguration:开启自动配置
                                       @ComponentScan]
   main(){
      SpringApplication.run(App.class,args); //启动SpringBoot应用
   }

@ComponentScan如果不指定成呐喊属性basePackages ,则默认为当前类所在的包及所有子包

-------------------------------------------在Controller类上的注解:
@RestController - 组合注解: @Controller+@ResponseBody
@RestController
public class UserController {
    @RequestMapping("/userList")
    public String userList(){
        return "进入userList";
    }

    @RequestMapping("/userList2")
    public ModelAndView userList2(){
        ModelAndView mav = new ModelAndView();
        mav.setViewName("xxx");
        return mav; //注意:此时会进行页面跳转
    }
}
2.SpringBoot自动配置原理
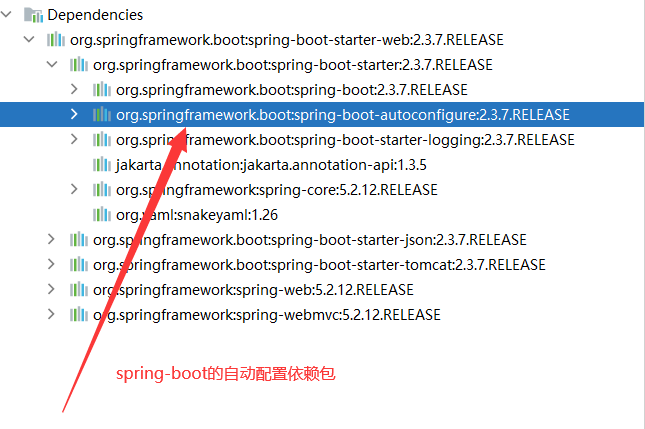
我们知道@EnableAutoConfiguration会开启SpringBoot的自动配置,并且根据你引入的依赖来生效对应的默认配置。
@EnableAutoConfiguration:SpringBoot自动配置功能开启
@Import({AutoConfigurationImportSelector.class})
public @interface EnableAutoConfiguration {
}

自动配置导入的选择器类 AutoConfigurationImportSelector
在该类中有一个方法: 获取候选配置清单
-----------------------------------------------------------------------------
protected List getCandidateConfigurations(AnnotationMetadata metadata, AnnotationAttributes attributes) {
        List configurations = SpringFactoriesLoader.loadFactoryNames(this.getSpringFactoriesLoaderFactoryClass(), this.getBeanClassLoader());
        Assert.notEmpty(configurations, "No auto configuration classes found in META-INF/spring.factories. If you are using a custom packaging, make sure that file is correct.");
        return configurations;
 }
-----------------------------------------------------------------------------
在自动配置spring-boot-autoconfiguration.jar包中meta-inf/spring.factories ,该文件就是读取自动配置清单配置类,找一个我们比较熟悉的框架产品SpringMVC
org.springframework.boot.autoconfigure.web.servlet.WebMvcAutoConfiguration@Configuration(
proxyBeanMethods = false
)
@ConditionalOnWebApplication(
type = Type.SERVLET
)
//称为条件注解 -- 表示在web环境下才会加载此配置类
@ConditionalOnClass({Servlet.class, DispatcherServlet.class, WebMvcConfigurer.class})
//表示当前执行环境中缺少WebMvcConfigurationSupport类的bean对象时,才加载此配置类
@ConditionalOnMissingBean({WebMvcConfigurationSupport.class})
@AutoConfigureOrder(-2147483638)
@AutoConfigureAfter({DispatcherServletAutoConfiguration.class, TaskExecutionAutoConfiguration.class, ValidationAutoConfiguration.class})
public class WebMvcAutoConfiguration {
...
}
我们看到这个类上的4个注解:
@Configuration:声明这个类是一个配置类
@ConditionalOnWebApplication(type = Type.SERVLET)
ConditionalOn,翻译就是在某个条件下,此处就是满足项目的类型是Type.SERVLET类型,也就是一个普通web工程,显然我们就是
@ConditionalOnClass({ Servlet.class, DispatcherServlet.class, WebMvcConfigurer.class })
这里的条件是OnClass,也就是满足以下类存在:Servlet、DispatcherServlet、WebMvcConfigurer,其中Servlet只要引入了tomcat依赖自然会有,后两个需要引入SpringMVC才会有。这里就是判断你是否引入了相关依赖,引入依赖后该条件成立,当前类的配置才会生效!
@ConditionalOnMissingBean(WebMvcConfigurationSupport.class)
这个条件与上面不同,OnMissingBean,是说环境中没有指定的Bean这个才生效。其实这就是自定义配置的入口,也就是说,如果我们自己配置了一个WebMVCConfigurationSupport的类,那么这个默认配置就会失效3.SpringBoot属性注入
使用Java配置类常用的注解:
@Configuration:声明一个类作为配置类,代替xml文件
@Bean:声明在方法上,将方法的返回值加入Bean容器,代替标签
@Value:属性注入
@PropertySource:指定外部属性文件 *.properties
以配置Java数据库连接池DataSource为例
jdbc.properties
jdbc.driverClass=com.mysql.cj.jdbc.Driver
jdbc.url=jdbc:mysql://localhost:3306/smbms?serverTimezone=Asia/Shanghai&characterEncoding=UTF-8
jdbc.username=root
jdbc.password=root
JdbcConfiguration.java 配置类
@Configuration
@PropertySource("classpath:jdbc.properties")
public class JdbcConfiguration {
    @Value("${jdbc.url}")
    String url;
    @Value("${jdbc.driverClassName}")
    String driverClassName;
    @Value("${jdbc.username}")
    String username;
    @Value("${jdbc.password}")
    String password;

    @Bean
    public DataSource dataSource() {
        DruidDataSource dataSource = new DruidDataSource();
        dataSource.setUrl(url);
        dataSource.setDriverClassName(driverClassName);
        dataSource.setUsername(username);
        dataSource.setPassword(password);
        return dataSource;
    }
}
解读:
- @Configuration:声明JdbcConfiguration是一个配置类。
- @PropertySource:指定属性文件的路径是: classpath:jdbc.properties
- 通过@Value为属性注入值。
- 通过@Bean将 dataSource()方法声明为一个注册Bean的方法,Spring会自动调用该方法,将方法的返回值加入Spring容器中。相当于以前的bean标签,然后就可以在任意位置通过@Autowired注入DataSource了!(1) @ConfigurationProperties注解
在SpringBoot中,提供了一种新的属性注入方式,支持各种java基本数据类型及复杂类型的注入
创建一个xxxProperties.java类,在上面添加注解@ConfigurationProperties,标注此类为一个属性读取类
,用于读取*properties属性文件
@Component
@ConfigurationProperties(prefix = "jdbc") //属性文件读取类,读取springboot的默认的属性配置文件(application.properties),指定读取属性名称的前缀
public class JdbcProperties {
    private String url;
    private String driverClass;
    private String username;
    private String password;

 ...//getter&setter
}
需要注意的是,这里我们并没有指定属性文件的地址,SpringBoot默认会读取文件名为application.properties的资源文件,所以我们把jdbc.properties名称改为application.properties,或者定义application.properties,把jdbc.properties属性文件内容拷贝到application.properties中。
application.properties文件
jdbc.driverClass=com.mysql.cj.jdbc.Driver
jdbc.url=jdbc:mysql://localhost:3306/smbms?serverTimezone=Asia/Shanghai&characterEncoding=UTF-8
jdbc.username=root
jdbc.password=root
通过Controller注入来测试
@RestController  //组合注解: 相当于 Controller+ResponseBody
public class HelloController {
    @Autowired
    private JdbcProperties jdbcProperties;

    @RequestMapping("/sayHello")
    public String sayHello(){
        return "hello,欢迎学习SpringBoot!!!";
    }
}
(2) @EnableConfigurationProperties注解
把JdbcConfiguration和JdbcProperties结合起来使用,可以去掉JdbcConfiguration上面的@Component注解
JdbcProperties.java
去掉上面的@Component注解
@ConfigurationProperties(prefix = "jdbc") //属性文件读取类,读取springboot的默认的属性配置文件(application.properties),指定读取属性名称的前缀
public class JdbcProperties {
    private String url;
    private String driverClass;
    private String username;
    private String password;
    ...
}
JdbcConfiguration配置类上添加@EnableConfigurationProperties注解,并指定属性读取类class
@Configuration
@EnableConfigurationProperties(JdbcProperties.class) //指定要加载的属性读取类
public class JdbcConfiguration {  //标注该为为一个配置类,相当于xml配置文件

    // @Autowired
    private JdbcProperties jdbcProperties;

    //构造函数注入
    public JdbcConfiguration(JdbcProperties jdbcProperties) {
        this.jdbcProperties = jdbcProperties;
    }

    @Bean
    public DataSource createDataSource(){
        DruidDataSource dataSource = new DruidDataSource();
        dataSource.setDriverClassName(jdbcProperties.getDriverClass());
        dataSource.setUrl(jdbcProperties.getUrl());
        dataSource.setUsername(jdbcProperties.getUsername());
        dataSource.setPassword(jdbcProperties.getPassword());
        return dataSource;
    }
}
通过HelloController测试获取到的数据源
@RestController  //组合注解: 相当于 Controller+ResponseBody
public class HelloController {
    @Autowired
    private DataSource dataSource;

    @RequestMapping("/sayHello")
    public String sayHello(){
        return "hello,欢迎学习SpringBoot!!!";
    }
}
(3) 更优雅的注入(了解)
事实上,如果一段属性只有一个Bean需要使用,我们无需将其注入到一个类(JdbcProperties)中
直接在配置类中的方法上使用@ConfigurationProperites注解注入属性值,不需要创建JdbcProperties文件
@Configuration
public class JdbcConfiguration {  //标注该为为一个配置类,相当于xml配置文件

    @Bean
    //从SpringBoot配置文件application.properties中读取,jdbc前缀那些属性配置,赋给Datasource同名属性
    @ConfigurationProperties(prefix = "jdbc")
    public DataSource createDataSource(){
        DruidDataSource dataSource = new DruidDataSource();
        return dataSource;
    }
}
4.SpringBoot实战 - [重点]
4-1 整合SpringMVC
示例module
    4.0.0


        org.springframework.boot
        spring-boot-starter-parent
        2.3.7.RELEASE


    com.woniu
    springboot-demo02
    1.0-SNAPSHOT


        8
        8


            org.springframework.boot
            spring-boot-starter-web
(1) 修改服务端口
在SpringBoot中已经为springmvc实现默认的配置,不过我们有时候需要进行自定义配置,在application.properties文件:
# Tomcat服务器设置
# 端口号
server.port=80

# 设置上下文路径
server.servlet.context-path=/springboot-demo02
http://localhost/springboot-demo02/test
(2) 两种配置文件
springboot有两种配置文件 *properties和 *yml,并且两种文件可以相互转换
yaml 是一种直观的能够被电脑识别的的数据数据序列化格式并且容易被人类阅读容易和脚本语言交互
后缀名*.yml
语法特点:
server:
port: 80
servlet:
 context-path: /springboot-demo02
如果同时存在application.properties和application.yml两个文件,则优先使用application.properties文件中的配置
(3) 访问静态资源
springboot创建的 不是一个war工程,没有 webapp,我们的静态资源该放哪里呢?
ResourceProperties --资源属性类【 属性读取类】 @ConfigurationProperties
CLASSPATH_RESOURCE_LOCATIONS = new String[]{"classpath:/META-INF/resources/", "classpath:/resources/", "classpath:/static/", "classpath:/public/"};我们在开发中,习惯会把静态资源放在classpath:/static/目录
通过配置也可以修改静态资 源访问目录
# 静态资源目录
spring.resources.static-locations=classpath:/META-INF/resources/,\
  classpath:/resources/,classpath:/static/,classpath:/public/,classpath:/x/
(4) 添加拦截器
拦截器也是我们经常需要使用的,在SpringBoot中该如何配置呢?
如果你想要保持Spring Boot 的一些默认MVC特征,同时又想自定义一些MVC配置(包括:拦截器,格式化器, 视图控制器、消息转换器 等等),你应该让一个类实现WebMvcConfigurer,并且添加@Configuration注解。
但是千万不要加@EnableWebMvc注解。因为添加此注解,会导致SprintBoot针对的SpringMvc的默认配置失效
以拦截器为例
步骤1:定义拦截器
/**
 * 自定义拦截器,实现接口HandlerInterceptor
 */
public class MyInterceptor implements HandlerInterceptor {
    //预处理
    public boolean preHandle(HttpServletRequest request, HttpServletResponse response, Object handler) throws Exception {
        System.out.println("preHandle.....");
        return true;
    }

    //执行handler方法后,还没有进入视图解析器
    public void postHandle(HttpServletRequest request, HttpServletResponse response, Object handler, ModelAndView modelAndView) throws Exception {
        System.out.println("postHandle.....");
    }

    //所有的事情完成,页面显示完后执行 此方法
    public void afterCompletion(HttpServletRequest request, HttpServletResponse response, Object handler, Exception ex) throws Exception {
        System.out.println("afterCompletion.....");
    }
}
步骤2: 在springboot项目环境下,创建一个关于SpringMVC的配置类:
@Configuration
// @EnableWebMvc  此注解添加后,将不再使用springboot提供的关于mvc默认的配置
public class MyWebMvcConfig implements WebMvcConfigurer {
    //配置自定义的SpringMVC相关的配置
    @Autowired
    private MyInterceptor myInterceptor;

    //添加拦截器
    public void addInterceptors(InterceptorRegistry registry) {
        registry.addInterceptor(myInterceptor).addPathPatterns("/**").excludePathPatterns("/c.html");
    }
}
注意:当使用spring 5.x时,静态资源也会执行自定义的拦截器,因此在配置拦截器的时候需要指定排除静态资源的访问路径
 //添加拦截器配置
    public void addInterceptors(InterceptorRegistry registry) {
        //注册拦截器,并设置拦截访问的路径与例外
        registry.addInterceptor(myInterceptor).addPathPatterns("/**")                .excludePathPatterns("/image/**","/js/**","/a.html","/b.html","/c.html");
    }
(5) 日志输出
由于spring-boot-starter-web中已经对logback-classic.jar支持,所以只需在配置中配置日志输出级别
SpringBoot通过logging.level.=debug来配置日志级别,填写包名
# 配置日志输出 debug4-2 整合数据源连接池
在SpringBoot中不需要单独添加数据源的依赖,内置了HikariCP [Connection Pool],需要添加spring官方的启动器starter依赖
HikariCP 是一个高性能的 JDBC 连接池组件,号称性能最好的后起之秀,是一个基于BoneCP做了不少的改进和优化的高性能JDBC连接池。
(1) 使用spring-jdbc内置的数据源HikariCP [推荐]
    org.springframework.boot
    spring-boot-starter-jdbc


    mysql
    mysql-connector-java
在application.properties添加配置
#配置数据源
spring.datasource.driver-class-name=com.mysql.cj.jdbc.Driver
spring.datasource.url=jdbc:mysql://localhost:3306/smbms?serverTimezone=Asia/Shanghai&characterEncoding=UTF-8
spring.datasource.username=root
spring.datasource.password=root
(2) 使用 DruidDataSource
在上面依赖的基础上添加Druid启动器依赖
    org.springframework.boot
    spring-boot-starter-jdbc


    mysql
    mysql-connector-java


    com.alibaba
    druid-spring-boot-starter
    1.2.5
配置方式有两种:
#配置数据源
#指定的了type表示使用DruidDataSource
spring.datasource.type=com.alibaba.druid.pool.DruidDataSource
spring.datasource.driver-class-name=com.mysql.cj.jdbc.Driver
spring.datasource.url=jdbc:mysql://localhost:3306/smbms?serverTimezone=Asia/Shanghai&characterEncoding=UTF-8
spring.datasource.username=root
spring.datasource.password=root


或使用下面的配置
-------------------------------------------------------------------------
#单独配置Druid数据源信息
spring.datasource.druid.driver-class-name=com.mysql.cj.jdbc.Driver
spring.datasource.druid.url=jdbc:mysql://localhost:3306/smbms?serverTimezone=Asia/Shanghai&characterEncoding=UTF-8
spring.datasource.druid.username=root
spring.datasource.druid.password=root
# 设置连接池初始大小
spring.datasource.druid.initial-size=4
# 最大活动连接数
spring.datasource.druid.max-active=100
# 最小空闲连接数
spring.datasource.druid.min-idle=2
4-3 整合mybatis
SpringBoot官方并没有实现Mybatis的启动器,不过Mybatis官方自己实现了
    org.mybatis.spring.boot
    mybatis-spring-boot-starter
    2.1.4
配置mybatis
#针对于mapper.xml中类型别名包
mybatis.type-aliases-package=com.woniu.entity
#如果sqlMapper.xml映射文件路径与mapper接口包名及文件名一致,则可以省略
#mybatis.mapper-locations=classpath:com/woniu/mapper/*.xml
#开启mybatis下划线转驼峰
mybatis.configuration.map-underscore-to-camel-case=true需要注意,这里没有配置mapper接口扫描包,因此我们需要给每一个Mapper接口添加@Mapper注解,才能被识别
问题:如果mapper接口很多,可以采用一步解决方式: 在引导类上添加注解@MapperScan("com.woniu.mapper")
@SpringBootApplication //组合注解: @SpringbootConfiguration,@EnableAutoConfiguration,@ComponentScan
@MapperScan("com.woniu.mapper") //扫描Mapper包,创建代理子类对象
public class App {
    public static void main(String[] args) {
        //启动SpringBoot应用
        SpringApplication.run(App.class,args);
    }
}
4-4 整合Thymeleaf
SpringBoot并不推荐使用jsp,但是支持一些模板引擎技术
· 默认前缀:classpath:/templates/
· 默认后缀:.html
添加Thymeleaf启动器依赖
    org.springframework.boot
    spring-boot-starter-thymeleaf
spring.thymeleaf.prefix=classpath:/templates/
spring.thymeleaf.suffix=.html
spring.thymeleaf.cache=false
#开发过程中 建议关闭缓存  false就是关闭,避免改了模板还要重启服务器,默认是启用模板缓存的