vue3 Component API
项目代码仓库:https://github.com/chenfenbgin/component-api
https://github.com/chenfenbgin/other_components
注:Component API也是用来替代Mixin的。
一、Mixin 和 extends
1、Mixin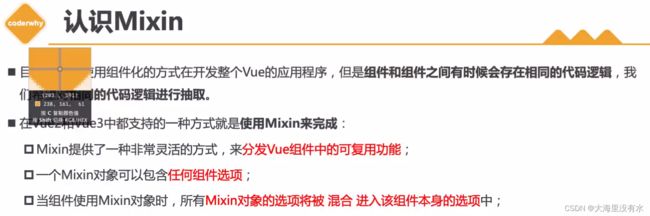


2、extends

二、Component Api


1、setup的参数

<template>
  <div id="app">
    home page

    <h2>{{ message }}h2>
    <h2>{{ title }}h2>
    <h2>当前计算: {{ counter }}h2>

  div>
template>

<script type="text/javascript">
export default {
  name: "app",

  props: {
    message: {
      type: String,
      required: true,
    },
  },

  // setup函数有哪些参数?
  // setup函数有什么样的返回值

  // setup写法一:两个参数
  /**
   * 参数一: props, 父组件传递过来的属性,这里如果想要使用props参数,必须这么写
   */
  // setup(props, context) {
  //   // setup里面不能使用this,无法获取this.props
  //   // console.log(this.props);
  //   console.log("props", props.message);

  //   // 我们不可以这么发出事件
  //   // this.$emit()
  //   console.log('id, class', context.attrs.id, context.attrs.class);
  //   console.log('slots', context.slots);
  //   console.log('emit', context.emit);
  // },

  // 之前的发出事件,写了setup,以后就不再这么写了,当然,也不可以在setup中直接使用this.$emit()
  // methods:{
  //   btnClick(){
  //     this.$emit("")
  //   }
  // }

  // setup写法二:对象的解构,如果没有需要,直接对content进行解构获取只需要的属性即可
  setup(props, { attrs, slots, emit }) {
    console.log(props.message);
    console.log(attrs.id, attrs.class);
    console.log(slots);
    console.log(emit);

    // 这里可以返回数据,就不需要data(){return{}},
    return {
      title: "hello home",
      counter: 100,
    };
  },
};
script>

<style scoped>style>
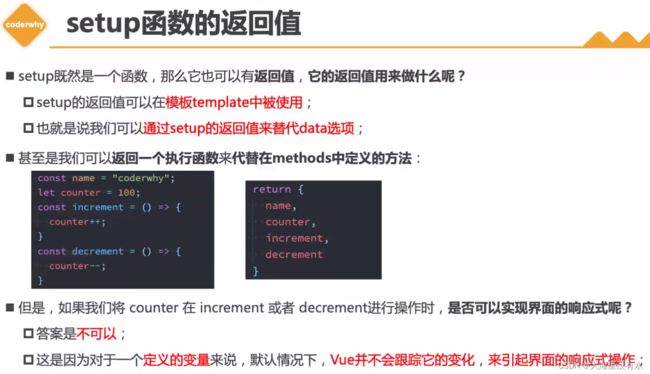
2、setup的返回值
<template>
  <div id="app">
    home page
    <h2>{{ message }}h2>

    <h2>{{ title }}h2>
    <h2>当前计算: {{ counter }}h2>
    <button @click="increment">+1button>
  div>
template>

<script type="text/javascript">
export default {
  name: "app",

  props: {
    message: {
      type: String,
      required: true,
    },
  },

  setup() {
    let counter = 100;
    // 局部函数
    const increment = () => {
      console.log("increment");
      counter++;
      // y有打印, 但是没刷新, 因为没加入响应式,因为data(){return{}}返回的数据会经过reactive函数处理, 他是响应式的
      console.log("counter", counter);
    };

    return {
      title: "hello home",
      counter,
      increment,
    };
  },
};
script>

<style scoped>style>
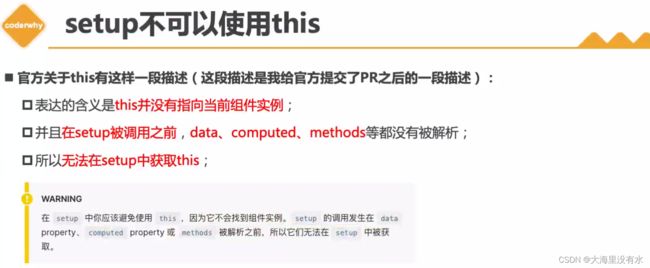
3、setup中的this问题


4、reactive Api
注:响应式对象其实是 JavaScript Proxy,其行为表现与一般对象相似。不同之处在于 Vue 能够跟踪对响应式对象 property 的访问与更改操作

注:
1、DOM更新的时机:当你更改响应式状态后,DOM 也会自动更新。然而,你得注意 DOM 的更新并不是同步的。相反,Vue 将缓冲它们直到更新周期的 “下个时机” 以确保无论你进行了多少次声明更改,每个组件都只需要更新一次。
若要等待一个状态改变后的 DOM 更新完成,你可以使用 nextTick() 这个全局 API。
2、深层响应性:在 Vue 中,状态都是默认深层响应式的。这意味着即使在更改深层次的对象或数组,你的改动也能被检测到。你也可以直接创建一个浅层响应式对象。它们仅在顶层具有响应性,一般仅在某些特殊场景中需要。
import { nextTick } from 'vue'
function increment() {
  state.count++
  nextTick(() => {
    // 访问更新后的 DOM
  })
}

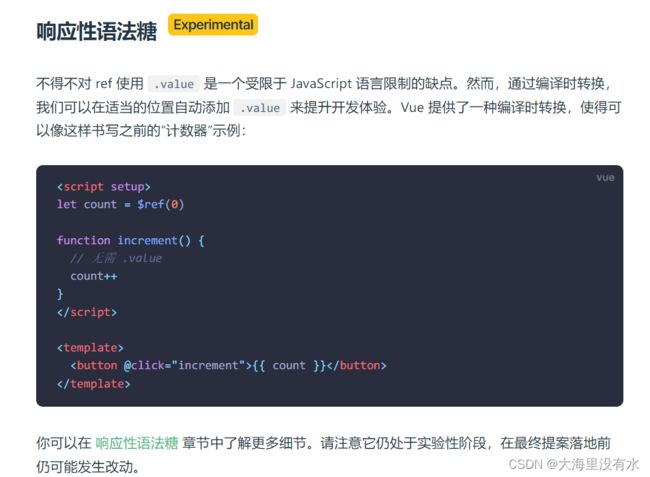
5、ref Api

注:模板中的解包,是一个浅层解包

<template>
  <div>
    Home Page
    <h2>{{ message }}h2>


    <h2>当前计数: {{ counter }}h2>


    <h2>当前计数:{{ info.counter.value }}h2>


    <h2>当前计数:{{ reactiveInfo.counter }}h2>
    <button @click="increment">+1button>
  div>
template>

<script>
import { ref, reactive } from "vue";

export default {
  props: {
    message: {
      type: String,
      required: true,
    },
  },
  setup() {
    // reactive API对传入的类型是有所限制的,要求我们必须传入一个对象或者数组类型,如果我们传入一个基本类型(String、Number、Boolean)会报一个警告
    // const counter = reactive(100) //报警告, 要使用Ref API, ref会返回一个可变的响应式对象,该对象作为一个响应式的引用,维护它内部的值,

    // counter = 100; //100是数值类型
    // 100变成了一个ref的可响应式的引用
    let counter = ref(100);

    // 情况1:无法解包:模板中无法通过{{info.counter}}进行解包的,这只是浅层解包
    const info = {
      counter,
    };

    // 情况2:可以解包:
    const reactiveInfo = reactive({
      counter,
    });
    const increment = () => {
      counter.value++;
      console.log(counter.value);
    };

    return {
      counter,
      increment,
      info,
      reactiveInfo,
    };
  },
};
script>

<style scoped>style>
6、readonly Api


注:给子组件传过去的,应该是一个响应式对象
<template>
  <div>
    <button @click="updateState">修改状态button>
  div>
template>

<script>
import { reactive, readonly } from "vue";

export default {
  setup() {
    // 1.普通对象
    const info1 = { name: "chen" };
    const readonlyInfo1 = readonly(info1);

    // 2.响应式对象, 给子组件传
    // 注:给子组件传过去的,应该是一个响应式对象
    const info2 = reactive({
      name: "chenheo",
    });
    const readonlyInfo2 = readonly(info2);

    const updateState = () => {
      // 无法修改
      readonlyInfo1.name = "chen1";
      // 下面的是可以i修改的
      info1.name = "chen";

      //无法修改
      readonlyInfo2.name = "chen2";
    };

    return {
      updateState,
    };
  },
};
script>

<style scoped>style>
7、Reactive判断的api

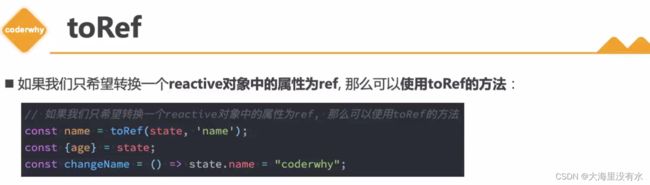
8、toRefs/toRef
注: toRefs/toRef传入的必须是响应式的对象

<template>
  <div id="app">
    <h2>{{ name }}-{{ age }}h2>
    <button @click="changeAge">修改agebutton>
  div>
template>

<script type="text/javascript">
import { reactive, toRefs, toRef } from "vue";

export default {
  setup() {
    // 响应式的
    const info = reactive({ name: "chen", age: 12 });

    // 我们从info中直接解构出来,只是赋值而已,不是响应式的
    // let { name, age } = info;

    // 我们希望解构出来的name,age还是响应式的, 会创建两个ref对对象,相当于 ref(name) 跟 ref(age)
    // 1.toRefs:将reactive对象中的所有属性都转成ref,建立连接, 相当于引用的同一个地方
    let { name, age } = toRefs(info);

    // 2.toRef: 对其中一个属性进行转换ref,建立连接
    let { name1 } = info;
    let age1 = toRef(info, "age"); //不需要再进行解构操作

    const changeAge = () => {
      // 有改,但是不是响应式的
      // age++;

      age1.value++;
      console.log("age", age.value);
      console.log(name1);

      //这个时候,我们改变info里面的age,也是会发生改变的
      // info.age++;
    };

    return {
      info,
      changeAge,
      age,
      name,
    };
  },
};
script>

<style scoped>style>
9、ref的补充

10、自定义ref的过程

自定义ref实现双向绑定数据防抖:
useDebounceRef.js:
import { customRef } from "vue";

// 自定义ref
export default function (value, delay = 300) {
  let timer = null;
  // customRef要去传入的是一个函数
  // track:什么时候收集依赖; trigger:什么时候触发依赖进行更新
  return customRef((track, trigger) => {
    return {
      get() {
        track();
        return value;
      },
      set(newValue) {
        clearTimeout(timer);
        timer = setTimeout(() => {
          value = newValue;
          trigger();
        }, delay);
      },
    };
  });
}
<template>
  <div>
    <input v-model="message" />
    <h2>{{ message }}h2>
  div>
template>

<script>
import debounceRef from "./hook/useDebounceRef";

export default {
  setup() {
    const message = debounceRef("Hello World");

    return {
      message,
    };
  },
};
script>

<style scoped>style>
11、computed

<template>
  <div id="app">
    <h2>{{ firstName }}- {{ lastName }}h2>
    <h2>{{ fullName }}h2>
    <button @click="changeName">修改名字button>
  div>
template>

<script type="text/javascript">
import { ref, computed } from "vue";

export default {
  setup() {
    const firstName = ref("尘");
    const lastName = ref("浮生");
    // 这么写的化fullName不是响应式的;我们需要写成computed,才是响应式的
    // const fullName = firstName.value + " " + lastName.value;

    // 1.computed用法一:传入一个getter函数
    // computed的返回值是一个ref对象
    // const fullName = computed(() => firstName.value + lastName.value);

    // 2.computed用法二:传入一个对象,对象包含getter/setter
    const fullName = computed({
      get: () => firstName.value + lastName.value,
      set(newValue) {
        const name = newValue.split(" ");
        firstName.value = name[0];
        lastName.value = name[1];
      },
    });
    const changeName = () => {
      // firstName.value = "流";
      fullName.value = "coder chen";
    };

    return {
      firstName,
      lastName,
      fullName,
      changeName,
    };
  },
};
script>

<style scoped>style>
注: computed 和 method 不同之处在于计算属性值会基于其响应式依赖被缓存。一个计算属性仅会在其响应式依赖更新时才重新计算。这意味着只要 数据 不改变,无论多少次访问都会立即返回先前的计算结果,而不用重复执行 getter 函数。
12、watchEffect

<template>
  <div id="app">
    <h2>{{ name }}-{{ age }}h2>
    <button @click="changeName">修改namebutton>
    <button @click="changeAge">修改agebutton>
  div>
template>

<script type="text/javascript">
import { watchEffect, ref } from "vue";
/**
 * Options api中,我们可以通过watch选项来侦听data 或者 props的数据变化
 * Component Api中,有两个选择: 1.使用watchEffect, 2.使用watch
 */
export default {
  setup() {
    // watchEffect: 会自动收集响应式的依赖
    const name = ref("chen");
    const age = ref(13);

    const changeName = () => (name.value = "liu");
    const changeAge = () => age.value++;

    // 回调函数默认执行一次,立即执行一次, name
    watchEffect(() => {
      // watchEffect可以自动收集可响应式的依赖
      // 点击按钮的时候,name有执行, age没有执行,因为age没被收集过依赖
      // console.log("name:====", name.value);

      console.log("name:====", name.value, "age: ", age.value);
    });

    return {
      name,
      age,
      changeName,
      changeAge,
    };
  },
};
script>

<style scoped>style>
13、watchEffect 停止侦听 和 清除副作用


<template>
  <div id="app">
    <h2>{{ name }}-{{ age }}h2>
    <button @click="changeName">修改namebutton>
    <button @click="changeAge">修改agebutton>
  div>
template>

<script type="text/javascript">
import { watchEffect, ref } from "vue";

export default {
  setup() {
    const name = ref("chen");
    const age = ref(13);

    const stop = watchEffect((onInvalidate) => {
      const timer = setTimeout(() => {
        console.log("网络请求成功");
      }, 2000);
      // 根据name和age两个变量发送网络请求, 上一次请求产生的过程,称之为副作用
      // 就是比如在修改age的时候,onInvalidate()函数会优先被调用了一下, 可以做一些相关的清除操作
      onInvalidate(() => {
        //在这个函数中, 清除额外的副作用
        // request.cancel();//取消请求
        clearTimeout(timer);
        console.log("onInvalidate");
      });

      console.log("name:====", name.value, "age: ", age.value);
    });

    const changeName = () => (name.value = "liu");
    const changeAge = () => {
      age.value++;
      if (age.value > 25) {
        // 停止侦听
        stop();
      }
    };

    return {
      name,
      age,
      changeName,
      changeAge,
    };
  },
};
script>

<style scoped>style>

14、setup中使用ref
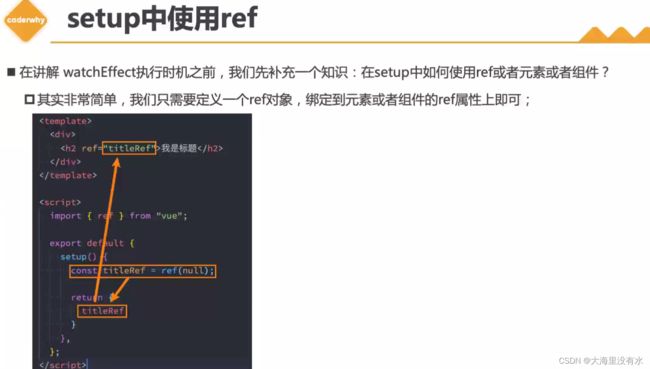

<template>
<div id="app">
<h2 ref="title">哈哈哈哈h2>
div>
template>
<script type="text/javascript">
import { watchEffect, ref } from "vue";
export default {
setup() {
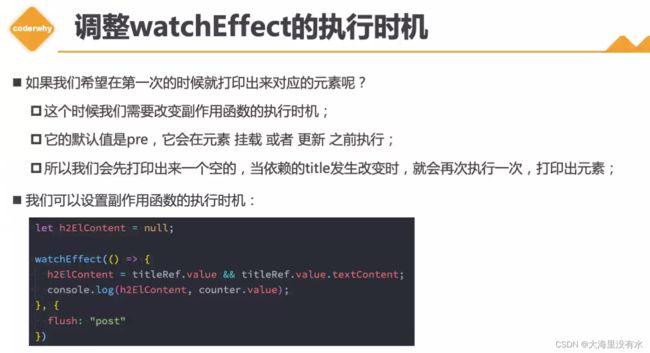
// 怎么拿到title元素, 使用ref(null)返回即可,到时title会被自动赋值, 挂载之后会自动赋值到title中
const title = ref(null);
// 两种方式,可以去生命周期查看,也可以使用watchEffect
watchEffect(
() => {
// 第一次立即执行,肯定是空的;第二次有具体的值
console.log(title.value);
},
// 下面的对象,第一次就能打印正确的内容
{
// DOM更新完之后执行, 这个是要使用到DOM里面的东西才用到、
// flush:'pre', DOM还没挂载完; post:DOM挂载完
flush: "post",
}
);
return {
title,
};
},
// methods:{
// foo(){
// // 以前我们时这么拿h2标签的
// this.$refs.title
// }
// }
};
script>
<style scoped>style>

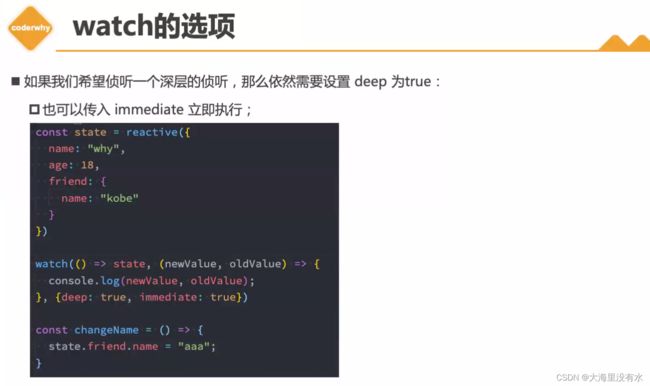
15、watch
注: watchEffect拿不到前后变化的值;不需要指定监听谁;watch需要指定监听的是谁。

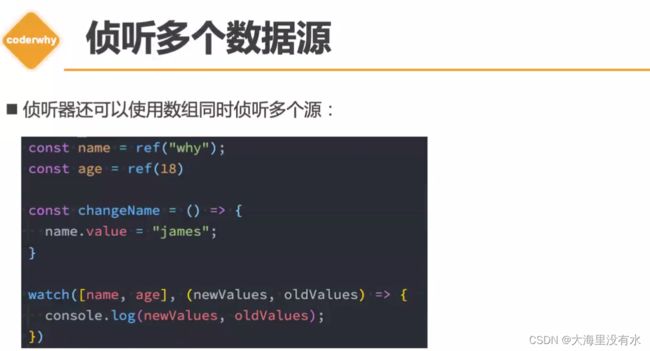
侦听多个数据源代码:
<template>
  <div id="app">
    <h2>哈哈哈哈h2>
    <h2>{{ name }}h2>
    <button @click="changeData">修改数据button>
  div>
template>

<script type="text/javascript">
import { ref, watch, reactive } from "vue";

export default {
  setup() {
    // 1.定义可响应式对象
    const info = reactive({ name: "chen", age: 13 });
    const name = ref("chen");

    // 2.侦听器watch, 侦听多个,写成数组
    watch(
      [() => ({ ...info }), name],
      ([newInfo, newName], [oldInfo, oldName]) => {
        console.log(newInfo, newName, oldInfo, oldName);
      }
    );

    const changeData = () => {
      info.name = "hello";
    };

    return {
      info,
      changeData,
    };
  },
};
script>

<style scoped>style>

16、生命周期钩子函数
注: vue3没有了create()、beforeCreate(),我们可以直接放到setup中, setup比create()/beforeCreate还要早。

17、Provide/inject


18、案例:

三、render函数、jsx


1、render - setup方式实现计算器
// 一旦写render函数,template就不需要了

<script type="text/javascript">
import { h, ref } from "vue";

export default {
  // counter可以有两种写法: 在data中定义,也可以在setup中定义; setup是可以替代data的,也可以替代render
  setup() {
    const counter = ref(0);

    // return {
    //   counter,
    // };

    return () => {
      // h2函数的执行可以返回一个vnode
      // setup可以替换掉data, 也是可以替代render函数的
      return h("div", { class: "app" }, [
        h("h2", null, `当前计数: ${counter.value}`), //这里不需要使用this
        h(
          "button",
          {
            onClick: () => counter.value++,
          },
          "+1"
        ),
        h(
          "button",
          {
            onClick: () => counter.value++,
          },
          "-1"
        ),
      ]);
    };
  },

  // render() {
  //   return h("div", { class: "app" }, [
  //     h("h2", null, `当前计数: ${this.counter}`), //这里可以使用this, render函数是有绑定this的
  //     h(
  //       "button",
  //       {
  //         onClick: () => this.counter++,
  //       },
  //       "+1"
  //     ),
  //     h(
  //       "button",
  //       {
  //         onClick: () => this.counter++,
  //       },
  //       "-1"
  //     ),
  //   ]);
  // },
};
script>

<style scoped>style>
2、jsx

3、自定义指令

自定义局部指令:
<template>
  <div id="app">

    <input type="text" v-focus />
  div>
template>

<script type="text/javascript">
// import { ref, onMounted } from "vue";

export default {
  // 定义局部指令,可以自定义多个指令
  // directives: {
  //   focus: {
  //     // 定义指令的很多生命周期,总共有四个参数,el, bindings, vnode, preVnode
  //     mounted(el) {
  //       console.log("focus mounted");
  //       el.focus();
  //     },
  //   },
  // },
};
script>

<style scoped>style>

4、Teleport

5、插件
