从零开始搭建微服务:微服务注册中心
微服务注册中心搭建
微服务注册中心的作用就是用于统一管理微服务实例,微服务间的调用只需要知道对方的服务名,而无需关注具体的IP和端口,便于微服务架构的拓展和维护。
因为Eureka较为简单,无须启动第三方服务,只需要引入相关依赖即可,所以先使用Eureka构建微服务注册中心(Eureka服务端)。
创建微服务注册中心子项目
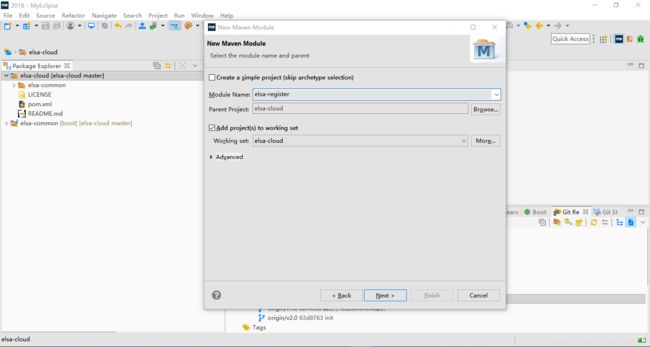
File==>新建==>Other==>搜索Maven,选择Maven Module,然后Next

填写Module Name:elsa-register,点击Next

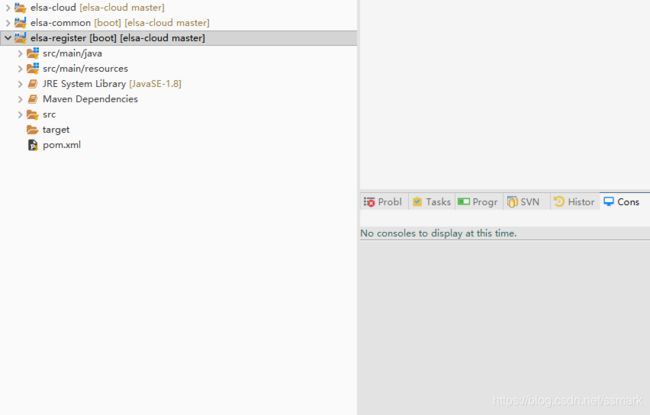
一直Next至FInish为止,创建完成,项目结构如下

添加Eureka注册中心依赖
<project
	xsi:schemaLocation="http://maven.apache.org/POM/4.0.0 http://maven.apache.org/xsd/maven-4.0.0.xsd"
	xmlns="http://maven.apache.org/POM/4.0.0"
	xmlns:xsi="http://www.w3.org/2001/XMLSchema-instance">
	<modelVersion>4.0.0modelVersion>
	<parent>
		<groupId>com.elsagroupId>
		<artifactId>elsa-cloudartifactId>
		<version>1.0-SNAPSHOTversion>
	parent>
	<artifactId>elsa-registerartifactId>
	<name>elsa-registername>
	<description>Elsa-Cloud服务注册中心description>
	<url>http://maven.apache.orgurl>
	<dependencies>

		<dependency>
			<groupId>org.springframework.cloudgroupId>
			<artifactId>spring-cloud-starter-netflix-eureka-serverartifactId>
		dependency>

		<dependency>
		    <groupId>org.springframework.cloudgroupId>
		    <artifactId>spring-cloud-starter-securityartifactId>
		dependency>
	dependencies>

	<build>
		<plugins>
			<plugin>
				<groupId>org.springframework.bootgroupId>
				<artifactId>spring-boot-maven-pluginartifactId>
			plugin>
		plugins>
	build>
project>
这里注意下,因为上面我们是通过添加Maven Modules方式添加的子项目,所以在父模块中会自动添加子项目依赖。

如果不是通过添加子项目添加的,请在父模块elsa-cloud依赖中添加。
开启Eureka注册中心服务端功能
打开elsa-register的入口类ElsaRegisterApp,在类上使用@EnableEurekaServer标注,用以开启Eureka服务端功能:
@EnableEurekaServer
@SpringBootApplication
public class ElsaRegisterApp {
    public static void main(String[] args) {
        SpringApplication.run(ElsaRegisterApp.class, args);
    }
}
注册中心Eureka相关配置
开始编写项目配置文件,采用yml格式的配置,在resources目录下创建名为application.yml,配置内容如下:
server:
  port: 8001
  servlet:
    context-path: /register

spring:
  application:
    name: Elsa-Register
eureka:
  instance:
    hostname: localhost
  client:
    register-with-eureka: false
    fetch-registry: false
    instance-info-replication-interval-seconds: 30
    serviceUrl:
      defaultZone: http://${eureka.instance.hostname}:${server.port}${server.servlet.context-path}/eureka/
项目的端口号为8001(约定配置),context-path为/register,剩下的配置含义如下:
spring.application.name,定义服务名称为Elsa-Register;
eureka.instance.hostname,指定了Eureka服务端的地址,因为我们是在本地搭建的,所以填写为localhost即可;
eureka.client.register-with-eureka,表示是否将服务注册到Eureka服务端,由于我们这里是单节点的Eureka服务端,所以这里指定false;
eureka.client.fetch-registry,表示是否从Eureka服务端获取服务信息,因为这里是单节点的Eureka服务端,并不需要从别的Eureka服务端同步服务信息,所以这里设置为false;
eureka.client.instance-info-replication-interval-seconds,微服务更新实例信息的变化到Eureka服务端的间隔时间,单位为秒,这里指定为30秒(这就是微服务启动后,要过一会才能注册到Eureka服务端的原因)。
eureka.client.serviceUrl.defaultZone,指定Eureka服务端的地址,这里为当前项目地址,即 http://localhost:8001/register/eureka/
至此,一个简单的微服务注册中心搭建好了,我们运行入口类ElsaRegisterApp的main方法启动项目。

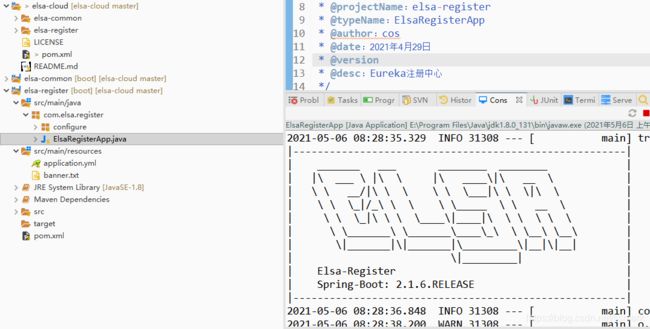
由于要搭建的微服务模块较多,所以为了在项目启动的时候更直观的区分开当前启动的是哪个微服务模块,我们可以自定义一个启动banner。在resources目录下新建一个banner.txt文件,文件内容如下所示:
|-------------------------------------------------------|
|    _______   ___       ________  ________     	|
|   |\  ___ \ |\  \     |\   ____\|\   __  \   		|
|   \ \   __/|\ \  \    \ \  \___|\ \  \|\  \  		|
|    \ \  \_|/_\ \  \    \ \_____  \ \   __  \ 		|
|     \ \  \_|\ \ \  \____\|____|\  \ \  \ \  \ 	|
|      \ \_______\ \_______\____\_\  \ \__\ \__\	|
|       \|_______|\|_______|\_________\|__|\|__|	|
|                          \|_________|         	|
|    ${spring.application.name}					|
|    Spring-Boot: ${spring-boot.version}				|
|-------------------------------------------------------|
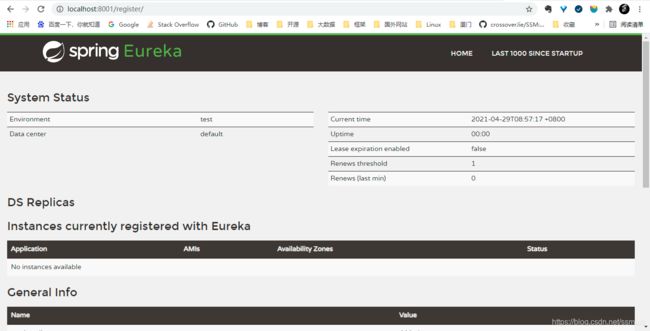
启动后访问 http://localhost:8001/register/,出现Eureka页面说明微服务注册中心搭建成功,目前还没有微服务实例注册进来,所以列表是空的。

微服务注册中心防护
目前Eureka服务端是“裸奔着”的,只要知道了Eureka服务端的地址后便可以将微服务注册进来,我们可以引入spring-cloud-starter-security来保护Eureka服务端。
Security防护依赖
在elsa-register模块的pom文件中添加如下依赖:
<dependency>
    <groupId>org.springframework.cloudgroupId>
    <artifactId>spring-cloud-starter-securityartifactId>
dependency>
Security安全配置类
在com.elsa.register路径下新建configure包,然后在configure包下新建ElsaRegisterWebSecurityConfigure配置类,该配置类用于开启Eureka服务端端点保护。
@EnableWebSecurity
public class ElsaRegisterWebSecurityConfigure extends WebSecurityConfigurerAdapter {
    @Override
    protected void configure(HttpSecurity http) throws Exception {
        http.csrf().ignoringAntMatchers("/eureka/**");
        super.configure(http);
    }
}
配置访问Eureka服务用户名及密码
配置访问Eureka服务的受保护资源所需的用户名和密码
在application.yml中配置访问Eureka服务的受保护资源所需的用户名和密码:
spring:
  # 配置访问Eureka服务的受保护资源所需的用户名和密码
  security:
    user:
      name: elsa
      password: 123456
eureka.client.serviceUrl.defaultZone路径配置账号密码
eureka:
  client:
    serviceUrl:
      defaultZone: http://${spring.security.user.name}:${spring.security.user.password}@${eureka.instance.hostname}:${server.port}${server.servlet.context-path}/eureka/
重新启动Elsa-Register项目,访问http://localhost:8001/register/发现已经需要账号密码才可访问。输入我们在配置文件中配置的账号密码:elsa和123456,可正常访问微服务注册列表。

源码下载
源码地址:微服务注册中心