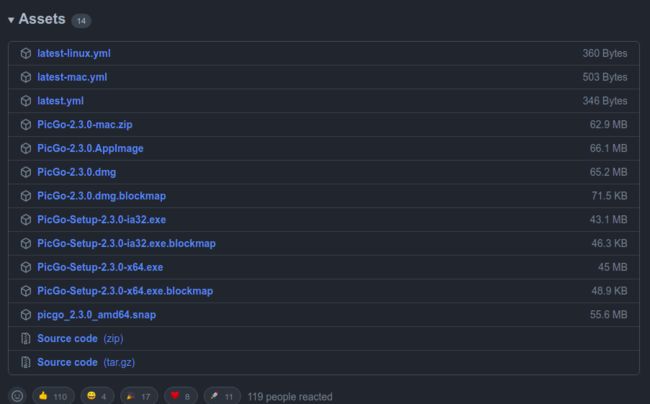
- Jetson Orin NX Super安装TensorRT-LLM
u013250861
#LLM/部署&推理elasticsearch大数据搜索引擎
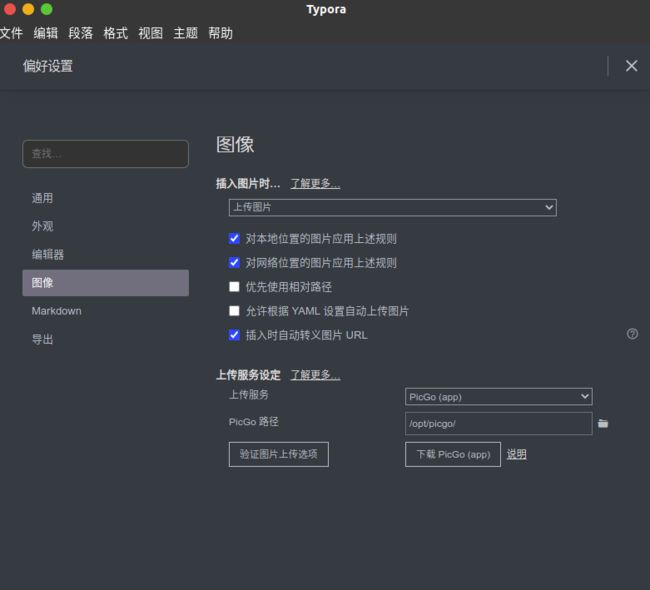
根据图片中显示的JetsonOrinNXSuper系统环境(JetPack6.2+CUDA12.6+TensorRT10.7),以下是针对该平台的TensorRT-LLM安装优化方案:一、环境适配调整基于你的实际配置:JetPack6.2(含CUDA12.6,TensorRT10.7)Python3.10.12aarch64架构需选择适配的TensorRT-LLM版本。由于官方预编译包可能未覆盖此
- 为什么国内的教科书编写的如此晦涩?
点云SLAM
数学学习方法
很多人在学习过程中都有类似感受:中国的教科书“难搞懂”。造成这种现象的原因主要可以从以下几个方面来分析:1.教学目标更重“系统性”而非“启发性”中国教科书通常强调知识的完整性、系统性、逻辑性,但不强调引导性和直觉体验。很多内容是按照“定义→定理→推论”的顺序展开,对初学者不友好,因为缺少“为什么要学”“生活中的例子”“背后直觉”的铺垫。国外教材比如《Calculus》(Stewart)会在每章开头
- 【Swift开发】屏蔽NSSecureCoding频繁警告
Jaaaaaaaaaaaaa
swift开发语言ios
解决iOS开发中NSSecureCoding警告的最佳实践问题背景在开发Mac应用时,我遇到了一个令人困扰的问题:Xcode控制台不断输出NSSecureCodingallowedclasseslistcontains[NSObjectclass]相关的警告信息。这些警告虽然不影响应用功能,但严重干扰了开发调试过程,让真正重要的日志信息淹没在系统警告中。***-[NSXPCDecodervalid
- 使用策略模式 + 自动注册机制来构建旅游点评系统的搜索模块
✅目标:搜索模块支持不同内容类型(攻略、达人、游记等)每种搜索逻辑用一个策略类表示自动注册(基于注解+Spring容器)新增搜索类型时,只需添加一个类+一个注解,无需改工厂、注册表等!️技术方案:SpringBoot自定义注解@SearchType("guide")进行标记启动时由Spring自动扫描并注册到Map项目结构如下(SpringBoot)search-system-springboot
- Pocket Cleaner Pro 垃圾清理工具(Mac)
fengyun2891
垃圾清理macosmac
PocketcleanerPro,是一款Mac垃圾清理工具,可以帮助用户将电脑里的垃圾文件、应用程序缓存文件、应用程序日志文件等垃圾进行清理,将占用内存的数据进行清除,优化和提升系统的运行速度。原文地址:PocketCleanerPro垃圾清理工具
- 【Tailwind CSS】font-light 和 my-4 的样式详解
Peter-Lu
#Tailwindcss前端react.jsjavascripttypescript
文章目录一、`font-light`与字体粗细的控制1.`font-light`的作用2.`font-weight`的等级划分3.使用示例二、`my-4`与垂直外边距的控制1.`my-4`的作用2.Tailwind的边距控制系统3.使用示例三、`font-light`和`my-4`的实际应用场景1.用于标题和描述文本的排版2.用于卡片组件的内容分隔3.用于导航菜单的轻量提示四、设计风格的提升:使用
- Turndown 项目教程
卓桔洋
Turndown项目教程turndownAnHTMLtoMarkdownconverterwritteninJavaScript项目地址:https://gitcode.com/gh_mirrors/tu/turndown项目介绍Turndown是一个用JavaScript编写的HTML到Markdown转换器。它旨在与CommonMark规范兼容,并提供了多种选项来定制输出样式。Turndown
- pip方式安装MindSpore Ascend版本
pip方式安装MindSporeAscend版本参考:https://www.mindspore.cn/install/本文档介绍如何在Ascend环境的Linux系统上,使用pip方式快速安装MindSpore。安装MindSpore与依赖软件下表列出了安装MindSpore所需的系统环境和第三方依赖。软件名称版本作用Ubuntu18.04/CentOS7.6/EulerOS2.8/openEu
- Tesla的FSD 架构设计
WSSWWWSSW
智能驾驶汽车人工智能FSD
特斯拉的FSD(完全自动驾驶)架构设计以端到端神经网络为核心,结合专用硬件加速、海量数据训练和持续OTA迭代,形成了一套高度集成的系统。以下从硬件、软件、算法、数据处理和安全机制五个维度展开分析:一、硬件架构:从HW3.0到AI5的算力跃迁HW3.0基础设计采用三星14nm工艺的定制SoC,包含12个Cortex-A72CPU核心、2个NPU(合计73.7TOPS算力)和Mali-G71GPU,支
- 后端框架
再见,再也不见(๑><๑)
java
后端开发中,使用框架可以提高开发效率、简化代码编写,并提供丰富的功能和工具支持。以下是一些流行的后端框架:SpringFramework:特点:SpringFramework是一个全功能的Java开发框架,提供了依赖注入、面向切面编程、事务管理等功能,广泛用于构建企业级应用。生态系统:Spring生态系统庞大,包括SpringBoot用于快速搭建项目、SpringData用于数据访问、Spring
- Rust 数据类型
froginwe11
开发语言
Rust数据类型引言Rust是一种系统编程语言,以其高性能和安全性而闻名。在Rust中,正确地使用数据类型对于编写高效、健壮的代码至关重要。本文将深入探讨Rust的数据类型,包括基本数据类型、复合数据类型以及引用和生命周期等概念。基本数据类型Rust提供了丰富的基本数据类型,包括整型、浮点型、字符和布尔型。整型Rust中的整型包括:i8至i128:有符号整数,大小分别为8位至128位。u8至u12
- 汇编语言:基于x86处理器第一章习题解答
「已注销」
Linux内核资深专家arm
汇编语言习题解答习题解答1.1.3本节回顾习题解答1.1.3本节回顾1、汇编器和链接器是如何一起工作的?汇编程序要转化为可执行程序,需要先译码后组合。这是因为一个完整的汇编程序常常是由多个文件构成,先用汇编器将每一个文件中的汇编代码转化为机器语言后,链接器再把这些文件组合成一个可执行程序。2、学习汇编语言如何能提高你对操作系统的理解?可用汇编语言验证操作系统的理论知识,从而更深刻的掌握操作系统3、
- 在 Git 中添加子模块(submodule)的详细步骤
在Git中添加子模块(submodule)的详细步骤如下:1.添加子模块命令格式:gitsubmoduleadd[目标路径]仓库URL:子模块的Git仓库地址(HTTP/SSH均可)。目标路径(可选):子模块在主仓库中的存放路径。若省略,默认使用仓库名称作为路径。示例:gitsubmoduleaddhttps://github.com/example/thirdparty.gitlibs/thir
- Git学习和使用
mayue_csdn
工具git
文章目录5.2.gitmodules用法5.2.1.gitmodules用法5.2.2纯本地用法5.2.3gitsubmoduleinit5.2.4gitclone子分支不是最新(有的是有的不是、配置没指定)检查子模块状态更新子模块重新初始化子模块清理和重新克隆检查SSH密钥和权限使用最新版本的Gitgitclone指定分支一、Git介绍1.2Git使用教程1.3Git查看和设置用户名和邮箱二、G
- Git Submodule的使用指南
一、GitSubmodule核心概念作用:将外部Git仓库作为子模块嵌入主项目,保持独立版本控制。关键文件:.gitmodules:记录子模块路径与远程URL(首次添加时自动生成)。.git/config:本地子模块配置信息(通过gitsubmoduleinit同步)。指针机制:主仓库仅记录子模块的CommitID,不跟踪其文件变化。二、分步操作详解1.添加子模块#语法gitsubmodulead
- Docker后端部署
cui_hao_nan
后端技术总结docker容器运维
1、构建Docker容器首先编写Dockerfile,将后端项目打包为Docker容器镜像。Dockerfile是一个文本配置文件,包含一系列指令,用干自动化构建Docker容器镜像。我们需要在Dockerfile中定义:基础环境(比如预装JDK的Linux系统)有哪些原始文件?(比如项目源代码)如何构建项目?(比如mavenpackage命令打包)如何启动项目?(比如java-jar命令).2、
- Git 子模块 (Submodule) 完全使用指南
BIBI2049
版本托管GitWindowsgitTortoiseGit子模块
Git子模块(Submodule)完全使用指南核心原理解析:子模块是什么?想象一下,你在开发一个大项目(父项目),需要用到另一个独立的项目(例如一个公共库、一个UI组件库)。你不想直接复制粘贴它的代码,因为那样就无法方便地获取那个库的后续更新。Git子模块就是来解决这个问题的。它允许你将一个Git仓库作为另一个Git仓库的子目录。最重要的核心原理:父项目不存储子模块的所有文件内容。它只存储一个“指
- 高压电缆护层安全的智能防线:TLKS-PLGD 监控设备深度解析
李子圆圆
安全
在现代电力系统庞大复杂的网络中,高压电缆护层是守护电力传输的"隐形铠甲",其安全直接影响电网稳定。传统监测手段响应慢、精度低,难以满足安全运维需求。TLKS-PLGD高压电缆护层环流监控设备应运而生,提供智能化解决方案。智能监测:全方位守护TLKS-PLGD专为高压电缆护层安全研发,融合实时监测、智能预警、远程管控技术,构建高精度监控体系。其功能强大:能实时监测接地电流,捕捉细微波动预判隐患;支持
- 网络与磁盘:Java架构师必知的系统“血管”和“仓库”
网络与磁盘:Java架构师必知的系统“血管”和“仓库”作为Java架构师,网络和磁盘是系统数据流动的“血管”与“仓库”。网络决定数据传输的快慢,磁盘影响数据存储的效率,直接关系系统性能和用户体验。一、网络:数据传输的“高速公路”以下是网络相关关键指标的整理表格:网络指标详细说明对Java架构的影响与实践建议万兆带宽实际速度万兆带宽(单位为bit),实际下载/上传速度为1250MB/s(因1字节=8
- 深入剖析F5、DNS、LVS、Nginx、Tomcat:Java架构师的流量分发指南(一)
呢喃coding
系统架构设计javalvsnginx
深入剖析F5、DNS、LVS、Nginx、Tomcat:Java架构师的流量分发指南在Java架构设计中,流量分发是保障系统高性能、高可用的关键环节。F5、DNS、LVS、Nginx和Tomcat在流量分发处理中各自扮演着独特的角色,深入理解它们对于Java架构师来说至关重要。一、F5:企业级的应用交付利器(一)功能与特性F5是一款企业级的应用交付网络(ADN)设备,它集负载均衡、应用安全、SSL
- 电商架构浅析
快乐非自愿
架构大数据
前言什么是电商,电商有哪些分类,以及一个完整的电商平台应该由哪些模块组成?本文将围绕电商平台系统的整体架构展开分析。一、简介1.什么是电商简单说就是通过网络进行的商务活动。以前的人都是通过现金进行交易,就是所谓的一手交钱、一手交货。而电商,则是通过通过网上商城、物流配送、线上资金结算等过程来完成交易。本质就是买卖双方围绕线上商品进行交易履约的过程。2.电商分类二、业务流程分析目前的电商的种类很多,
- C#配置全面详解:从传统方式到现代配置系统
阿蒙Armon
C#工作中的应用c#网络数据库
C#配置全面详解:从传统方式到现代配置系统在软件开发中,配置是指应用程序运行时可调整的参数集合,如数据库连接字符串、API地址、日志级别等。将这些参数从代码中分离出来,便于在不修改代码的情况下调整应用行为。C#提供了多种配置管理方式,从传统的XML配置文件到现代的多源配置系统,每种方式都有其适用场景。本文将全面介绍C#中的配置技术,帮助开发者根据项目需求选择合适的配置方案。一、配置基础与核心概念1
- C#指针:解锁内存操作的底层密码
C#指针:解锁内存操作的底层密码在C#的世界里,我们习惯了托管代码带来的安全与便捷——垃圾回收器自动管理内存,类型系统严格检查数据操作,就像在精心维护的花园中漫步,无需担心杂草与荆棘。但当性能成为关键瓶颈,或是需要与非托管代码交互时,我们就需要一把能劈开藩篱的利刃——C#指针。它允许开发者直接操作内存地址,如同在荒野中开辟道路,充满挑战却也暗藏高效的可能。一、什么是C#指针?指针是一个变量,其值为
- curl --resolve
雨声不在
curl
curl--resolve是一个用于在发起HTTP请求时,临时修改域名解析的选项。它允许你指定某个域名解析到某个特定的IP地址,而不使用系统默认的DNS解析结果。这个选项在测试、调试或者绕过某些DNS问题时非常有用。基本语法:curl--resolvehost:port:address:指定要修改解析的域名、端口和对应的IP地址。URL:请求的目标URL。作用:当你使用curl--resolve时
- Spring Cloud Config(微服务配置中心详解)
白仑色
Spring系列微服务微服务架构配置中心SpringCloud
关键词:SpringCloudConfig、配置中心、远程仓库、动态刷新、加密解密✅摘要在微服务架构中,随着服务数量的增加,统一管理各服务的配置信息变得尤为重要。传统的本地配置文件方式难以满足多环境、多实例、集中化的需求。SpringCloudConfig是SpringCloud提供的一个分布式配置中心解决方案,支持将配置信息集中存储在Git、SVN或本地文件系统中,并提供给各个微服务动态获取和更
- win10 git ssh key 配置后仍然无法连接
问题描述:win10通过ssh-keygen命令生成id_rsakey,并将id_rsa.pub中的key配置到git服务器上,但是gitclone时仍然报错:permissiondenied修改:默认是rsa算法,配置成ed25519算法,生成id_ed25519文件ssh-keygen-ted25519-C"
[email protected]"原因:暂未查明,推测是安装的git版本太新,与服务器端
- Java技术栈/面试题合集(16)-SpringCloud篇
霸道流氓气质
Java进阶JavaSpringCloud微服务面试
场景Java入门、进阶、强化、扩展、知识体系完善等知识点学习、性能优化、源码分析专栏分享:Java入门、进阶、强化、扩展、知识体系完善等知识点学习、性能优化、源码分析专栏分享_java高级进阶-CSDN博客通过对面试题进行系统的复习可以对Java体系的知识点进行查漏补缺。注:博客:霸道流氓气质-CSDN博客实现什么是SpringCloud?一、SpringCloud的核心定位1.定义SpringC
- ubuntu20.04自建代码托管平台-Gitlab
HuangFJ-
VMware虚拟机ubuntulinux服务器git
介绍由于gitlab需要在linux操作系统部署,因此这篇文章涉及以下关键点1.虚拟机VMware安装ubuntu2.ubuntu修改下载源问题3.openssh、vim、net-tools等插件下载4.ubuntu下载gitlab免费版:5.gitlab相关命令6.使用浏览器访问gitlab7.初始密码/修改密码8.如何新增用户并发送邮件环境ubuntu-20.04.1-desktop-amd6
- 鸿蒙分布式开发实战指南:让设备协同像操作本地一样简单
harmonyos
摘要在如今设备高度互联的时代,一个用户往往会同时使用手机、平板、电视、手表等多个设备。鸿蒙系统基于“分布式能力”,让多个设备协同工作变得更简单,比如手机控制电视播放、手表调节空调,甚至多设备之间自动分工协作。这篇文章就带你从开发者角度出发,手把手了解鸿蒙分布式能力的实现方式。引言:为什么要用鸿蒙的分布式能力?随着物联网的发展,单设备运行逻辑已经难以满足日常复杂场景。鸿蒙系统设计了独特的分布式架构,
- 全球86%企业已启程:SNP零中断迁移方案护航S/4HANA转型
snpgroupcn
云计算数据仓库运维
目录如何在RISE项目中取得成功全程赋能:SNP为RISE项目打造的六大核心优势1、更快实现价值2、更高的灵活性3、降低成本4、风险可控5、更高的用户接受度3、近乎零中断客户评价实践见证:全球领先企业的成功典范1、IBM2、Pfizer辉瑞3、Coop超越迁移:构建数据驱动型业务的未来在SNP,我们已成功指导数百家企业完成复杂的SAP系统迁移项目。这些经验已融入我们的软件和转型方法论,使您的迁移之
- JAVA中的Enum
周凡杨
javaenum枚举
Enum是计算机编程语言中的一种数据类型---枚举类型。 在实际问题中,有些变量的取值被限定在一个有限的范围内。 例如,一个星期内只有七天 我们通常这样实现上面的定义:
public String monday;
public String tuesday;
public String wensday;
public String thursday
- 赶集网mysql开发36条军规
Bill_chen
mysql业务架构设计mysql调优mysql性能优化
(一)核心军规 (1)不在数据库做运算 cpu计算务必移至业务层; (2)控制单表数据量 int型不超过1000w,含char则不超过500w; 合理分表; 限制单库表数量在300以内; (3)控制列数量 字段少而精,字段数建议在20以内
- Shell test命令
daizj
shell字符串test数字文件比较
Shell test命令
Shell中的 test 命令用于检查某个条件是否成立,它可以进行数值、字符和文件三个方面的测试。 数值测试 参数 说明 -eq 等于则为真 -ne 不等于则为真 -gt 大于则为真 -ge 大于等于则为真 -lt 小于则为真 -le 小于等于则为真
实例演示:
num1=100
num2=100if test $[num1]
- XFire框架实现WebService(二)
周凡杨
javawebservice
有了XFire框架实现WebService(一),就可以继续开发WebService的简单应用。
Webservice的服务端(WEB工程):
两个java bean类:
Course.java
package cn.com.bean;
public class Course {
private
- 重绘之画图板
朱辉辉33
画图板
上次博客讲的五子棋重绘比较简单,因为只要在重写系统重绘方法paint()时加入棋盘和棋子的绘制。这次我想说说画图板的重绘。
画图板重绘难在需要重绘的类型很多,比如说里面有矩形,园,直线之类的,所以我们要想办法将里面的图形加入一个队列中,这样在重绘时就
- Java的IO流
西蜀石兰
java
刚学Java的IO流时,被各种inputStream流弄的很迷糊,看老罗视频时说想象成插在文件上的一根管道,当初听时觉得自己很明白,可到自己用时,有不知道怎么代码了。。。
每当遇到这种问题时,我习惯性的从头开始理逻辑,会问自己一些很简单的问题,把这些简单的问题想明白了,再看代码时才不会迷糊。
IO流作用是什么?
答:实现对文件的读写,这里的文件是广义的;
Java如何实现程序到文件
- No matching PlatformTransactionManager bean found for qualifier 'add' - neither
林鹤霄
java.lang.IllegalStateException: No matching PlatformTransactionManager bean found for qualifier 'add' - neither qualifier match nor bean name match!
网上找了好多的资料没能解决,后来发现:项目中使用的是xml配置的方式配置事务,但是
- Row size too large (> 8126). Changing some columns to TEXT or BLOB
aigo
column
原文:http://stackoverflow.com/questions/15585602/change-limit-for-mysql-row-size-too-large
异常信息:
Row size too large (> 8126). Changing some columns to TEXT or BLOB or using ROW_FORMAT=DYNAM
- JS 格式化时间
alxw4616
JavaScript
/**
* 格式化时间 2013/6/13 by 半仙
[email protected]
* 需要 pad 函数
* 接收可用的时间值.
* 返回替换时间占位符后的字符串
*
* 时间占位符:年 Y 月 M 日 D 小时 h 分 m 秒 s 重复次数表示占位数
* 如 YYYY 4占4位 YY 占2位<p></p>
* MM DD hh mm
- 队列中数据的移除问题
百合不是茶
队列移除
队列的移除一般都是使用的remov();都可以移除的,但是在昨天做线程移除的时候出现了点问题,没有将遍历出来的全部移除, 代码如下;
//
package com.Thread0715.com;
import java.util.ArrayList;
public class Threa
- Runnable接口使用实例
bijian1013
javathreadRunnablejava多线程
Runnable接口
a. 该接口只有一个方法:public void run();
b. 实现该接口的类必须覆盖该run方法
c. 实现了Runnable接口的类并不具有任何天
- oracle里的extend详解
bijian1013
oracle数据库extend
扩展已知的数组空间,例:
DECLARE
TYPE CourseList IS TABLE OF VARCHAR2(10);
courses CourseList;
BEGIN
-- 初始化数组元素,大小为3
courses := CourseList('Biol 4412 ', 'Psyc 3112 ', 'Anth 3001 ');
--
- 【httpclient】httpclient发送表单POST请求
bit1129
httpclient
浏览器Form Post请求
浏览器可以通过提交表单的方式向服务器发起POST请求,这种形式的POST请求不同于一般的POST请求
1. 一般的POST请求,将请求数据放置于请求体中,服务器端以二进制流的方式读取数据,HttpServletRequest.getInputStream()。这种方式的请求可以处理任意数据形式的POST请求,比如请求数据是字符串或者是二进制数据
2. Form
- 【Hive十三】Hive读写Avro格式的数据
bit1129
hive
1. 原始数据
hive> select * from word;
OK
1 MSN
10 QQ
100 Gtalk
1000 Skype
2. 创建avro格式的数据表
hive> CREATE TABLE avro_table(age INT, name STRING)STORE
- nginx+lua+redis自动识别封解禁频繁访问IP
ronin47
在站点遇到攻击且无明显攻击特征,造成站点访问慢,nginx不断返回502等错误时,可利用nginx+lua+redis实现在指定的时间段 内,若单IP的请求量达到指定的数量后对该IP进行封禁,nginx返回403禁止访问。利用redis的expire命令设置封禁IP的过期时间达到在 指定的封禁时间后实行自动解封的目的。
一、安装环境:
CentOS x64 release 6.4(Fin
- java-二叉树的遍历-先序、中序、后序(递归和非递归)、层次遍历
bylijinnan
java
import java.util.LinkedList;
import java.util.List;
import java.util.Stack;
public class BinTreeTraverse {
//private int[] array={ 1, 2, 3, 4, 5, 6, 7, 8, 9 };
private int[] array={ 10,6,
- Spring源码学习-XML 配置方式的IoC容器启动过程分析
bylijinnan
javaspringIOC
以FileSystemXmlApplicationContext为例,把Spring IoC容器的初始化流程走一遍:
ApplicationContext context = new FileSystemXmlApplicationContext
("C:/Users/ZARA/workspace/HelloSpring/src/Beans.xml&q
- [科研与项目]民营企业请慎重参与军事科技工程
comsci
企业
军事科研工程和项目 并非要用最先进,最时髦的技术,而是要做到“万无一失”
而民营科技企业在搞科技创新工程的时候,往往考虑的是技术的先进性,而对先进技术带来的风险考虑得不够,在今天提倡军民融合发展的大环境下,这种“万无一失”和“时髦性”的矛盾会日益凸显。。。。。。所以请大家在参与任何重大的军事和政府项目之前,对
- spring 定时器-两种方式
cuityang
springquartz定时器
方式一:
间隔一定时间 运行
<bean id="updateSessionIdTask" class="com.yang.iprms.common.UpdateSessionTask" autowire="byName" />
<bean id="updateSessionIdSchedule
- 简述一下关于BroadView站点的相关设计
damoqiongqiu
view
终于弄上线了,累趴,戳这里http://www.broadview.com.cn
简述一下相关的技术点
前端:jQuery+BootStrap3.2+HandleBars,全站Ajax(貌似对SEO的影响很大啊!怎么破?),用Grunt对全部JS做了压缩处理,对部分JS和CSS做了合并(模块间存在很多依赖,全部合并比较繁琐,待完善)。
后端:U
- 运维 PHP问题汇总
dcj3sjt126com
windows2003
1、Dede(织梦)发表文章时,内容自动添加关键字显示空白页
解决方法:
后台>系统>系统基本参数>核心设置>关键字替换(是/否),这里选择“是”。
后台>系统>系统基本参数>其他选项>自动提取关键字,这里选择“是”。
2、解决PHP168超级管理员上传图片提示你的空间不足
网站是用PHP168做的,反映使用管理员在后台无法
- mac 下 安装php扩展 - mcrypt
dcj3sjt126com
PHP
MCrypt是一个功能强大的加密算法扩展库,它包括有22种算法,phpMyAdmin依赖这个PHP扩展,具体如下:
下载并解压libmcrypt-2.5.8.tar.gz。
在终端执行如下命令: tar zxvf libmcrypt-2.5.8.tar.gz cd libmcrypt-2.5.8/ ./configure --disable-posix-threads --
- MongoDB更新文档 [四]
eksliang
mongodbMongodb更新文档
MongoDB更新文档
转载请出自出处:http://eksliang.iteye.com/blog/2174104
MongoDB对文档的CURD,前面的博客简单介绍了,但是对文档更新篇幅比较大,所以这里单独拿出来。
语法结构如下:
db.collection.update( criteria, objNew, upsert, multi)
参数含义 参数
- Linux下的解压,移除,复制,查看tomcat命令
y806839048
tomcat
重复myeclipse生成webservice有问题删除以前的,干净
1、先切换到:cd usr/local/tomcat5/logs
2、tail -f catalina.out
3、这样运行时就可以实时查看运行日志了
Ctrl+c 是退出tail命令。
有问题不明的先注掉
cp /opt/tomcat-6.0.44/webapps/g
- Spring之使用事务缘由(3-XML实现)
ihuning
spring
用事务通知声明式地管理事务
事务管理是一种横切关注点。为了在 Spring 2.x 中启用声明式事务管理,可以通过 tx Schema 中定义的 <tx:advice> 元素声明事务通知,为此必须事先将这个 Schema 定义添加到 <beans> 根元素中去。声明了事务通知后,就需要将它与切入点关联起来。由于事务通知是在 <aop:
- GCD使用经验与技巧浅谈
啸笑天
GC
前言
GCD(Grand Central Dispatch)可以说是Mac、iOS开发中的一大“利器”,本文就总结一些有关使用GCD的经验与技巧。
dispatch_once_t必须是全局或static变量
这一条算是“老生常谈”了,但我认为还是有必要强调一次,毕竟非全局或非static的dispatch_once_t变量在使用时会导致非常不好排查的bug,正确的如下: 1
- linux(Ubuntu)下常用命令备忘录1
macroli
linux工作ubuntu
在使用下面的命令是可以通过--help来获取更多的信息1,查询当前目录文件列表:ls
ls命令默认状态下将按首字母升序列出你当前文件夹下面的所有内容,但这样直接运行所得到的信息也是比较少的,通常它可以结合以下这些参数运行以查询更多的信息:
ls / 显示/.下的所有文件和目录
ls -l 给出文件或者文件夹的详细信息
ls -a 显示所有文件,包括隐藏文
- nodejs同步操作mysql
qiaolevip
学习永无止境每天进步一点点mysqlnodejs
// db-util.js
var mysql = require('mysql');
var pool = mysql.createPool({
connectionLimit : 10,
host: 'localhost',
user: 'root',
password: '',
database: 'test',
port: 3306
});
- 一起学Hive系列文章
superlxw1234
hiveHive入门
[一起学Hive]系列文章 目录贴,入门Hive,持续更新中。
[一起学Hive]之一—Hive概述,Hive是什么
[一起学Hive]之二—Hive函数大全-完整版
[一起学Hive]之三—Hive中的数据库(Database)和表(Table)
[一起学Hive]之四-Hive的安装配置
[一起学Hive]之五-Hive的视图和分区
[一起学Hive
- Spring开发利器:Spring Tool Suite 3.7.0 发布
wiselyman
spring
Spring Tool Suite(简称STS)是基于Eclipse,专门针对Spring开发者提供大量的便捷功能的优秀开发工具。
在3.7.0版本主要做了如下的更新:
将eclipse版本更新至Eclipse Mars 4.5 GA
Spring Boot(JavaEE开发的颠覆者集大成者,推荐大家学习)的配置语言YAML编辑器的支持(包含自动提示,