SpringSecurity
SrpingSecurity
-
- SrpingSecurity简介
- SpringSecurity入门
-
- 依赖分析
- 实现类~~
- 密码解析器接口
- SpringSecurity整合数据库
- 自定登陆页面
- API详解
-
- 访问控制API
- 权限控制API
- 基于表达式的访问控制
- 基于注解的访问控制
-
- @PreAuthorize
- @PostAuthorize
- @PreFilter
- @PostFilter
- @Secure
- @RolesAllowed
- Remember Me功能实现
- Thymeleaf的使用
- SpringSecurity的退出机制
-
- 自定义退出配置
- 登陆保护
- logout其他的API
- CSRF~跨站请求伪造
- Spring Security中CSRF
SrpingSecurity简介

Spring Security是一个高度自定义的安全框架。利用Spring IoC/DI和AOP功能,为系统提供了声明式安全访问控制功能,减少了为系统安全而编写大量重复代码的工作。
- Spring Boot配置不多,但它做了很多。功能摘要如下:
要求经过身份验证的用户才能与应用程序进行任何交互
1,生成默认登录表单
让用户名和密码记录到控制台的用户使用基于表单的身份验证进行身份验证
2,使用 BCrypt 保护密码存储
3,允许用户注销
4,CSRF 攻击预防
5,会话固定保护
6,安全标头集成
7,HTTP 严格传输安全,用于安全请求
8,X-内容-类型-选项集成
9,缓存控制(以后可由应用程序覆盖,以允许缓存静态资源)
10,X-XSS-保护集成
11,X 帧选项集成,有助于防止点击劫持
SpringSecurity入门
新建一个项目,引入依赖
<dependency>
    <groupId>org.springframework.bootgroupId>
    <artifactId>spring-boot-starter-securityartifactId>
    <version>2.6.4version>
dependency>
<dependency>
        <groupId>org.springframework.bootgroupId>
        <artifactId>spring-boot-starter-webartifactId>
        <version>2.6.4version>

    dependency>
编写启动类后运行

导入spring-boot-starter-security启动器后,Spring Security已经生效,默认拦截全部请求,如果用户没有登录,跳转到内置登录页面。
而这个页面并没有特别指定的情况下会跳转到spring默认的登录页 index.html;
账号默认为 user,
密码为随机生成的~12db20a8-2db3-4971-b351-98ac058d0892
![]()
Spring Security为身份验证提供全面的支持。身份验证是验证尝试访问特定资源的人的身份的方式。对用户进行身份验证的常用方法是要求用户输入用户名和密码。执行身份验证后,才得可以正常访问servlet

因为什么也没有配置,所以就这样喽!
依赖分析

现实情况是账号密码是持久化到服务器中的,而不是登陆时随机生成的,所以我们奥通过自定义逻辑来实现控制登录的目的;
- 使用UserDetails接口来实现自定义登录校验
public interface UserDetailsService {
	UserDetails loadUserByUsername(String username) throws UsernameNotFoundException;
//这里的username 就是前端获取到的用户名,之后去服务器中查(代码省略)
}
实现类~~

package com.gavin.Security;

import org.springframework.security.core.GrantedAuthority;
import org.springframework.security.core.authority.AuthorityUtils;
import org.springframework.security.core.userdetails.User;
import org.springframework.security.core.userdetails.UserDetails;
import org.springframework.security.core.userdetails.UserDetailsService;
import org.springframework.security.core.userdetails.UsernameNotFoundException;
import org.springframework.stereotype.Service;

import java.util.Collection;
@Service
public class UserService implements UserDetailsService {
String name="admin";
String pwd="1234";
    @Override
    public UserDetails loadUserByUsername(String username) throws UsernameNotFoundException {
        if(!name.equals(username)){
            throw new UsernameNotFoundException("用户或密码错误");
        }
        return new User(username, pwd, AuthorityUtils.commaSeparatedStringToAuthorityList("admin1.admin2"));
    }
}
这里的参数名必须为username,否则前端在匹配的时候会匹配失败

就当我以为就这…的时候~后台报错了!!!
说什么没有密码解析器.密码解析器是什么?
![]()
密码解析器要求我们的密码必须经过加密,铭文的密码是不安全的;那怎么添加密码解析器呢?
密码解析器接口
package org.springframework.security.crypto.password;

public interface PasswordEncoder {
    String encode(CharSequence rawPassword);

    boolean matches(CharSequence rawPassword, String encodedPassword);

    default boolean upgradeEncoding(String encodedPassword) {
        return false;
    }
}
是一个接口,找他的实现类~
有很多实现的类,

利用实现类来完成对密码的加密传输
    @Override
    public UserDetails loadUserByUsername(String username) throws UsernameNotFoundException {
        if(!name.equals(username)){
            throw new UsernameNotFoundException("用户或密码错误");
        }

        PasswordEncoder passwordEncoder = new SCryptPasswordEncoder();
        String encode = passwordEncoder.encode(password);
        return new User(username, encode, AuthorityUtils.commaSeparatedStringToAuthorityList("admin1.admin2"));
    }
好奇~
这些加密方法加密后得到了什么样的字符串?
首先一起来看一下加密的类~
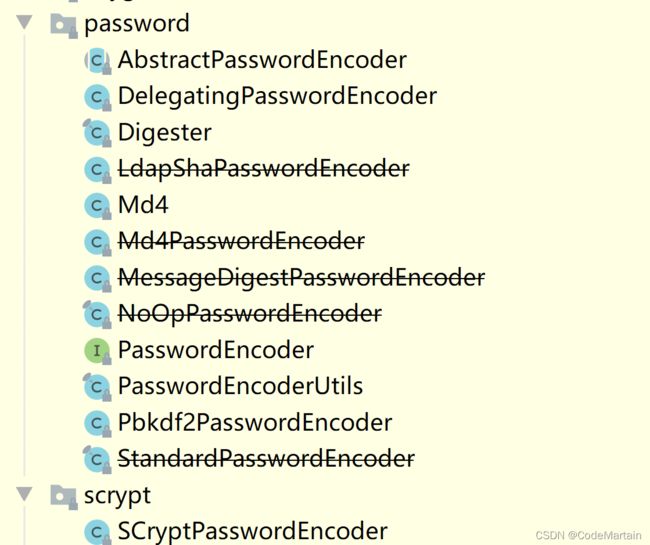
划线的已经被废弃,暂时不看;
随机技术的发展,密码存储的最佳做法也将再次发生更改。那么随之带来的问题将如何解决?
package JustTest;

import com.gavin.CodemsecurityApplication;
import org.apache.tomcat.util.security.MD5Encoder;
import org.junit.jupiter.api.Test;
import org.springframework.boot.test.context.SpringBootTest;
import org.springframework.security.crypto.argon2.Argon2PasswordEncoder;
import org.springframework.security.crypto.bcrypt.BCryptPasswordEncoder;
import org.springframework.security.crypto.password.*;
import org.springframework.security.crypto.scrypt.SCryptPasswordEncoder;
import sun.security.provider.MD4;

import java.util.HashMap;
import java.util.Map;

@SpringBootTest(classes = CodemsecurityApplication.class)
public class securityTest {

    @Test
    void SafeTest(){
String idforNode="noop";

        Map<String,PasswordEncoder> encoders = new HashMap<>();
        encoders.put( "bcrypt",new BCryptPasswordEncoder());
      encoders.put("noop", NoOpPasswordEncoder.getInstance());
        encoders.put("pbkdf2", new Pbkdf2PasswordEncoder());
        encoders.put("scrypt", new SCryptPasswordEncoder());
        encoders.put("argon",new Argon2PasswordEncoder());

        encoders.put("sha256", new StandardPasswordEncoder());//被废弃


        PasswordEncoder passwordEncoder = new DelegatingPasswordEncoder(idforNode, encoders);
        String password="1234";
        String encode = passwordEncoder.encode(password);

        System.out.println(encode);

    }

}
DelegatingPasswordEncoder适用于根据前缀委托给另一个 PasswordEncoder 标识符。
即可以灵活选用加密规则;
“idforNode”是一个标识符,用于查找哪个 PasswordEncoder应该被使用,并且“encodedPassword”是所选的原始编码密码 PasswordEncoder.的idforNode必须在密码的开头,以 “{}”包裹。 如果找不到“idforNode”,则“idforNode”将报noclassdefond。
#加密案例  1234  加密规则bcrypt
{bcrypt}$2a$10$ObObkTa6dToEriDUccdVIO9Z5TL3QrFrnVr45.eOm/DMo6MzLhRlm
提取密码加密器为配置类,以便spring完成aop注入
@Configuration
public class EncodeConfig {
    @Bean
    protected PasswordEncoder passwordEncoder() {

        Map<String, PasswordEncoder> encoders = new HashMap<>();

        encoders.put("bcrypt", new BCryptPasswordEncoder());
        encoders.put("noop", NoOpPasswordEncoder.getInstance());
        encoders.put("pbkdf2", new Pbkdf2PasswordEncoder());
        encoders.put("scrypt", new SCryptPasswordEncoder());
        encoders.put("argon", new Argon2PasswordEncoder());

        encoders.put("sha256", new StandardPasswordEncoder());//被废弃

        String idforNode = "bcrypt";
        PasswordEncoder passwordEncoder = new DelegatingPasswordEncoder(idforNode, encoders);
        return passwordEncoder;
    }

}
测试代码~
  @Test
    void TestDemo2() {

        String password = "密码";
        String encode = passwordEncoder.encode(password);
        System.out.println(encode);
        System.out.println("能正常解码吗?---"+passwordEncoder.matches(password,encode));
    }
通过password工厂类来轻松创建一个密码解析器;
PasswordEncoderFactories 源码
public final class PasswordEncoderFactories {
    private PasswordEncoderFactories() {
    }

    public static PasswordEncoder createDelegatingPasswordEncoder() {
        String encodingId = "bcrypt";
        Map<String, PasswordEncoder> encoders = new HashMap();
        encoders.put(encodingId, new BCryptPasswordEncoder());
        encoders.put("ldap", new LdapShaPasswordEncoder());
        encoders.put("MD4", new Md4PasswordEncoder());
        encoders.put("MD5", new MessageDigestPasswordEncoder("MD5"));
        encoders.put("noop", NoOpPasswordEncoder.getInstance());
        encoders.put("pbkdf2", new Pbkdf2PasswordEncoder());
        encoders.put("scrypt", new SCryptPasswordEncoder());
        encoders.put("SHA-1", new MessageDigestPasswordEncoder("SHA-1"));
        encoders.put("SHA-256", new MessageDigestPasswordEncoder("SHA-256"));
        encoders.put("sha256", new StandardPasswordEncoder());
        encoders.put("argon2", new Argon2PasswordEncoder());
        return new DelegatingPasswordEncoder(encodingId, encoders);
    }
}
测试代码~
//        String encodingId = "bcrypt";//默认的是这个
        PasswordEncoder delegatingPasswordEncoder = PasswordEncoderFactories.createDelegatingPasswordEncoder();
        String encode = delegatingPasswordEncoder.encode(password);
        System.out.println(encode);
BCryptPasswordEncoder是Spring Security官方推荐的密码解析器,平时多使用这个解析器。
BCryptPasswordEncoder是对bcrypt强散列方法的具体实现。是基于Hash算法实现的单向加密。可以通过strength控制加密强度,默认10.
SpringSecurity整合数据库
配置类~
@Configuration
public class EncodeConfig {
    @Bean
    protected PasswordEncoder passwordEncoder() {
        PasswordEncoder passwordEncoder = PasswordEncoderFactories.createDelegatingPasswordEncoder();
        return passwordEncoder;
    }

}
服务类~
/**
 * @author Gavin
 */
@Service
public class UserServiceImpl implements UserDetailsService {

    @Autowired
    private UserMapper userMapper;

    @Override
    public UserDetails loadUserByUsername(String username) throws UsernameNotFoundException {
        com.gavin.pojo.User user = userMapper.SelectUserByName(username);
        if (null == user) {
            throw new UsernameNotFoundException("用户或密码错误");
        } else if (!user.getBeizhu().equals("admin")) {
            throw new UsernameNotFoundException("非法用户,请联系管理员");
        }

        return new User(username, user.getPwd(), AuthorityUtils.commaSeparatedStringToAuthorityList("admin1.admin2"));
    }
}
测试代码与数据库链接部分略

配置类中也可以直接指定用户管理员
@Bean
UserDetailsManager users(DataSource dataSource) {
	UserDetails user = User.builder()
		.username("user")
		.password("{bcrypt}$2a$10$GRLdNijSQMUvl/au9ofL.eDwmoohzzS7.rmNSJZ.0FxO/BTk76klW")
		.roles("USER")
		.build();
	UserDetails admin = User.builder()
		.username("admin")
		.password("{bcrypt}$2a$10$GRLdNijSQMUvl/au9ofL.eDwmoohzzS7.rmNSJZ.0FxO/BTk76klW")
		.roles("USER", "ADMIN")
		.build();
	JdbcUserDetailsManager users = new JdbcUserDetailsManager(dataSource);
	users.createUser(user);
	users.createUser(admin);
	return users;
}
自定登陆页面

1,用户向未授权的资源发出未经身份验证的请求;
2,没有认证则拒绝登录并抛出异常~AccessDeniedException
3,启动身份验证
4,重定向到登录页
5,提交用户名和密码后,将对用户名和密码进行身份验证;
6,当用户提交其用户名和密码时,通过从 中提取用户名和密码来创建一种身份验证类型;
7,验证成功则可以访问否则仍需要验证;
默认情况下,Spring 安全表单登录处于启用状态。但是,一旦提供了任何基于 servlet 的配置,就必须显式提供基于表单的登录;
即需要配置java配置类~config
该配置类需要继承WebSecurityConfigurerAdapter,并覆写configure方法;
@Configuration
public class MySecurityConfig extends WebSecurityConfigurerAdapter {

    @Override
    protected void configure(HttpSecurity http) throws Exception {
        /**
         * formLogin() 表单认证
         */
        http.formLogin().loginProcessingUrl("/login");
//        UserDetailsService......
    super.configure(http);
    }
}
- 关于自定义 HTML 表单,有几个关键点:
1,表单应执行 post/login
2,该表格需要包括一个CSRF令牌,该令牌由Thymeleaf自动包含。
3,表单user名为username
4,表单password名为password
5,如果发现 HTTP 参数错误,则表示用户未能提供有效的用户名/密码
6,如果找到 HTTP 参数注销,则表示用户已成功注销
DOCTYPE html>
<html lang="en">
<head>
    <meta charset="UTF-8">
    <title>表单提交title>
head>
<body>
<form action="/login" method="post">
    <input type="text" name="username"/>
    <input type="password" name="password"/>
    <input type="submit" value="提交"/>
form>

body>
html>
配置类~
package com.gavin.config;

import org.springframework.context.annotation.Bean;
import org.springframework.context.annotation.Configuration;
import org.springframework.security.config.annotation.web.builders.HttpSecurity;
import org.springframework.security.config.annotation.web.configuration.WebSecurityConfigurerAdapter;
import org.springframework.security.crypto.factory.PasswordEncoderFactories;
import org.springframework.security.crypto.password.PasswordEncoder;


@Configuration
public class MyConfig extends WebSecurityConfigurerAdapter {
    @Override
    protected void configure(HttpSecurity http) throws Exception {
        //formLogin配置段,用于配置登录验证逻辑相关的信息。如:登录页面、登录成功页面、登录请求处理路径等。
        http.csrf().disable()//禁用跨站伪造攻击

                /*用户未登录时请求任何资源都要跳转到login.html*/
                .formLogin().loginPage("/login.html")

                /*登录表单的action地址~ 用户提交表单之后会先走这里进行权限验证,如果成功则跳转到相应页面*/
                .loginProcessingUrl("/login")

                /*登陆表单的的用户输入框的id名,默认为username,这里可以指定其他的名字*/
                .usernameParameter("username")
                /*同uername一样*/
                .passwordParameter("password")

                /*登录成功后默认跳转的路径*/
                .defaultSuccessUrl("/showMain")

                .failureForwardUrl("/showFail")
                .loginPage("/fail.html")
                .and()/*添加权限认证*/
                //authorizeRequests配置端,用于配置资源的访问权限。如:开发登录页面的permitAll开放访问
                /*不需要认证的资源放行*/
                .authorizeHttpRequests().antMatchers("/login.html", "/login").permitAll()

                .antMatchers("/fail.html", "/fail").permitAll()
                .anyRequest().authenticated();


    }
    //返回密码解析器

    @Bean
    public PasswordEncoder getPassWordEncoder() {
        return PasswordEncoderFactories.createDelegatingPasswordEncoder();
    }

}
controller~
@Controller
public class Mycontroller {


    @RequestMapping("/showLogin")
    public String ShowLogin(){

        return "login";
    }


    @RequestMapping("/showMain")
    public String ShowMain(){
        return "main";
    }


    @RequestMapping("/showFail")
    public String ShowFail(){
        return "fail";
    }
}
有时候因为访问慢的原因,可以将用户信息做一下缓存,
小结~数据库权限认证操作关键步骤
- 配置类
1,配置密码解析器 passwordEncoder
2,自定义表单的登录页要继承WebSecurityConfigurerAdapter,闭关重写configure(HttpSecurity http) 方法,该方法中指明登录请求是登录页的servletname或者请求地址包含登录页的关键字----即与登录页有关
3,验证用户通过实现UserDetailsService覆写loadUserByUsername(String username)方法来验证用户身份
Spring Security的Servlet支持基于Servlet 的过滤链
spring官网给出的模型~
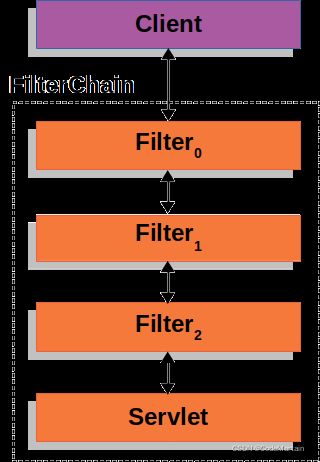
客户端向应用程序发送请求,容器创建一个包含 s 的请求,该请求应根据请求 URI 的路径处理 。
public void doFilter(ServletRequest request, ServletResponse response, FilterChain chain) {
	// do something before the rest of the application
    chain.doFilter(request, response); // invoke the rest of the application
    // do something after the rest of the application
}
当我们有静态资源时,需要放行,但是如果没有配置也会被拦截
//    静态资源放行
    @Override
    public void configure(WebSecurity web) throws Exception {
        web.ignoring().antMatchers("/config/**","/static/**","/img/**");
    }
还有别的放行方法~—见API详解
API详解
访问控制API
- 1.anyRequest()
表示匹配所有的请求。一般情况下此方法都会使用,设置全部内容都需要进行认证。
- 2.antMatcher()
方法定义如下:
public C antMatchers(String... antPatterns)
参数是不定参数,每个参数就是一个ant表达式,用于匹配URL规则。
规则如下:
? 匹配一个字符

* 匹配0个或多个字符

** 匹配0个或多个目录
在实际项目中经常需要放行所有静态资源
.antMatchers("/js/**").permitAll()
还有一种配置方式是只要是.js文件都放行
antMatchers("/**/*.js").permitAll()
- 3.regexMatchers()
使用正则表达式进行匹配。和antMatchers()主要的区别就是参数,antMatchers()参数是ant表达式,regexMatchers()参数是正则表达式。
演示所有以.js结尾的文件都被放行。
.regexMatchers(".+[.]js").permitAll()
- 4.permitAll()
permitAll()表示所匹配的URL任何人都允许访问。
-
5.authenticated()
authenticated()表示所匹配的URL都需要被认证才能访问。
-
6.anonymous()
anonymous()表示可以匿名访问匹配的URL。
-
7,denyAll()
denyAll()表示所匹配的URL都不允许被访问。
-
8.rememberMe()
被“remember me”的用户允许访问
-
9.fullyAuthenticated()
如果用户不是被remember me的,才可以访问。
就类似于微信朋友圈分组
当没有访问权限时浏览器会报403错误,对用户来讲不太友好,那么就需要将返回的错误信息包装一下;
实现AccessDeniedHandler接口
/**需要配置一下自定义AccessDenyHandler,
 * 配置类MyConfig中注入该Bean
 * @author Gavin
 */
@Component
public class MyAccessDenyHandler implements AccessDeniedHandler {
    @Override
    public void handle(HttpServletRequest request, HttpServletResponse response, AccessDeniedException accessDeniedException) throws IOException, ServletException {

        response.setContentType("application/json;charset=utf-8");
        PrintWriter out=response.getWriter();
        out.println("{\"status\":\"error\",\"msg\":\"权限不足,请联系管理员!\"}");
        out.flush();
        out.close();
    }
}
配置类中~
   @Autowired
   private MyAccessDenyHandler myAccessDenyHandler;
    @Override
    protected void configure(HttpSecurity http) throws Exception {
      .................略...................
.and()
 //403处理
.exceptionHandling()
//403处理模板
 .accessDeniedHandler(myAccessDenyHandler);

    }
现在的问题是怎么出现403~
访问/abc时要求有指定权限才可以访问;

指定权限,当有admin权限时可以访问/abc,当有vip权限时可以访问/efg
@Service
public class MyServiceImpl implements UserDetailsService {

    @Autowired
    private UserMapper userMapper;

    @Override
    public UserDetails loadUserByUsername(String username) throws UsernameNotFoundException {
        User user = userMapper.SelectUserByName(username);
        String privilege = "admin";
        if (null == user) {
            throw new UsernameNotFoundException("用户不存在,请重新登录");
        }
         if (privilege.equals(user.getBeizhu())) {

             return new org.springframework.security.core.userdetails.User(username, user.getPwd(), AuthorityUtils.commaSeparatedStringToAuthorityList("admin,user"));
        }

        return new org.springframework.security.core.userdetails.User(username, user.getPwd(), AuthorityUtils.commaSeparatedStringToAuthorityList("vip,user"));
    }

我们可以自己制作一给403页面


验证机制~

权限控制API
之前的权限控制是登录时就认定好的,在springsecurity中还支持其他的访问控制权限认证,这种方式一般用于用户被认证后判断用户是否具有特定的要求;
- 1.hasAuthority(String)
判断用户是否具有特定的权限,用户的权限是在自定义登录逻辑中创建User对象时指定的。
![]()
在配置类中通过hasAuthority(“admin”)设置具有admin权限时才能访问,hasAuthority(“vip”)设置具有vip的用户才能访问;
- 2.hasAnyAuthority(String …)
如果用户具备给定权限中某一个,就允许访问。
![]()
注意这里在设置权限的时候

通过注解来指定权限
- 3.@RoleAllowed
@RolesAllowed表示访问对应方法时所应该具有的角色
@Documented
@Retention (RUNTIME)
@Target({TYPE, METHOD})
public @interface RolesAllowed {
    /**
     * List of roles that are permitted access.
     */
    String[] value();
}
- 4.hasIpAddress(String)
如果请求是指定的IP就运行访问。
…演示略…
基于表达式的访问控制
基于表达式的访问控制
查看权限控制的API,底层都用到了access
源码~
public AuthorizationManagerRequestMatcherRegistry permitAll() {
			return access((a, o) -> new AuthorizationDecision(true));
		}

public AuthorizationManagerRequestMatcherRegistry denyAll() {
			return access((a, o) -> new AuthorizationDecision(false));
		}
access()方法源码
	public AuthorizationManagerRequestMatcherRegistry access(
				AuthorizationManager<RequestAuthorizationContext> manager) {
			Assert.notNull(manager, "manager cannot be null");
			return AuthorizeHttpRequestsConfigurer.this.addMapping(this.matchers, manager);
		}
参数要求~AuthorizationManager实例
.antMatchers("/hij") .access(AuthorityAuthorizationManager.hasRole("abc"))
AuthorizationManager 源码~
@FunctionalInterface
public interface AuthorizationManager<T> {

	/**
	 * Determines if access should be granted for a specific authentication and object.
	 * @param authentication the {@link Supplier} of the {@link Authentication} to check
	 * @param object the {@link T} object to check
	 * @throws AccessDeniedException if access is not granted
	 */
	default void verify(Supplier<Authentication> authentication, T object) {
		AuthorizationDecision decision = check(authentication, object);
		if (decision != null && !decision.isGranted()) {
			throw new AccessDeniedException("Access Denied");
		}
	}
	@Nullable
	AuthorizationDecision check(Supplier<Authentication> authentication, T object);

}
实现类~~

以AuthenticatedAuthorizationManager为例
public final class AuthenticatedAuthorizationManager<T> implements AuthorizationManager<T> {

	private final AuthenticationTrustResolver trustResolver = new AuthenticationTrustResolverImpl();

	/**
	 * Creates an instance of {@link AuthenticatedAuthorizationManager}.
	 * @param  the type of object being authorized
	 * @return the new instance
	 */
	public static <T> AuthenticatedAuthorizationManager<T> authenticated() {
		return new AuthenticatedAuthorizationManager<>();
	}

这里acccess方法跟4.0版本的有些区别
在springsecurity5之前可以直接用access(“hasRole(‘role’)”)的方式,

这里虽然给出了一些常用的权限管理,但是我们还需要用自定义的方式来完成我们的实际需要;
#在5.0之后就有了些变化,需要实现
AuthorizationManager<RequestAuthorizationContext> 接口;
例如判断登录用户是否具有访问当前URI的权限
- 5之前的 版本
自定义实现类
public interface MyWebSecurity {
    /**
     * 验证权限
     * @param authentication 权限
     * @param request
     * @return
     */
    boolean hasPermission(Authentication authentication, HttpServletRequest request);
}
实现类~
@Service
public class MyWebSecurityImpl implements MyWebSecurity {
    @Override
    public boolean hasPermission(Authentication authentication, HttpServletRequest request) {

        Object principal = authentication.getPrincipal();
        if (principal instanceof UserDetails) {
            UserDetails userDetails = (UserDetails) principal;
            Collection<? extends GrantedAuthority> authorities = userDetails.getAuthorities();
            return authorities.contains(new SimpleGrantedAuthority(request.getRequestURI()));
        }
        return false;
    }
}
- 5之后的版本
@Component
public class MyManager2 implements AuthorizationManager<RequestAuthorizationContext> {
    @Override
    public AuthorizationDecision check(Supplier<Authentication> authentication, RequestAuthorizationContext object) {

        Authentication authentication1 = authentication.get();
        Collection<? extends GrantedAuthority> authorities = authentication1.getAuthorities();
    if( authorities.contains(new SimpleGrantedAuthority("ROLE_vip"))){
        return new AuthorizationDecision(true);
    }
        return new AuthorizationDecision(false);

    }
基于注解的访问控制
有四个注释支持global-method-security表达式属性,以允许调用前和调用后的授权检查,并支持筛选提交的集合参数或返回值
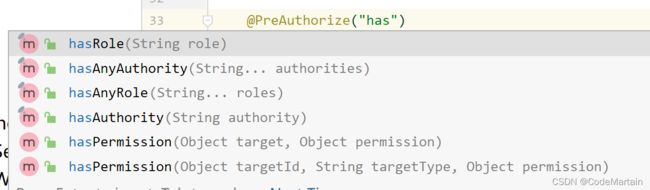
@PreAuthorize
@PreFilter
@PostAuthorize
@PostFilter
这些注解可以放在Service接口或方法上上也可以写到Controller或Controller的方法上。通常情况下都是写在控制器方法上的,控制接口URL是否允许被访问,这样方便只管利于管理;
@PreAuthorize
用于指定方法访问控制表达式的注释,将计算该表达式以决定是否允许方法调用。
使用方法参数作为表达式的一部分来决定当前用户是否具有给定联系人的"vip"权限。
hasPermission()表达式被委托给 的实例。它旨在桥接表达式系统和Spring Security的ACL系统,允许您根据抽象权限指定域对象的授权约束
    @ResponseBody   @PreAuthorize("hasPermission(#myManager2,'vip')")
    @RequestMapping("/delete")
    public String deleteUserById( MyManager2 myManager2,Integer id) {
        Integer i = myService.DeleteUserById(id);
        if (i == 1) {
            return "success";

        }
        return "fail";
    }
MyManager2代码~
public class MyManager2 implements AuthorizationManager<RequestAuthorizationContext> {
    @Override
    public AuthorizationDecision check(Supplier<Authentication> authentication, RequestAuthorizationContext object) {

        Authentication authentication1 = authentication.get();
        Collection<? extends GrantedAuthority> authorities = authentication1.getAuthorities();
    if( authorities.contains(new SimpleGrantedAuthority("ROLE_vip"))){
        return new AuthorizationDecision(true);
    }
        return new AuthorizationDecision(false);
    }
}
web结果~

数据库结果~

除了实例对象还可以支持任何指定注释的值属性来实现的。
Spring Security 的注释存在于该方法的单个参数上,则将使用该值。这对于在 JDK 8 之前使用 JDK 编译的接口非常有用,这些接口不包含有关参数名称的任何信息。例如:@P
import org.springframework.security.access.method.P;
@PreAuthorize("#c.name == authentication.name")
public void doSomething(@P("c") Contact contact);
@PostAuthorize
用于带有返回值的权限验证,一般习惯使用@PreAuthorize
  @ResponseBody
    @PostAuthorize("hasRole('vip') && returnObject.beizhu.equals('vip')")
    @RequestMapping("/showById")
    public User showUserById(Integer id){
        User user = myService.showUserById(id);
        System.out.println(user);
        if (user!=null){
            return user;
        }
        return null;
    }
@PreFilter
Spring Security支持使用表达式过滤集合,数组,映射和流
筛选显然不能替代优化数据检索查询。如果要筛选大型集合并删除许多条目,则这可能效率低下;
@PreFilter是过滤参数的
@ResponseBody
    //当角色是admin,并且名字位gavin的用户登录则可以add用户信息,否则add失败

    @PreFilter("hasRole('admin') and filterObject.name.equals('gavin')")
    @RequestMapping("/add")
    public String addUser(@Param("user") User user) {
        Integer i = myService.addUser(user);
        if (i == 1) {
            return "add success";

        }
        return "add fail";
    }

注意:Spring Security默认关闭了@PreFilter、@PostFilter,所以若想使其生效,则需要在@EnableGlobalMethodSecurity中加入prePostEnabled = true:
@EnableWebSecurity
@EnableGlobalMethodSecurity(prePostEnabled = true )
@PostFilter
用于指定方法过滤表达式的注释方法已被调用。
这个是过滤输出的结果
//    只能查自己的名字信息
    @ResponseBody
@PostFilter("filterObject.name.equals(authentication.principal.username)")
    @RequestMapping("/show")
    public List<User> showUser(){
        List<User> list = myService.showUser();
        return list;
    }

@PreFilter、@PostFilter均支持SpEL;在表达式中可以使用filterObject来表示传入的参数中(@PreFilter)的遍历项或返回值(@PostFilter)的遍历项。
@PosFilter虽然简单易用,但如果某方法中返回的数据量过大,则由于其需要遍历其每一项的特点,将对程序的执行效率产生影响。
@Secure
用于定义一个安全配置列表业务方法的属性。这个注释可以作为Java 5的替代XML配置。
源码~
@Target({ ElementType.METHOD, ElementType.TYPE })
@Retention(RetentionPolicy.RUNTIME)
@Inherited
@Documented
public @interface Secured {
	/**
	 * Returns the list of security configuration attributes (e.g. ROLE_USER,
	 * ROLE_ADMIN).
	 * @return String[] The secure method attributes
	 */
	String[] value();

}
此注解跟前四个注解一样,默认是关闭的,需要配置后开启
@EnableWebSecurity
@EnableGlobalMethodSecurity(securedEnabled = true)
此注解参数要以ROLE_开头
@Secured("ROLE_vip")
    @RequestMapping("/klm")
    public String showklm() {

        return "klm";
    }

@RolesAllowed
对象中的方法中允许访问的安全角色列表*应用程序。RolesAllowed注释的值
*是安全角色名的列表。
这个注释可以在类或方法上指定。指定它
*在类级别意味着它应用于类中的所有方法。
*在方法上指定它意味着它只适用于该方法。
*如果同时应用于类和方法级别,方法值将被覆盖
如果两者冲突,则为类的值为准
源码~
@Documented
@Retention (RUNTIME)
@Target({TYPE, METHOD})
public @interface RolesAllowed {
    /**
     * List of roles that are permitted access.
     */
    String[] value();
}
演示代码~
@RolesAllowed({"vip"})

    @RequestMapping("/klm")
    public String showklm() {

        return "klm";
    }
此注解需要开启jsr250Enabled 才能生效
@EnableWebSecurity
@EnableGlobalMethodSecurity(jsr250Enabled = true)
Remember Me功能实现
记住我功能的实现~~~~
Spring Security 中Remember Me为“记住我”功能,用户只需要在登录时添加remember-me复选框,取值为true。Spring Security会自动把用户信息存储到数据源中,以后就可以不登录进行访问。
记住登陆状态就需要持久化到磁盘,需要实现接口~PersistentTokenRepository
源码~
/**
 * The abstraction used by {@link PersistentTokenBasedRememberMeServices} to store the
 * persistent login tokens for a user.
 *
 * @author Luke Taylor
 * @since 2.0
 * @see JdbcTokenRepositoryImpl
 * @see InMemoryTokenRepositoryImpl
 */
public interface PersistentTokenRepository {

	void createNewToken(PersistentRememberMeToken token);

	void updateToken(String series, String tokenValue, Date lastUsed);

	PersistentRememberMeToken getTokenForSeries(String seriesId);

	void removeUserTokens(String username);

}
实现类

InMemoryTokenRepositoryImpl
该实现类用于测试
/**
 * Simple PersistentTokenRepository implementation backed by a Map. Intended for
 * testing only.
 * * @author Luke Taylor
 */
public class InMemoryTokenRepositoryImpl implements PersistentTokenRepository {
.................................
JdbcTokenRepositoryImpl
会持久化到数据库;
/**
 * JDBC based persistent login token repository implementation.
 *
*/
public class JdbcTokenRepositoryImpl extends JdbcDaoSupport implements PersistentTokenRepository {

.............................................................
java实现代码~
根据实现逻辑,需要连接数据库,因为登录所以还需要mybatis…
依赖
<dependencies>
    <dependency>
        <groupId>org.mybatis.spring.bootgroupId>
        <artifactId>mybatis-spring-boot-starterartifactId>
        <version>2.2.2version>
    dependency>

    <dependency>
        <groupId>mysqlgroupId>
        <artifactId>mysql-connector-javaartifactId>
        <version>8.0.27version>
    dependency>
dependencies>
配置类~
@Configuration
public class RemembermeConfig {
    @Autowired
    private DataSource dataSource;

    public PersistentTokenRepository getPersistentTokenRepository() {
        JdbcTokenRepositoryImpl jdbcTokenRepository = new JdbcTokenRepositoryImpl();
        jdbcTokenRepository.setDataSource(dataSource);
        //第一次运行要建表,以后可以注释掉
        jdbcTokenRepository.setCreateTableOnStartup(true);
        return jdbcTokenRepository;
    }
}
在登陆页面添加复选框–RememberMe
<input type="checkbox" name="remember-me" value="true"/> 记住我<br/>
默认情况下重启项目后登录状态失效了。但是可以通过设置状态有效时间,即使项目重新启动下次也可以正常登录。
@Configuration
public class Myconfig extends WebSecurityConfigurerAdapter {
//需要注入的类---登录逻辑
@Autowired
private MyServiceImpl myService;
//持久化token工厂类
@Autowired
private PersistentTokenRepository persistentTokenRepository;
    @Override
    protected void configure(HttpSecurity http) throws Exception {
        http.formLogin()
                .loginPage("/login.html")
                .loginProcessingUrl("/login")
                .usernameParameter("username")
                .passwordParameter("password")
                .successForwardUrl("/showMain")
                .failureForwardUrl("/showFail")
                .and()
                .authorizeHttpRequests()
                .antMatchers("/img/*", "/login.html", "/login.html", "/fail.html", "/showFail").permitAll()
                .and()
                .rememberMe().userDetailsService(myService)
                .tokenRepository(persistentTokenRepository)
                .tokenValiditySeconds(100000)
                .and()
                .csrf().disable();
    }

    @Bean
    public PasswordEncoder passwordEncoder() {
        return PasswordEncoderFactories.createDelegatingPasswordEncoder();
    }
}

解决Failed to configure a DataSource: ‘url‘ attribute is not specified and no embedded datasource coul
Thymeleaf的使用
引入依赖
        <dependency><groupId>org.springframework.bootgroupId>
            <artifactId>spring-boot-starter-thymeleafartifactId>
            <version>2.6.4version>
        dependency>
<dependency>
    <groupId>org.thymeleaf.extrasgroupId>
    <artifactId>thymeleaf-extras-springsecurity5artifactId>
    <version>3.0.3.RELEASEversion>
dependency>
引入命名空间—>>在这之前要引入thymeleaf-extras-springsecurity5依赖,
注:最新版本的好像有些问题,得到的数据为空白的,也可能是其他原因,
~java.lang.NoSuchMethodError: org.thymeleaf.context.IWebContext.getExchange()Lorg/thymeleaf/web/IWebExchange;
日志如下~~~

换成3.0.3.RELEASE正常运行,有时候追求最新版本还是有一些问题的;
<html lang="en"
      xmlns="http://www.w3.org/1999/xhtml"
      xmlns:th="http://www.thymeleaf.org"
      xmlns:sec="http://www.thymeleaf.org/thymeleaf-extras-springsecurity5">
通过命名空间xmlns:sec="http://www.thymeleaf.org/thymeleaf-extras-springsecurity5
可以获取登录用户的所有信息;
name:登录账号名称
principal:登录主体,在自定义登录逻辑中是UserDetails
credentials:凭证
authorities:权限和角色
details:实际上是WebAuthenticationDetails的实例。可以获取remoteAddress(客户端ip)和sessionId(当前sessionId)
DOCTYPE html>
<html lang="en"
xmlns="http://www.w3.org/1999/xhtml"
xmlns:th="http://www.thymeleaf.org"
xmlns:sec="http://www.thymeleaf.org/thymeleaf-extras-springsecurity5">
<head>
<meta charset="UTF-8">
<title>Titletitle>
head>
<body>
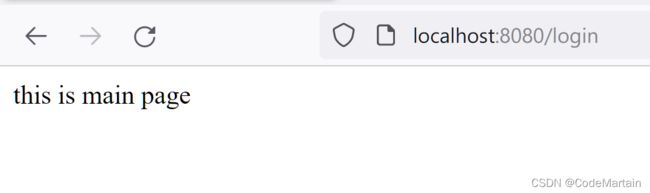
<h1>this is main pageh1>
欢迎<span sec:authentication="name">span>
登录名:<span sec:authentication="principal.authorities">span><br>
登录名:<span sec:authentication="principal.username">span><br>
凭证:<span sec:authentication="credentials">span><br>
权限/角色:<span sec:authentication="authorities">span><br>
访问IP:<span sec:authentication="details.remoteAddress">span><br>
sessionId:<span sec:authentication="details.sessionId">span><br>
body>
html>

根据上面的获取到的权限我们就可以根据权限去设计一下不同的权限享有的不同的展示内容;
<hr>
欢迎<span  sec:authentication="name">span>你所有的权限是:
<button sec:authorize="hasAuthority('/insert')">新增button>
<button sec:authorize="hasAuthority('/query')">查询button>
<button sec:authorize="hasAuthority('/delete')">删除button>
<button sec:authorize="hasAuthority('/update')">修改button>

<hr>
<button sec:authorize="hasRole('admin')">新增button>
<button sec:authorize="hasRole('admin')">查询button>
<button sec:authorize="hasRole('admin')">修改button>
<button sec:authorize="hasRole('admin')">查看button>

注:第一个登录名为角色/权限,就不修改了
SpringSecurity的退出机制
只需要向Spring Security项目中发送/logout退出请求即可。
就这么简单粗暴,如果想要自定义退出,为了实现更好的效果,
自定义退出配置
源码~
public final class LogoutConfigurer<H extends HttpSecurityBuilder<H>>
		extends AbstractHttpConfigurer<LogoutConfigurer<H>, H> {

	private List<LogoutHandler> logoutHandlers = new ArrayList<>();

	private SecurityContextLogoutHandler contextLogoutHandler = new SecurityContextLogoutHandler();

	private String logoutSuccessUrl = "/login?logout";

	private LogoutSuccessHandler logoutSuccessHandler;

	private String logoutUrl = "/logout";

	private RequestMatcher logoutRequestMatcher;

	private boolean permitAll;

	private boolean customLogoutSuccess;

	private LinkedHashMap<RequestMatcher, LogoutSuccessHandler> defaultLogoutSuccessHandlerMappings = new LinkedHashMap<>();
自定义退出参数配置
http.logout().logoutUrl("/logout").logoutSuccessUrl("/showLogout");
可以通过logout(Url)设置退出时的URL
通过logoutSuccessUrl(url)来设置退出后的url,

登陆保护
springsecurity还支持设置登陆保护
       //session管理,失效后跳转
        http.sessionManagement().invalidSessionUrl("/login");
        //单用户登录,如果有一个登录了,同一个用户在其他地方登录将前一个剔除下线
        http.sessionManagement().maximumSessions(1).expiredSessionStrategy(expiredSessionStrategy());
        //单用户登录,如果有一个登录了,同一个用户在其他地方不能登录
        //http.sessionManagement().maximumSessions(1).maxSessionsPreventsLogin(true);

        //退出时删除cookies
        http.logout().deleteCookies("JESSIONID");
        //解决中文乱码问题
        CharacterEncodingFilter filter = new CharacterEncodingFilter();
        filter.setEncoding("UTF-8"); filter.setForceEncoding(true);
        http.addFilterBefore(filter, CsrfFilter.class);


 @Bean
  public SessionInformationExpiredStrategy expiredSessionStrategy() {
      return new SimpleRedirectSessionInformationExpiredStrategy("/login.html");
  }
单用户登录

logout其他的API
public interface LogoutHandler {

	/**
	 * Causes a logout to be completed. The method must complete successfully.
	 * @param request the HTTP request
	 * @param response the HTTP response
	 * @param authentication the current principal details
	 */
	void logout(HttpServletRequest request, HttpServletResponse response, Authentication authentication);

}
实现类~
退出机制源码~
public LogoutFilter(LogoutSuccessHandler logoutSuccessHandler, LogoutHandler... handlers) {
		this.handler = new CompositeLogoutHandler(handlers);
		Assert.notNull(logoutSuccessHandler, "logoutSuccessHandler cannot be null");
		this.logoutSuccessHandler = logoutSuccessHandler;
		setFilterProcessesUrl("/logout");
	}

	public LogoutFilter(String logoutSuccessUrl, LogoutHandler... handlers) {
		this.handler = new CompositeLogoutHandler(handlers);
		Assert.isTrue(!StringUtils.hasLength(logoutSuccessUrl) || UrlUtils.isValidRedirectUrl(logoutSuccessUrl),
				() -> logoutSuccessUrl + " isn't a valid redirect URL");
		SimpleUrlLogoutSuccessHandler urlLogoutSuccessHandler = new SimpleUrlLogoutSuccessHandler();
		if (StringUtils.hasText(logoutSuccessUrl)) {
			urlLogoutSuccessHandler.setDefaultTargetUrl(logoutSuccessUrl);
		}
		this.logoutSuccessHandler = urlLogoutSuccessHandler;
		setFilterProcessesUrl("/logout");
	}
public class SecurityContextLogoutHandler implements LogoutHandler {

	protected final Log logger = LogFactory.getLog(this.getClass());

	private boolean invalidateHttpSession = true;

	private boolean clearAuthentication = true;

	/**
	 * Requires the request to be passed in.
	 * @param request from which to obtain a HTTP session (cannot be null)
	 * @param response not used (can be null)
	 * @param authentication not used (can be null)
	 */
	@Override
	public void logout(HttpServletRequest request, HttpServletResponse response, Authentication authentication) {
		Assert.notNull(request, "HttpServletRequest required");
		if (this.invalidateHttpSession) {
			HttpSession session = request.getSession(false);
			if (session != null) {
				session.invalidate();
				if (this.logger.isDebugEnabled()) {
					this.logger.debug(LogMessage.format("Invalidated session %s", session.getId()));
				}
			}
		}
		SecurityContext context = SecurityContextHolder.getContext();
		SecurityContextHolder.clearContext();
		if (this.clearAuthentication) {
			context.setAuthentication(null);
		}
	}
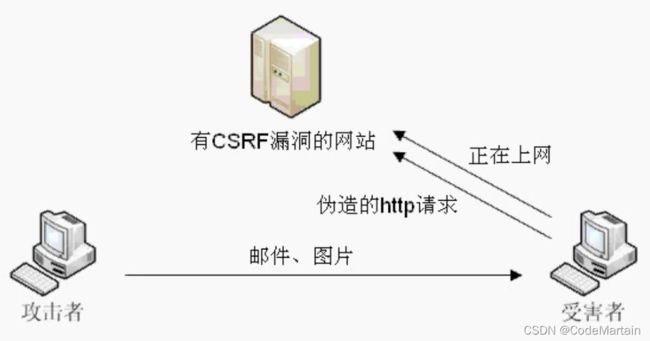
CSRF~跨站请求伪造
什么是跨站伪造请求呢?在我们日常访问网站时,有时候是跨域的,如果没有安全机制做保证,这很容易造成信息的泄露;
比如按照上面这个例子~跨域请求的安全机制是关闭的;
![]()
现在我们将其开启之后
新建一个简单的web项目,端口为8081
伪造的前端登录页,提交的地址是8080服务器的
DOCTYPE html>
<html lang="en">
<head>
<meta charset="UTF-8">
<title>Titletitle>
head>
<body>
<div class="container">
<form class="form-signin" method="post" action="http://127.0.0.1:8080/login">
<h2 class="form-signin-heading">Please sign inh2>
<p>
<label for="username" class="sr-only">Usernamelabel>
<input type="text" id="username" name="username" class="form-control" placeholder="Username" required autofocus>
p>
<p>
<label for="password" class="sr-only">Passwordlabel>
<input type="password" id="password" name="password" class="form-control" placeholder="Password" required>
p>
<input type="checkbox" name="remember-me" value="true"/> 记住我<br/>
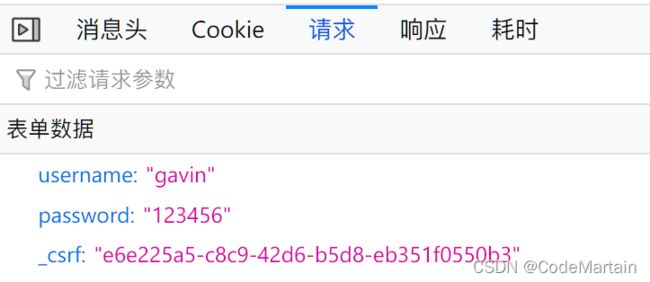
<input name="_csrf" type="hidden" value="e6e225a5-c8c9-42d6-b5d8-eb351f0550b3" />
<button class="btn btn-lg btn-primary btn-block" type="submit">Sign inbutton>
form>
<br>
<br>
div>
body>
html>
提交请求后就可以获取到用户的信息:也就是说如果账号信息被别人非法获取,后果会很糟糕;

虽然返回了我们要访问的页面,但是账号密码被恶意的获取了;
但是当我们注掉后,重启

提示我们无权访问,即使用户名和密码输入正确

客户端与服务进行交互时,由于http协议本身是无状态协议,所以引入了cookie进行记录客户端身份。在cookie中会存放session id用来识别客户端身份的。在跨域的情况下,session id可能被第三方恶意劫持,通过这个session id向服务端发起请求时,服务端会认为这个请求是合法的,进而不法分子就会凭借这个来获取用户的信息~~~即号被盗了的情况;
Spring Security中CSRF
从Spring Security4开始CSRF防护默认开启。默认会拦截请求。进行CSRF处理。CSRF为了保证不是其他第三方网站访问,要求访问时携带参数名为_csrf值为token(token在服务端产生)的内容,如果token和服务端的token匹配成功,则正常访问。
2.1实现步骤
在登录页/或者其他请求的页面添加_csrf来验证;
<input type="hidden" th:value="${_csrf.token}" name="_csrf" th:if="${_csrf}"/>
这个_csrf在请求服务器时会由服务器产生

DOCTYPE html>
<html lang="en"
      xmlns="http://www.w3.org/1999/xhtml"
      xmlns:th="http://www.thymeleaf.org"
      xmlns:sec="http://www.thymeleaf.org/thymeleaf-extras-springsecurity5">

<head>
    <meta charset="UTF-8">
    <title>Titletitle>
head>
<body>
<div class="container">
    <form class="form-signin" method="post" action="/login">
        <h2 class="form-signin-heading">Please sign inh2>
        <p>
            <label for="username" class="sr-only">Usernamelabel>
            <input type="text" id="username" name="username" class="form-control" placeholder="Username" required autofocus>
        p>
        <p>
            <label for="password" class="sr-only">Passwordlabel>
            <input type="password" id="password" name="password" class="form-control" placeholder="Password" required>
        p>
        <input type="checkbox" name="remember-me" value="true"/> 记住我<br/>
        <input type="hidden" th:value="${_csrf.token}" name="_csrf" th:if="${_csrf}"/>
        <button class="btn btn-lg btn-primary btn-block" type="submit">Sign inbutton>
    form>
    <br>
    <br>
    <div id="pic" >
        <img src="../img/nvdi.png" width="180px" height="100px">
    div>
div>
body>
html>
再次通过跨域访问~~

这次直接跳到真正的登录页了;