第一章 Spring Boot搭建一个WEB应用 & 什么是Spring Boot
文章目录
- 前言
- 一、使用IDEA创建一个Spring Boot的WEB服务?
-
- 1、创建项目
-
- 1.1 选择创建Module 或者 Project
- 1.2 配置JDK信息和Spring项目模板来源路径
- 1.3 配置创建的项目信息
- 1.4 选择要加入项目的组件
- 1.5 确认信息并完成
- 1.6 删除无用文件
- 1.7 打开的窗口中配置Maven信息
- 2、项目结构&主要文件内容解析
-
- 2.1 项目文件结构
- 2.2 POM文件解析
- 2.3 启动类
- 2.4 启动效果
- 3、配置访问入口&数据库
-
- 3.1 配置文件(.yml)
- 3.2 创建一个html页面
- 3.3 创建实体对应数据库
- 3.4 Repository
- 3.5 控制器
- 4、测试
- 二、项目部署
-
- 1、 打包
- 2、启动
- 总结
-
- Spring Boot的作用
- 本文涉及代码下载
前言
该系列文章介绍Spring Boot从入门到源码进阶的所有知识,敬请期待!!
本章主要介绍什么是Spring Boot,Spring Boot的使用能给我们带来什么样的便利!入门小伙伴可以先不需要了解太多,跟着操作,具体的细节后面会一一带入。老司机的话也可以共勉,万一有自己还没有关注到的小细节呢?
本文涉及代码git地址
工具安装(自备):IDEA, JDK1.8, Maven
一、使用IDEA创建一个Spring Boot的WEB服务?
1、创建项目
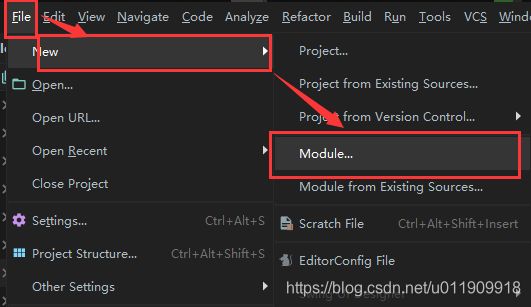
1.1 选择创建Module 或者 Project
1.2 配置JDK信息和Spring项目模板来源路径
1.3 配置创建的项目信息
1.4 选择要加入项目的组件
1.5 确认信息并完成
1.6 删除无用文件
删除选中文件(看自己情况,需要的可以留下。文件作用就是文件名的中文释义,So easy!)

1.7 打开的窗口中配置Maven信息
2、项目结构&主要文件内容解析
2.1 项目文件结构
2.2 POM文件解析
因为我们的所有Jar包都委托给了Maven来管理,所以在这里我们没有看到导入的Jar包。而Maven管理Jar包的方式就是通过POM文件配置依赖包的三坐标(groupId, artifactId,version)来实现的。现在我们来看下POM文件内容:
相关内容使用注释标记
<project xmlns="http://maven.apache.org/POM/4.0.0" xmlns:xsi="http://www.w3.org/2001/XMLSchema-instance"
         xsi:schemaLocation="http://maven.apache.org/POM/4.0.0 https://maven.apache.org/xsd/maven-4.0.0.xsd">
    <modelVersion>4.0.0modelVersion>


    <parent>
        <groupId>org.springframework.bootgroupId>
        <artifactId>spring-boot-starter-parentartifactId>
        <version>2.3.5.RELEASEversion>
        <relativePath/>
    parent>


    <groupId>com.examplegroupId>
    <artifactId>spring-boot-web-demoartifactId>
    <version>0.0.1-SNAPSHOTversion>


    <name>spring-boot-web-demoname>
    <description>Demo project for Spring Bootdescription>


    <properties>
        <java.version>1.8java.version>
    properties>


    <dependencies>

        <dependency>
            <groupId>org.springframework.bootgroupId>
            <artifactId>spring-boot-starter-thymeleafartifactId>

        dependency>

        <dependency>
            <groupId>org.springframework.bootgroupId>
            <artifactId>spring-boot-starter-webartifactId>
        dependency>

        <dependency>
            <groupId>org.springframework.bootgroupId>
            <artifactId>spring-boot-starter-testartifactId>
            <scope>testscope>
            <exclusions>
                <exclusion>
                    <groupId>org.junit.vintagegroupId>
                    <artifactId>junit-vintage-engineartifactId>
                exclusion>
            exclusions>
        dependency>
    dependencies>


    <build>
        <plugins>

            <plugin>
                <groupId>org.springframework.bootgroupId>
                <artifactId>spring-boot-maven-pluginartifactId>
            plugin>
        plugins>
    build>

project>
2.3 启动类
启动类比较简单,就是加一个标识的main方法;我们不需要去做处理。
import org.springframework.boot.SpringApplication;
import org.springframework.boot.autoconfigure.SpringBootApplication;

@SpringBootApplication //Spring Boot 启动类注解标识,实现后面讲
public class SpringBootWebDemoApplication {

    /**
     * 启动方法
     * @param args
     */
    public static void main(String[] args) {
        SpringApplication.run(SpringBootWebDemoApplication.class, args);
    }

}
2.4 启动效果
直接在主类上右键启动就OK!
启动结果:默认端口8080

测试:

OK,这个404是不存在接口,我们写一个接口试试!
3、配置访问入口&数据库
<dependency>
            <groupId>mysqlgroupId>
            <artifactId>mysql-connector-javaartifactId>
            <version>8.0.22version>
        dependency>

        <dependency>
            <groupId>org.springframework.bootgroupId>
            <artifactId>spring-boot-starter-data-jpaartifactId>
        dependency>
    dependencies>
3.1 配置文件(.yml)
我们这里使用yml文件,把之前的properties后缀改为yml
##自定义端口
server:
  port: 9090

##数据库配置
spring:
  datasource:
    driver-class-name: com.mysql.jdbc.Driver
    url: jdbc:mysql://127.0.0.1:3306/demo?useUnicode=true&characterEncoding=UTF-8&allowMultiQueries=true&serverTimezone=GMT
    username: demo
    password: demo

  ##前端引擎配置
  thymeleaf:
    enabled: true
    servlet:
      content-type: text/html
    mode: HTML
    ## 页面前缀
    prefix: classpath:/templates/
    ## 后缀
    suffix: .html
3.2 创建一个html页面
spring-boot-web-demo\src\main\resources\templates\index.html
<html lang="en">
<head>
    <meta charset="UTF-8">
    <title>Titletitle>
head>
<body>
<img src="/images/20170425152845_50326.jpg" alt="速度与激情">
body>
html>
3.3 创建实体对应数据库
get、set方法自己补充下:
import javax.persistence.Column;
import javax.persistence.Entity;
import javax.persistence.GeneratedValue;
import javax.persistence.Id;

@Entity //Spring JPA声明为实体(表)
public class User {
    @Id //主键
    @GeneratedValue //自增
    private Integer id;

    @Column(nullable = false, unique = true) //非空,唯一
    private String username;
}
3.4 Repository
JpaRepository提供了基本的CRUD操作,直接继承就OK!
import com.example.springboot.web.demo.entity.User;
import org.springframework.data.jpa.repository.JpaRepository;

public interface UserRepository extends JpaRepository<User, Integer> {
}
3.5 控制器
服务提供的接口
import com.example.springboot.web.demo.repository.UserRepository;
import org.springframework.beans.factory.annotation.Autowired;
import org.springframework.stereotype.Controller;
import org.springframework.web.bind.annotation.GetMapping;
import org.springframework.web.bind.annotation.RequestMapping;
import org.springframework.web.bind.annotation.ResponseBody;

@Controller //声明该类为MVC的控制器
@RequestMapping("") //配置该控制器的命名空间
public class UserController {

    @Autowired
    private UserRepository repository; //JPA数据库Bean

    /**
     * 返回数据
     * @return
     */
    @GetMapping("/user") //配置接口地址
    @ResponseBody //返回数据,无该注解则返回页面
    public String test(){
        return repository.findAll().get(0).getUsername();
    }

    /**
     * 返回页面 classpath:/templates/index.html
     * classpath:/templates/   为前缀
     * .html   为后缀
     * @return
     */
    @GetMapping("/")
    public String index(){
        return "index";
    }
}
4、测试
访问:http://localhost:9090/

访问 :http://localhost:9090/user

二、项目部署
1、 打包
在控制台中使用 mvn clean package 打包

或者使用工具打包

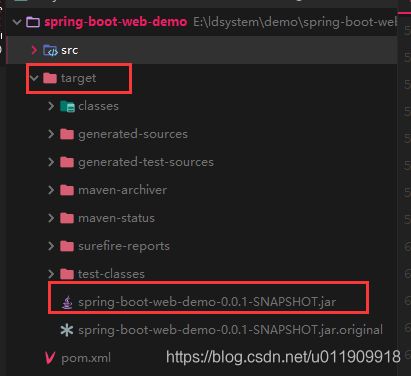
完成之后在项目下面生成一个target目录,下面有生成的jar包

2、启动

使用windows的dos窗口或者Linux也是一样的操作!
总结
Spring Boot的作用
现在我们的一个WEB项目就搭建完成了,完全可以替代以前的繁琐的系统搭建,这就是Spring Boot的作用。没有以前Spring MVC的繁琐的XML配置,不再需要以前的web.xml,也不需要自己安装Tomcat web容器去启动项目。
所以Spring Boot的作用就是整合了其他一系列的热门框架和组件并取消以前繁琐的XML配置,从而简化开发难度,节约开发成本。
网上说的所谓的约定大于配置,这里的约定就是它:

配置就是使用xml文件定义dataSource以及jdbcTemplate这些bean信息的文件。
本文涉及代码下载
下一章:Spring Boot四大核心组件


