使用最新版vite搭一个react 18项目
使用Vite搭建一个简单的react项目
使用到的技术
Vite @latest、React.js @18.2.0、React-router @6.14.1、Typescript @5.2.0、Ant Design @5.7.0、Tailwind.css @3.3.3、Sass @1.63.6、less @4.1.3、zustand @4.3.9
项目源码地址:react-app
可以根据这个代码来修改,有可能有遗漏的bug我没找到
ps: 暂时还没有使用到状态管理工具,后续再选择
开始吧
项目初始化第一步选择脚手架
打开vite官网
vite官网
按照官网的命令,选择一个文件夹(在此文件夹下初始化你的项目),打开终端
// windows
cmd 当前文件夹打开终端
npm create vite@latest
// mac
自己设置的快捷键打开终端
npm create vite@latest
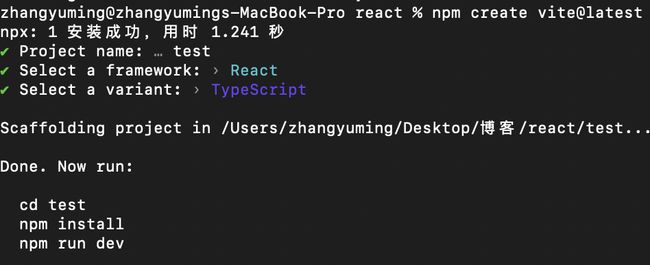
然后就按着自己的需求,输入项目名称,选技术、就是ts、react
下载好以后
cd 项目名
pnpm install
pnpm run dev
类似下图
tips:博主使用的是pnpm 看个人习惯吧,没什么区别
配置vite.config.ts
import { defineConfig } from "vite";
import react from "@vitejs/plugin-react";
// path 是node的一个模块,和文件路径操作有关
import path from "path";

import { createStyleImportPlugin, AntdResolve } from "vite-plugin-style-import";

// 手写了resolve来拼接路径
const resolve = (url) => {
  // __dirname 在这里可以获取到项目的根路径 不太理解的可以看node教程
  return path.resolve(__dirname, url);
};

// https://vitejs.dev/config/
export default defineConfig({
  plugins: [
    react(),
    // antd 按需加载 在引入antd的时候会使用这个来进行按需导入 按需导入只会引入一部分使用的组件 在打包的时候体积会减小很多
    createStyleImportPlugin({
      resolves: [AntdResolve()],
    }),
  ],
  // 配置 @ 路径 但是在这里配置了还不够,还需要在tsconfig.json里配置 后续会讲到
  resolve: {
    alias: [
      {
        find: "@",
        replacement: resolve("./src"),
      },
    ],
  },
  css: {
    preprocessorOptions: {
      // 配置全局css文件入口,这里配置了就不用在main.ts里引入了
      scss: {
        additionalData: '@import "@/style/index.scss";',
      },
      // 由于antd里使用了less 这里我们也引入一下,不然会报错
      less: {
        javascriptEnabled: true,
      },
    },
  },
});
引入一些需要的框架
- 引入 antd
// 博主是在页面内导入使用的,所以没有配置其他的,下好就行了
pnpm install antd --save
- 引入sass、less
pnpm i sass
pnpm i less
// 后续引入在vite.config.ts里已经引了
- 引入 tailwind.css
1、下载
pnpm install -D tailwindcss@latest postcss@latest autoprefixer@latest
2、初始化配置文件
npx tailwindcss init -p
上述命令会生成两个文件,分别是tailwind.config.js和postcss.config.js。
3、tailwind.config.js 配置
/** @type {import('tailwindcss').Config} */
export default {
  content: ["./src/**/*.html", "./src/**/*.{js,ts,vue,jsx,tsx}"],
  theme: {
    extend: {},
  },
  plugins: [require("tailwindcss"), require("autoprefixer")],
};
4、postcss.config.js 配置
export default {
  plugins: {
    tailwindcss: {},
    autoprefixer: {},
  },
};
实际上是可以配置很多样式、主题的,有兴趣可以去试试
tailwind.css 官网
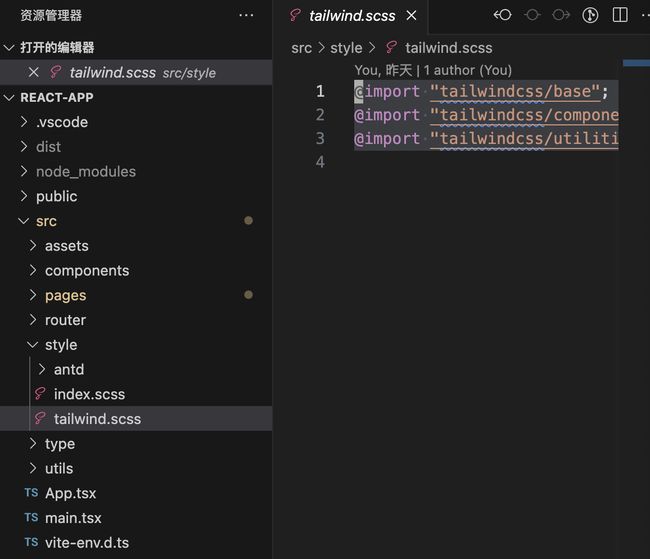
5、在src下创建style文件夹,在里面创建tailwind.css
@import "tailwindcss/base";
@import "tailwindcss/components";
@import "tailwindcss/utilities";
6、最后在main.tsx里引入
import ReactDOM from "react-dom/client";
import App from "./App";
import "./style/tailwind.scss";
// 初始化项目的时候使用了React.StrictMode 但是在我使用过程中有渲染两次的bug我就删了
ReactDOM.createRoot(document.getElementById("root")!).render(- 引入 vite-plugin-style-import 实现antd按需导入
pnpm i vite-plugin-style-import -D
pnpm i consola -D

// 在vite.config.ts里配置
import { createStyleImportPlugin, AntdResolve } from "vite-plugin-style-import";


plugins: [
    // antd 按需加载
    createStyleImportPlugin({
      resolves: [AntdResolve()],
    }),
],
引入react-router
- 下载
// react-router-dom 是针对于pc端的
pnpm i react-touter-dom
- 在src下创建router文件夹
初始化路由
// 懒加载组件 懒加载可以减小打包体积
import { lazy, Suspense } from "react";
import Layout from "@/components/layout";
import NotFound from "@/pages/404/index";
import { Route } from "@/type/router.type";
// 通过路由生成菜单方法
import { generateMenu } from "@/router/generateMenu";
// tips: antd高亮是根据key来的,可以根据目前有的菜单key类似的配置 防止不生效
const routes: Array = [
{
id: "1", // 唯一的id
name: "layout", // 菜单名称
path: "/", // 菜单路径
element: loading... - 使用路由
我的主页面是App.tsx, 并且我想让我的layout组件是通过路由的形式组装的,这样我可以实现更复杂的路由
import { ConfigProvider } from "antd";
import { BrowserRouter, useRoutes } from "react-router-dom";
import routes from "./router/index";

// 渲染路由
function RouteElement() {
  const element = useRoutes(routes.routes);
  return element;
}

function App() {
  return (
    <>

        {/* react-touter-dom 6是这样包裹的 */}


  );
}

export default App;
- layout组件编写
1、头部
import "../index.scss";

import { Menu } from "antd";
import { useEffect, useState } from "react";
import { useNavigate, useLocation } from "react-router-dom";
import routes from "@/router/index";
import { menu } from "@/type/router.type";

function Header() {
  const navigate = useNavigate();
  const [current, setCurrent] = useState("1.1");
  // location 获取当前路由路径
  const location = useLocation();
  // 这个菜单就是我们自己生成的
  const menus = routes.menu;

  // 使用useEffect来获取当前菜单的keyPath,让菜单高亮
  useEffect(() => {
    setCurrent(getMenuKey(menus, location.pathname));
  }, [location.pathname]);

  // 通过路径获取当前高亮的pathKey
  const getMenuKey = (menus: menu[], path: string, keyPath: string[] = []) => {
    menus.forEach((menu: menu) => {
      if (menu.path == path) {
        keyPath.push(menu.key);
      }
      if (menu.children && menu.children.length) {
        getMenuKey(menu.children, path, keyPath);
      }
    });

    return keyPath;
  };

  // 选择菜单
  const handleSelect = (val: any) => {
    // 设置菜单高亮的key
    setCurrent(val.keyPath);
    // 路由跳转
    navigate(val.item.props.path);
  };

  return (
    <>


  );
}

export default Header;
2、身体
import "../index.scss";
// 这里二级路由就是使用Outlet渲染的 vue里路由全是用router-view渲染的
import { Outlet } from "react-router-dom";
function Main() {
return (
<>
引入状态管理库
找了一些资料,目前比较好用的,和vue比较类似的就是zustand,主要是操作简单一些
1、下载
pnpm i zustand
2、在src下创建store文件夹,增加index.ts文件,middleware.ts文件
index.ts用于定义store
middleware.ts用于持久化store
index.ts
import { create } from "zustand";
import myMiddleware from "./middleware";

export const userStore = create(
  // 自定义的中间件
  myMiddleware(
    (set: any) => ({
      id: "1",
      name: "zym",
      age: 23,

      increase: () => {
        set((state: any) => ({ age: state.age + 1 }));
      },
    }),
    "react-app-user"
  )
);
middleware.ts
import { devtools, persist } from "zustand/middleware";

// 自定义持久化中间件
const myMiddleware = (f: any, name: string): any => devtools(persist(f, { name }));

export default myMiddleware;
3、使用
import "../index.scss";
import { userStore } from "@/store/index";
import { Button } from "antd";
function Footer() {
const { age, increase } = userStore();
return (
<>
{age}
底部
);
}
export default Footer;
自定义字体
1、在一些字体网站上下载字体
我使用的是 自由字体
2、通过在全局css里引入
先将下好的字体放到项目里的assets/font下
@font-face {
  font-family: "Alimama";
  font-weight: 400;
  src: url("../assets/font/SmileySans-Oblique.ttf"), url("../assets/font/SmileySans-Oblique.ttf.woff2") format("woff2");
  font-display: swap;
}

* {
  font-family: "Alimama", serif;
}
tips:字体是比较大的,可能字体还没加载好网站就已经加载了,得使用一些方法去解决(博主还在试,目前知道在线cdn比较可行)
解决打包报错
// 在运行pnpm 打包的时候,会遇到报错json-schema类型找不到的情况
pnpm i @types/json-schema
在tsconfig.json里配置
"compilerOptions" : {
    "baseUrl": "./", // 这个重要
    "paths": {
      // 这里还解决了在vite.config.ts里配置@路径不起作用的问题
      "@/*": ["src/*"]
    },
    // 在这引入类型再打包就没问题了
    "typeRoots": ["node_modules/@types"],
    "types": ["json-schema"]
}
动画
我还引入了动画库 Ant Motion,只有首页用到了,很好用
pnpm i rc-banner-anim rc-queue-anim rc-tween-one
Ant Motion
结束
到这里你就完成了一个react项目的简单初始化,开始你的表演吧!