SpringCloud-Netfilx
注册中心eureka
eureka-server
-
spring boot和spring cloud的依赖
<parent> <groupId>org.springframework.bootgroupId> <artifactId>spring-boot-starter-parentartifactId> <version>2.2.6.RELEASEversion> <relativePath/> parent> <properties> <java.version>1.8java.version> <spring-cloud.version>Hoxton.SR3spring-cloud.version> properties> -
启动类开启eureka服务
@EnableEurekaServer -
eureka单点配置
server.port=7001
#是否将自己注册到Eureka Server,默认为true,由于当前就是server,故而设置成false,表明该服务不会向eureka注册自己的信息
eureka.client.register-with-eureka=false
#是否从eureka server获取注册信息,由于单节点,不需要同步其他节点数据,用false
eureka.client.fetch-registry=false
#设置服务注册中心的URL,用于client和server端交流
eureka.client.service-url.defaultZone=http://localhost:7002/eureka/
eureka高可用配置服务相互注册
- 第1台eureka服务器配置
server.port=7001
#设置服务注册中心的URL,用于client和server端交流
eureka.client.service-url.defaultZone=http://euk2.top:7002/eureka/
#设置服务名
spring.application.name=eureka-server
- 第2台eureka服务器配置
server.port=7002
#设置服务注册中心的URL,用于client和server端交流
eureka.client.service-url.defaultZone=http://euk1.top:7001/eureka/
#设置服务名
spring.application.name=eureka-server
- 自我保护机制
eureka-client
- EurekaClient 可以在客户端获取eureka服务器上的注册者信息
- org.springframework.cloud.client.discovery与com.netflix.discovery.DiscoveryClient
- org.springframework.cloud.client.discovery是SpringCloud对注册中心client的抽象封装,提供公用功能
- org.springframework.cloud.client.discovery定义用来服务发现的客户端接口,是客户端进行服务发现的核心接口,是spring cloud用来进行服务发现的顶级接口,在common中可以看到其地位。在Netflix Eureka和Consul中都有具体的实现类。
- 代表通用于服务发现的读操作,例如在 eureka或consul中。
@Autowired DiscoveryClient client; // 抽象 @Autowired EurekaClient client2; // Eureka Listservices = client.getServices();//获取所有服务实例id。 List instances = client.getInstances("provider");//通过服务id查询服务实例信息列表。 - com.netflix.discovery.DiscoveryClient为Eureka注册中心客户端的接口,功能更丰富
远程调用RestTemplate
- 注入RestTemplate对象到spring
@Bean // 开启负载均衡 @LoadBalanced RestTemplate restTemplate() { return new RestTemplate(); } - 接下来便可以使用资源地址调用服务
-
get 请求处理
@RestController @RequestMapping("/demo") public class DemoController { @Autowired RestTemplate restTemplate; @GetMapping("getHi") public String getHi(){ String url = "http://PROVIDER/demo/getHi"; String resp = restTemplate.getForObject(url, String.class); return resp; } } -
post 请求处理
-
exchange可以自定义http请求的头信息,同时保护get和post方法
-
拦截器
-
需要实现ClientHttpRequestInterceptor接口
public class LoggingClientHttpRequestInterceptor implements ClientHttpRequestInterceptor { @Override public ClientHttpResponse intercept(HttpRequest request, byte[] body, ClientHttpRequestExecution execution) throws IOException { System.out.println("拦截啦!!!"); System.out.println(request.getURI()); ClientHttpResponse response = execution.execute(request, body); System.out.println(response.getHeaders()); return response; } -
添加到resttemplate中
@Bean
@LoadBalanced
RestTemplate restTemplate() {
	RestTemplate restTemplate = new RestTemplate();
	restTemplate.getInterceptors().add(new LoggingClientHttpRequestInterceptor());
	return restTemplate;
}
-
负载均衡Ribbon
-
pom
<dependency> <groupId>org.springframework.cloudgroupId> <artifactId>spring-cloud-starter-netflix-ribbonartifactId> dependency> -
切换负载均衡策略
-
注解方式
@Bean public IRule myRule(){ //return new RoundRobinRule(); //return new RandomRule(); return new RetryRule(); -
配置文件
针对服务定ribbon策略:provider.ribbon.NFLoadBalancerRuleClassName=com.netflix.loadbalancer.RandomRule给所有服务定ribbon策略:
ribbon.NFLoadBalancerRuleClassName=com.netflix.loadbalancer.RandomRule -
属性配置方式优先级高于Java代码。
-
-
Ribbon脱离Eureka
设置 请求的网络地址列表。
Ribbon可以和服务注册中心Eureka一起工作,从服务注册中心获取服务端的地址信息,也可以在配置文件中使用listOfServers字段来设置服务端地址。ribbon.eureka.enabled=false ribbon.listOfServers=localhost:80,localhost:81 -
用法:
@RestController @RequestMapping("/demo") public class DemoController { @Autowired LoadBalancerClient lb; @Autowired RestTemplate restTemplate; @GetMapping("getHi") public String getHi(){ // ribbon 完成客户端的负载均衡,过滤掉down了的节点 ServiceInstance provider = lb.choose("PROVIDER"); String url ="http://" + provider.getHost() +":"+ provider.getPort() + "/demo/getHi"; return restTemplate.getForObject(url, String.class); } } -
手动实现,其实也是它的原理,做事的方法
手写客户端负载均衡 1、知道自己的请求目的地(虚拟主机名,默认是spring.application.name) 2、获取所有服务端地址列表(也就是注册表)。 3、选出一个地址,找到虚拟主机名对应的ip、port(将虚拟主机名 对应到 ip和port上)。 4、发起实际请求(最朴素的请求)。 -
负载均衡算法
-
默认实现:
ZoneAvoidanceRule(区域权衡策略):复合判断Server所在区域的性能和Server的可用性,轮询选择服务器。 -
其他规则:
BestAvailableRule(最低并发策略):会先过滤掉由于多次访问故障而处于断路器跳闸状态的服务,然后选择一个并发量最小的服务。逐个找服务,如果断路器打开,则忽略。RoundRobinRule(轮询策略):以简单轮询选择一个服务器。按顺序循环选择一个server。RandomRule(随机策略):随机选择一个服务器。AvailabilityFilteringRule(可用过滤策略):会先过滤掉多次访问故障而处于断路器跳闸状态的服务和过滤并发的连接数量超过阀值得服务,然后对剩余的服务列表安装轮询策略进行访问。WeightedResponseTimeRule(响应时间加权策略):据平均响应时间计算所有的服务的权重,响应时间越快服务权重越大,容易被选中的概率就越高。刚启动时,如果统计信息不中,则使用RoundRobinRule(轮询)策略,等统计的信息足够了会自动的切换到WeightedResponseTimeRule。响应时间长,权重低,被选择的概率低。反之,同样道理。此策略综合了各种因素(网络,磁盘,IO等),这些因素直接影响响应时间。RetryRule(重试策略):先按照RoundRobinRule(轮询)的策略获取服务,如果获取的服务失败则在指定的时间会进行重试,进行获取可用的服务。如多次获取某个服务失败,就不会再次获取该服务。主要是在一个时间段内,如果选择一个服务不成功,就继续找可用的服务,直到超时。
-
声明式调用Open Feign
-
pom
<dependency> <groupId>org.springframework.cloudgroupId> <artifactId>spring-cloud-starter-openfeignartifactId> dependency> -
启动类
@EnableFeignClients -
FeignClieng
@FeignClient(name="provider",configuration = FeignConfig.class) public interface ProviderClient extends ApiDemo { } -
服务提供方接口Controller,继承到FeignClient就省的自己写。
@RequestMapping("/demo") public interface ApiDemo { @GetMapping("/getHi") String getHi(); } -
远程调用
@Autowired ProviderClient providerClient; @GetMapping("getHiFeign") public String getHiFeign(){ return providerClient.getHi(); } -
feign的配置类( 1.自定义配置类、2.增加拦截器)
- Feign拦截器
RequestInterceptor,用于header中增加设置参数-
通用配置
@Configuration public class FeignConfig implements RequestInterceptor { private String iamKey="123456"; @Override public void apply(RequestTemplate requestTemplate) { requestTemplate.header("Content-Type","application/json"); requestTemplate.header("X-Gaia-Api-Key",iamKey); } } -
配置类不加@Configuration,在配置文件里配置哪个服务用哪个配置类
provider是服务名,不指定就写defult@FeignClient(name = "provider") feign: client: config: provider: request-interceptors: - com.msb.config.FeignConfig
-
- 默认配置类:org.springframework.cloud.openfeign.FeignClientsConfiguration默认定义了feign使用的编码器,解码器等
- 使用@FeignClient的configuration的属性自定义Feign配置。自定义的配置优先级高于上面的FeignClientsConfiguration
- 扩展
- 通用配置:
feign: client: config: default: connect-timeout: 5000 read-timeout: 5000 logger-level: full - 指定服务名称配置:
feign: client: config: provider: connect-timeout: 5000 read-timeout: 5000 logger-level: full - 属性配置比Java代码优先级高。也可通过配置设置java代码优先级高。
feign:
	client:
		default-to-properties: false
- 通用配置:
- Feign拦截器
-
原理
- 主程序入口添加@EnableFeignClients注解开启对Feign Client扫描加载处理。根据Feign Client的开发规范,定义接口并加@FeignClient注解。
- 当程序启动时,会进行包扫描,扫描所有@FeignClient注解的类,并将这些信息注入Spring IoC容器中。当定义的Feign接口中的方法被调用时,通过JDK的代理方式,来生成具体的RequestTemplate。当生成代理时,Feign会为每个接口方法创建一个RequestTemplate对象,该对象封装了HTTP请求需要的全部信息,如请求参数名、请求方法等信息都在这个过程中确定。
- 然后由RequestTemplate生成Request,然后把这个Request交给client处理,这里指的Client可以是JDK原生的URLConnection、Apache的Http Client,也可以是Okhttp。最后Client被封装到LoadBalanceClient类,这个类结合Ribbon负载均衡发起服务之间的调用。
-
压缩
- 服务端provider配置
#服务端开启压缩 server.compression.enabled=true - 调用方consumer配置
#配置请求GZIP压缩
feign.compression.request.enabled=true
#配置响应GZIP压缩
feign.compression.response.enabled=true
#单位是B
feign.compression.request.min-request-size=100
- 服务端provider配置
-
开启日志
- 配置文件
logging.level.com.mashibing.UserConsumer:debug - 重写日志等级
@Configuration
public class FeiginConfig {
	@Bean
	Logger.Level logLevel(){
		return Logger.Level.BASIC;
	}
}
- 配置文件
-
超时
- Feign默认支持Ribbon;Ribbon的重试机制和Feign的重试机制有冲突,所以源码中默认关闭Feign的重试机制,使用Ribbon的重试机制
#连接超时时间(ms) ribbon.ConnectTimeout=1000 #业务逻辑超时时间(ms) ribbon.ReadTimeout=6000 -
重试
使用ribbon重试机制,请求失败后,每个6秒会重新尝试#同一台实例最大重试次数,不包括首次调用 ribbon.MaxAutoRetries=1 #重试负载均衡其他的实例最大重试次数,不包括首次调用 ribbon.MaxAutoRetriesNextServer=1 #是否所有操作都重试 ribbon.OkToRetryOnAllOperations=false
服务监控Actuator
-
Eureka 健康检查
-
由于server和client通过心跳保持 服务状态,而只有状态为UP的服务才能被访问。看eureka界面中的status。
-
比如心跳一直正常,服务一直UP,但是此服务DB连不上了,无法正常提供服务。
-
开启手动控制
-
在client端配置:将自己真正的健康状态传播到server。
eureka: client: healthcheck: enabled: true -
Client端配置Actuator
		<dependency>
			<groupId>org.springframework.bootgroupId>
			<artifactId>spring-boot-starter-actuatorartifactId>
		dependency>
-
改变健康状态的Service
@Service public class HealthStatusService implements HealthIndicator{ private Boolean status = true; public void setStatus(Boolean status) { this.status = status; } @Override public Health health() { // TODO Auto-generated method stub if(status) return new Health.Builder().up().build(); return new Health.Builder().down().build(); } public String getStatus() { // TODO Auto-generated method stub return this.status.toString(); } -
-
测试用的Controller
@GetMapping("/health") public String health(@RequestParam("status") Boolean status) { healthStatusSrv.setStatus(status); return healthStatusSrv.getStatus(); } -
开启所有端点
- Spring Boot 2.0 的Actuator只暴露了health和info端点,提供的监控信息无法满足我们的需求
- 在1.x中有n多可供我们监控的节点,官方的回答是为了安全….
#开启所有端点 management.endpoints.web.exposure.include=* -
api端点功能
- Health
会显示系统状态
{“status”:“UP”} - shutdown
用来关闭节点
开启远程关闭功能management.endpoint.shutdown.enabled=true - autoconfig
获取应用的自动化配置报告 beans
获取应用上下文中创建的所有Bean - configprops
获取应用中配置的属性信息报告 - env
获取应用所有可用的环境属性报告 - Mappings
获取应用所有Spring Web的控制器映射关系报告 - info
获取应用自定义的信息 - metrics
返回应用的各类重要度量指标信息
Metrics节点并没有返回全量信息,我们可以通过不同的key去加载我们想要的值metrics/jvm.memory.max - Threaddump
1.x中为dump
返回程序运行中的线程信息
东宝商城(仿淘宝)项目技术架构图 高并发电商系统瓶颈分析 秒杀系统多级“读、写”分离 神一样的CAP定理以及BASE理论
- Health
熔断器Hystrix
-
pom
<dependency>
    <groupId>org.springframework.cloudgroupId>
    <artifactId>spring-cloud-starter-netflix-hystrixartifactId>
dependency>
单独使用
public class HystrixTest extends HystrixCommand {
    public static void main(String[] args) {
    String result="";
        Future<String> spring = new HystrixTest(HystrixCommandGroupKey.Factory.asKey("spring")).queue();
    try {
       result = spring.get();
    } catch (InterruptedException e) {
        e.printStackTrace();
    } catch (ExecutionException e) {
        e.printStackTrace();
    }
    System.out.println("程序结果:"+result);
    }

    protected HystrixTest(HystrixCommandGroupKey key) {
        super(key);
        // TODO Auto-generated constructor stub
    }
    @Override
    protected Object run() throws Exception {
        System.out.println("执行逻辑");
        int i = 1/0;
        return "ok";
    }
    @Override
    protected Object getFallback() {
        // TODO Auto-generated method stub
        return "getFallbackgetFallback";
    }
}
配合RestTemplate使用
启动类
@EnableCircuitBreaker@HystrixCommand(fallbackMethod = "back") public String alive() { // 自动处理URL RestTemplate restTemplate = new RestTemplate(); String url ="http://user-provider/User/alive"; String object = restTemplate.getForObject(url, String.class); return object; } public String back() { return "请求失败~bbb..."; }配合OpenFeign使用
启动类
@EnableHystrix配置文件开启
feign.hystrix.enabled=trueFeignClient添加fallback执行类

fallback类

FallbackFactory类

@Component
public class ProError implements FallbackFactory<ProviderClient> {
    @Override
    public ProviderClient create(Throwable throwable) {
        return new ProviderClient() {
            @Override
            public String getHi() {
                throwable.printStackTrace();
                if(throwable instanceof FeignException.InternalServerError) {
                    System.out.println("InternalServerError");
                    return "远程服务报错";
                }else if(throwable instanceof RuntimeException) {
                    System.out.println("RuntimeException");
                    return "远程服务链接超时";
                }else {
                    return "都算不上";
                }
            }
        };
    }
}
信号量隔离与线程隔离
-
默认情况下hystrix使用线程池控制请求隔离
-
线程池隔离技术,是用 Hystrix 自己的线程去执行调用;而信号量隔离技术,是直接让 tomcat 线程去调用依赖服务。信号量隔离,只是一道关卡,信号量有多少,就允许多少个 tomcat 线程通过它,然后去执行。
-
信号量隔离主要维护的是Tomcat的线程,不需要内部线程池,更加轻量级。
-
配置
hystrix.command.default.execution.isolation.strategy 隔离策略,默认是Thread, 可选Thread|Semaphore thread 通过线程数量来限制并发请求数,可以提供额外的保护,但有一定的延迟。一般用于网络调用 semaphore 通过semaphore count来限制并发请求数,适用于无网络的高并发请求 hystrix.command.default.execution.isolation.thread.timeoutInMilliseconds 命令执行超时时间,默认1000ms hystrix.command.default.execution.timeout.enabled 执行是否启用超时,默认启用true hystrix.command.default.execution.isolation.thread.interruptOnTimeout 发生超时是是否中断,默认true hystrix.command.default.execution.isolation.semaphore.maxConcurrentRequests 最大并发请求数,默认10,该参数当使用ExecutionIsolationStrategy.SEMAPHORE策略时才有效。如果达到最大并发请求数,请求会被拒绝。理论上选择semaphore size的原则和选择thread size一致,但选用semaphore时每次执行的单元要比较小且执行速度快(ms级别),否则的话应该用thread。 semaphore应该占整个容器(tomcat)的线程池的一小部分。 -
Feign下配置
hystrix.command.default.execution.isolation.strategy=SEMAPHORE
dashboard
-
pom
<dependency> <groupId>org.springframework.cloudgroupId> <artifactId>spring-cloud-starter-netflix-hystrix-dashboardartifactId> dependency> <dependency> <groupId>org.springframework.bootgroupId> <artifactId>spring-boot-starter-actuatorartifactId> dependency> -
启动类
@EnableHystrixDashboard -
图形化
http://localhost:90/hystrix -
健康上报
http://localhost:90/actuator/hystrix.stream
-
服务网关Zuul
-
pom
<dependency> <groupId>org.springframework.cloudgroupId> <artifactId>spring-cloud-starter-netflix-zuulartifactId> dependency> -
启动类
@EnableZuulProxy -
访问(网关会将服务名转换成具体服务的ip和端口,实际进行访问)
http://euk1.top:1000/consumer/demo1/getHiFeign -
负载均衡(默认是轮询)
consumer.ribbon.NFLoadBalancerRuleClassName=com.netflix.loadbalancer.RandomRule -
路由端点
调试的时候,看网关请求的地址,以及 映射是否正确。网关请求有误时,可以通过此处排查错误。management.endpoints.web.exposure.include=* management.endpoint.health.show-details=always management.endpoint.health.enabled=true management.endpoint.routes.enabled=true -
配置指定微服务的访问路径
-
通过服务名配置(虚拟主机名)
http://euk1.top:1000/consumer/demo1/getHiFeign
http://euk1.top:1000/consumer_v1/demo1/getHiFeignzuul.routes.consumer=/consumer_v1/** -
自定义映射
zuul.routes.baidu.path=/baidu/**
zuul.routes.baidu.url=http://baidu.com
自定义下的负载均衡
zuul.routes.user-provider.path=/user-provider/**
zuul.routes.user-provider.service-id=cuid
cuid.ribbon.listOfServers=euk1.top:8001,euk1.top:8002
ribbon.eureka.enabled=false
-
-
忽略微服务
zuul.ignored-services=consumer -
前缀
zuul.prefix=/api/v1- 带上前缀请求
zuul.strip-prefix=false
- 带上前缀请求
链路追踪Sleuth
Sleuth是Spring cloud的分布式跟踪解决方案。
-
pom
<dependency>
    <groupId>org.springframework.cloudgroupId>
    <artifactId>spring-cloud-starter-sleuthartifactId>
    <version>2.2.6.RELEASEversion>
dependency>
Sleuth单独使用
zipkin
上面拍错看日志,很原始。刀耕火种,加入利器 zipkin。

zipkin是twitter开源的分布式跟踪系统。

原理收集系统的时序数据,从而追踪微服务架构中系统延时等问题。还有一个友好的界面。
- 由4个部分组成:
- Collector、Storage、Restful API、Web UI组成
- 采集器,存储器,接口,UI。
- 原理:
- sleuth收集跟踪信息通过http请求发送给zipkin server,zipkin将跟踪信息存储,以及提供RESTful API接口,zipkin ui通过调用api进行数据展示。
- 默认内存存储,可以用mysql,ES等存储。
操作步骤:
- pom
<dependency> <groupId>org.springframework.cloudgroupId> <artifactId>spring-cloud-starter-zipkinartifactId> dependency> - 每个需要监听的服务yml中
spring: #zipkin zipkin: base-url: http://localhost:9411/ #采样比例1 sleuth: sampler: rate: 1 - 启动zipkin
-
jar包下载:wget ‘https://search.maven.org/remote_content?g=io.zipkin.java&a=zipkin-server&v=LATEST&c=exec’
-
curl -sSL https://zipkin.io/quickstart.sh | bash -s
我放到了 目录:C:\github\online-taxi-demo 下面。java -jar zipkin.jar -
或者docker:
docker run -d -p 9411:9411 openzipkin/zipkin
健康检查Spring Cloud Admin
server
-
pom
<properties> <spring-boot-admin.version>2.2.1spring-boot-admin.version> properties> <dependency> <groupId>de.codecentricgroupId> <artifactId>spring-boot-admin-starter-serverartifactId> <version>${spring-boot-admin.version}version> dependency> <dependency> <groupId>de.codecentricgroupId> <artifactId>spring-boot-admin-server-uiartifactId> <version>${spring-boot-admin.version}version> dependency> -
配置
server.port=1100 #设置服务注册中心的URL,用于client和server端交流 eureka.client.service-url.defaultZone=http://euk2.top:7002/eureka/,http://euk1.top:7001/eureka/ spring.application.name=admin management.endpoints.web.exposure.include=* management.endpoint.health.show-details=always management.endpoint.health.enabled=true management.endpoint.routes.enabled=true -
启动类
@EnableAdminServer
client
-
pom
<dependency> <groupId>de.codecentricgroupId> <artifactId>spring-boot-admin-starter-clientartifactId> <version>2.2.1version> dependency> <dependency> <groupId>org.springframework.bootgroupId> <artifactId>spring-boot-starter-actuatorartifactId> dependency> -
配置
management.endpoints.web.exposure.include=*
management.endpoint.health.show-details=always
spring.boot.admin.client.url=http://localhost:1100
邮件通知
-
pom
<dependency> <groupId>org.springframework.bootgroupId> <artifactId>spring-boot-starter-mailartifactId> dependency> -
配置
# 邮件设置
spring.mail.host=smtp.qq.com
spring.mail.username=QQ号码
spring.mail.password=pbwyfawjefspbdhd1
spring.mail.properties.mail.smpt.auth=true
spring.mail.properties.mail.smpt.starttls.enable=true
spring.mail.properties.mail.smpt.starttls.required=true
#收件邮箱
spring.boot.admin.notify.mail.to=QQ号码@qq.com
# 发件邮箱
spring.boot.admin.notify.mail.from=QQ号码@qq.com
钉钉群通知
-
pom
<dependency> <groupId>com.alibabagroupId> <artifactId>fastjsonartifactId> <version>1.2.68version> dependency> -
配置
# spring cloud access&secret config # 可以访问如下地址查看: https://usercenter.console.aliyun.com/#/manage/ak spring.cloud.alicloud.access-key=LTAIEW7ORp2hYTBB1 spring.cloud.alicloud.secret-key=TSqXlzrivoVYdD7CH9HVmjKwbtC9Xa1 -
启动类
@Bean public DingDingNotifier dingDingNotifier(InstanceRepository repository) { return new DingDingNotifier(repository); } -
DingDingNotifier
public class DingDingNotifier extends AbstractStatusChangeNotifier { public DingDingNotifier(InstanceRepository repository) { super(repository); } @Override protected Mono<Void> doNotify(InstanceEvent event, Instance instance) { String serviceName = instance.getRegistration().getName(); String serviceUrl = instance.getRegistration().getServiceUrl(); String status = instance.getStatusInfo().getStatus(); Map<String, Object> details = instance.getStatusInfo().getDetails(); StringBuilder str = new StringBuilder(); str.append("系统警告 : 【" + serviceName + "】"); str.append("【服务地址】" + serviceUrl); str.append("【状态】" + status); str.append("【详情】" + JSONObject.toJSONString(details)); return Mono.fromRunnable(() -> { DingDingMessageUtil.sendTextMessage(str.toString()); }); } } -
DingDingMessageUtil
public class DingDingMessageUtil { // 从钉钉群获取的 public static String access_token = "55420aefab13c4cf75b3ad144a0efa71ba406ba0037e2619fb99ad2ca5e2c452"; public static void sendTextMessage(String msg) { //https://oapi.dingtalk.com/robot/send?access_token=55420aefab13c4cf75b3ad144a0efa71ba406ba0037e2619fb99ad2ca5e2c452 try { Message message = new Message(); message.setMsgtype("text"); message.setText(new MessageInfo(msg)); URL url = new URL("https://oapi.dingtalk.com/robot/send?access_token=" + access_token); // 建立 http 连接 HttpURLConnection conn = (HttpURLConnection) url.openConnection(); conn.setDoOutput(true); conn.setDoInput(true); conn.setUseCaches(false); conn.setRequestMethod("POST"); conn.setRequestProperty("Charset", "UTF-8"); conn.setRequestProperty("Content-Type", "application/Json; charset=UTF-8"); conn.connect(); OutputStream out = conn.getOutputStream(); String textMessage = JSONObject.toJSONString(message); byte[] data = textMessage.getBytes(); out.write(data); out.flush(); out.close(); InputStream in = conn.getInputStream(); byte[] data1 = new byte[in.available()]; in.read(data1); System.out.println(new String(data1)); } catch (Exception e) { e.printStackTrace(); } } } -
Message
public class Message { private String msgtype; private MessageInfo text; public String getMsgtype() { return msgtype; } public void setMsgtype(String msgtype) { this.msgtype = msgtype; } public MessageInfo getText() { return text; } public void setText(MessageInfo text) { this.text = text; } } -
MessageInfo
public class MessageInfo {
    private String content;
    public MessageInfo(String content) {
        this.content = content;
    }
    public String getContent() {
        return content;
    }
    public void setContent(String content) {
        this.content = content;
    }
}
配置中心Spring Cloud Config
1、创建配置文件git仓库
2、config-server端
-
pom
<dependency> <groupId>org.springframework.cloudgroupId> <artifactId>spring-cloud-starter-netflix-eureka-clientartifactId> dependency> <dependency> <groupId>org.springframework.cloudgroupId> <artifactId>spring-cloud-config-serverartifactId> dependency> -
配置文件
server.port=1141
# git地址
spring.cloud.config.server.git.uri=https://gitee.com/a84/config-server.git
# git分支
spring.cloud.config.label=master
#设置服务注册中心的URL,用于client和server端交流
eureka.client.service-url.defaultZone=http://euk2.top:7002/eureka/,http://euk1.top:7001/eureka/
spring.application.name=config-server
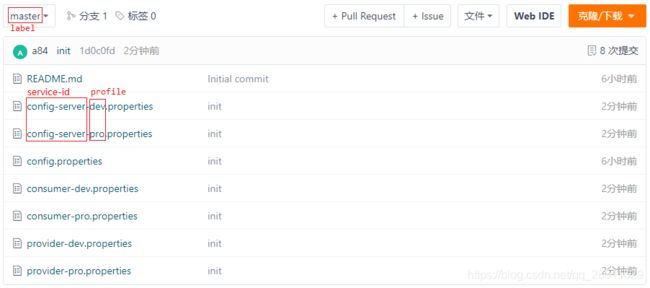
下面简单说一下,因为我们读取的配置文件名字叫做【provider-dev.properties】,所以spring.application.name对应【provider】;属性【profile】对应【dev】;然后就是spring.cloud.config.discovery.service-id对应的是注册在Eureka上的config Server的名字 -
启动类
@EnableEurekaClient @EnableConfigServer -
启动测试拉取
不写默认masterhttp://host:port/lable/fileName
http://localhost:1141/master/config-client-dev.properties -
匹配规则
正确配置后能读到来自git的配置文件获取配置规则:根据前缀匹配 /{name}-{profiles}.properties /{name}-{profiles}.yml /{name}-{profiles}.json /{label}/{name}-{profiles}.yml name 服务名称 profile 环境名称,开发、测试、生产:dev qa prd lable 仓库分支、默认master分支 匹配原则:从前缀开始。
3、config-client端
-
pom
<dependency> <groupId>org.springframework.cloudgroupId> <artifactId>spring-cloud-config-clientartifactId> dependency> -
配置文件
- bootstrap.properties(eureka和config-server)
注意:#设置服务注册中心的URL,用于client和server端交流 eureka.client.service-url.defaultZone=http://euk2.top:7002/eureka/,http://euk1.top:7001/eureka/ spring.application.name=consumer #直接URL方式查找配置中心 #spring.cloud.config.uri=http://localhost:1141/ #通过注册中心查找 spring.cloud.config.discovery.enabled=true spring.cloud.config.discovery.service-id=config-server spring.cloud.config.profile=dev spring.cloud.config.label=master- spring.application.name=
config-client端服务名,配置文件name - spring.cloud.config.discovery.service-id=config-server端服务名
- spring.application.name=
- bootstrap.properties(eureka和config-server)
-
启动日志
加载了 master分支的consumer-dev配置文件

4、刷新配置
-
手动配置热更新
- config-client端开启actuator中的refresh端点
- config-client端用到远程配置文件的类添加@RefreshScope注解 //开启更新功能
- 发送Post请求config-client端http://localhost:9001/actuator/refresh发送Post请求
-
自动配置热更新(Spring Cloud Bus + RabbitMQ)
-
pom(server + client)
<dependency> <groupId>org.springframework.cloud</groupId> <artifactId>spring-cloud-starter-bus-amqp</artifactId> </dependency> -
配置文件(server + client)
spring.rabbitmq.host=81.70.111.111 spring.rabbitmq.port=5672 spring.rabbitmq.username=guest spring.rabbitmq.password=guest -
测试
启动两个微服务- http://localhost:91/actuator/
bus-refresh
修改配置文件后向其中一个端点发送post请求,观察另一个服务是否也跟着刷新了。 - http://localhost:8002/actuator/
refresh
只能刷新当前应用的配置
- http://localhost:91/actuator/
消息总线Spring Cloud Bus
- pom(server + client)
<dependency>
	<groupId>org.springframework.cloud</groupId>
	<artifactId>spring-cloud-starter-bus-amqp</artifactId>
</dependency>
消息队列RabbitMQ
- 配置文件(server + client)
spring.rabbitmq.host=81.70.111.111
spring.rabbitmq.port=5672
spring.rabbitmq.username=guest
spring.rabbitmq.password=guest


