SpringBoot核心注解,配置文件,condition,启动器分析,源码分析,自建springboot启动器starter,SpringBoot集成jsp
SpringBoot进阶
一、SpringBoot核心注解
1. @SpringBootApplication
标识springboot项目的启动类
打开@SpringBootApplication注解
@Target({ElementType.TYPE})
@Retention(RetentionPolicy.RUNTIME)
@Documented
@Inherited
@SpringBootConfiguration
@EnableAutoConfiguration
@ComponentScan(
    excludeFilters = {@Filter(
    type = FilterType.CUSTOM,
    classes = {TypeExcludeFilter.class}
), @Filter(
    type = FilterType.CUSTOM,
    classes = {AutoConfigurationExcludeFilter.class}
)}
)
public @interface SpringBootApplication {
2. @SpringBootConfiguration
实际上就是@configuration注解的别名,标识一个类是一个配置类,相当于一个xml格式的spring配置文件。
3. @EnableAutoConfiguration
让SpringBoot根据配置文件或者pom文件,自动配置,(自动实例化bean)
4. @ComponentScan
组件扫描,默认是扫描启动类之下的所有包。一般加在启动类上。
二、SpringBoot的配置文件
常见的配置文件类型
bootstrap.properties(springcloud使用,优先加载)
application.properties
application.yml
application.yaml
spring-boot-starter-parent种定义的配置文件格式,默认名称为application

yml和properties的区别
- properties配置类似于简单的map结构,一个key对应一个value,中间使用=连接
- 一个key多个value的情况,properties不擅长
SpringBoot的profile
profile提供一种隔离应用程序配置的方法,根据不同的配置类型,加载不同的bean或者不同的配置文件。
使用在方法@bean类上@component@controller@service,@configuration@Repositpry
无论是方法还是类都要被spring管理
使用profile加载不同的bean
配置类中有两个相同名称的bean:myGirl
package com.example.controller;

import com.example.domain.Girl;
import org.springframework.context.annotation.Bean;
import org.springframework.context.annotation.Configuration;
import org.springframework.context.annotation.Profile;

/**
 * @author : 尚腾飞
 * @version : 1.0
 * @createTime : 2022/10/9 16:24
 * @description :
 */
@Configuration
public class MyProfile {
    @Bean("myGirl")
    @Profile("school")
    public Girl girlSchool(){
       return new Girl(111,"张大炮");
    }
    @Bean("myGirl")
    @Profile("family")
    public Girl girlFamily() {
        return new Girl(222, "李二雷");
    }
}
主配置文件中指定用哪个:
spring:
    profiles:
        active: family
实际生产中经常用到的配置文件的名称
开发环境
- dev:(Development environment):开发环境。用于开发者调试使用。
测试环境:
- test:测试环境。
- sit:(System Integration Test):系统集成测试。
- uat:(User Acceptance environment):用户验收测试环境。生产环境下的软件测试者测试使用。预发布环境。
- pre:灰度环境。灰度测试环境就是生产环境,生产数据,所影响的也是生产环境,只是范围比测试环境更广,更真实。其实就是小范围的生产环境。类似于游戏内测。
- fat:(Feature Acceptance Test environment):功能验收测试环境。软件测试者测试使用。
生产环境
- prod:(Production environment):生产环境。正式线上环境。
三、SpringBoot的condition
@Condition根据满足某一个特征条件创建一个特定的bean。比如说当一个jar包在一个类路径下的时候,自动配置一个或者多个bean。或者只有某个bean被创建才会创建另外一个bean。总之就是根据特定的条件来控制bean的创建行为,这样的话我们就可以利用此特性来进行一些自动配置。
下面根据不同的操作系统返回不同的列表命令:
查看当前文件夹中的所有内容
linux
ls -l
windows
dir
1. 定义判断条件。通过实现condition接口,并重写matches方法。
Linux的判断条件
package com.example.condition;

import org.springframework.context.annotation.Condition;
import org.springframework.context.annotation.ConditionContext;
import org.springframework.core.type.AnnotatedTypeMetadata;

/**
 * @author : 尚腾飞
 * @version : 1.0
 * @createTime : 2022/10/10 18:40
 * @description :
 */
public class LinuxCondition implements Condition {
    @Override
    public boolean matches(ConditionContext context, AnnotatedTypeMetadata metadata) {
        //获取当前操作系统的名称os.name
        String propertyValue = context.getEnvironment().getProperty("os.name");
        //先将获取的字符串转小写再判断包含不包含
        return propertyValue.toLowerCase().contains("linux");
    }
}
Windows的判断条件
package com.example.condition;

import org.springframework.context.annotation.Condition;
import org.springframework.context.annotation.ConditionContext;
import org.springframework.core.type.AnnotatedTypeMetadata;

/**
 * @author : 尚腾飞
 * @version : 1.0
 * @createTime : 2022/10/10 18:40
 * @description :
 */
public class WindowsCondition implements Condition {
    @Override
    public boolean matches(ConditionContext context, AnnotatedTypeMetadata metadata) {
        //获取当前操作系统的名称os.name
        String propertyValue = context.getEnvironment().getProperty("os.name");
        //先将获取的字符串转小写再判断包含不包含
        return propertyValue.toLowerCase().contains("window");
    }
}
2. 创建不同操作系统的不同的bean
ListFileCmd接口
package com.example.condition;

/**
 * @author : 尚腾飞
 * @version : 1.0
 * @createTime : 2022/10/10 18:44
 * @description :
 */
public interface ListFileCmd {
    String getListCmd();
}
Linux的实现类
package com.example.condition;

/**
 * @author : 尚腾飞
 * @version : 1.0
 * @createTime : 2022/10/10 18:45
 * @description :
 */
public class LinuxListCmdImpl implements ListFileCmd{
    @Override
    public String getListCmd() {
        //如果是linux返回ls命令
        return "ls";
    }
}
Windows的实现类
package com.example.condition;

/**
 * @author : 尚腾飞
 * @version : 1.0
 * @createTime : 2022/10/10 18:45
 * @description :
 */
public class WindowsListCmdImpl implements ListFileCmd{
    @Override
    public String getListCmd() {
        //如果是windows返回dir命令
        return "dir";
    }
}
3. 在配置类(启动类)中添加bean
    /*listFileCmd  bean的实例化依赖于@Conditional中的
    LinuxCondition和WindowsCondition的匹配结果*/
    @Bean("listFileCmd")
    @Conditional(LinuxCondition.class)
    public ListFileCmd LinuxListFileCmd(){
        System.out.println("操作系统是linux");
        return  new LinuxListCmdImpl();
    }
    @Bean("listFileCmd")
    @Conditional(WindowsCondition.class)
    public ListFileCmd WindowsListFileCmd(){
        System.out.println("操作系统是windows");
        return  new WindowsListCmdImpl();
    }
4. 测试
Linux中测试:
Windows中测试:
package com.example;

import com.example.condition.ListFileCmd;
import org.junit.jupiter.api.Test;
import org.springframework.beans.factory.annotation.Autowired;
import org.springframework.boot.test.context.SpringBootTest;

@SpringBootTest
class Mysrpingboot03ApplicationTests {

    @Autowired
    private ListFileCmd listFileCmd;

    @Test
    public void testFileCmd(){
        System.out.println(listFileCmd.getListCmd());
    }
}
四、SpringBoot启动器分析
在配置文件application.properties中加上debug=true
#开启启动的debug模式
debug=true
2. 启动器没有匹配
1. 手动验证不匹配的组件(ActiveMQAutoConfiguration)
<dependency>
    <groupId>org.apache.activemqgroupId>
    <artifactId>activemq-springartifactId>
    <version>5.17.2version>
dependency>
2. 重新启动
从控制台debug信息中发现不匹配变成匹配,原因是项目中存在javax.jms.ConnectionFactory,触发了springboot的condition实现

3. 查看ActiveMQAutoConfiguration 自动配置类的源码:
@AutoConfiguration(before = JmsAutoConfiguration.class, after = JndiConnectionFactoryAutoConfiguration.class)
@ConditionalOnClass({ ConnectionFactory.class, ActiveMQConnectionFactory.class })
@ConditionalOnMissingBean(ConnectionFactory.class)
@EnableConfigurationProperties({ ActiveMQProperties.class, JmsProperties.class })
@Import({ ActiveMQXAConnectionFactoryConfiguration.class, ActiveMQConnectionFactoryConfiguration.class })
public class ActiveMQAutoConfiguration {
...
}
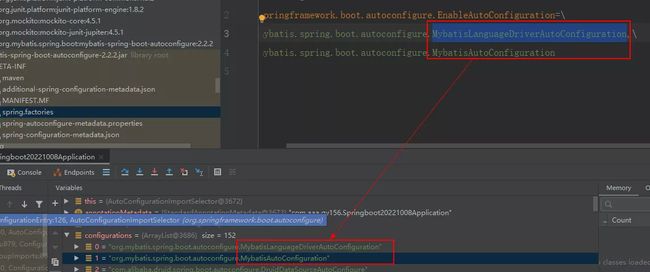
五、mybatis的自动配置源码
六、SpringBoot源码分析
1. SpringBoot的入口函数
package com.example;

import org.springframework.boot.SpringApplication;
import org.springframework.boot.autoconfigure.SpringBootApplication;


@SpringBootApplication
public class Mysrpingboot03Application {

    public static void main(String[] args) {
        SpringApplication.run(Mysrpingboot03Application.class, args);
    }
}
run方法必须传入一个类,这个类必须拥有注解@SpringBootApplication
2. 注解SpringBootApplication分析
@SpringBootApplication标注在某个类上说明这个类是SpringBoot的主配置类,SpringBoot就会运行这个类的main方法来启动SpringBoot项目。
@SpringBootApplication:
@Target(ElementType.TYPE)
@Retention(RetentionPolicy.RUNTIME)
@Documented
@Inherited
//等同于configuration
@SpringBootConfiguration
//启用Spring应用程序上下文的自动配置,尝试猜测(满足condition)和配置您可能需要的bean
@EnableAutoConfiguration
@ComponentScan(excludeFilters = { @Filter(type = FilterType.CUSTOM, classes = TypeExcludeFilter.class),
      @Filter(type = FilterType.CUSTOM, classes = AutoConfigurationExcludeFilter.class) })
public @interface SpringBootApplication {
...
}
3. @EnableAutoConfiguration自动配置bean
@Target(ElementType.TYPE)
@Retention(RetentionPolicy.RUNTIME)
@Documented
@Inherited
@AutoConfigurationPackage
@Import(AutoConfigurationImportSelector.class)
public @interface EnableAutoConfiguration {
...
}
4. @AutoConfigurationPackage
@AutoConfigurationPackage 自动配置包,主要是使用的@Import来给Spring容器中导入一个组件 ,这里导入的是Registrar.class
@Target(ElementType.TYPE)
@Retention(RetentionPolicy.RUNTIME)
@Documented
@Inherited
@Import(AutoConfigurationPackages.Registrar.class)
public @interface AutoConfigurationPackage {
...
}
5. Registrar 注册类
Registrar 注册类将主配置类(即@SpringBootApplication标注的类)的所在包及子包里面所有组件扫描加载(注册)到Spring容器。
static class Registrar implements ImportBeanDefinitionRegistrar, DeterminableImports {
        Registrar() {
        }

        public void registerBeanDefinitions(AnnotationMetadata metadata, BeanDefinitionRegistry registry) {
        	//获取需要注册的组件的包名
            AutoConfigurationPackages.register(registry, (String[])(new PackageImports(metadata)).getPackageNames().toArray(new String[0]));
        }

        public Set<Object> determineImports(AnnotationMetadata metadata) {
            return Collections.singleton(new PackageImports(metadata));
        }
    }
6. 选择器类AutoConfigurationImportSelector
扫描的包找到之后,那具体加载哪些组件呢,看看下面这个注解

AutoConfigurationImportSelector.class:
	public String[] selectImports(AnnotationMetadata annotationMetadata) {
        if (!this.isEnabled(annotationMetadata)) {
            return NO_IMPORTS;
        } else {
            AutoConfigurationEntry autoConfigurationEntry = this.getAutoConfigurationEntry(annotationMetadata);
            return StringUtils.toStringArray(autoConfigurationEntry.getConfigurations());
        }
    }
	protected AutoConfigurationEntry getAutoConfigurationEntry(AnnotationMetadata annotationMetadata) {
        if (!this.isEnabled(annotationMetadata)) {
            return EMPTY_ENTRY;
        } else {
            AnnotationAttributes attributes = this.getAttributes(annotationMetadata);
            List<String> configurations = this.getCandidateConfigurations(annotationMetadata, attributes);
            configurations = this.removeDuplicates(configurations);
            Set<String> exclusions = this.getExclusions(annotationMetadata, attributes);
            this.checkExcludedClasses(configurations, exclusions);
            configurations.removeAll(exclusions);
            configurations = this.getConfigurationClassFilter().filter(configurations);
            this.fireAutoConfigurationImportEvents(configurations, exclusions);
            return new AutoConfigurationEntry(configurations, exclusions);
        }
    }
    protected List<String> getCandidateConfigurations(AnnotationMetadata metadata, AnnotationAttributes attributes) {
        List<String> configurations = new ArrayList(SpringFactoriesLoader.loadFactoryNames(this.getSpringFactoriesLoaderFactoryClass(), this.getBeanClassLoader()));
        ImportCandidates.load(AutoConfiguration.class, this.getBeanClassLoader()).forEach(configurations::add);
        Assert.notEmpty(configurations, "No auto configuration classes found in META-INF/spring.factories nor in META-INF/spring/org.springframework.boot.autoconfigure.AutoConfiguration.imports. If you are using a custom packaging, make sure that file is correct.");
        return configurations;
    }
总结
springboot启动类里面有一个 main 方法运行了一个 run()方法,在 run 方法中必 须要传入一个@SpringBootApplication 注解的类。 @SpringBootApplication 包含@EnableAutoConfiguration 该注解 @EnableAutoConfiguration 开启自动配置功能,在 @EnableAutoConfiguration 中包含 @Import({AutoConfigurationImportSelector.class})注解, 该注解需 要导入 AutoConfigurationImportSelector 自动配置选择器类,该类会 自动装载一些自动配置类。而这些配置类会完成相应的自动装配。
七、自建springboot启动器starter
1. 创建一个maven项目,引入springboot的自动配置jar包
        <dependency>
            <groupId>org.springframework.bootgroupId>
            <artifactId>spring-boot-autoconfigureartifactId>
            <version>2.7.4version>
        dependency>
2. 创建一个Student实体类,并自动读取properties中的配置
package com.aaa.entity;

import org.springframework.boot.context.properties.ConfigurationProperties;
import org.springframework.stereotype.Component;

/**
 * @author : 尚腾飞
 * @version : 1.0
 * @createTime : 2022/10/10 14:29
 * @description :
 */
@Component
@ConfigurationProperties(prefix = "student")
public class Student {
    private Integer id;
    private String name;
    private String message;

    public Student() {
    }

    public Student(Integer id, String name, String message) {
        this.id = id;
        this.name = name;
        this.message = message;
    }

    public Integer getId() {
        return id;
    }

    public void setId(Integer id) {
        this.id = id;
    }

    public String getName() {
        return name;
    }

    public void setName(String name) {
        this.name = name;
    }

    public String getMessage() {
        return message;
    }

    public void setMessage(String message) {
        this.message = message;
    }
}
3. 创建一个service层的bean,随便写一个getMessage方法
package com.aaa.service;

import com.aaa.entity.Student;

/**
 * @author : 尚腾飞
 * @version : 1.0
 * @createTime : 2022/10/10 14:31
 * @description :
 */
public class StudentService {
    private Student student;

    public Student getStudent() {
        return student;
    }

    public void setStudent(Student student) {
        this.student = student;
    }

    public void getMessage(){
        System.out.println(student.getMessage());
    }
}
4. 创建自动配置类
package com.aaa.config;

import com.aaa.entity.Student;
import com.aaa.service.StudentService;
import org.springframework.beans.factory.annotation.Autowired;
import org.springframework.boot.autoconfigure.condition.ConditionalOnClass;
import org.springframework.boot.context.properties.EnableConfigurationProperties;
import org.springframework.context.annotation.Bean;
import org.springframework.context.annotation.Configuration;

/**
 * @author : 尚腾飞
 * @version : 1.0
 * @createTime : 2022/10/10 14:34
 * @description :
 */
@Configuration
@ConditionalOnClass({StudentService.class})
@EnableConfigurationProperties(Student.class)
public class Qy156AutoConfiguration {

    @Autowired
    private Student student;

    @Bean
    public StudentService service(){
        StudentService service = new StudentService();
        service.setStudent(student);
        return service;
    }

}
5. 创建spring.factories配置文件
# Auto Configure
org.springframework.boot.autoconfigure.EnableAutoConfiguration=\
com.aaa.config.Qy156AutoConfiguration
6. 打包发布到本地仓库
mvn install
mvn install 打包到本地仓库
mvn package 打包到target目录
7. 在另外一个普通的springboot项目中使用之前创建好的starter
        <dependency>
            <groupId>com.aaagroupId>
            <artifactId>qy156-spring-boot-starterartifactId>
            <version>1.0-SNAPSHOTversion>
        dependency>
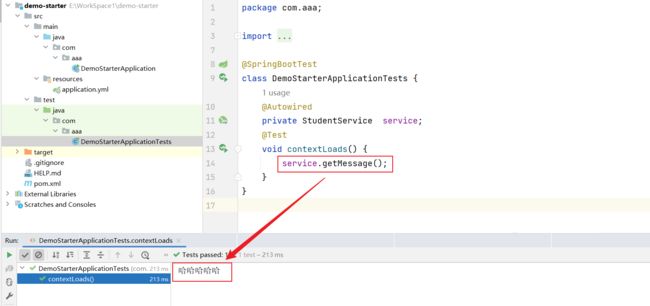
8. 在另外一个普通的springboot项目中测试
在主配置中加入student的配置参数
student:
  id: 1
  name: 张三
  message: 哈哈哈哈哈
package com.aaa;

import com.aaa.service.StudentService;
import org.junit.jupiter.api.Test;
import org.springframework.beans.factory.annotation.Autowired;
import org.springframework.boot.test.context.SpringBootTest;

@SpringBootTest
class DemoStarterApplicationTests {
    @Autowired
    private StudentService  service;
    @Test
    void contextLoads() {
        service.getMessage();
    }
}
八、SpringBoot集成jsp
1. 引入jsp需要的jar
<dependency>
    <groupId>org.apache.tomcat.embedgroupId>
    <artifactId>tomcat-embed-jasperartifactId>
    <scope>providedscope>
dependency>
<dependency>
    <groupId>javax.servletgroupId>
    <artifactId>jstlartifactId>
    <scope>providedscope>
dependency>
<dependency>
    <groupId>javax.servletgroupId>
    <artifactId>javax.servlet-apiartifactId>
    <scope>providedscope>
dependency>
2. 添加webapp文件夹
注意:webapp文件夹要设置一下,变成下图所示文件夹样式
3. 设置视图解析
spring:
  mvc:
    view:
      prefix: /views/
      suffix: .jsp


