Spring Cloud之多级缓存
目录
传统缓存
多级缓存
JVM进程缓存
Caffeine
缓存驱逐策略
实现进程缓存
常用Lua语法
数据类型
变量声明
循环使用
定义函数
条件控制
安装OpenResty
实现Nginx业务逻辑编写
请求参数解析
实现lua访问tomcat
JSON的序列化和反序列化
Tomcat的集群负载均衡
资料下载:day04-多级缓存
下载完成后跟着案例导入说明去做
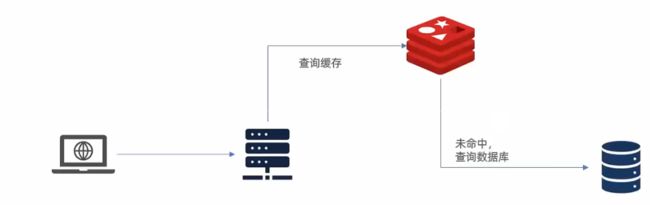
传统缓存
传统的缓存策略一般是请求到达Tomcat后,先查询Redis,如果未命中则查询数据库,存在下面的问题
- 请求要经过Tomcat处理,Tomcat的性能成为整个系统的瓶颈
- Redis缓存失效时,会对数据库产生冲击
多级缓存

多级缓存主要压力在于nginx,在生产环境中,我们需要通过部署nginx本地缓存集群以及一个nginx反向代理到本地缓存
JVM进程缓存
缓存在日常开发中启动至关重要的作用,由于是存储在内存中,数据的读取速度是非常快的,能大量减少对数据库的访问,减少数据库的压力。我们把缓存分为两类:
- 分布式缓存,例如Redis:
- 优点:存储容量更大、可靠性更好、可以在集群间共享
- 缺点:访问缓存有网络开销
- 场景:缓存数据量较大、可靠性要求较高、需要在集群间共享
- 进程本地缓存,例如HashMap、GuavaCache
- 优点:读取本地内存,没有网络开销,速度更快
- 缺点:存储容量有限、可靠性较低、无法共享
- 场景:性能要求较高,缓存数据量较小
Caffeine
案例测试代码
@Test
void testBasicOps() {
// 创建缓存对象
Cache cache = Caffeine.newBuilder().build();
// 存数据
cache.put("name", "张三");
// 取数据,不存在则返回null
String name = cache.getIfPresent("name");
System.out.println("name = " + name);
// 取数据,不存在则去数据库查询
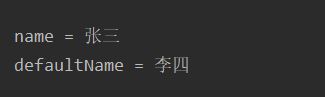
String defaultName = cache.get("defaultName", key -> {
// 这里可以去数据库根据 key查询value
return "李四";
});
System.out.println("defaultName = " + defaultName);
} 运行结果如下
缓存驱逐策略
Caffeine提供了三种缓存驱逐策略:
- 基于容量:设置缓存的数量上限
- 基于时间:设置缓存的有效时间
- 基于引用:设置缓存为软引用或弱引用,利用GC来回收缓存数据,性能较差。
默认情况下,当缓存数据过期时,并不会立即将其清理和驱逐,而是在一次读或写操作后,或是在空闲时间完成对失效数据的驱逐。
基于容量实现
    /*
     基于大小设置驱逐策略:
     */
    @Test
    void testEvictByNum() throws InterruptedException {
        // 创建缓存对象
        Cache cache = Caffeine.newBuilder()
                // 设置缓存大小上限为 1
                .maximumSize(1)
                .build();
        // 存数据
        cache.put("name1", "张三");
        cache.put("name2", "李四");
        cache.put("name3", "王五");
        // 延迟10ms,给清理线程一点时间
        Thread.sleep(10L);
        // 获取数据
        System.out.println("name1: " + cache.getIfPresent("name1"));
        System.out.println("name2: " + cache.getIfPresent("name2"));
        System.out.println("name3: " + cache.getIfPresent("name3"));
    }
运行结果如下

基于时间实现
/*
基于时间设置驱逐策略:
*/
@Test
void testEvictByTime() throws InterruptedException {
// 创建缓存对象
Cache cache = Caffeine.newBuilder()
.expireAfterWrite(Duration.ofSeconds(1)) // 设置缓存有效期为 10 秒
.build();
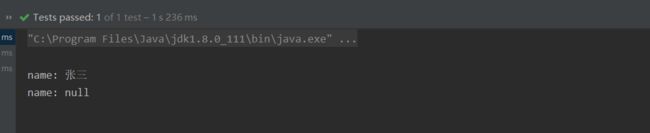
// 存数据
cache.put("name", "张三");
// 获取数据
System.out.println("name: " + cache.getIfPresent("name"));
// 休眠一会儿
Thread.sleep(1200L);
System.out.println("name: " + cache.getIfPresent("name"));
} 运行结果如下
实现进程缓存
利用Caffeine实现下列需求:
- 给根据id查询商品的业务添加缓存,缓存未命中时查询数据库
- 给根据id查询商品库存的业务添加缓存,缓存未命中时查询数据库
- 缓存初始大小为100
- 缓存上限为10000
添加缓存对象
@Configuration
public class CaffeineConfig {
    /**
     * 商品信息缓存
     * @return
     */
    @Bean
    public Cache itemCache(){
        return Caffeine.newBuilder()
                .initialCapacity(100)
                .maximumSize(10_000)
                .build();
    }

    /**
     * 商品库存缓存
     * @return
     */
    @Bean
    public Cache itemStockCache(){
        return Caffeine.newBuilder()
                .initialCapacity(100)
                .maximumSize(10_000)
                .build();
    }
}
在ItemController中写入查询本地缓存的方法
    @Autowired
    private Cache itemCache;
    @Autowired
    private Cache itemStockCache;

    @GetMapping("/{id}")
    public Item findById(@PathVariable("id") Long id) {
        return itemCache.get(id, key -> {
                    return itemService.query()
                            .ne("status", 3).eq("id", key)
                            .one();
                }
        );
    }

    @GetMapping("/stock/{id}")
    public ItemStock findStockById(@PathVariable("id") Long id) {
        return itemStockCache.get(id,key->{
            return stockService.getById(id);
        });
    }
修改完成后,访问localhost:8081/item/10001,观察控制台

存在一次数据库查询。后续再次查询相同id数据不会再次查询数据库。至此实现了JVM进程缓存。

常用Lua语法
Nginx与Redis的业务逻辑编写并不是通过Java语言,而是通过Lua。Lua是一种轻量小巧的脚本语言,用标准的C语言编写并以源代码形式开放,其设计目的是为了嵌入应用程序中,从而为应用程序提供灵活的扩展和定制功能。
入门案例,输出hello world
在linux中创建一个文本文件
touch hello.lua
# 进入vi模式
vi hello.lua
# 打印hello world。输入以下内容
print("hello world")

# 保存退出后,运行lua脚本
lua hello.lua
或是直接输入命令启动lua控制台
lua
直接输入命令即可

数据类型
| 数据类型 |
描述 |
| nil |
表示一个无效值,类似于Java中的null,但在条件表达式中代表false |
| boolean |
包含:true与false |
| number |
表示双精度类型的实浮点数(简单来说,是数字都可以使用number表示) |
| string |
字符串,由单引号或双引号来表示 |
| function |
由C或是Lua编写的函数 |
| table |
Lua中的表其实是一个“关联数组”,数组的索引可以是数字,字符串或表类型。在 Lua里,table的创建是通过“构造表达式”来完成,最简单构造表达式是{},用来创建一个空表。 |
变量声明
Lua声明变量的时候,并不需要指定数据类型
-- local代表局部变量,不加修饰词,代表全局变量
local str ='hello'
local num =10
local flag =true
local arr ={'java','python'} --需要注意的是,访问数组元素时,下标是从1开始
local table ={name='Jack',age=10} --类似于Java中的map类型,访问数据时是通过table['key']或是table.key
循环使用
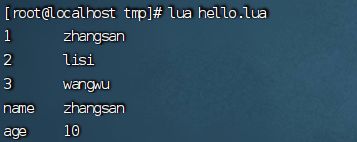
-- 声明数组
local arr={'zhangsan','lisi','wangwu'}
-- 进行循环操作
for index,value in ipairs(arr) do
	print(index,value)
end
-- lua 脚本中,for循环从do开始end结束,数组解析使用ipairs
-- 声明table
local table={name='zhangsan',age=10}
-- 进行循环操作
for key,value in pairs(table) do
        print(key,value)
end
-- table解析使用pairs
执行lua脚本
定义函数
-- 声明数组
local arr={'zhangsan','lisi','wangwu'}
-- 定义函数
local function printArr(arr)
  for index,value in ipairs(arr) do
      print(index,value)
  end
end
-- 执行函数
printArr(arr)
执行lua脚本

条件控制
| 操作符 |
描述 |
实例 |
| and |
逻辑与操作符。若A为false,则返回A,否则返回B |
(A and B)为false |
| or |
逻辑或操作符。若A为true,则返回A,否则返回B |
(A or B)为true |
| not |
逻辑非操作符。与逻辑运算结果相反 |
not(A and B)为true |
-- 声明数组
local table={name='zhangsan',sex='boy',age=15}
-- 定义函数
local function printTable(arr)
  if(not arr) then
    print('table中不存在该字段')
    return nil
  end
  print(arr)
end
-- 执行函数
printTable(table.name)
printTable(table.addr)
执行lua脚本

安装OpenResty
是基于Nginx的一个组件,主要作用是对Nginx编写业务逻辑
yum install -y pcre-devel openssl-devel gcc --skip-broken

yum-config-manager --add-repo https://openresty.org/package/centos/openresty.repo
# 如果失败则先执行下面一条语句后再执行上面这条
yum install -y yum-utils

yum install -y openresty

yum install -y openresty-opm
配置nginx的环境变量
vi /etc/profile

# 在最下面插入如下信息
export NGINX_HOME=/usr/local/openresty/nginx
export PATH=${NGINX_HOME}/sbin:$PATH

# 保存后刷新配置
source /etc/profile
修改/usr/local/openresty/nginx/conf/nginx.conf配置文件如下
#user  nobody;
worker_processes  1;
error_log  logs/error.log;

events {
    worker_connections  1024;
}

http {
    include       mime.types;
    default_type  application/octet-stream;
    sendfile        on;
    keepalive_timeout  65;

    server {
        listen       8081;
        server_name  localhost;
        location / {
            root   html;
            index  index.html index.htm;
        }
        error_page   500 502 503 504  /50x.html;
        location = /50x.html {
            root   html;
        }
    }
}
启动nginx
# 启动nginx
nginx
# 重新加载配置
nginx -s reload
# 停止
nginx -s stop
启动后,访问虚拟机的8081端口,如果正常跳转页面如下

实现Nginx业务逻辑编写
先分析请求转发流程。打开win系统上的nginx路由配置文件

接下来就需要对虚拟机中的nginx添加业务逻辑了
对虚拟机Nginx中的配置文件添加如下代码
    # 放入http模块下
	#lua 模块
	lua_package_path "/usr/local/openresty/lualib/?.lua;;";
	#c模块
	lua_package_cpath "/usr/local/openresty/lualib/?.so;;";

    # 放入server模块下
		location /api/item {
			# 响应类型为json
			default_type application/json;
			# 响应结果来源
			content_by_lua_file lua/item.lua;
		}
编写lua脚本
在nginx目录下创建lua文件夹,并创建lua脚本
mkdir lua
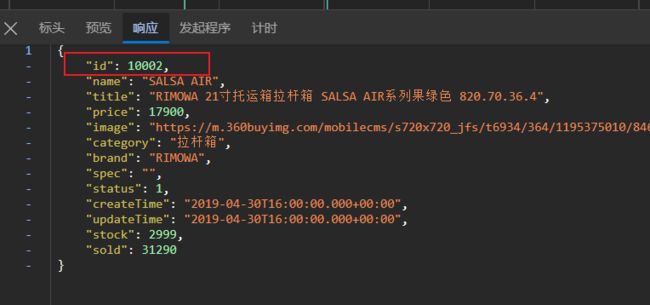
touch lua/item.lua先使用假数据测试是否可以正常响应
ngx.say('{"id":10001,"name":"SALSA AIR","title":"RIMOWA 21寸托运箱拉杆箱 SALSA AIR系列果绿色 820.70.36.4","price":17900,"image":"https://m.360buyimg.com/mobilecms/s720x720_jfs/t6934/364/1195375010/84676/e9f2c55f/597ece38N0ddcbc77.jpg!q70.jpg.webp","category":"拉杆箱","brand":"RIMOWA","spec":"","status":1,"createTime":"2019-04-30T16:00:00.000+00:00","updateTime":"2019-04-30T16:00:00.000+00:00","stock":2999,"sold":31290}')访问localhost/item.html?id=10001。查看控制台是否正常响应。如果出现如下错误,去观察win系统下的nginx日志,我的打印了如下错误
2023/11/07 19:29:38 [error] 16784#2812: *34 connect() failed (10061: No connection could be made because the target machine actively refused it) while connecting to upstream, client: 127.0.0.1, server: localhost, request: "GET /api/item/10001 HTTP/1.1", upstream: "http://192.168.10.10:8081/api/item/10001", host: "localhost", referrer: "http://localhost/item.html?id=10001"

解决方法,打开任务管理器,将所有关于nginx的服务全部结束再次重启win系统下的nginx即可。如果不是此类错误,请查看linux系统下的错误日志。
请求参数解析
| 参数格式 |
参数实例 |
参数解析代码示例 |
| 路径占位符 |
/item/1001 |
拦截路径中:location ~ /item/(\d+){} ~:表示使用正则表达式 (\d+):表示至少有一位数字 Lua脚本中:local id = ngx.var[1] 匹配到的参数会存入ngx.var数组中,通过下标获取 |
| 请求头 |
id:1001 |
获取请求头,返回值是table类型 local headers = ngx.req.get_headers() |
| Get请求参数 |
?id=1001 |
获取GET请求参数,返回值是table类型 local getParams = ngx.req.get_uri_args() |
| Post表单参数 |
id=1001 |
读取请求体:ngx.req.read_body() 获取POST表单参数,返回值是table类型 local postParams = ngx.req.get_post_args() |
| JSON参数 |
{"id": 1001} |
读取请求体:ngx.reg.read bodv() 获取body中的ison参数,返回值是string类型 local jsonBody = ngx.req.get_body_data() |
修改linux中nginx的配置文件,实现参数解析
		location ~ /api/item/(\d+) {
			# 响应类型为json
			default_type application/json;
			# 响应结果来源
			content_by_lua_file lua/item.lua;
		}
修改lua脚本
-- 获取参数
local id = ngx.var[1]
-- 返回结果
ngx.say('{"id":'..id..',"name":"SALSA AIR","title":"RIMOWA 21寸托运箱拉杆箱 SALSA AIR系列果绿色 820.70.36.4","price":17900,"image":"https://m.360buyimg.com/mobilecms/s720x720_jfs/t6934/364/1195375010/84676/e9f2c55f/597ece38N0ddcbc77.jpg!q70.jpg.webp","category":"拉杆箱","brand":"RIMOWA","spec":"","status":1,"createTime":"2019-04-30T16:00:00.000+00:00","updateTime":"2019-04-30T16:00:00.000+00:00","stock":2999,"sold":31290}')
访问id为10002的参数,可以发现id随着参数改变,而不是伪数据了
实现lua访问tomcat
nginx提供了内部API用来发送http请求
local resp = ngx.location.capture("/path",{
	method = ngx.HTTP_GET,-- 请求方式
  args = {a=1,b=2},-- get方式传参数
  body ="c=3&d=4" -- post方式传参数
})
返回响应结果内容包括:
- resp.status:响应状态码
- resp.header:响应头,是一个table
- resp.body:响应体,就是响应数据
需要注意的是,/path不会指定IP地址和端口而是会被内部拦截,这个时候我们还需要编写一个路由器,发送到对应的服务器。修改linux中的nginx.conf文件添加如下配置
		location /item {
			proxy_pass http://192.168.10.11:8081;
		}
发起Http请求我们可以封装成一个方法,让其他请求发起时也可以调用,因此,我们可以在lualib文件夹下,创建lua脚本。
-- 封装函数,发送http请求,并解析响应
local function read_http(path, params)
    local resp = ngx.location.capture(path,{
        method = ngx.HTTP_GET,
        args = params,
    })
    if not resp then
        -- 记录错误信息,返回404
        ngx.log(ngx.ERR, "http not found, path: ", path , ", args: ", args)
        ngx.exit(404)
    end
    return resp.body
end
-- 将方法导出
local _M = {
    read_http = read_http
}
return _M
修改item.lua脚本,不再返回伪数据,而是查询真实的数据
-- 导入common函数库
local common = require('common')
local read_http = common.read_http

-- 获取参数
local id = ngx.var[1]
-- 查询商品信息
local itemJSON = read_http('/item/'..id,nil)
-- 查询库存信息
local stockJSON = read_http('/item/stock/'..id,nil)
-- 返回结果
ngx.say(itemJSON)
这里只返回了商品信息,接下来访问其他id的商品,查看是否可以查询出商品信息

JSON的序列化和反序列化
引入cjson模块,实现序列化与反序列化
-- 导入common函数库
local common = require('common')
local cjson = require('cjson')
local read_http = common.read_http

-- 获取参数
local id = ngx.var[1]
-- 查询商品信息
local itemJSON = read_http('/item/'..id,nil)
-- 查询库存信息
local stockJSON = read_http('/item/stock/'..id,nil)
-- 反序列化JSON商品信息为table类型数据
local item = cjson.decode(itemJSON)
local stock = cjson.decode(stockJSON)
-- 数据组合
item.stock = stock.stock
item.sold = stock.sold

-- 序列化为JSON
-- 返回结果
ngx.say(cjson.encode(item))
Tomcat的集群负载均衡
这里我们访问的服务端口是写死的,但通常tomcat是一个集群,因此,我们需要修改我们linux的配置文件,配置tomcat集群
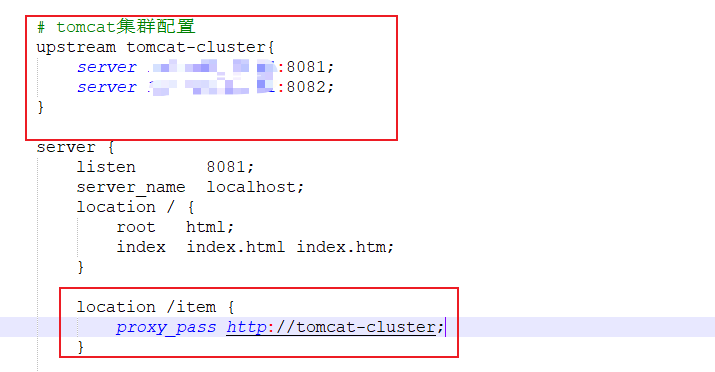
由于Tomcat的负载均衡策略为轮询,那么就会产生一个问题,tomcat集群的进程缓存是不共享的,也就是说,第一次访问8081生成的缓存,在第二次访问8082时,是不存在的,会在8082也生成一份相同的缓存。所以我们需要保证访问同一个id的请求,会被路由到存在缓存的那个tomcat服务器上。这就需要我们修改负载均衡算法。实际实现很简单,只需要在tomcat集群配置添加一行

实现原理是,nginx会对拦截到的请求进行hash算法,然后对集群数量进行取余。从而保证对同一个id的请求都会被路由到同一个tomcat服务器。