Unix/Linux操作系统分析实验二 内存分配与回收:Linux系统下利用链表实现动态内存分配
Unix/Linux操作系统分析实验一 进程控制与进程互斥
Unix/Linux操作系统分析实验三 文件操作算法: 实现在/proc目录下添加文件
Unix/Linux操作系统分析实验四 设备驱动: Linux系统下的字符设备驱动程序编程
本文章用于记录自己所学的内容,方便自己回顾复习。
实验内容
- 利用malloc和 calloc函数实现动态内存的分配;利用free函数实现动态内存的释放;
- 利用realloc函数实现调整内存空间的大小;
- 利用链表实现动态内存分配。
- Linux操作系统原理与应用教材(第2版陈莉君)上的第四章 例 4-1(P95)、4-2(P96)、4-3(P98)、4-4(P98)、5-1(P143)、P158
- Linux操作系统原理与应用教材(第2版陈莉君)上的第八章 例8-1
实验步骤
- 利用malloc函数和 free函数来实现动态内存的申请和释放;
- 利用realloc函数来修改上述malloc函数申请的动态内存的大小;
- 利用链表结构,malloc函数和 free函数实现将终端输入的一系列字符串用链表的形式保存下来。然后再将这些数据组装起来,回显到输出终端。
- 实验和验证 教材第四章 例4.1 4.2 4.3 4.4 内容见p95—98 和例5-1(P143)、定时器的应用(P158)、打印super_blocks结构中一些域的值(P215)。
实验结果分析(截屏的实验结果,与实验结果对应的实验分析)
实验结果:
1、 利用malloc函数和 free函数来实现动态内存的申请和释放;
2、 利用realloc函数来修改上述malloc函数申请的动态内存的大小;
实验分析:
当函数的返回类型为void类型时,参数newstring为NULL时,函数realloc的作用为重新申请动态内存空间,把原来string的动态内存空间替换了,所以主函数里的实际参数string(NULL)与当前函数里的形式参数newstring的值不同。
3、 利用链表结构,malloc函数和 free函数实现将终端输入的一系列字符串用链表的形式保存下来。然后再将这些数据组装起来,回显到输出终端。
4、 实验和验证 教材第四章 例4.1 4.2 4.3 4.4 内容见p95—98 和例5-1(P143)、定时器的应用(P158)
(1)例4.1:
(2)例4.2
(3)例4.3
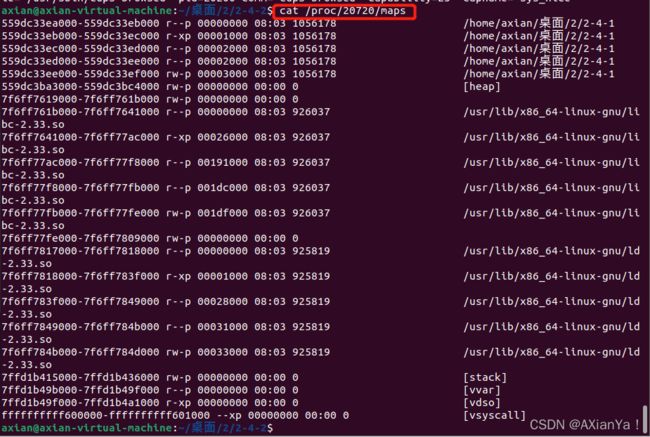
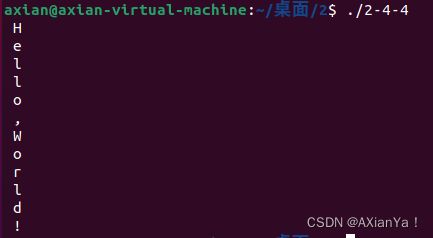
(4)例4.4
(5)例5-1
(6)定时器的应用
(7)查看超级块super_block数据结构中的数据
实验分析:
(1)超级块与分区是一对一还是一对多的关系?超级块与文件系统是什么关系?
答:超级块与分区是一对一的关系;超级块与文件系统是一对一关系,一个超级块对应一个文件系统。
(2)超级块与索引结点是什么关系?
答:超级块与索引结点是一对多的关系。超级块是对一个文件系统的描述,索引结点是对一个文件物理属性的描述。超级块是我们寻找索引结点的唯一源头。操作文件必然需要获得其对应的索引结点,而获取索引结点是通过超级块操作表提供的read_inode()函数完成的。操作索引结点的低层次任务,如创建一个索引结点、释放一个索引结点,也是通过超级块操作表提供的有关函数完成的。
实验总结
通过这次实验,了解静态内存与动态内存的区别,学会了如何分配、释放动态内存和如何调整动态内存的大小,学会在何种情况下利用链表实现动态内存的分配,了解Linux进程虚拟内存区的原理和内存映射的应用,学会如何在内核模块中计算两次中断的时间间隔,理解定时器在内核中的应用,初步了解超级块与分区、文件系统、索引结点之间的关系。
所有实验的源代码如下:
2-1.c
//使用动态内存实现将子函数中分配的内存空间指针返回主函数,实现数据的传递。
#include
#include
#include
char* UPCASE(char* inputstring);
char* CAPITAL(char* inputstring);

int main() {
	char* str1, * str2;
	str1 = UPCASE("Hello"); //将字符串的所有字符转换为大写字母
	str2 = CAPITAL("Goodbye"); //将字符串的所有字符转换为大写字母

	printf("str1 = %s, str2 = %s\n", str1, str2);

	free(str1); //释放动态内存的指针
	free(str2); //释放动态内存的指针

	return 0;
}

char* UPCASE(char* inputstring) { //将字符串的所有字符转换为大写字母
	char* newstring;

	if (!(newstring = malloc(strlen(inputstring) + 1))) { //分配动态内存空间失败
		printf("ERROR ALLOCATING MEMORY! \n");
		exit(255); //退出程序
	}

	strcpy(newstring, inputstring); //将字符串inputstring的内容复制到新字符串newstring中
	for (int counter = 0; counter < strlen(newstring); counter++) {
		if (newstring[counter] >= 97 && newstring[counter] <= 122) //当前字符为小写字母
			newstring[counter] -= 32; //小写字母转换为大写字母
	}
	return newstring;
}

char* CAPITAL(char* inputstring) {
	char* newstring;

	if (!(newstring = calloc(strlen(inputstring) + 1, 1))) { //分配动态内存空间失败
		printf("ERROR ALLOCATION MEMORY! \n");
		exit(255); //退出程序
	}

	strcpy(newstring, inputstring); //将字符串inputstring的内容复制到新字符串newstring中
	for (int counter = 0; counter < strlen(newstring); counter++) {
		if (newstring[counter] >= 97 && newstring[counter] <= 122) //当前字符为小写字母
			newstring[counter] -= 32; //小写字母转换为大写字母
	}
	return newstring;
}
2-2.c
//在这个程序中,针对函数upcase的参数newstring是否为NULL,采取了不同的处理方式。如果newstring不为NULL,则直接分配内存空间。否则调整原空间的大小以适应新的需要。
#include
#include
#include

char* UPCASE(char *inputstring, char *newstring);
char* CAPITAL(char *inputstring, char *newstring);

int main(void)	{
    	char *string;

    	string = UPCASE("Hello", string);
    	printf("str1 = %s \n", string);

		string = CAPITAL("Goodbye", string);
    	printf("str2 = %s \n", string);

    	free(string); //释放动态内存的指针

    	return 0;
}


char* UPCASE(char *inputstring, char *newstring) {//注意:当函数的返回类型为void类型时,参数newstring为NULL时,函数realloc的作用为重新申请动态内存空间,把原来string的动态内存空间替换了,所以主函数里的实际参数string(NULL)与当前函数里的形式参数newstring的值不同。
    	int counter;

    	if(!newstring) { //字符串newstring为空,说明函数realloc的第一个参数为NULL,其作用相当于函数于malloc
        	if(!(newstring = realloc(NULL, strlen(inputstring) + 1))) { //分配动态内存失败
        		printf("ERROR ALLOCATING MEMORY! \n");
        		exit(255); //退出程序
			}
    	}
    	else { //字符串newstring非空
        	if(!(newstring = realloc(newstring, sizeof(inputstring) + 1))) { //调整动态内存失败
        		printf("ERROR REALLOCATING MEMORY! \n");
        		exit(255); //退出程序
    		}
		}

        strcpy(newstring, inputstring); //将字符串inputstring的内容复制到新字符串newstring中

		for(counter = 0; counter < strlen(newstring); counter++) {
        	if(newstring[counter] >= 97 && newstring[counter] <= 122) //当前字符为小写字母
             		newstring[counter] -= 32; //小写字母转换为大写字母
		}
		return newstring;
}

char* CAPITAL(char *inputstring, char *newstring) {//注意:当函数的返回类型为void类型时,参数newstring为NULL时,函数realloc的作用为重新申请动态内存空间,把原来string的动态内存空间替换了,所以主函数里的string(NULL)与当前函数里的newstring的值不同。
    	int counter;

    	if(!newstring) { //字符串newstring为空,说明函数realloc的第一个参数为NULL,其作用相当于函数和malloc
        	if(!(newstring = realloc(NULL, strlen(inputstring) + 1))) { //分配动态内存失败
        		printf("ERROR ALLOCATING MEMORY! \n");
        		exit(255); //退出程序
			}
    	}
    	else { //字符串newstring非空
        	if(!(newstring = realloc(newstring, sizeof(inputstring) + 1))) { //调整动态内存失败
        		printf("ERROR REALLOCATING MEMORY! \n");
        		exit(255); //退出程序
    		}
		}

        strcpy(newstring, inputstring); //将字符串inputstring的内容复制到新字符串newstring中

		for(counter = 0; counter < strlen(newstring); counter++) {
        	if(newstring[counter] >= 97 && newstring[counter] <= 122) //当前字符为小写字母
             		newstring[counter] -= 32; //小写字母转换为大写字母
		}
		return newstring;
}
2-3.c
//这个程序将终端输入的一系列字符串用链表的形式保存下来。然后再将这些数据组装起来,回显到输出终端。

#include
#include
#include

#define DATASIZE 10 //宏

typedef struct stringdata { //链表的节点
	char* string; //数据域
	int iscontinuing; //用于表示当前结点是否为链表的末尾。如果iscontinuing有值,则表示此结点不是链表的末尾。
	struct stringdata* next; //节点的指针域
}mydata;

mydata* append(mydata* start, char* input) {
	//将终端输入的一系列字符串用链表的形式保存下来
	//遍历链表至末尾,然后将新节点添加到链表的末尾。
	mydata* cur = start, * prev = NULL, * new;

	while (cur) { //遍历链表
		prev = cur;
		cur = cur->next;
	}
	cur = prev; //指针cur指向链表的末尾

	new = malloc(sizeof(mydata)); //分配动态内存空间的大小为sizeof(mydata)

	if (!new) {//分配内存失败
		printf("COULDN'T ALLOCATE MEMORY! \n");
		exit(255); //退出程序
	}

	if (cur) //指针cur非空
		cur->next = new; //将新建立的节点new放在节点cur的后面
	else //链表为空
		start = new;

	cur = new; //指针cur指向新节点的指针new

	if (!(cur->string = malloc(sizeof(input) + 1))) { //动态分配内存失败
		printf("ERROR ALLOCATING MEMORY! \n");
		exit(255); //退出程序
	}

	strcpy(cur->string, input); //将输入的字符串input复制到节点cur的数据域
	cur->iscontinuing = !(input[strlen(input) - 1] == '\n' || input[strlen(input) - 1] == '\r'); //如果iscontinuing有值,则表示此结点不是链表的末尾。
	cur->next = NULL; //指针域置空

	return start; //返回链表的头部
}

void displayData(mydata* start) {
	//遍历链表,输出数据
	mydata* cur;
	int linecounter = 0, structcounter = 0;
	int newline = 1;

	cur = start;
	while (cur) { //遍历链表
		if (newline)
			printf("LINE %d:", ++linecounter); //输出数据包含多少行
		structcounter++; //结构数加1
		printf("%s", cur->string); //输出节点cur的数据域string
		newline = !cur->iscontinuing; //cur->iscontinuing有值,表示此结点不是链表的末尾。
		cur = cur->next; //指针cur指向指针cur的指针域
	}
	printf("THIS DATA CONTAINED %d LINES AND WAS STORED IN %d STRUCTS. \n", linecounter,structcounter); //此数据包含%d行,并存储在%d个结构中。
}

void freeData(mydata* start) {
	//释放链表的所有动态内存空间
	mydata* cur, * next = NULL;
	cur = start;

	while (cur) {//遍历链表
		next = cur->next;
		free(cur->string); //释放动态内存空间
		free(cur); //释放动态内存空间
		cur = next;
	}
}

int main(void) {
	char input[DATASIZE]; //定义一个大小为10的字符数组
	mydata* start = NULL;
	printf("ENTER SOME DATA, AND PRESS Ctrl+D WHEN DONE. \n");

	while (fgets(input, sizeof(input), stdin))
		start = append(start, input);

	displayData(start); //遍历链表,输出数据
	freeData(start); //释放链表的所有动态内存空间
	return 0;
}
2-4-1.c
//查看进程的虚存区
#include
#include
#include

int main (int argc, char** argv) {
	unsigned char* buff; //无符号的字符指针

	buff = (char*)malloc(sizeof(char) * 1024); //分配动态内存空间
	printf("My pid is: %d\n", getpid());

	for (int i = 0; i < 60; i++)
		sleep(60); //进程自我阻塞5秒(即当前进程睡眠/等待/延迟5秒)

	return 0;
}

//编译:
/*
1、gcc -o 2-4-1 2-4-1.c
2、./2-4-1(在后台运行)
3、ps -u   查看进程标识符
4、cat  /proc/进程标识符/maps   查看进程的虚存区
*/
mem.c
//编写一个内核模块,打印进程的虚存区,其中通过模块参数把进程的PID传递给模块
#include
#include
#include
#include
#include
#include

static int pid; //全局静态变量

module_param(pid, int, 0644); //作用:传递命令行参数给模块

static int __init memtest_init(void) { //模块的初始化函数
	struct task_struct* p;  //被装载到RAM中并且包含着进程的信息,类似与PCB
	struct vm_area_struct* temp; //用来描述进程用户空间的一个虚拟内存区间

	printk("The virtual memory areas(VMA) are:\n");
	//在Linux Kernel 2.6.30之后(确切的说是从2.6.31开始),find_task_by_vpid没有被export(Kernel 里面还有定义该函数,但是没有导出symbol,所以 driver 里面不能再使用)。
	//解决的方法是使用 pid_task 来替代。
	//p = find_task_by_vpid(pid); //该函数因内核版本不同而稍不同
	p = pid_task(find_vpid(pid), PIDTYPE_PID); //pid_task( ) 函数获取任务的任务描述符信息,此任务在进程pid的使用链表中,并且搜索的链表的起始元素的下标为参数type的值。
	temp = p->mm->mmap;

	while (temp) {
		printk("start: %p\tend: %p\n", (unsigned long*)temp->vm_start, (unsigned long*)temp->vm_end);
		temp = temp->vm_next;
	}

	return 0;
}

static void __exit memtest_exit(void) { //模块的退出和清理函数
	printk("Unloading my module.\n");
	return;
}

module_init(memtest_init); //向内核注册模块提供新功能
module_exit(memtest_exit); //注销由模块提供所有的功能

MODULE_LICENSE("GPL"); //模块具有GUN公共许可证
Makefile
obj-m+=mem.o #产生mem模块的目标文件

all:
	make -C /lib/modules/$(shell uname -r)/build M=$(PWD) modules
clean:
	make -C /lib/modules/$(shell uname -r)/build M=$(PWD) clean

#shell uname -r: Linux内核源代码的当前版本
#PWD: 模块所在的当前路径
2-4-3.c
//映射一个4字节大小的匿名区,父进程和子进程共享这个匿名区。
#include
#include
#include
#include  //函数mmap的头文件
//#include  错误

#define N 10

void main() {
	int i, sum, fd;
	int* result_ptr = mmap(0, 4, PROT_READ | PROT_WRITE, MAP_SHARED | MAP_ANONYMOUS, 0, 0); //映射一个4字节大小的匿名区
	int pid = fork(); //创建子进程,父进程和子进程共享匿名区
	if (pid == 0) {//子进程在执行
		for (sum = 0, i = 1; i <= N; i++)
			sum += i;
		*result_ptr = sum;
	}
	else {//父进程在执行
		wait(0); //父进程等待子进程结束才执行
		printf("result = %d\n", *result_ptr);
	}
}
2-4-4.c
//映射一个名叫"test_data"的文件,文件包含的内容为"Hello,World!"。
#include
#include
#include
#include  //缺少这个文件会错误,第3和4行是函数open的头文件
#include

void main() {
	int i;
	char* buf;
	int fd = open("test_data", O_RDONLY); //O_RDONLY 以只读方式打开文件
	buf = mmap(0, 12, PROT_READ, MAP_PRIVATE, fd, 0); //将文件test_data的内容映射到进程的用户空间(即可像访问内存一样访问文件)
	for(i = 0; i < 12; i++)
		printf(" %c\n", buf[i]); //逐行输出Hello,World!
}
intr.c
//编写内核模块,计算两次中断的时间间隔。
#include
#include
#include
#include
#include
#include  //变量jiffies

static int irq;	//模块参数——中断号(这里的中断号必须是可共享的)
static char* interface;	//模块参数——设备名
static int count = 0; //统计插入模块期间发生的中断次数

module_param(interface, charp, 0644); //作用:传递命令行参数给模块
module_param(irq, int, 0644); //作用:传递命令行参数给模块

static irqreturn_t intr_handler(int irq, void* dev_id) {
	static long interval = 0;
	if (count == 0)
		interval = jiffies;
	interval = jiffies - interval; //计算两次中断之间的间隔,时间单位为节拍
	printk(" The interval between two interrupts is %ld.\n", interval);
	interval = jiffies;
	count++;

	return IRQ_NONE;
}

static int __init intr_init(void) { //模块的初始化函数
	if (request_irq(irq, &intr_handler, IRQF_SHARED, interface, &irq)) {//注册中断服务程序,注意内核版本不同,共享标志可能有所不同
		printk("Fails to register IRQ %d\n", irq);
		return -EIO;
	}
	printk("%s Requesst on IRQ %d succeeded.\n", interface, irq);
	return 0;
}

static void __exit intr_exit(void) { //模块的退出和清理函数
	printk("The %d interrupts happened on irq %d.", count, irq);
	free_irq(irq, &irq); //释放中断线
	printk("Freeing IRQ %d\n", irq);
	return;
}

module_init(intr_init); //向内核注册模块提供新功能
module_exit(intr_exit); //注销由模块提供所有的功能

MODULE_LICENSE("GPL"); //模块具有GUN公共许可证
Makefile
obj-m+=intr.o #产生intr模块的目标文件

all:
	make -C /lib/modules/$(shell uname -r)/build M=$(PWD) modules
clean:
	make -C /lib/modules/$(shell uname -r)/build M=$(PWD) clean

#shell uname -r: Linux内核源代码的当前版本
#PWD: 模块所在的当前路径
tim.c
#include
#include
#include
#include
#include
#include
#include  //函数set_current_state()的头文件
#include  //函数wake_up_process()的头文件

//定时器由timer_list结构表示
static struct timer_list my_timer; //定时器

static void init_timer(struct timer_list* timer) {
	//初始化结构timer_list的一些变量
	printk("Initialize structure timer_list of some variables!\n");
	mod_timer(&my_timer, jiffies + 2 * HZ);
}

static void process_timeout(struct timer_list* timer) {
	//当进程延时到期时,内核执行该函数
	struct task_struct* p = (struct task_struct*)(unsigned long)current;
	wake_up_process(p);
}

static unsigned long sch_timeout(unsigned long timeout) {
	//该函数创建一个定时器timer;然后设置它的到期时间expire;设置超时时要执行的函数process__timeout();然后激活定时器并且调用调度程序schedule()。
	my_timer.expires = timeout + jiffies; //到期时间


	//init_timer(&my_timer); //初始化结构timer_list的一些变量,初始化必须在对定时器操作前完成
	//函数init_timer在linux内核4.15之后的版本被移除,使用新的timer_setup接口来代替
	timer_setup(&my_timer, init_timer, (unsigned long)current); //初始化结构timer_list的一些变量,并赋值func和data


	//在linux内核4.15之后的版本,变量function,参数类型由unsigned long 变为struct timer_list*
	my_timer.function = process_timeout; //定时器到期调用的函数


	add_timer(&my_timer); //激活定时器,将timer加入内核timer列表中,等待处理
	printk(KERN_INFO "if already initialized and added timer!\n");
	schedule(); //进程被挂起直到定时器到期
	del_timer(&my_timer); //在定时器超时前停止定时器,将timer从内核timer列表中删除,

	timeout = my_timer.expires - jiffies;
	return (timeout < 0 ? 0 : timeout);
}

static int __init test_timer_init(void) { //模块的初始化函数
	unsigned long timeout = 2 * HZ; //1HZ等于1000,因此将当前进程挂起2s
	set_current_state(TASK_INTERRUPTIBLE); //将当前进程的状态设置为TASK_INTERRUPTIBLE
	unsigned long remaining = sch_timeout(timeout);
	printk("The current process sleeps for %lu seconds.", remaining);
	return 0;
}

static void __exit test_timer_cleanup(void) { //模块的退出和清理函数
	printk("GoodBye, World! Leaving kernel space...\n");
}

module_init(test_timer_init); //向内核注册模块提供新功能
module_exit(test_timer_cleanup); //注销由模块提供所有的功能

MODULE_LICENSE("GPL"); //模块具有GUN公共许可证
Makefile
obj-m+=tim.o #产生tim模块的目标文件

all:
	make -C /lib/modules/$(shell uname -r)/build M=$(PWD) modules
clean:
	make -C /lib/modules/$(shell uname -r)/build M=$(PWD) clean

#shell uname -r: Linux内核源代码的当前版本
#PWD: 模块所在的当前路径
printValue.c
//编写内核模块,打印super_block结构中的一些域的值
#include
#include
//观察超级快super_block数据结构中的数据
#include
#include
#include
#include
#include

//查询两个变量super_blocks_address和sb_lock_address的地址
#define SUPER_BLOCKS_ADDRESS 0xffffffff9c1e84f0
#define SB_LOCK_ADDRESS 0xffffffff9c836098

static int __init my_init(void) {
	struct super_block* sb;
	struct list_head* pos;
	struct list_head* linode;
	struct inode* pinode;
	unsigned long long count = 0;

	printk("\nPrint some fileds of super_blocks:\n");
	spin_lock((spinlock_t*)SB_LOCK_ADDRESS); //加锁
	list_for_each(pos, (struct list_head*)SUPER_BLOCKS_ADDRESS) {
		sb = list_entry(pos, struct super_block, s_list);
		printk("dev_t: %d: %d", MAJOR(sb->s_dev), MINOR(sb->s_dev)); //打印文件系统所在设备的主设备号和次设备号
		printk("file_type name: %s\n", sb->s_type->name); //打印文件系统名

		list_for_each(linode, &sb->s_inodes) {
			pinode = list_entry(linode, struct inode, i_sb_list);
			count++;
			printk("%lu\t", pinode->i_ino); //打印索引结点号
		}
	}
	spin_unlock((spinlock_t*)SB_LOCK_ADDRESS);
	printk("The number of inodes: %llu\n", sizeof(struct inode) * count);
	return 0;
}

static void __exit my_exit(void) {
	printk("unloading......\n");
}

module_init(my_init);
module_exit(my_exit);
MODULE_LICENSE("GPL");
Makefile
obj-m+=printValue.o #产生printValue模块的目标文件

all:
	make -C /lib/modules/$(shell uname -r)/build M=$(PWD) modules
clean:
	make -C /lib/modules/$(shell uname -r)/build M=$(PWD) clean

#shell uname -r: Linux内核源代码的当前版本
#PWD: 模块所在的当前路径


