GitLab CI/CD 持续集成 持续交付 持续部署
目录
- 准备
-
- 涉及工具
-
- 安装注册 gitlab-runner
- gitlab-ci涉及的概念
- 基本语法
- 实战
-
- 激活
- 梳理
- 编写
- 提交项目代码
- 输入网址验证
- 进阶
-
- 复用
- cache关键字
- artifacts关键字
- image/services
- only/except
- allow_failure
- retry
- timeout
- When
准备
涉及工具
- 项目根目录需要一个.gitlab-ci.yml文件
- 通过在项目根目录下配置.gitlab-ci.yml文件,可以控制ci流程的不同阶段,例如install/检查/编译/部署服务器。gitlab平台会扫描.gitlab-ci.yml文件,并据此处理ci流程
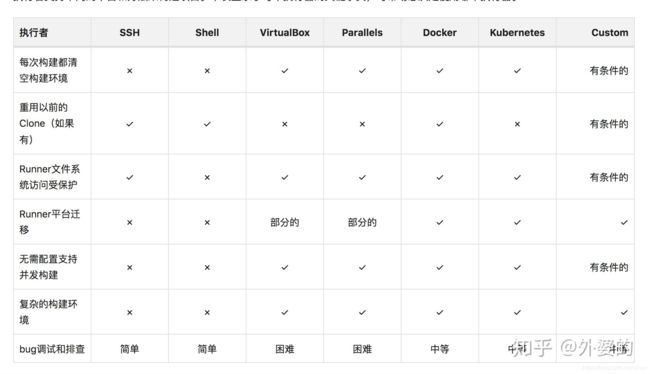
- gitlab-runner 执行器
安装注册 gitlab-runner
1、 Mac下如何更改brew地址源
cd "$(brew --repo)"
git remote set-url origin https://mirrors.aliyun.com/homebrew/brew.git
cd "$(brew --repo)/Library/Taps/homebrew/homebrew-core"
git remote set-url origin https://mirrors.aliyun.com/homebrew/homebrew-core.git
echo $SHELL
echo 'export HOMEBREW_BOTTLE_DOMAIN=https://mirrors.aliyun.com/homebrew/homebrew-bottles' >> ~/.zshrc
source ~/.zshrc
2、添加gitlab 官方库&安装gitlab-runner
curl -L https://packages.gitlab.com/install/repositories/runner/gitlab-runner/script.rpm.sh | sudo bash
brew install gitlab-runner
3、初始化gitlab-runner
cd ~
gitlab-runner install
gitlab-runner start
4、gitlab-runner 注册
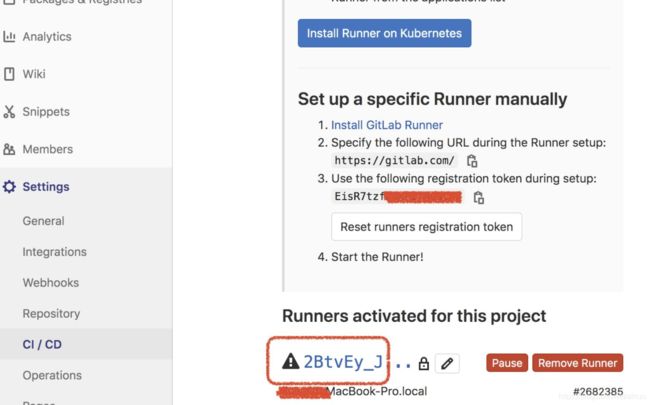
gitlab页面 上获取 url 和token
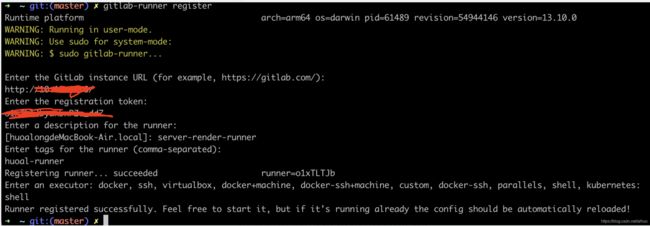
gitlab-runner register
注意: tags 是指定的执行器标签,shell 是执行的容器Executor,下面有用

gitlab-ci涉及的概念
- Pipeline
Pipeline是Gitlab根据项目的.gitlab-ci.yml文件执行的流程,它由许多个任务节点组成, 而这些Pipeline上的每一个任务节点,都是一个独立的Job - Runner
Runner可以理解为:在特定机器上根据项目的.gitlab-ci.yml文件,对项目执行pipeline的程序。Runner可以分为两种: Specific Runner 和 Shared Runner
- Shared Runner是Gitlab平台提供的免费使用的runner程序,它由Google云平台提供支持,每个开发团队有十几个。对于公共开源项目是免费使用的,如果是私人项目则有每月2000分钟的CI时间上限。
- Specific Runner是我们自定义的,在自己选择的机器上运行的runner程序,gitlab给我们提供了一个叫gitlab-runner的命令行软件,只要在对应机器上下载安装这个软件,并且运行gitlab-runner register命令,然后输入从gitlab-ci交互界面获取的token进行注册, 就可以在自己的机器上远程运行pipeline程序了
- Executor
Executor 任何一台机器或服务器,执行 gitlab-runner 的平台或容器
基本语法
- YML通过缩进组织层级
- YML里允许通过#符号编写注释
YML中的数组写法
stages:
  - build
  - code_check
  - test
  - deploy
YML中的对象写法
people:
  name: zhangsan
  age: 14
gitlab-ci.yml配置的特定关键字
stages // stages定义在YML文件的最外层,它的值是一个数组,用于定义一个pipeline不同的流程节点
stage // 当前脚本所处的阶段,在script内部
script // 当前执行的脚步命令
tags // 指定当前脚本被哪个runner执行
实战
激活
sudo gitlab-runner verify
sudo gitlab-runner restart
梳理
- 梳理和规划Pipeline的不同阶段和过程
在编写.gitlab-ci.yml前,首先需要考虑的是我们的pipeline分几个阶段处理。
从前端工程师的角度出发,一个前端项目的PipeLine处理包括以下阶段
<1> install阶段
就是执行npm install命令,根据package.json安装node_modules依赖包
<2> eslint阶段
执行eslint检查,判断代码格式是否符合规范,如果不符合则pipeline终止。
在这之前,我先通过npm install eslint安装了eslint检查工具,然后在项目根目录下配置了.eslintrc文件。这部分可自行参考相关资料,这里暂不多赘述。
<3>build阶段
编译生成生产代码,可以通过webpack之类的打包工具执行编译。当然可以通过框架提供的编译命令进行编译,例如我这个示例项目是用 react-scripts脚手架搭建的,所以通过npx react-scripts build进行编译。
<4>deploy阶段
deploy也就是部署阶段,也就是把刚才bulid阶段生成的生产代码,部署到生产访问的服务器上。这里又具体有以下两部分工作要做
A.申请服务器 & 安装web服务 (准备工作)
(1)我本次使用的是百度云的云服务器(每天9点的时候可以抢有一定免费使用期限的服务器)(下一节来讲解)
(2)然后在本地终端通过ssh远程登陆服务器,并安装apache以提供web服务
#  linux分两大类
# 1、RedHat系列:Redhat、Centos、Fedora等使用yum来管理包
sudo yum install apache2
# 2、Debian系列:Debian、Ubuntu等使用apt-get
sudo apt-get install apache2
(3)然后,安装完后的apache会在服务器下新增/var/www/html/目录, 这个目录就是存放网站资源的位置。
(4)最后我们只需要在每次部署的时候把生产的单页面拷贝到这个页面下,就能在浏览器上通过对应的 IP+路径 来访问Web页面了
B. 部署资源(每次pipeline都进行)
我下面的示例中,是通过 scp 这一命令,将本地机器代码远程拷贝到云服务器上。
因为这一命令需要输入密码,所以通过 sshpass 命令携带密码再执行scp:
sshpass -p $PASSWORD scp -r ./build $CUSTOM_USERNAME@$CUSTOM_IP:/var/www/html
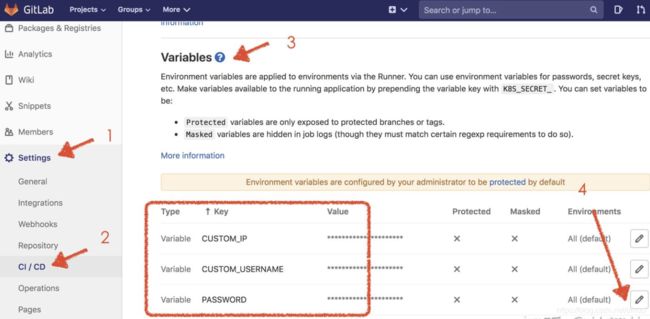
这里说明一下,Gitlab有自定义变量的功能,例如我们觉得直接在YML中写入密码/账号等信息不太好,那么可以通过美元符号$写入一个预定义的变量,然后在Gitlab面板上输入它

编写
- 编写.gitlab-ci.yml配置文件
stages: # 分段
  - install
  - eslint
  - build
  - deploy

cache: # 缓存
  paths:
    - node_modules
    - build

install-job:
  tags:
    - sss
  stage: install
  script:
    - npm install

eslint-job:
  tags:
    - sss
  stage: eslint
  script:
    - npm run eslint

build-job:
  tags:
    - sss
  stage: build
  script:
    - npm run build

deploy-job:
  tags:
    - sss
  stage: deploy
  script:
    - sshpass -p $PASSWORD scp -r ./build $CUSTOM_USERNAME@$CUSTOM_IP:/var/www/html
提交项目代码
输入网址验证
进阶
复用
使用 &符号可以定义一个片段的别名
使用 <<符号和 * 符号可以将别名对应的YML片段导入
.common-config: &commonConfig
  only: # 表示仅在develop/release分支上执行
    refs:
      - develop
      - release

install-job:
  # 其他配置 ....
  <<: *commonConfig
build-job:
  # 其他配置 ....
  <<: *commonConfig
YML的模块化功能
 ├── .gitlab-ci.h5.yml'
 ├── .gitlab-ci.bd.yml'
 ├── .gitlab-ci.wx.yml
 └── .gitlab-ci.yml
.gitlab-ci.yml中这么写
include:
  - '/.gitlab-ci.wx.yml'
  - '/.gitlab-ci.bd.yml'
  - '/.gitlab-ci.h5.yml'
gitlab-ci还提供了extend关键字,它的功能和前面提到的YML的片段导入的功能是一样的,
.common-config:
  only: # 表示仅在develop/release分支上执行
    refs:
      - develop
      - release
install-job:
  # 其他配置 ....
  extends: .common-config

build-job:
  # 其他配置 ....
  extends: .common-config
cache关键字
为什么要做缓存呢? 当然是为了重复运行pipeline的时候不会重复安装全部node_modules的包,从而减少pipeline的时间,提高pipeline的性能
问题: 它在运行下一个Job的时候,会默认把前一个Job新增的资源删除得干干静静
cache的作用就在这里体现出来了:如果我们把bulid生产的包的路径添加到cache里面,虽然gitlab还是会删除bulid目录,但是因为在删除前我们已经重新上传了cache,并且在下个Job运行时又把cache给pull下来,那么这个时候就可以实现在下一个Job里面使用前一个Job的资源了
- 在不同pipeline之间重用资源
- 在同一pipeline的不同Job之间重用资源
artifacts关键字
这个关键字的作用是:将生成的资源作为pipeline运行成功的附件上传,并在gitlab交互界面上提供下载
Build-job:
  stage: build
  script:
  - 'npm run build'
  artifacts:
    name: 'bundle'
    paths:
      - build/
image/services
这两个关键字可使用Docker的镜像和服务运行Job,具体可参考Docker的相关资料,这里暂不多加叙述
only/except
这两个关键字后面跟的值是tag或者分支名的列表
- only的作用是指定当前Job仅仅只在某些tag或者branch上触发
- 而except的作用是当前Job不在某些tag或者branch上触发
job:
  # use regexp
  only:
    - /^issue-.*$/
    - develop
    - release
allow_failure
值为true/false, 表示当前Job是否允许允许失败。
- 默认是false,也就是如果当前Job因为报错而失败,则当前pipeline停止
- 如果是true,则即使当前Job失败,pipeline也会继续运行下去。
job1:
  stage: test
  script:
    - execute_script_that_will_fail
  allow_failure: true
retry
当前Job的失败重试次数的上限
- 但是这个值只能在0 ~2之间,也就是重试次数最多为2次,包括第一次运行在内,Job最多自动运行3次
timeout
Job:
  script: rspec
  timeout: 3h 30m
When
表示当前Job在何种状态下运行,它可设置为3个值
on_success: 仅当先前pipeline中的所有Job都成功(或因为已标记,被视为成功allow_failure)时才执行当前Job 。这是默认值。
on_failure: 仅当至少一个先前阶段的Job失败时才执行当前Job。
always: 执行当前Job,而不管先前pipeline的Job状态如何。
参考资料:
https://docs.gitlab.com/runner/executors/#selecting-the-executor
https://zhuanlan.zhihu.com/p/184936276
https://www.jianshu.com/p/2b4c44babbbd

