使用swagger-typescript-api
引言
前后端分离大致是这样的
- 后端:控制层 / 业务层 / 数据操作层
- 前端:控制层 / 视图层
前后端的控制层,实际上就是前后端接口的对接
前后端分离,实现了更好地解耦合,但也引入了接口对接的过程,这个过程常常是繁琐,容易产生错误的
于是引入了api接口文档,来解决这个事情,如果有一份事先约定好的接口文档,双方都按照这个来,就能实现完美的对接。(但这通常很难实现,无法预先知道需要什么接口,接口的参数,是一个反复修改的过程)
现在后端广泛采用swagger技术,能够在开发时,就能生成接口文档,并能便捷地测试接口
对前端来说,就可以根据后端项目的swagger文档,来设计前端的控制层,也就是通常的根目录下的api文件夹,将对接口的请求封装为功能函数(也是为了与视图层解耦)
// user.ts
export const getUserList = () => request.get('/user/list')
但其实,一个api函数也就是对应的一个后端接口,已经有了接口文档,为什么不能直接生成前端的控制层?
前端控制层函数看似简单,其实做到类型完备,函数提示清晰(参数类型,返回值类型,各种注释),是一个十分繁琐的过程
所以,just relax,这个过程交由swagger-typescript-api来完成吧
swagger-typescript-api
我并不是讲swagger-typescript-api教程,可以去github上看它的所有用法,我只是讲述一下我是如何使用它的
我的项目并不是一个大型前后端分离项目,仅仅是作为练手,用前后端分离的方式自己开发。如果适用于您,您可以往下看
swagger-typescript-api有两种使用方式:命令行 & node脚本程序
优缺点显然:前者方便,后者易定制
我将以命令行的方式
进入我的前端项目中,在shell中输入
npx swagger-typescript-api -p http://localhost:8080/v2/api-docs?group=Manager -o ./src/api --axios --modular --module-name-index 1 --single-http-client
http://localhost:8080/v2/api-docs?group=Manager我的swagger api文档地址-o ./src/api将生成的文件输出到src下的api目录下--axios采用axios客户端,默认fetch--modular分离http client,data constracts, 和routes,否则只会生成一个大文件http client这里就是axios客户端,对其进行了一定的封装data constractsapi接口中,用到的参数,或者返回值类型
--module-name-index 1分离routes,意思是按api路径.split('/')[1]拆分接口文件
比如我有两个controller,UserController和DishController,访问UserController下的api,都是以
/admin/user开头的,而访问DishController下的api,是以/admin/dish开头,所以这样做后,也就是按照后端的controller分离api接口文件了
--single-http-client意为只有一个http客户端,稍后解释
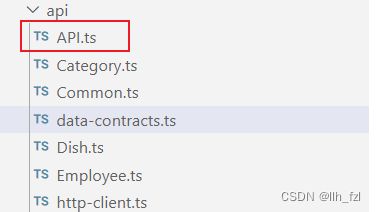
于是在api文件夹下,生成了

这里swagger-typescript-api替我生成了除API.ts外的所有文件
如果直接使用的话,还是不太方便,因为每个controller都是一个http客户端
意味着我需要这么调用接口
new Category().getCategoryList()
new Dish().addDish()
当然,最重要的是,我们还需要对axios进行配置!
- 比如添加baseUrl,当然它生成的http客户端默认为localhost:8080,但我们通常都会配置为环境变量,以便切换不同环境下的后端
- 比如添加请求拦截器,向后端请求自动携带token认证信息
- 比如添加响应拦截器,对产生的http错误,进行捕获和反馈(如show error message,告知unauthorized)
如果没有设置--single-http-client,产生的controller是这样的
class Employee<SecurityDataType = unknown> extends HttpClient<SecurityDataType>{...}
这样,你需要为每个controller的http客户端进行相同的配置,so dity!!!
但是,设置之后,产生controller是这样的
class Employee<SecurityDataType = unknown> {
  http: HttpClient<SecurityDataType>;

  constructor(http: HttpClient<SecurityDataType>) {
    this.http = http;
  }
  ...
}
可以看到,前者是继承,后者是组合,也叫委派
但是,我们仍然需要为每个controller委派相同的http-client,所以我引入了API.ts来解决这个问题(这只是一个简单的示例)
class API<SecurityDataType = unknown> extends HttpClient<SecurityDataType> {
  public category = new Category(this);
  public common = new Common(this);
  public dish = new Dish(this);
  public employee = new Employee(this);
}

export const api = new API({
  paramsSerializer: (params) => qs.stringify(params, { indices: false }),
  baseURL: import.meta.env.VITE_APP_API_URL,
});

api.instance.interceptors.request.use(
  (config) => {
    if (getToken()) {
      config.headers["token"] = getToken();
    }
    return config;
  },
  (error) => {
    console.log(error);
    Promise.reject(error);
  }
);

api.instance.interceptors.response.use(
  (res) => {
    const code = res.data.code;
    const msg = res.data.msg || "系统未知错误,请反馈给管理员";
    if (
      res.request.responseType === "blob" ||
      res.request.responseType === "arraybuffer"
    ) {
      return res;
    }
    if (code !== 1) {
      message.error(msg);
      return Promise.reject(new Error(msg));
    } else {
      return res;
    }
  },
  (error) => {
    console.log("err" + error);
    let { message: msg } = error;
    if (msg === "Network Error") {
      msg = "后端接口连接异常";
    } else if (msg.includes("timeout")) {
      msg = "系统接口请求超时";
    } else if (msg.includes("Request failed with status code")) {
      // 获得异常http状态码
      const statusCode = +msg.substr(msg.length - 3);
      if (statusCode === 401) {
        Modal.confirm({
          title: "系统提示",
          content: "登录状态已过期,请重新登录",
          okText: "确定",
          onOk() {
            removeToken();
            location.href = "/";
          },
        });
        return Promise.reject("无效的会话,或者会话已过期,请重新登录。");
      }
      msg = "系统接口" + statusCode + "异常";
    }
    message.error(msg);
    return Promise.reject(error);
  }
);
进行封装后,我们可以更为优雅地调用api
api.category.getCategoryList()