java springboot入门
工作需要,java springboot+vue这个东西需要学一下,先从搭建环境开始吧
jdk eclipse maven tomcat
jdk 安装 转自博客 落泪秋 https://www.cnblogs.com/yybrhr/p/9811352.html (侵删)
eclipse 安装 转自博客 执||念 https://www.cnblogs.com/caijiaming/p/10837083.html (侵删)
tomcat 安装 转自博客风霜高杰 https://www.cnblogs.com/caijiaming/p/10837083.html (侵删)
tomcat bin路径下有startup 与shutdown的脚本,启动之后访问 http://localhost:8080
maven安装 转自博客KyleInJava https://www.cnblogs.com/kyleinjava/p/9549481.html
1开始配置maven
配置文件settting.xml的简单配置(最好是将setting.xml文件复制一份到本地仓库中,然后进行修改)
本地仓库的位置如下位置 E:\mqy\mavenfile 第二步由自己设置
1)配置创建项目时默认的jdk版本,在
        jdk-1.7

            true
            1.7


            1.7
            1.7
            1.7
2)配置私有仓库的位置(maven所有的本地jar包都会放在私有仓库里面),其默认位置是当前用户目录下.m2文件夹中。通过修改下面的路径可以修改本地仓库的位置。
E:\mqy\mavenfile 3)配置中央仓库,使用阿里云仓库作为中央仓库的镜像,因为国外的仓库访问非常慢
      nexus-aliyun
      central
      Nexus aliyun
      http://maven.aliyun.com/nexus/content/groups/public
2.eclipes 中添加tomcat
Window--Preferences--Server--Runtime Environment--ADD--选择相应的Tomcat版本,然后在弹出的窗口配置。
昨晚的maven 项目没有进行硬性要求,暂时不讲这个、、、、
3 eclipes 中添加maven
1.在window 下 Preferences 中找到maven,选择Installations
2设置好Installations ,之后设置user settings
4.创建maven project
1. File---->New----->Other---->maven project
2. 选中Use default Workspace location 复选框
quickstart启动方式
配置pom.xml文件
红色部分是后添加的部分,蓝色即原来自带的,标记出来以作对比
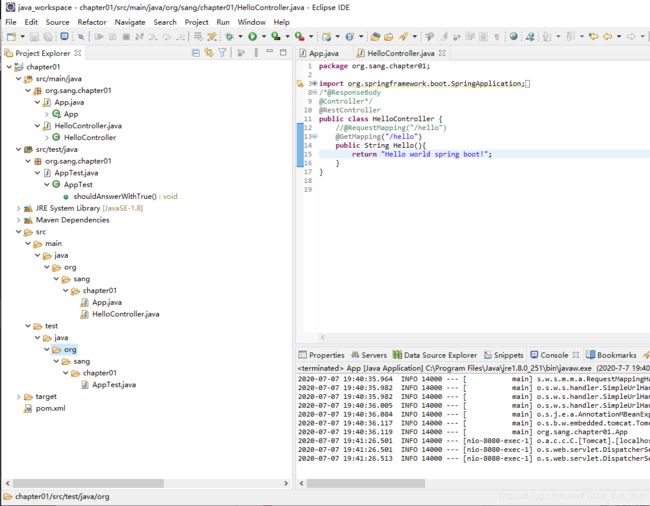
编写启动类
项目启动
直接运行main 方法
直接在IDE 中运行App 类的main 方法,就可以看到项目启动了
启动成功后,在浏览器地址栏输入 http://localhost:8080/hello即可看到运行结果
一个maven项目算是起来了
maven的自动注解与pom.xml需要研究一下
pom.xml的详细介绍
pom作为项目对象模型。通过xml表示maven项目,使用pom.xml来实现。主要描述了项目:包括配置文件;开发者需要遵循的规则,缺陷管理系统,组织和licenses,项目的url,项目的依赖性,以及其他所有的项目相关因素。
[xml] view plain copy print?


    4.0.0

    asia.banseon

    banseon-maven2

    jar

    1.0-SNAPSHOT

    banseon-maven

    http://www.baidu.com/banseon

    A maven project to study maven.


        jira

        http://jira.baidu.com/banseon


            Demo

            [email protected]

            [email protected]

            [email protected]

            http:/hi.baidu.com/banseon/demo/dev/


            HELLO WORLD

            banseon

            [email protected]


                Project Manager
                Architect


            demo

            http://hi.baidu.com/banseon


                No


            -5


            Apache 2

            http://www.baidu.com/banseon/LICENSE-2.0.txt

            repo

            A business-friendly OSS license


            scm:svn:http://svn.baidu.com/banseon/maven/banseon/banseon-maven2-trunk(dao-trunk)


            scm:svn:http://svn.baidu.com/banseon/maven/banseon/dao-trunk


        http://svn.baidu.com/banseon


        demo

        http://www.baidu.com/banseon


       ......


      ......


     Windows XP

     Windows

     x86

     5.1.2600


     mavenVersion

     2.0.3


     /usr/local/hudson/hudson-home/jobs/maven-guide-zh-to-production/workspace/

     /usr/local/hudson/hudson-home/jobs/maven-guide-zh-to-production/workspace/


         ......


        ......


     ......


    ......


      ......


    ......


   banseon-repository-proxy

            banseon-repository-proxy

            http://192.168.1.169:9999/repository/

            default


   ......


            org.apache.maven

            maven-artifact

            3.8.1

            jar


            test


                    spring-core
                    org.springframework


            true


    ......


   banseon-maven2
   banseon maven2
            file://${basedir}/target/deploy


   banseon-maven2
            Banseon-maven2 Snapshot Repository
            scp://svn.baidu.com/banseon:/usr/local/maven-snapshot


            banseon-site

            business api website


                scp://svn.baidu.com/banseon:/var/www/localhost/banseon-web
一、spring-boot介绍
Spring Boot提供了一个强大的一键式Spring的集成开发环境,能够单独进行一个Spring应用的开发,其中:
(1)集中式配置(application.properties)+注解,大大简化了开发流程
(2)内嵌的Tomcat和Jetty容器,可直接打成jar包启动,无需提供Javawar包以及繁琐的Web配置
(3)提供了Spring各个插件的基于Maven的pom模板配置,开箱即用,便利无比
(4)可以在任何你想自动化配置的地方,实现可能
(5)提供更多的企业级开发特性,如何系统监控,健康诊断,权限控制
(6)无冗余代码生成和XML强制配置
(7)提供支持强大的Restfult风格的编码,非常简洁
二、spring-boot常用注解
1、@SpringBootApplication
该注解等价于以默认属性使用@Configuration,@EnableAutoConfiguration和@ComponentScan。
2、Configuration
相当于传统的xml配置文件,如果有些第三方库需要用到xml文件,建议仍然通过@Configuration类作为项目的配置主类——可以使用@ImportResource注解加载xml配置文件。
3、EnableAutoConfiguration
Spring Boot自动配置(auto-configuration):尝试根据你添加的jar依赖自动配置你的Spring应用。如果发现了你不想要的特定自动配置类,你可以使用排除属性来禁用它们。
4、ComponentScan
表示将该类自动发现(扫描)并注册为Bean,可以自动收集所有的Spring组件,包括@Configuration类。我们经常使用@ComponentScan注解搜索beans,并结合@Autowired注解导入。如果没有配置的话,SpringBoot会扫描启动类所在包下以及子包下的使用了@Service,@Repository等注解的类。
5、@RestController
@ResponseBody和@Controller的合集
6、@Import
用来导入其他配置类。
7、@ImportResource
用来加载xml配置文件。
8、@Bean
用@Bean标注方法等价于XML中配置的bean。
9、@Value
注入Springbootapplication.properties配置的属性的值。
10、@Inject
等价于默认的@Autowired,只是没有required属性;
11、其他
@ResponseBody、@Controller、@RequestMapping、@Autowired、@Service、@Repository


