mac下vscode配置c++环境
文章目录
- 1. vscode中使用c++
-
- 1.1 安装c/c++扩展
- 1.2 查看Clang
- 1.3 创建demo项目
-
- a. 添加hello world源代码文件/cpp
- b. 编译cpp文件(tasks.json)
- c. 运行编译
- d. 更进一步
- 1.4 debug刚才的demo项目(launch.json)
- 1.5 单步执行代码
- 1.6 添加监视
- 1.7 C/C++配置(c_cpp_properties.json)
- 2. C++ 11到C++ 17
-
- 2.1 确定语法特性和clang版本
- 2.2 更新clang
- 3. 报错解决
-
- 3.1 修改vscode语言为英文
- 3.2 vector
initialization with {...} is not allowed in VS2012? - 3.3 zsh: command not found: code
- 3.4 Bad CMake executable "". Is it installed or settings contain the correct path (cmake.cmakePath)?
1. vscode中使用c++
配置开发环境
- 如果使用的是macos,还没有配置C++环境,可以参考VSCode的C++配置:Using Clang in Visual Studio Code,以下都是使用vscode的C++内容。
- 如果对xcode有兴趣,也可以去安装Xcode。参考这里
- 如果是windows系统,同样也可以参考vscode文档中对应的配置;或者直接使用visual studio 2015系列的IDE
1.1 安装c/c++扩展
第一步,安装vscode中c/c++的插件—— C++ extension for VS Code

1.2 查看Clang
第二步,检查Clang是否已经安装
~ » clang --version
Apple clang version 11.0.0 (clang-1100.0.33.16)
Target: x86_64-apple-darwin19.6.0
Thread model: posix
InstalledDir: /Library/Developer/CommandLineTools/usr/bin
如果没有安装的话,在终端,使用以下语句进行安装:
xcode-select --install
1.3 创建demo项目
第三步,创建Hello World项目
可以直接用命令行,但是也可以直接在UI界面创建
mkdir projects
cd projects
mkdir helloworld
cd helloworld
code .
其中,code .表示在.目录打开vscode,这个当前目录就是之后的workspace/工作目录。在接下来的操作中,会在工作目录中的.vscode文件夹里,创建三个文件,如下:
tasks.json(compiler build settings)launch.json(debugger settings)c_cpp_properties.json(compiler path and IntelliSense settings)
另外,打开后,会发现hellworld显示在vscode里是大写的HELLOWORLD
a. 添加hello world源代码文件/cpp
新建一个cpp文件,粘贴以下内容:
#include 如果此时报错了,例如:
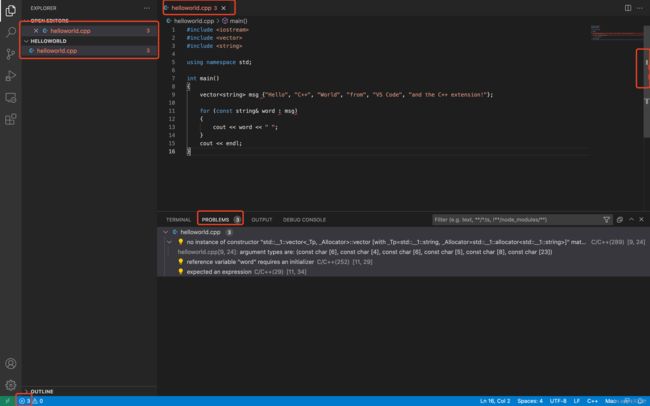
这些红色其实都是在告诉你,代码有语法错误。
错误原因
- vscode给出的示例代码采用的是C++ 17的语法,而我本机自带的这个clang是C++ 11的编译器。因此语法不兼容
解决方案
- 升级clang版本,参见2.2 C++11到C++ 17部分内容,对mac来说可行性不高,放弃❌
- 修改代码语法格式,参考菜鸟教程:C++ vector 容器浅析。将上述代码改为:
然后就会看到没有错误提示了,#include#include #include using namespace std; int main() { vector<string> msg; msg.push_back("Hello"); msg.push_back("C++"); msg.push_back("World"); msg.push_back("from"); msg.push_back("VS code"); msg.push_back("and the C++ extension!"); for(int i=0; i<msg.size(); i++) { cout<<msg[i]<<" "; } cout<<endl; } }
b. 编译cpp文件(tasks.json)
- 在vscode中,需要为每个project创建一个
tasks.json文件来告诉vscode如何去构建/编译这个程序。 - 编译会触发Clang C++编译器,从源代码创建一个可执行程序
- 需要保证将被编译的文件是当前的活动文件(显示在编辑器面板中的),因为之后会使用活动文件作为创建build/compile任务的上下文
- 菜单栏->
终端->配置默认生成任务,然后弹出的窗口中选择C/C++ clang++ build active file - 会默认生成
tasks.json文件,包含以下内容:{ "version": "2.0.0", "tasks": [ { "type": "cppbuild", "label": "C/C++: clang++ 生成活动文件", "command": "/usr/bin/clang++", # 明确所使用的编译器 "args": [ "-fdiagnostics-color=always", "-g", "${file}", "-o", "${fileDirname}/${fileBasenameNoExtension}" ], "options": { "cwd": "${fileDirname}" # 明确工作目录 }, "problemMatcher": [ "$gcc" ], "group": { "kind": "build", "isDefault": true }, "detail": "编译器: /usr/bin/clang++" } ] } - 对于
task.json文件参数的详细介绍,可以看这里
c. 运行编译
- 返回
helloworld.cpp文件,继续保持它在编辑器面板在,是当前的活跃文件,因为下一步使用的就是活跃文件 - 使用快捷键
⇧⌘B或者终端->Run build Task来执行编译 - 编译时,终端输出类似下面的内容:

- 点击终端里的
+按钮,会得到一个以helloworld为工作目录的新终端,

- 执行
ls,会看到可执行文件helloworld以及debug文件helloworld.dSYM

- 直接在这个新的终端中输入
./helloworld就可以运行这个helloworld程序啦。如下:

d. 更进一步
- 可以通过修改
tasks.json中的参数来编译多个文件 - 使用
${workspaceFolder}/*.cpp代替${file},这样就会编译当前目录下所有的.cpp文件... "args": [ "-fdiagnostics-color=always", "-g", "${file}", "-o", "${fileDirname}/${fileBasenameNoExtension}" ], ... - 也可以将输出文件名称从
"${fileDirname}/${fileBasenameNoExtension}"换成一个硬编码的名称(固定的,不能改的),例如:${workspaceFolder}/myProgram.out
1.4 debug刚才的demo项目(launch.json)
如果还需要debug,那么也需要做一个配置(每次新弄一个project,就要重新生成一次配置文件。。)
- 使用
launch.json文件来配置vscode,当使用F5进行debug时,会触发LLDB debugger 菜单栏->运行->添加配置,然后选择C++ (GDB/LLDB)(依然要保证,helloworld.cpp是当前的活跃文件)- 然后会弹出一个对话框,选择
clang++ build and debug active file,然后可能会出现调试界面,结束后会生成一个launch.json文件
对于launch.json文件
- 默认情况下,C++扩展不会对源代码添加任何断点,
stopAtEntry默认为false,将其改为true,则在开始debug的时候,程序会停在main方法。 - 保证
launch.json中的preLaunchTask参数值与tasks.json中的label值相同
开启一个debug会话
- 保证
helloworld.cpp是当前的活跃文件,因为vscode会使用当前的活跃文件作为debug的对象 - 先在源代码左侧加一个断点,按
F5键,或者Run->Starting Debugging,就可以看到debug界面了。
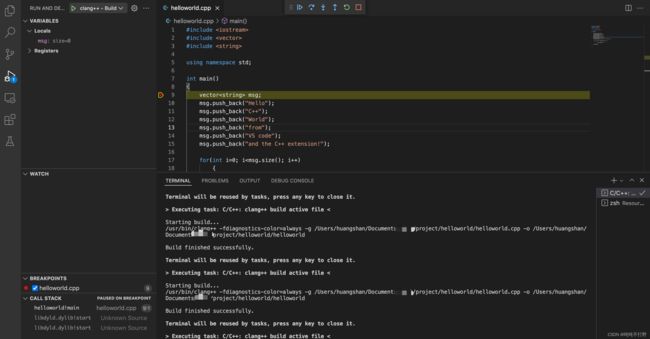
1.5 单步执行代码
Step through the code,单步执行代码
1.6 添加监视
有时候,可能要对程序执行过程中的某个变量进行监控,可以通过对变量添加监控实现这个目的
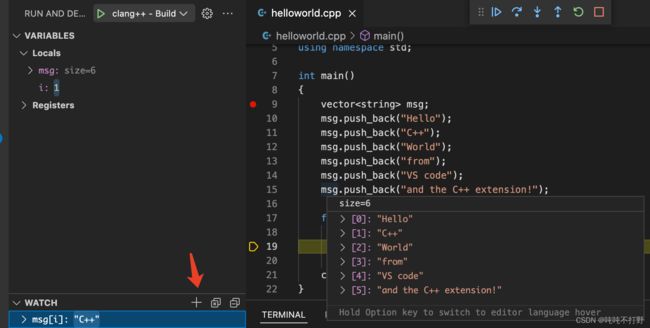
- 在左侧的WATCH窗口中,点击
+,输入要监控的变量的名称,msg[i]也是可以的。 - 同时在运行过程中,鼠标滑过某个变量,例如
msg,就可以看到这个变量的值。
1.7 C/C++配置(c_cpp_properties.json)
如果想更好的使用C/C++ extension,可以创建一个c_cpp_properties.json文件,在这个文件中,可以设置编译器路径、包含路径(include paths)、要编译的C++标准(如C++17)等。
使用⇧⌘P(command+shift+P)快捷键,打开命令面板,在弹出的面板中选择C/C++: Edit Configurations (UI)
2. C++ 11到C++ 17
2.1 确定语法特性和clang版本
虽然只是某些语法风格有变化,但是对我这种小白应该非常不友好,需要储备一些内容
可以改代码,也可以直接修改编译器版本进而支持对应的语言版本。根据clange官网
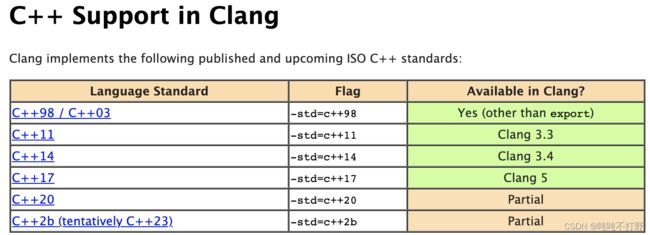
另外,还有详细的版本对特定性能的支持表格,例如:
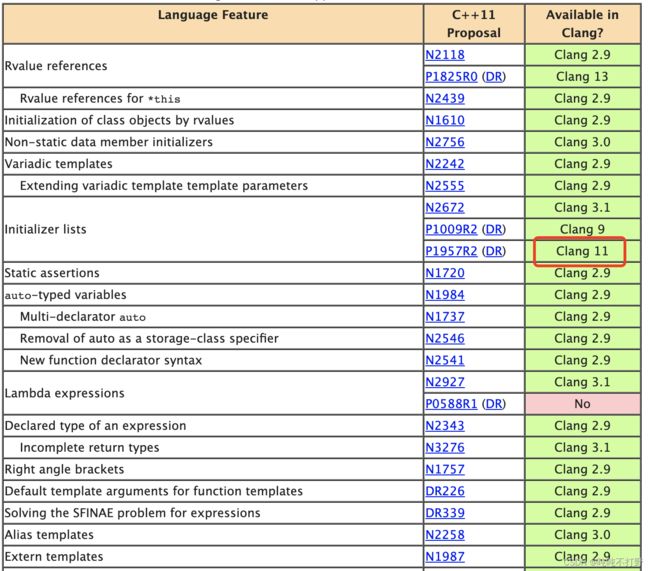
所以我本机的这个clang版本太低了,需要更新!
参考:
- 知乎问题:怎样从C++11转型到C++17/20?
- github历代C++特性对比:https://github.com/AnthonyCalandra/modern-cpp-features
2.2 更新clang
施行难度较高,风险较大,放弃。
- Clang C/C++ Download and Installation
- Stack Overflow:How to update Xcode from command line
- 如果clang版本比较老,那么大概率是因为没有更新maocs中关于xcode的一些内容,建议直接更新系统
- Stack Overflow: How to update LLVM & Clang on Mac OSX?
- 建议不要随意更新maocs上的clang版本,因为mac系统依赖于这个东西,所以最好直接使用系统自带的clang版本比较好。简而言之,要更新clang版本,那就直接更新系统吧。
3. 报错解决
3.1 修改vscode语言为英文
如果debug不顺利,中文不太好找解决方案,
3.2 vector initialization with {…} is not allowed in VS2012?
参考:vector initialization with {…} is not allowed in VS2012?
大致意思就是某些IDE会自带编译器,但是IDE版本自带的编译器版本可能比较旧,所以可能会导致不支持某些新的语言特性。
所以在定义字符串向量的时候,不支持{}语法,只能用比较麻烦的方式定义,例如:
#include3.3 zsh: command not found: code
之前搞conda的时候,就遇到过,因为换了zsh的shell,所以有些程序的执行路径找不到,只用改一下zsh里的配置就行。
参考:“code .” Not working in Command Line for Visual Studio Code on OSX/Mac
首先,打开访达->Application->找到vscode->右击选择显示包内容,
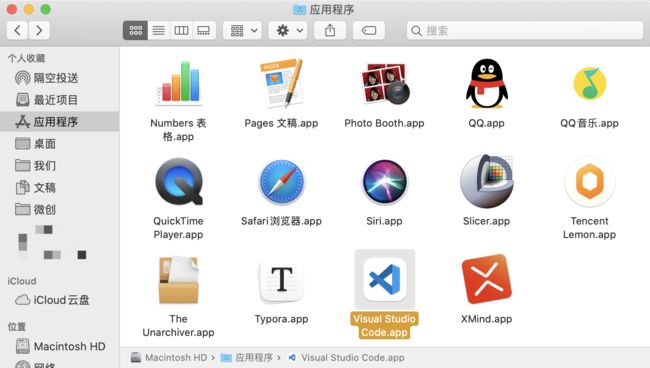
确认code.app的位置,一般都是 /Applications/Visual Studio Code.app/Contents/Resources/app/bin

确认位置后,打开mac终端,准备配置.zshrc中的vscode路径
vim ~/.zshrc
在zshrc文件中,加入export PATH="$PATH:/Applications/Visual Studio Code.app/Contents/Resources/app/bin",整体类似:
# If you come from bash you might have to change your $PATH.
# export PATH=$HOME/bin:/usr/local/bin:$PATH

# Path to your oh-my-zsh installation.
export ZSH="/Users/XXXX/.oh-my-zsh"
export PATH="/Users/XXXX/Documents/software/miniconda3/miniconda3/bin:$PATH"
export PATH="$PATH:/Applications/Visual Studio Code.app/Contents/Resources/app/bin"
加完之后,记得source ~/.zshrc使得配置生效。
- 如果报错:
compinit:503: no such file or directory: /usr/local/share/zsh/site-functions/_brew_cask。 - 参考:解决终端compinit:503: no such file or directory: /usr/local/share/zsh/site-functions/_brew_cask
- 若是装了brew的,有可能是缓存记录导致的;执行
brew cleanup可以修正
3.4 Bad CMake executable “”. Is it installed or settings contain the correct path (cmake.cmakePath)?
根据stack overflow:Bad CMake executable “”. Is it installed or settings contain the correct path (cmake.cmakePath)? - Pixhawk 4 Development
大概意思就是 :出现这个错误,要么就是因为你没有安装cmake,要么就是没有在设置里给出正确的cmake路径,记得安装过cmake之后设置一下系统路径。关于CMake的安装,详见ITK——2. 在mac中配置及使用vscode示例的1.1部分
vim ~/.bashrc
# 或者如果是zsh的shell的话
vim ~/.zashrc

# 加入这句话
export PATH="/Applications/CMake.app/Contents/bin":"$PATH"

# 使修改生效
source ~/.zshrc

# 验证是否生效
~ » cmake --version
cmake version 3.22.3
CMake suite maintained and supported by Kitware (kitware.com/cmake).
另外,如果希望vscode里可以使用cmake,还需要确保安装了``插件,详见:CMake Tools
参考:
- CSDN博客:[解决]是否已安装该可执行文件或设置是否包含正确的路径(cmake.cmakePath)?
- github issue:Bad CMake executable “C:\Program Files\CMake\bin\cmake.exe”. #685
