8255 boot介绍及bring up经验分享
这篇文章会简单的介绍8255的启动流程,然后着重介绍8255在实际项目中新硬件上的bring up工作,可以给大家做些参考。
8255 boot介绍
下面这些信息来自文档:《QAM8255P IVI Boot and CoreBSP Architecture Technical Overview》 80-42847-11 Rev. AC,如果已经对这个文档比较熟悉可以跳过这个部分。如果没有看过,建议一定要认真看一遍。
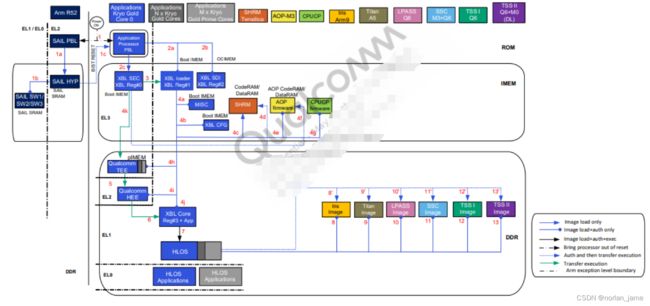
1. After the chipset is reset, the SAIL and Qualcomm® Kryo™ CPU Gold core 0 comes out of reset.
1a. SAIL configures the pre-built-in self-test (pre-BIST) and go into wait for interrupt (WFI) and hardware BIST controller unit (HBCU), which is a
hardware controller performs the BIST on SAIL. SAIL PBL initializes hardware and loads SAIL hypervisor to run.
1b. SAIL hypervisor loads the SW1/SW2/SW3 images.
1c. APPS core0 executes application primary boot loader (APPS PBL) pre-BIST configuration and goes into WFI and wait for SAIL communication
to run BIST on APSS. After Phase-1 BIST, SAIL sends post BIST reset to APSS, APSS reset and the Kryo Gold core 0, APPS PBL initializes
hardware (timer, PRNG, clocks, and so on), enables caches and memory management unit (MMU), and detects the boot device according to
the boot option configuration:
□ Default boot option for APSS: UFS
□ Default boot option for SAIL: NOR
□ Default boot option: Overridden by EDL cookie or force USB GPIO
2a. APPS PBL loads and authenticates XBL loader (region #1) from the boot device to the Boot IMEM.
2b. APPS PBL loads and authenticates XBL SDI (region #2) from the boot device to on-chip internal memory (OCIMEM).
2c. APPS PBL loads XBL SEC (region #0) from the boot device to boot IMEM. XBL SEC is a QTI-signed ELF segment, which locks xPUs. XBL
SEC runs the security configuration in the EL3 mode
3. XBL SEC runs the security configuration in the EL3 mode and after it is done, it will inform SAIL hypervisor that APPS is ready for the phase
BIST-II on DPU, Camera, CamNoc, NSP, Ethernet, PCIe, and so on.
4a. XBL loader will take over control and continue to load multi-image signature and integrity check (MISC).
4b. XBL loader loads and authenticates XBLConfig image.
4c. XBL loader loads SHRM.
4d. XBL loader loads and authenticates MISC image.
4e. XBL loader loads and authenticates the AOP image from the boot device to the AOP CodeRAM.
4f. XBL loader brings the AOP processor out of reset.
4g. XBL loader will then load and authenticate the CPU firmware.
4h. XBL loader loads and authenticates Qualcomm® Trusted Execution Environment (TEE) into pseudo internal memory (pIMEM).
4i. XBL loader loads and authenticates Qualcomm® Hypervisor Execution Environment (HEE).
4j. Loads and authenticates XBL core from XBL image.
4k. XBL jumps to XBL_SEC and XBL SEC transfers execution to the Qualcomm TEE.
5. Qualcomm TEE transfers the execution to Qualcomm HEE, Qualcomm HEE runs at EL2 mode. Qualcomm HEE configures SMMUs and
provides virtualization support.
6. Qualcomm HEE transfers the execution to XBL core(region #3). It runs at nonsecure EL1 mode
7. Linux loader application (part of application boot loader firmware volume (ABL FV)) loads and authenticates the HLOS kernel with verified boot,
jumps to HLOS. HLOS runs at nonsecure EL1 mode
8-13. HLOS Peripheral image loader (PIL) driver loads all subsystems iris firmware (FW), camera FW, audio FW, sensor FW, turing FW, deep
learning FW images to DDR and configures the clocks and power rails, if necessary. HLOS PIL driver executes a secure channel manager
(SCM) call to Qualcomm TEE to request a secure PIL driver, authenticates images, and Qualcomm HEE brings each subsystem out of reset.
QAM8255P Cold Boot Flow – Phase 2 BIST
8255 bring up经验分享
这几天刚刚把新到的8255的硬件完成了bring up,中间遇到了挺多问题,趁着现在还有些印象抓紧记录一下。
8255 boot硬件框架
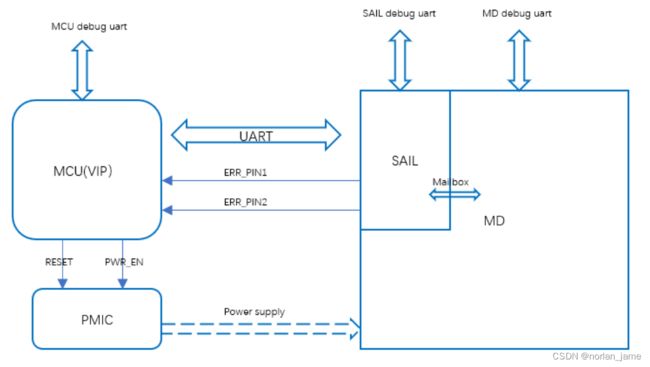
1,由于功能安全的要求,8255的boot流程和8155有很大的差异
2,MCU和SAIL(安全岛)在boot的流程中需要多次握手,且SAIL软件正常工作时才会放行MD(main domain)域的软件
3,MCU-SAIL之间通信方式为UART,同时SAIL会向外输出ERR_PIN1/PIN2来表明当前的异常状态
4,SAIL和MD之间是通过mailbox进行通信,他们之间也会做一些状态监控
5,这里的MD主域指的是APPS,即application processes,我们常说的A核
6,这里的MCU/VIP型号可能是TC397也可能是瑞萨的RH850系列
8255 bring up前期准备
bring up工作更像是阶段性的总结工作,对这一阶段的工作成果进行验证和总结,打个比喻,你可以认为bring up是一次期中考试。前期工作做的好不好,准备的充不充分,将会在这个时刻得到充分的验证。所以越是前期工作准备的越充分,bring up节点到来的时候,成功bring up的难度就越小,成功率就越高,软硬件的问题也就越少。
硬件设计阶段
在前期的硬件设计阶段,你需要:
1,参与硬件原理图设计的评审会
2,检查review pin mux/HSIS
文档准备
软件需要提前阅读熟悉下面几个文档:
QAM8255P IVI Boot and CoreBSP Architecture Technical Overview
Qualcomm® Snapdragon Ride™ Platform Automotive Reference (SA8775P/SA8650P/SRV1H/SRV1M/SA8255P/ SA8620P/SA7255P) Vehicle Interface Processor (Aurix) User Guide)
SoC-MCU Protocol – Boot and Safety Status Messages
MCU部分
1,搭建好MCU的开发环境
2,熟悉MCU芯片的各项功能,编写控制GPIO驱动,SPI/UART通信驱动
3,熟悉MCU-SAIL之间的通信方式,握手机制,阅读相关的文档
SOC部分
编译环境准备
1,准备好QNX的编译环境,下载好SDP包
2,下载8255 SDK软件包
3,编译好所有镜像文件
烧录环境准备
1,安装刷机软件,熟悉刷机流程
2,准备好相关的刷机工具,如USB线束等
8255 硬件bring up
MCU供电部分
MCU需要根据手册要求控制连接到PMIC的两个pin脚:PWR_EN和RESET。
这里的前提是MCU自己本身的bring-up已经完成!
这里我们就遇到了一些问题,在bring up MCU的时候,烧录完MCU的软件,重新上电之后发现MCU的晶振并没有起振。做了一些列的检查之后,发现硬件本身是没有问题的,问题出在软件上,这个MCU比较特殊,需要配置一些参数才能触发外部晶振起振(MCU内部自带一个时钟源)。
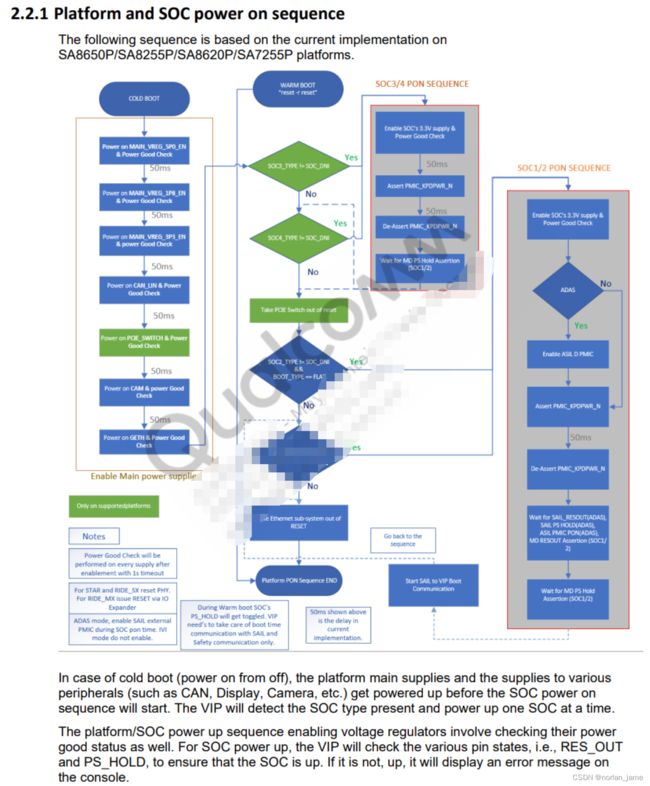
电源检测流程图:
8255 刷机
下面的每一个步骤都是在上一个步骤完成的前提下进行的:
1,需要确保MCU自身bring up 完成
2,MCU完成对PWR_EN/RESET两个pin的控制之后,需要硬件确认所有的供电是否正常才能进行下一步
3,通过FORCE_USB pin强制让SOC进入下载模式
4,SOC进入下载模式后,连接USB CABLE到PC上,这个时候应该在PC上识别到com设备,如果没有观察到COM设备,请回去检查前面的步骤,需要注意的是进入下载模式的COM设备是不需要安装特别驱动就能识别到的!
5,打开烧录软件,烧录nor-flash,UFS,需要注意的是在烧录nor-flash时,需要先擦在写(这里我们踩过坑),UFS需要做一次provision。
6,如果烧录成功,那么刷机软件会有相应的提示,否则会提示错误,这里导致烧录失败的原因有很多,比如DDR的问题,线束的问题,供电的问题等等,可以说烧录成功是bring up成功的一个里程碑的节点。
MCU-SAIL握手通信
MCU-SAIL之间需要有一些通信和握手,细节可以看下面这张图。
总结来说:
1,在MCU给SOC上电之后,MCU需要通过uart来查询SAIL的bootstatus,发送的数据帧格式长下面这样:
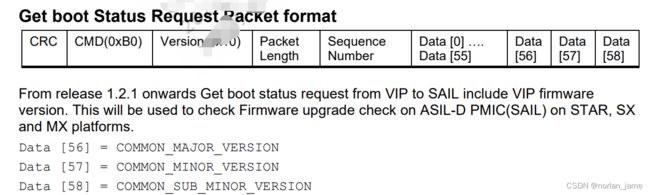
具体来说是:crc+cmd 0xB0 + 0x10 + 数据包长度64个字节 0x40 + 消息序列号,从0开始每次递增1 + data[0] ... data[58]. 下面是几个具体的发送帧示例:

数据包的总长度是64个字节
2,这个时候SAIL通常会返回一个256个字节数据帧来告诉MCU当前他的boot状态
一个正常的uart返回帧:

一个异常的返回帧:

需要注意的是,异常的时候返回的数据帧格式可能不是完全按照 第2点的帧格式返回的,但是也是可以解析出来哪里出了异常。比如上面返回的异常uart消息,我们可以按照协议解析出来哪里出了问题:
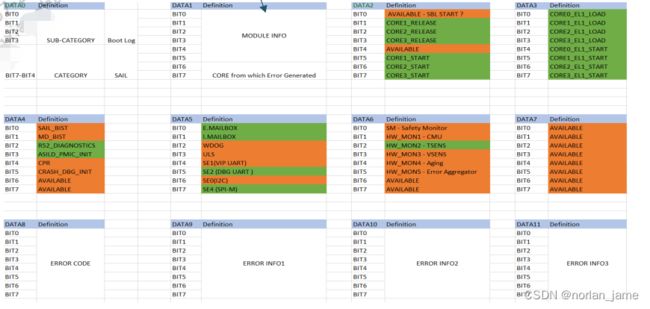
异常状态帧数据:00 A0 10 OC 00 FO B1 40 00 00 00 00 E2 FF FF FF 00