gateway网关的使用
今天与大家分享gateway网关的使用
1. gateway简介
1.1 是什么
SpringCloud Gateway 作为 Spring Cloud 生态系统中的网关,目标是替代 Zuul,在Spring Cloud 2.0以上版本中,没有对新版本的Zuul 2.0以上最新高性能版本进行集成,仍然还是使用的Zuul 2.0之前的非Reactor模式的老版本。而为了提升网关的性能,SpringCloud Gateway是基于WebFlux框架实现的,而WebFlux框架底层则使用了高性能的Reactor模式通信框架Netty。
1.2 作用
Spring Cloud Gateway 的目标,不仅提供统一的路由方式,并且基于 Filter 链的方式提供了网关基本的功能,例如:安全,监控/指标,和限流。
1.3 主要特征
- 基于 Spring Framework 5,Project Reactor 和 Spring Boot 2.0
- 集成 Hystrix 断路器
- 集成 Spring Cloud DiscoveryClient
- Predicates 和 Filters 作用于特定路由,易于编写的 Predicates 和 Filters
- 具备一些网关的高级功能:动态路由、限流、路径重写
1.4 与zuul的主要区别
Spring Cloud Gateway 底层使用了高性能的通信框架Netty, zuul采用的是传统的servlet IO。
1.5 主要组件
-
Filter
过滤器,与zuul中的过滤器作用相同,可以用来拦截和修改请求,也可以对响应做处理。比如用来进行安全校验等。 -
Route
路由组件,将网关接受到的请求发送给指定的上游服务进行处理。一个Route模块由一个 ID,一个目标 URI,一组断言和一组过滤器定义。如果断言为真,则路由匹配,目标URI会被访问 -
Predicate
断言, 这是一个 Java 8 的 Predicate。简单的理解是路由转发的条件,满足条件的请求才会被转发。有点像sql中的where子句的作用。
1.6 架构图
官网 https://docs.spring.io/spring-cloud-gateway/docs/2.2.5.RELEASE/reference/html/
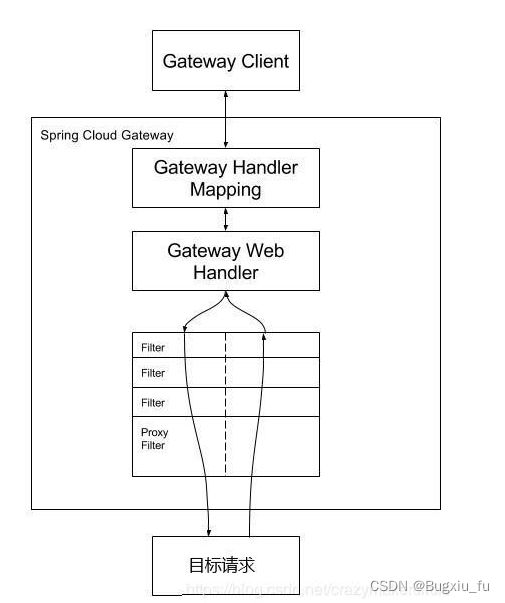
对上图的理解:
客户端向 Spring Cloud Gateway 发出请求。然后在 Gateway Handler Mapping 中找到与请求相匹配的路由,将其发送到 Gateway Web Handler。Handler 再通过指定的过滤器链来将请求发送到我们实际的服务执行业务逻辑,然后返回。过滤器之间用虚线分开是因为过滤器可能会在发送代理请求之前(“pre”)或之后(“post”)执行业务逻辑
2. 开发示例
2.1 创建一个gateway模块
1)创建一个gateway模块
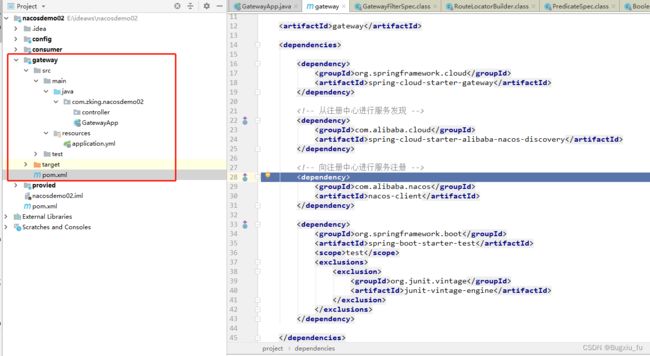
2)如上图,配置pom文件,引入必要的包
            org.springframework.cloud
            spring-cloud-starter-gateway


            com.alibaba.cloud
            spring-cloud-starter-alibaba-nacos-discovery


            com.alibaba.nacos
            nacos-client


            org.springframework.boot
            spring-boot-starter-test
            test


                    org.junit.vintage
                    junit-vintage-engine
- 项目配置文件:application.yml
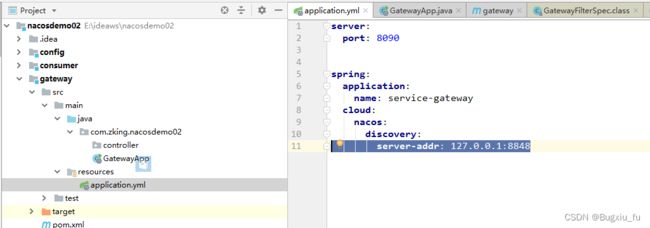
server:
  port: 8090

spring:
  application:
    name: service-gateway
  cloud:
    nacos:
      discovery:
        server-addr: 127.0.0.1:8848
4)创建启动类
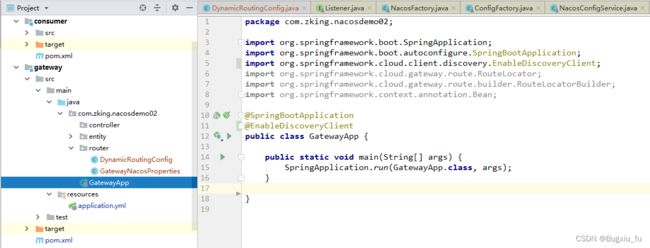
@SpringBootApplication
public class GatewayApp {

    public static void main(String[] args) {
        SpringApplication.run(GatewayApp.class, args);
    }

}
2.2 与nacos结合使用
2.2.1 默认规则
将gateway注册到nacos注册中心,使用默认规则进行路由,默认规则使用简单,但功能也相当较弱。
默认规则:
http://gateway_host:gateway_port/服务名/**
服务名 默认为nacos注册的服务点的大写,可以修改
配置文件:
server:
  port: 8090

spring:
  application:
    name: service-gateway
  cloud:
    nacos:
      discovery:
        server-addr: 127.0.0.1:8848

    gateway:
      discovery:
        locator:
          #开启服务发现功能,从注册中心获取服务列表,(nacos->服务管理->服务列表)
          #默认服务名称需要为大写,可以通过配置lower-case-service-id: true 改变这一规则
          enabled: true
          #配置服务名使用小写
          lower-case-service-id: true

#配置配置
logging:
  level:
    #trace,debug,info
    org.pringframework.cloud.gateway: trace #便于跟踪调试,生产环境最好不用
    org.springframework.http.server.reactive: debug
    org.springframework.web.reactive: debug
    reactor.ipc.netty: debug
2.2.2 通过配置文件配置路由
RouteDefinition中,主要有五个属性:
- id:路由标识(id:标识,具有唯一性,默认为uuid
- predicates:PredicateDefinition 路由断言定义列表
- filters:FilterDefinition 过滤器定义列表,为一个数组
- uri:目标服务地址(uri:地址,请求转发后的地址)
- order:优先级, 越小越优先
通过配置文件配置路由的缺点是,当增加服务时需要修改配置文件并重启网关。
配置文件:
server:
  port: 8090

spring:
  application:
    name: service-gateway
  cloud:
    nacos:
      discovery:
        server-addr: 127.0.0.1:8848

    gateway:
      discovery:
        locator:
          #开启服务发现功能,从注册中心获取服务列表,(nacos->服务管理->服务列表)
          #默认服务名称需要为大写,可以通过配置lower-case-service-id: true 改变这一规则
          enabled: false
          #配置服务名使用小写
          lower-case-service-id: true

      routes:
        # http://localhost:5000/usr/hello
        #路由标识(id:标识,具有唯一性)
        - id: consumer-service-api
          #目标服务地址(uri:地址,请求转发后的地址),会自动从注册中心获得服务的IP,不需要手动写死
          uri: lb://service-consumer
          #优先级,越小越优先
          #order: 999
          #路由条件(predicates:断言)
          predicates:
          # 路径匹配,
          - Path=/consumer/**
          filters:
          #路径前缀删除示例:请求/name/bar/foo,StripPrefix=2,去除掉前面两个前缀之后,最后转发到目标服务的路径为/foo
          #前缀过滤,请求地址:http://localhost:5000/usr/hello
          #此处配置去掉1个路径前缀,再配置上面的 Path=/usr/**,就将**转发到指定的微服务
          #因为这个api相当于是服务名,只是为了方便以后nginx的代码加上去的,对于服务提供者service-client来说,不需要这段地址,所以需要去掉
          - StripPrefix=1

#配置配置
logging:
  level:
    #trace,debug,info
    org.pringframework.cloud.gateway: trace #便于跟踪调试,生产环境最好不用
    org.springframework.http.server.reactive: debug
    org.springframework.web.reactive: debug
    reactor.ipc.netty: debug
2.2.3 动态路由
功能强,在新增服务时不需要重启网关
1)配置文件
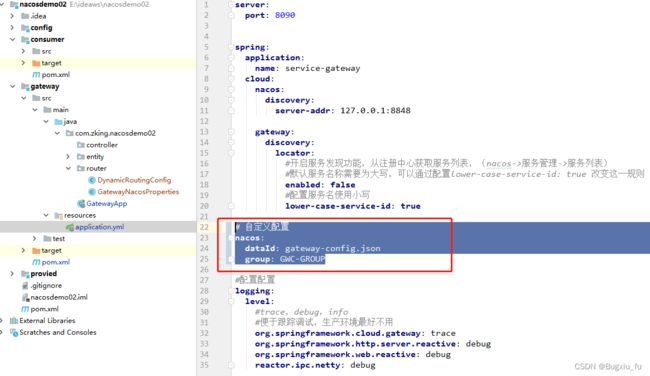
# 自定义配置
# 自定义配置
nacos:
  dataId: gateway-config.json
  group: GWC-GROUP

#配置配置
logging:
  level:
    #trace,debug,info
    #便于跟踪调试,生产环境最好不用
    org.springframework.cloud.gateway: trace
    org.springframework.http.server.reactive: debug
    org.springframework.web.reactive: debug
    reactor.ipc.netty: debug
2)读取配置文件的中的配置信息
/**
 * 1. 保存Gateway(网关)中与nacos相关的属性
 * 2. 这些信息是自定义配置属性,它们保存在配置文件application.yml中
 */
@Configuration
@Data
public class GatewayNacosProperties {

    @Value("${spring.cloud.nacos.discovery.server-addr}")
    private String serverAddr;

    @Value("${nacos.dataId}")
    private String dataId;

    @Value("${nacos.group}")
    private String group;

}
3)实现实现动态路由
/**
 * 此类实现了Spring Cloud Gateway + nacos 的动态路由
 * 该类用于监听配置中心中的路由配置的变化,当监听到配置变化,则发布一个事件,
 * 用于更新本地路由信息。
 * 它实现一个Spring提供的事件推送接口ApplicationEventPublisherAware
 */
@Component
public class DynamicRoutingConfig implements ApplicationEventPublisherAware {

    private final Logger logger = LoggerFactory.getLogger(DynamicRoutingConfig.class);

    @Autowired
    private RouteDefinitionWriter routeDefinitionWriter;

    @Autowired
    private GatewayNacosProperties gatewayNacosProperties;

    private ApplicationEventPublisher applicationEventPublisher;


    @Override
    public void setApplicationEventPublisher(ApplicationEventPublisher applicationEventPublisher) {
        this.applicationEventPublisher = applicationEventPublisher;
    }

    /**
     * 这个方法主要负责监听Nacos的配置变化,这里先使用参数构建一个ConfigService,再使用ConfigService开启一个监听,
     * 并且在监听的方法中刷新路由信息。
     *
     * @throws NacosException
     */
    @Bean
    public void refreshRouting() throws NacosException {
        Properties properties = new Properties();
        properties.put(PropertyKeyConst.SERVER_ADDR, gatewayNacosProperties.getServerAddr());
        ConfigService configService = NacosFactory.createConfigService(properties);

        //获得nacos中已有的路由配置
        String json = configService.getConfig(gatewayNacosProperties.getDataId(), gatewayNacosProperties.getGroup(), 8090);
        this.parseJson(json);

        //添加监听器,监听nacos中的数据修改事件
        configService.addListener(gatewayNacosProperties.getDataId(), gatewayNacosProperties.getGroup(), new Listener() {
            @Override
            public Executor getExecutor() {
                return null;
            }

            @Override
            public void receiveConfigInfo(String configInfo) {
                logger.info(configInfo);
                parseJson(configInfo);
            }
        });
    }


    /**
     * 解析从nacos读取的路由配置信息(json格式)
     *
     * @param json
     */
    public void parseJson(String json) {
        logger.info("从Nacos返回的路由配置(JSON格式):" + json);
        List routeArr = JSON.parseArray(json).toJavaList(RouteDefinition.class);
        for (RouteDefinition route : routeArr) {
            update(route);
        }
    }


    /**
     * 路由更新:
     * 1)先将原来的路由信息删除
     * 2)保存新的路由信息
     * @param routeDefinition
     * @return
     */
    public void update(RouteDefinition routeDefinition) {

        try {
            this.routeDefinitionWriter.delete(Mono.just(routeDefinition.getId()));
            logger.info("删除原来的路由信息");
        } catch (Exception e) {
            logger.error(e.getMessage(), e);
        }

        try {
            routeDefinitionWriter.save(Mono.just(routeDefinition)).subscribe();
            this.applicationEventPublisher.publishEvent(new RefreshRoutesEvent(this));
            logger.info("路由更新成功");
        } catch (Exception e) {
            logger.error(e.getMessage(), e);
        }
    }

}
4)在配置中心中配置路由信息
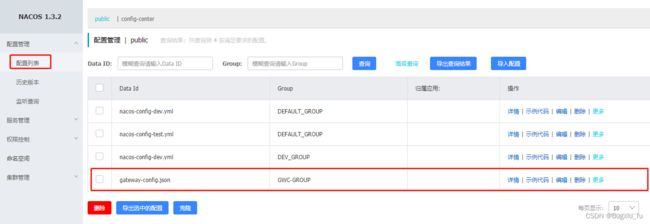
路由配置采用json格式,参考配置如下:
[
  {
    "id": "service-consumer",
    "predicates": [
      {
        "name": "Path",
        "args": {
        "_genkey_0": "/consumer/**"
        }
      }
    ],
    "filters": [
      {
        "name": "StripPrefix",
        "args": {
          "_genkey_0": "1"
        }
      }
    ],
    "uri": "lb://service-consumer",
    "order": 0
  }
]
需要根据自己的项目的具体情况配置。