spring boot + vue知识点总结
1.课程简介
本课程是让小白迅速掌握springboot和vue的知识点,可以快速做出项目。
课程导图

视频:程序员云翼的个人空间-程序员云翼个人主页-哔哩哔哩视频
2.软件安装
备注: 需要的软件我会百度网盘发给大家,大家下载到电脑,安装目录不能包含中文。然后根据下面的步骤安装和配置环境变量即可
2.1 JDK1.8
JDK简介:Java Development Kit (JDK) 是 Sun 公司(已被 Oracle 收购)针对 Java 开发员的软件开发工具包。自从 Java 推出以来,JDK 已经成为使用最广泛的 Java SDK(Software development kit)。没有 JDK 的话,无法编译 Java 程序,如果想只运行 Java 程序,要确保已安装相应的 JRE。
点击 jdk-8u201-windows-x64.exe 进行安装,选好安装目录。配置环境变量

新建JAVA_HOME的系统变量,变量值是jdk安装目录,点击 path 变量,将 jdk的bin目录配置好
JAVA_HOME
C:\Program Files\Java\jdk1.8.0_201 (本地电脑的jdk目录)
%JAVA_HOME%\bin
最后 按 win + r 键盘,输入cmd打开黑窗口 检查jdk环境变量是否成功
输入命令
java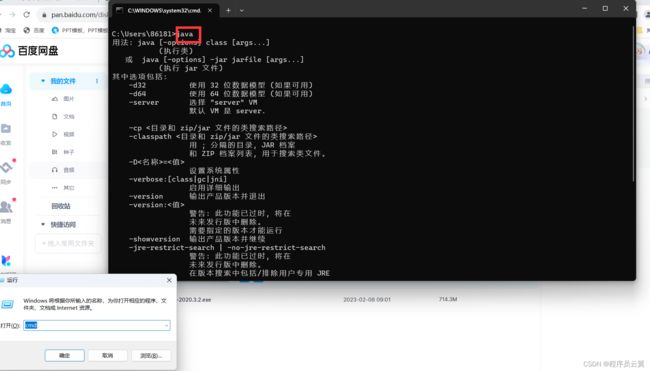
出现这些代表配置成功,你通关了!
2.2 maven
maven简介:是一个项目管理工具。它负责管理项目开发过程中的几乎所有的东西。
解压缩 apache-maven-3.6.3.zip 到英文目录下,并且创建一个repository文件夹做为maven下载依赖的仓库。

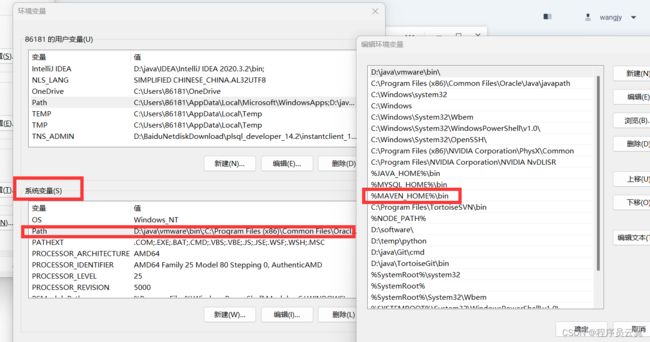
配置maven环境变量
MAVEN_HOME
D:\java\apache-maven-3.6.3-bin\apache-maven-3.6.3 (你本地电脑的maven安装目录) 
验证配置是否成功,按 win + r 键盘,输入cmd打开黑窗口,输入:
mvn -v出现下图表示成功,你离成功又近了一步,加油。

最后修改maven的settings.xml文件的本地仓库目录和配置下载依赖的服务器
打开settings.xml修改仓库目录


修改下载依赖的服务器配置,因为中央仓库在国外导致下载依赖很慢或者失败,所以我们改为国内的服务器。
在
  aliyunmaven
  *
  阿里云公共仓库
  https://maven.aliyun.com/repository/public


    nexus-tencentyun
    *
    Nexus tencentyun
    http://mirrors.cloud.tencent.com/nexus/repository/maven-public/

最后在IDEA里面的下面配置一下我们安装好的maven,这里我们就永久设置maven,新项目默认不需要重新设置


到此maven全部配置完成,你离成功又近了一步,加油。
2.3 MySQL5.7
MySQL简介:MySQL是一个开源的关系型数据库管理系统,常用于Web应用程序的后端数据存储。它支持多种操作系统和编程语言,具有高性能、可靠性和可扩展性等特点。
软件安装,解压缩MySql安装.zip,里面有详细的安装文档,环境变量配置文档和卸载软件文档,大家跟着做就好

然后下载navicat来操作MySQL数据库,一键安装即可。打开navicat,新建MySQL连接

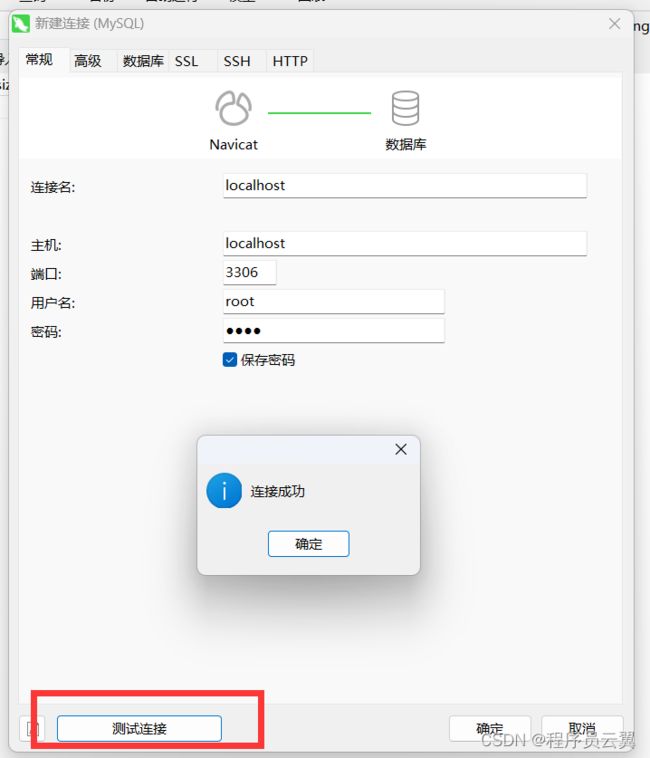
连接成功,就可以操作数据库了。
2.4 Redis
Redis简介:Redis 是一个高性能的key-value非关系型数据库。 redis的出现,很大程度补偿了memcached这类key/value存储的不足,在部 分场合可以对关系数据库起到很好的补充作用。
Redis支持主从同步。数据可以从主服务器向任意数量的从服务器上同步,从服务器可以是关联其他从服务器的主服务器。
解压缩Redis.zip,点击redis-server.exe 或者 双击 startRedis.bat 即可启动 Redis,默认端口:6379

安装一下redis可视化软件,方便操作数据, 点击 RedisDesktopManager.exe 一键安装即可

2.5 Idea
Idea简介:IntelliJ在业界被公认为最好的java开发工具,尤其在智能代码助手、代码自动提示、重构、JavaEE支持、各类版本工具(git、svn等)、JUnit、CVS整合、代码分析、 创新的GUI设计等方面的功能可以说是超常的。
点击ideaIU-2020.3.2.exe 执行文件,一路安装就好,这是有30天试用期的,超过这个时间就不能用了。
2.6 Nodejs
Nodejs简介: 脚本语言需要一个解析器才能运行,JavaScript是脚本语言,在不同的位置有不一样的解析器,如写入html的js语言,浏览器是它的解析器角色。而对于需要独立运行的JS,nodejs就是一个解析器。
官方下载地址:https://nodejs.org/zh-cn/
我已经下好了,大家点击 node-v16.19.0-x64.msi 安装,选好安装目录,全部选择默认配置就好

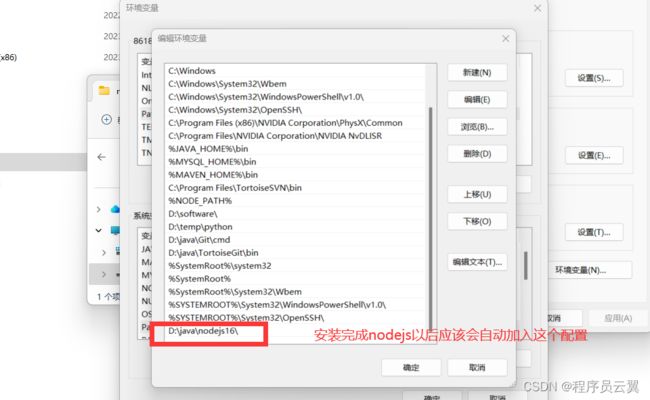
系统变量下的Path变量下在nodejs安装完成后应该会自动生成Node环境
cmd检查是否安装好了,输入命令,安装nodejs的同时会安装npm(包管理工具),npm的作用就是对Node.js依赖的包进行管理,也可以理解为用来安装/卸载Node.js需要装的东西
node -v
npm -v
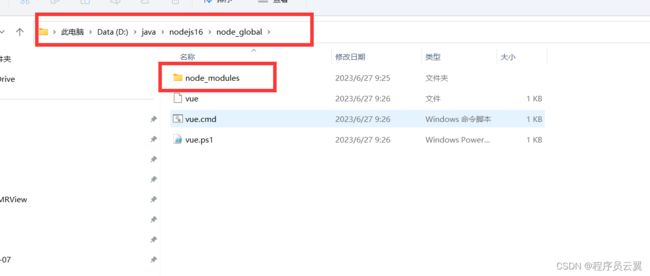
配置nodejs的环境,新建两个文件夹,node_cache文件夹存放node资源的缓存,node_global文件夹存放资源的安装,还需要在node_global目录下在创建一个“node_modules”空目录文件夹。

然后cmd输入命令
npm config set prefix "D:\java\nodejs16\node_global"

npm config set cache "D:\java\nodejs16\node_cache"

npm config list
配置淘宝镜像,加速下载npm依赖的速度,输入命令
npm config set registry https://registry.npm.taobao.org

npm config get registry
配置环境变量,新建NODE_PATH,再把NODE_PATH 放到系统变量 Path里面


在用户变量也要添加

软件安装就介绍完了,接下来在IDEA编写代码
3.spring boot知识点总结
3.1项目搭建
在idea创建spring boot项目
pom.xml文件依赖
    4.0.0

        org.springframework.boot
        spring-boot-starter-parent
        2.5.9


    com.example
    authority
    0.0.1-SNAPSHOT
    authority
    Demo project for Spring Boot

        1.8


            org.springframework.boot
            spring-boot-starter


            org.springframework.boot
            spring-boot-starter-test
            test


            io.springfox
            springfox-swagger2
            2.9.2


            io.springfox
            springfox-swagger-ui
            2.9.2


            org.springframework.boot
            spring-boot-starter-web


            mysql
            mysql-connector-java
            runtime


            org.projectlombok
            lombok
            true


            com.baomidou
            mybatis-plus-boot-starter
            3.5.1


            org.mybatis.spring.boot
            mybatis-spring-boot-starter
            2.2.1


            org.springframework.boot
            spring-boot-starter-data-redis


            com.alibaba
            fastjson
            1.2.69


            org.springframework.boot
            spring-boot-devtools
            true


                org.springframework.boot
                spring-boot-maven-plugin
配置文件
spring:
  datasource:
    url: jdbc:mysql://localhost:3306/student-manager?serverTimezone=GMT%2b8
    username: root
    password: root
    driver-class-name: com.mysql.cj.jdbc.Driver
  redis:
    port: 6379
    host: localhost
  servlet:
    multipart:
      max-file-size: 100MB
      max-request-size: 500MB
  jackson:
    time-zone: GMT+8
    date-format: yyyy-MM-dd HH:mm:ss
  devtools:
    restart:
      enabled: true
      additional-paths: src/main/java
server:
  port: 8888

mybatis-plus:
  mapper-locations: classpath:mapper/*.xml
  configuration:
    log-impl: org.apache.ibatis.logging.stdout.StdOutImpl


files:
  upload:
    path: D:\temp\files\
@RequestMapping的类型说明:
GET
特点:安全、幂等。
说明:从服务器端获取数据,请求body在地址栏上。
作用:获取资源。HEAD
特点:安全、幂等。
说明:与get方法类似,但不返回message body内容,仅仅是获得获取资源的部分信息(content-type、content-length)。
作用:restful框架中较少使用。POST
特点:非安全、非幂等。
说明:向服务器端提交数据,请求数据在报文body里;
发送一个修改数据的请求,需求数据要重新新创建。
作用:用于创建子资源。创建、更新、删除、查询资源均可使用。PUT
特点:非安全、幂等。
说明:向服务器端提交数据,请求数据在报文body里;
发送一个修改数据的请求,需求数据更新(全部更新)。
作用:用于创建、更新资源。DELETE
特点:非安全、幂等。
说明:向服务器端提交数据,请求数据在报文body里;
发送一个删除数据的请求。
作用:删除资源。OPTIONS
特点:安全、幂等。
作用:用于url验证,验证接口服务是否正常。TRACE
特点:安全、幂等。
说明:维基百科“回显服务器收到的请求,这样客户端可以看到(如果有)哪一些改变或者添加已经被中间服务器实现。”
作用:restful框架中较少使用。PATCH
特点:非安全、幂等。
说明:向服务器端提交数据,请求数据在报文body里;
与PUT类似,发送一个修改数据的请求,区别在于PATCH代表部分更新;
后来提出的接口方法,使用时可能去要验证客户端和服务端是否支持;
作用:用于创建、更新资源。局部更新,比如:user对象,只更改了name属性,那么他的其他属性值是不会变的,如果用post,那么其他属性值会被设置为null(全局更新)
幂等性
幂等性:用户对于同一操作发起的一次请求或者多次请求的结果是一致的,不会因为多次点击而产生了副作用。
3.2文件上传,拦截器,自定义注解
文件上传,RESTful接口规范, 方法的请求路径加{参数名称},方法入参加 @PathVariable接受数据
package com.example.base.controller;

import com.example.base.annotation.NoAuth;
import org.springframework.beans.factory.annotation.Value;
import org.springframework.web.bind.annotation.*;
import org.springframework.web.multipart.MultipartFile;

import javax.servlet.ServletOutputStream;
import javax.servlet.http.HttpServletResponse;
import java.io.*;
import java.net.URLEncoder;
import java.util.UUID;

@RestController
@RequestMapping("/file")
public class FileController {

    @Value("${files.upload.path}")
    private String fileUploadPath;

    @PostMapping("/upload")
    public String upload(@RequestParam MultipartFile file){
        String originalFilename = file.getOriginalFilename();
        String type = originalFilename.substring(originalFilename.lastIndexOf(".") + 1);
        File uploadParentFile = new File(fileUploadPath);
        if(!uploadParentFile.exists()){
            uploadParentFile.mkdirs();
        }
        String uuid = UUID.randomUUID().toString().replaceAll("-", "");
        String fileUUID = uuid + "." + type;
        File uploadFile = new File(fileUploadPath + fileUUID);
        try {
            file.transferTo(uploadFile);
            return "http://localhost:8888/file/" + fileUUID;
        } catch (IOException e) {
            e.printStackTrace();
            return "上传失败";
        }
    }

    @GetMapping("/{fileUUID}")
    @NoAuth
    public void download(@PathVariable String fileUUID, HttpServletResponse response){
        File file = new File(fileUploadPath + fileUUID);
        try {
            FileInputStream fileInputStream = new FileInputStream(file);
            response.reset();
            response.setCharacterEncoding("UTF-8");
            response.addHeader("Content-Disposition","attachment;filename=" + URLEncoder.encode(fileUUID,"UTF-8"));
            response.setContentType("image/jpeg");
            ServletOutputStream outputStream = response.getOutputStream();
            int len = 0;
            byte[] bytes = new byte[1024];
            while((len = fileInputStream.read(bytes)) != -1){
                outputStream.write(bytes,0,len);
                outputStream.flush();
            }
        } catch (IOException e) {
            e.printStackTrace();
        }
    }
}
拦截器
package com.example.base.config;

import com.example.base.intercecptor.JwtInterceptor;
import org.springframework.beans.factory.annotation.Autowired;
import org.springframework.context.annotation.Configuration;
import org.springframework.web.servlet.config.annotation.InterceptorRegistry;
import org.springframework.web.servlet.config.annotation.WebMvcConfigurer;

@Configuration
public class InterceptorConfig implements WebMvcConfigurer {

    @Autowired
    private JwtInterceptor jwtInterceptor;

    @Override
    public void addInterceptors(InterceptorRegistry registry) {
        registry.addInterceptor(jwtInterceptor).addPathPatterns("/**");
    }
}
package com.example.base.intercecptor;

import com.example.base.annotation.NoAuth;
import org.springframework.stereotype.Component;
import org.springframework.web.method.HandlerMethod;
import org.springframework.web.servlet.HandlerInterceptor;

import javax.servlet.http.HttpServletRequest;
import javax.servlet.http.HttpServletResponse;

@Component
public class JwtInterceptor implements HandlerInterceptor {

    @Override
    public boolean preHandle(HttpServletRequest request, HttpServletResponse response, Object handler) throws Exception {
        if(!(handler instanceof HandlerMethod)){
            return true;
        }
        NoAuth methodAnnotation = ((HandlerMethod) handler).getMethodAnnotation(NoAuth.class);
        if(null != methodAnnotation){
            return true;
        }
        return false;
    }
}
自定义注解
package com.example.base.annotation;

import org.springframework.stereotype.Indexed;

import java.lang.annotation.*;

@Target({ElementType.METHOD})
@Retention(RetentionPolicy.RUNTIME)
@Documented
public @interface NoAuth {
}
3.3 整合swagger,结合 AOP,JWT的使用
3.3.1 整合Swagger
引入依赖
            io.springfox
            springfox-swagger2
            2.9.2


            io.springfox
            springfox-swagger-ui
            2.9.2
配置类
package com.wjy.test.config;

import org.springframework.context.annotation.Bean;
import org.springframework.context.annotation.Configuration;
import springfox.documentation.builders.ApiInfoBuilder;
import springfox.documentation.builders.PathSelectors;
import springfox.documentation.builders.RequestHandlerSelectors;
import springfox.documentation.service.ApiInfo;
import springfox.documentation.service.Contact;
import springfox.documentation.spi.DocumentationType;
import springfox.documentation.spring.web.plugins.Docket;
import springfox.documentation.swagger2.annotations.EnableSwagger2;

@Configuration
public class SwaggerConfig {
    @Bean
    public Docket createRestApi() {
        return new Docket(DocumentationType.SWAGGER_2)
                .pathMapping("/")
                .select()
                .apis(RequestHandlerSelectors.basePackage("com.wjy.test.controller"))  //controller类所在的路径
                .paths(PathSelectors.any())
                .build().apiInfo(new ApiInfoBuilder()
                        .title("SpringBoot整合Swagger")
                        .description("SpringBoot整合Swagger,详细信息......")
                        .version("9.0")
                        .contact(new Contact("111","blog.csdn.net","[email protected]"))
                        .license("hello")
                        .licenseUrl("http://www.baidu.com")
                        .build());
    }
}
在spring boot的启动类加注解:
@EnableSwagger2常用注解
@ApiModel
该注解是作用于类上面的,是用来描述类的一些基本信息的。
@ApiModelProperty
它的作用是添加和操作属性模块的数据。
@ApiOperation
该注解用来对某个方法/接口进行描述
@ApiParam
该注解使用在方法上或者参数上,字段说明,表示对参数的添加元数据(说明或者是否必填等)
@Api(tags = "用户controller接口")
用在类上,说明该类的作用。可以标记一个 Controller 类作为 Swagger 文档资源,使用方式代码如下所示。
3.3.2 整合AOP
AOP(Aspect Oriented Programming):面向切面编程,一种编程范式,隶属于软件工程范畴,指导开发者如何组织程序结构,AOP弥补了OOP的不足,基于OOP基础之上进行横向开发。
引入依赖
            org.springframework.boot
            spring-boot-starter-aop
AOP做什么
- 在哪里切入,也就是权限校验等非业务操作在哪些业务代码中执行。
- 在什么时候切入,是业务代码执行前还是执行后。
- 切入后做什么事,比如做权限校验、日志记录等。
3.3.3 整合JWT
JWT简介:
JWT全称是Json Web Token,JWT 主要用于用户登录鉴权,由Header(头部) Payload(负载) Signature(签名)三部分组成,以 . 分割eyJ0eXAiOiJKV1QiLCJhbGciOiJIUzI1NiJ9.eyJhdWQiOiIxMiIsImV4cCI6MTY5MjA2ODEyNH0.d-dwqP-kL8yiL6paMAR_CisaFeefSczLboWdrIyfd-4
引入依赖
            com.auth0
            java-jwt
            3.10.3
代码
package com.example.authority.utils;

import com.auth0.jwt.JWT;
import com.auth0.jwt.algorithms.Algorithm;
import com.auth0.jwt.exceptions.JWTDecodeException;
import com.auth0.jwt.interfaces.Claim;
import com.auth0.jwt.interfaces.DecodedJWT;
import com.baomidou.mybatisplus.core.toolkit.StringUtils;
import com.example.authority.entity.User;
import com.example.authority.enums.ResponseEnum;
import com.example.authority.exception.ServiceException;
import com.example.authority.service.UserService;
import org.springframework.beans.factory.annotation.Autowired;
import org.springframework.stereotype.Component;

import javax.annotation.PostConstruct;
import javax.servlet.http.HttpServletRequest;
import java.text.SimpleDateFormat;
import java.util.Date;
import java.util.Map;

@Component
public class JwtUtils {

    @Autowired
    private UserService userService;

    private static UserService userStaticService;

    @PostConstruct
    public void setUserStaticService(){
        userStaticService = this.userService;
    }

    public static String generateToken(String userId,String sign){
        return JWT.create().withAudience(userId).withAudience(userId)
                .withExpiresAt(new Date(System.currentTimeMillis() + 3600 * 24 * 1000))
                .sign(Algorithm.HMAC256(sign));
    }

    /**
     * 获取当前登录用户
     * @param request
     * @return
     */
    public static User getCurrentUser(HttpServletRequest request){
        String token = request.getHeader("token");
        if(StringUtils.isNotBlank(token)){
            String userId;
            try{
                userId = JWT.decode(token).getAudience().get(0);
            }catch(JWTDecodeException e){
                throw new ServiceException(ResponseEnum.NOAUTH.getCode(),"token验证失败");
            }
            User user = userStaticService.getById(userId);
            return user;
        }else{
            return null;
        }
    }

}
3.4 整合mybatisplus
引入依赖
            com.baomidou
            mybatis-plus-boot-starter
            3.5.1


            org.mybatis.spring.boot
            mybatis-spring-boot-starter
            2.2.1
4.Vue知识点总结
简介:vue官网说:Vue.js(读音 /vjuː/,类似于 view) 是一套构建用户界面的渐进式框架。与其他重量级框架不同的是,Vue 采用自底向上增量开发的设计。Vue是单页应用,就相当于只有一个主页的index.html页面。
MVVM
Model:对应数据层的域模型,它主要做数据的管理,通过ajax/fetch/axios等api完成客户端和服务端的Model同步,在层间关系里,它主要用于抽象出ViewModel中的Model。
View:View是作为视图模板,用于定义结构、布局。它自己不处理数据,只是将ViewModel中的数据展现出来。
ViewModel:ViewModel起着链接View和Model的作用,同时用于处理View中的逻辑。ViewModel从Model中取数据,渲染到View中。
4.1 基本语法
指令
Document
过滤器,监听器,计算属性
Document
{{count | filterEven}}
{{fullName}}
计算属性
{{name}}
Vue的生命周期就是vue实例从创建到销毁的全过程,也就是new Vue() 开始就是vue生命周期的开始。
vue生命周期可以分为八个阶段,分别是:
beforeCreate(创建前)、created(创建后)、beforeMount(载入前)、mounted(载入后)、beforeUpdate(更新前)、updated(更新后)、beforeDestroy(销毁前)、destroyed(销毁后)
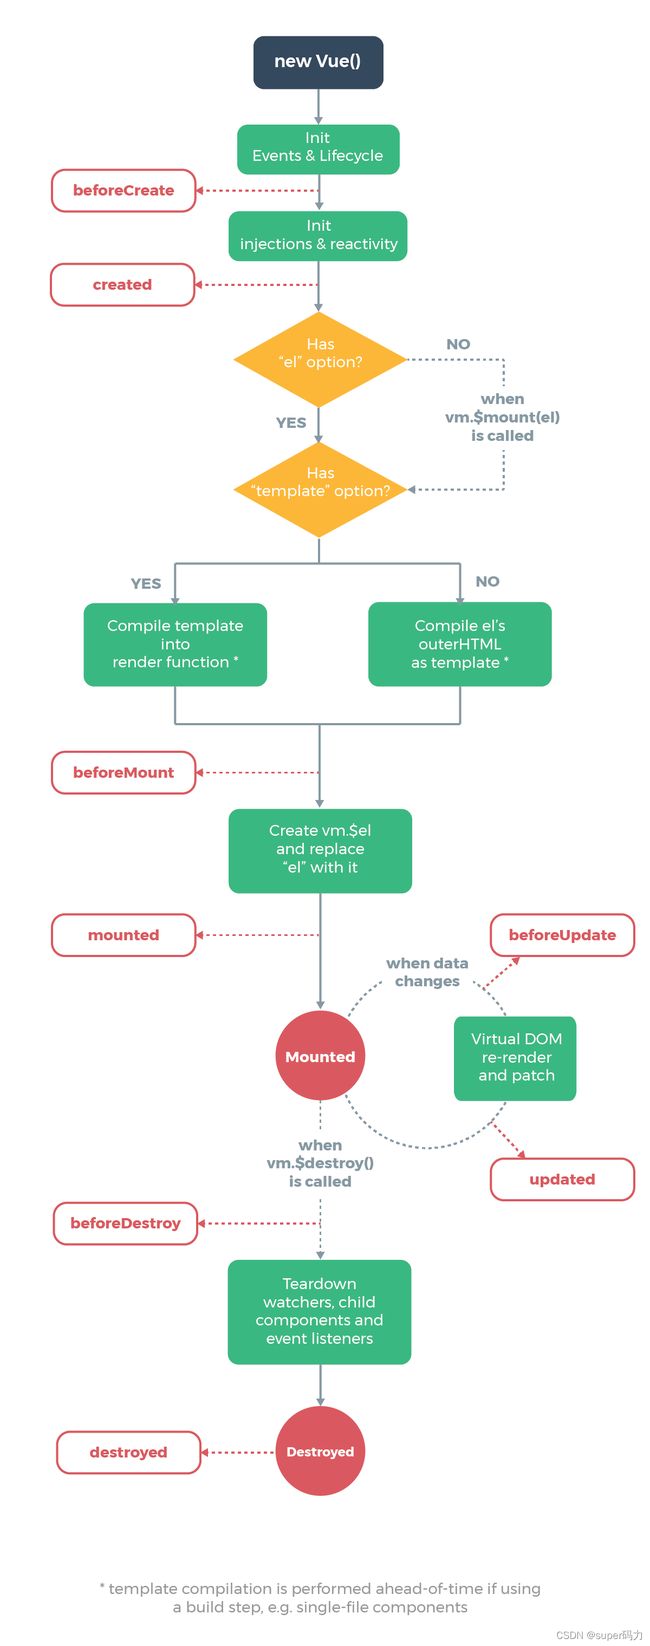
常用的就是created 和 mounted
4.2 组件开发
如果你只是简单写几个Vue的demo,那么你不需要使用VueCli
如果你在开发实际的项目,必然会使用VueCli
如果开发一个项目,我们需要考虑代码结构、目录结构、部署、热加载、单元测试等等,如果我们都手动去完成,那么效率非常的低。通常我们会使用一些脚手架去完成,
Cli翻译为命令行界面,但是我们俗称脚手架。
用vue-cli 创建脚手架项目,先安装,cmd打开黑窗口,输入命令
npm install -g @vue/cli创建项目

使用组件
views目录下创建Manage.vue
components下创建 Child1.vue 和 Child2.vue
child1
{{name}}
child2
{{test}}
router目录下的index.js加

4.3 axios
bug修复:child2.vue
child2
{{test}}
简介:本质上还是对原生XMLHttpRequest的封装,可用于浏览器和nodejs的HTTP客户端,只不过它是基于Promise的,符合最新的ES规范。
安装axios,发送请求
npm install axios --save跨域介绍:当一个请求url的协议、域名、端口三者之间任意一个与当前页面url不同即为跨域。
后端解决跨域配置
package com.example.base.config;

import org.springframework.context.annotation.Bean;
import org.springframework.context.annotation.Configuration;
import org.springframework.web.cors.CorsConfiguration;
import org.springframework.web.cors.UrlBasedCorsConfigurationSource;
import org.springframework.web.filter.CorsFilter;

@Configuration
public class CorsConfig {

    // 当前跨域请求最大有效时长。这里默认1天
    private static final long MAX_AGE = 24 * 60 * 60;

    @Bean
    public CorsFilter corsFilter() {
        UrlBasedCorsConfigurationSource source = new UrlBasedCorsConfigurationSource();
        CorsConfiguration corsConfiguration = new CorsConfiguration();
        corsConfiguration.addAllowedOrigin("*"); // 1 设置访问源地址
        corsConfiguration.addAllowedHeader("*"); // 2 设置访问源请求头
        corsConfiguration.addAllowedMethod("*"); // 3 设置访问源请求方法
        corsConfiguration.setMaxAge(MAX_AGE);
        source.registerCorsConfiguration("/**", corsConfiguration); // 4 对接口配置跨域设置
        return new CorsFilter(source);
    }
}
使用axios
安装elementui依赖,封装request.js
import axios from 'axios'
import { Notification, MessageBox, Message, Loading } from 'element-ui'
import ElementUI from 'element-ui'
import router from "@/router";

const request = axios.create({
    baseURL:'http://localhost:8888/',
    timeout:5000
})

request.interceptors.request.use(config => {
    config.headers['Content-Type'] = 'application/json;charset=UTF-8'
    let user = localStorage.getItem("user") ? JSON.parse(localStorage.getItem("user")) : null
    if(user){
        config.headers["token"] = user.token;
    }
    return config;
},error => {
    return Promise.reject(error)
})

request.interceptors.response.use(
    response => {
        let res = response.data;
        if(response.config.responseType === 'blob'){
            return res;
        }
        if(typeof res === 'string'){
            res = res ? JSON.parse(res) : res
        }
        // 当权限验证不通过的时候给出提示
        if (res.code === '401') {
            ElementUI.Message({
                message: res.msg,
                type: 'error'
            });
            console.log('router.currentRoute.fullPath ')
            console.log(router.currentRoute.fullPath )
            if (router.currentRoute.fullPath  !== '/login') {
                router.push('/login').then(r => {
                    ElementUI.Message({
                        message: '请先登录',
                        type: 'error'
                    });
                })
            }
        }
        return res;
    },
    error => {
        if(error.code === '401'){
            router.push("/login").then(r => {
                ElementUI.Message({
                    message: '请先登录',
                    type: 'error'
                });
            })
        }
        Message.error(error)
        return Promise.reject(error);
    }
)

export default request
4.4 路由Vue-router
Vue-router 是Vue.js官方的路由插件,它和vue.js是深度集成的,适合用于构建单页面应用。vue的单页面应用是基于路由和组件的,路由用于设定访问路径,并将路径和组件映射起来。传统的页面应用,是用一些超链接来实现页面切换和跳转的。在vue-router单页面应用中,则是路径之间的切换,也就是组件的切换。本质作用是做页面导航。
核心概念 : route,routes,router
- route : 单个路由
- routes : 路由集合
- router : 路由器:管理路由
使用代码:
组件支持用户在具有路由功能的应用中点击导航。
通过to属性指定目标地址,

router-view:用于显示点击router-link以后出现的内容

路由守卫:路由守卫作用是监听路由的进入和离开,vue-router提供了beforeEach和afterEach这两个钩子函数,它们会在路由即将改变前和改变后触发。这里我们学一下 beforeEach
编程式导航
代码使用:this.$router.push("/login")
$router和$route
$route和$router是有区别的
$router是VueRouter实例,想要导航到不同的URL,使用$router.push方法。
$route是当前router的跳转对象,可以获取name、path等等
4.5 状态管理Vuex
官方解释:Vuex是一个专为Vue.js应用程序开发的状态管理模式。它采用集中式存储管理应用的所有组件的状态,并以相应的规则保证状态以一种可预测的方式发生变化。
简单理解,就是将多个组件共享的变量统一放到一个地方去管理。
State---保存共享状态,单一状态树,类似于vue中data,用于定义全局信息。不建议直接修改state中的数据。
Getters---类似组件里的计算属性
Mutations---操作状态
Actions---用于进行异步操作
Modules---划分模块
4.6 Mockjs
在做开发时,当后端的接口还未完成,前端为了不影响工作效率,手动模拟后端接口,使用mockjs模拟后端接口,实现数据获取
安装
npm install mockjs在src目录下创建mock目录,创建mock.js文件
import Mock from 'mockjs'

Mock.mock('/user/test',{
    'code':200,
    'data':{
        'time':'@datetime',
        'score|1-100' : 1,//生成随机数据
        'name':'jack'
    }
})
在main.js引入
import './mock/mock.js'代码使用
 axios.get('/user/test').then(res => {
      console.log(res)
    })