ansible的命令(ad-hoc+playbook)
文章目录
- 1.运行临时命令(ad-hoc)
-
- 1.1 临时命令的格式与帮助
- 1.2 使用临时命令通过模块执行任务
-
- 1.ansible模块分类
- 2.使用ping模块检查能否在受管主机上运行python模块
- 3.使用user模块确保用户存在于受管主机中且指定uid
- 4.使用command模块在受管主机上运行命令(与shell不同)
- 5.使用shell模块在受管主机上运行命令
- 6.使用copy模块将本地文件复制到受管主
- *.ad-hoc命令练习
- 7.使用yum模块管理安装包
- 8.使用service模块管理服务
- 9.使用user模块管理用户
- 2.playbook
-
- 2.1编写和运行playbook
-
- 1.查看指定用户的命令
- 2.使用yum模块安装Apache
- 3.确保服务开机启动
- 4.playbook的语法检测和空运行
- 5.安装、配置默认发布页并启动apache(多任务)
- 5.多剧本
- 3. 对playbook进行加密
-
- 3.1 对原有的文件进行加密
- 3.2 对加密文件进行运行
- 3.3 对加密文件进行解密
- 3.4 对加密的文件进行改密码
- 3.5 创建新的加密文件
1.运行临时命令(ad-hoc)
使用临时命令可以快速测试和更改,无需编写playbook
ansible命令执行过程:
1.加载自己的配置文件
2.加载对应的模块文件
3.通过ansible将模块生成对应的临时py文件,并将该文件传输到远程服务器的对应执行用户¥HOME/.ansible/temp/tmp/ansible-tmp-数字/xxx.py文件
4.给文件+x执行
5.执行并返回结果
6.删除临时文件,退出
执行状态:
绿色:执行成功并且没有对目标主机有修改
黄色:执行成功并且对受管主机做更改
红色:执行失败
1.1 临时命令的格式与帮助
格式:
ansible < host-pattern > -m module [-a ‘module arguments’] [-i inventory]

| ansible的参数 | 用途 |
|---|---|
| - -version | 显示版本 |
| - m module | 指定模块(默认command) |
| -v | 详细过程,显示任务结果 |
| -vv | 显示任务结果和任务配置 |
| -vvv | 包含关于与受管主机的连接信息 |
| -vvvv | 增加连接插件相关的额外详细程度选项(包括受管主机上用于执行脚本的用户及所 执行的脚本) |
| - -list-all | 显示主机列表 |
| -k ,- - ask-pass | 提示输入ssh连接密码,默认key验证 |
| -K ,- - ask-become-pass | 提示输入sudo时的口令 |
| -C ,- -check | 检查,并不执行 |
| -T, - - timeout | 执行命令的超时时间,默认10s |
| -u, - -user=REMOTE_USER | 执行远程执行的用户 |
| -b ,- -become | sudo切换 |
ansible-doc -l |
列出所有模块 |
|---|---|
ansible-doc ping |
查看ping模块帮助文档 |
ansible-doc -s ping |
查看ping模块用法(片段) |


1.2 使用临时命令通过模块执行任务
1.ansible模块分类
文件模块:
| -copy | 将本地文件复制到受管主机 |
|---|---|
| -file | 设置文件的权限和其他属性 |
| -lineinfile | 确保特定行是否在文件中 |
| -synchronize | 使用rsync同步内容 |
系统模块:
| -firewalld | 使用firewalld管理任意端口和服务 |
|---|---|
| 用firewalld | 管理任意端口和服务 |
| -reboot | 重启 |
| -service | 管理服务 |
| -user | 添加、删除和管理用户账户 |
Net Tools模块:
| -get_url | 通过http、https、或者ftp下载文件 |
|---|---|
| nmcli | 管理网络 |
| -uri | 与web服务交互 |
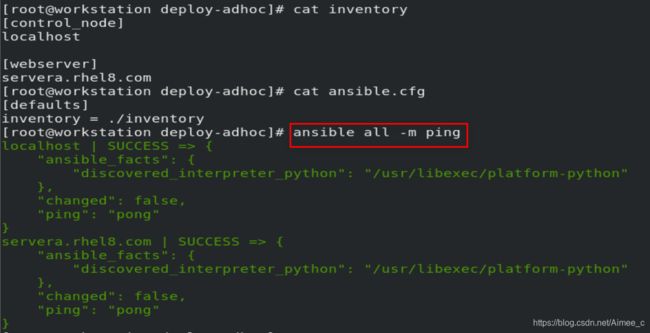
2.使用ping模块检查能否在受管主机上运行python模块
ansible all -m ping

3.使用user模块确保用户存在于受管主机中且指定uid
ansible -m user -a 'name=blue uid=1001 state=present' servera.lab.example.com

![]()
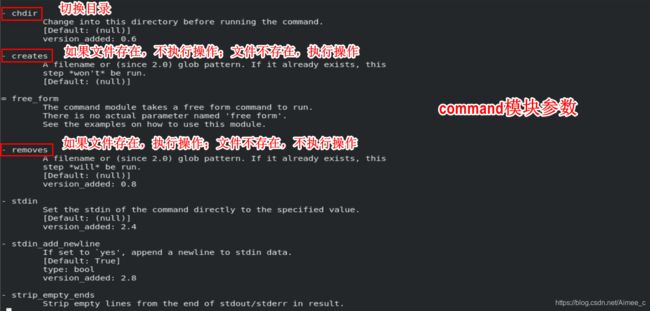
4.使用command模块在受管主机上运行命令(与shell不同)
command是ansible上的默认模块,可以忽略-m
ansible webservers -mcommand -a /usr/bin/hostname
在受管主机serverc上运行hostname命令
ansible webservers -mcommand -a /usr/bin/hostname -o
(注意:加上-o参数,单行显示)

ansible localhost -m command -a 'id'
查看本机当前用户的ID
ansible localhost -m command -a 'id' -u blue
通过-u选项使用blue进行连接并执行id命令
执行上面两条命令时,需要在当前目录中执行,其他目录配置文件不一样。详细内容可见anblie的配置文件部署link


注意:command模块不支持$varname、<、>、|、&等
5.使用shell模块在受管主机上运行命令
ansible localhost -m shell -a set

使用shell和command的区别:
注意:command模块允许执行远程命令,但这些命令不是shell处理,所以无法访问shell环境变量,所以不能执行重定向、传送等操作
6.使用copy模块将本地文件复制到受管主
copy从服务器复制文件到客户端,与fetch(从客户端取文件到服务器)相反


1.首先使用rhel8用户,因为rhel8用户没有写权限,会失败
localhost -m copy -a 'content="westos ansible\n" dest=/etc/motd' -u rhel8

2.使用特权升级,以root身份运行
‘注意:此处使用特权升级需要先编辑/etc/sudoers.d/rhel8文件’
vim /etc/sudoers
![]()
vim /etc/sudoers.d/rhel8

以root身份运行
ansible localhost -m copy -a 'content="hello ansible\n" dest=/etc/motd' -u rhel8 --become


使用all参数一次更改servera和localhost
ansible all -m copy -a 'content="hello ansible!\n" dest=/etc/motd' -u rhel8 --become


*.ad-hoc命令练习
使用adhoc命令更改Apache默认发布页面
练习:
ansible servera.rhel8.com -m copy -a 'content="hello apache!\n" dest=/var/www/html/index.html'
前提:已经在servera主机中安装好Apache,并设定好火墙与selinux


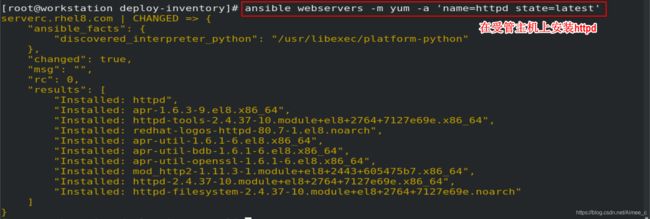
7.使用yum模块管理安装包
前提:受管主机上必须有yum仓库


安装包:
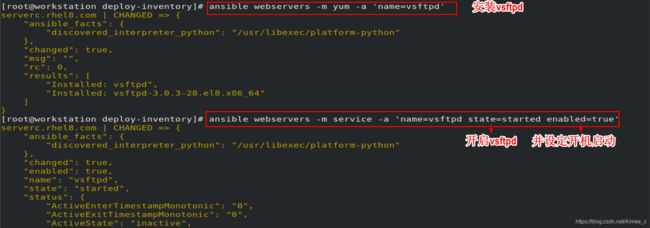
ansible webservers -m yum -a 'name=httpd state=latest'
安装多个包可用逗号隔开

删除包:
ansible webservers -m yum -a 'name=httpd state=removed'

![]()
8.使用service模块管理服务
ansible webservers -m service -a 'name=vsftpd state=started enabled=true'启动服务
ansible webservers -m service -a 'name=vsftpd state=restarted '重启服务
ansible webservers -m service -a 'name=vsftpd state=stopped enabled=no'停止服务


9.使用user模块管理用户
ansible dbservers -m user -a 'name=nginx shell=/sbin/nologin system=yes home=/var/nginx groups=root,bin uid=1999 comment="nginx service"'创建指定用户
ansible dbservers -m user -a 'name=nginx state=absent remove=yes'删除用户及用户家目录

![]()

2.playbook
1.剧本(Playbook):是利用YAML标记语言编写的可重复执行的任务的列表。
2.yaml格式通常以 .yml为扩展名
ansible-play xxx.yml 运行playbook(要求环境中有inventory和ansible.cfg)注意:playbook里任务和任务间要有-,play和play间要有-
3.ansible-playbook默认输出不提供详细任务执行信息。
-v参数提供,共四个级别: -v(显示任务结果) -vv (显示任务结果和任务配置) -vvv (包含关于与受管主机的连接信息) -vvvv (增加连接插件相关的额外详细程度选项)(包括受管主机上用于执行脚本的用户及所 执行的脚本)
4.执行playbool前最好进行语法验证
ansible-playbook --syntax-check webserver.yml
有语法错误,会提示错误位置 ERROR!S
5.yaml对于缩进量没有严格要求,但是有两个基本原则:
1).处于同一层次结构中同一级别的数据元素必须具有相同的缩进量(play本身是一个键值对集合,同一play中的键应当使用相同的缩进量)
2).如果项目属于其他项目的子项,其缩进量必须大于父项’
2.1编写和运行playbook
1.查看指定用户的命令
(1)ad-hoc(临时命令)
ansible serverb.lab.example.com -m user-a "name=studentuid=1000 state=present"

(2)playbook
vim user.yml
---  #开头三个破折号,文档的开始标记
- name: Configure User  #可选,但是建议使用
  hosts:serverb.rhel8.com  #运行主机
  tasks: #任务
   - name: blue user
     user: #使用模块
        name:blue
        uid: 1001
        state: present
...  #结尾三个省略号,结束标记(通常省略)


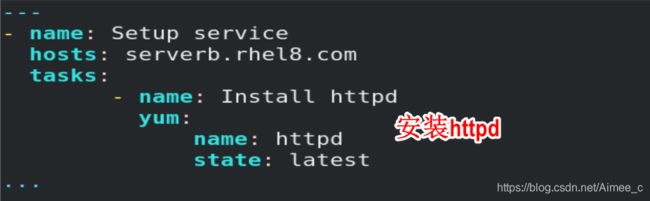
2.使用yum模块安装Apache
---
- name: Setup service
  hosts: serverb.rhel8.com
  tasks:
        - name: Install httpd
          yum:
              name: httpd
              state: latest
...


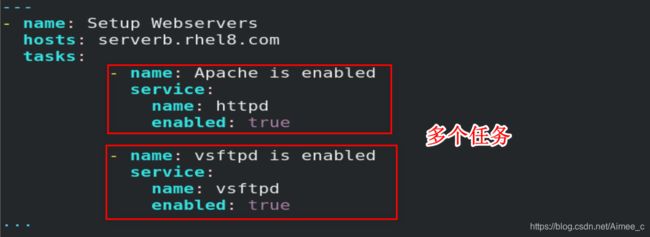
3.确保服务开机启动
---
- name: Setup Webservers
  hosts: serverb.rhel8.com
  tasks:
          - name: Apache is enabled
            service:
              name: httpd
              enabled: true

          - name: vsftpd is enabled
            service:
              name: vsftpd
              enabled: true
...


4.playbook的语法检测和空运行
ansible-playbook --syntax-check service.yml语法检测
![]()

ansible-playbook -C service.yml
空运行会报告执行这个playbook将会发生什么,但不会改变目标主机

5.安装、配置默认发布页并启动apache(多任务)
---
- name: Install and Start Apache
  hosts: serverb.rhel8.com
  tasks:
          - name: Apache is Installed
            yum:
                    name: httpd
                    sta)te: present
          - name: Change index.html
            copy:
                    content: "Welcome to Apache"
                    dest: /var/www/html/index.html
          - name: Start Apache
            service:
                    name: httpd
                    state: started
                    enabled: true
...
[外链图片转存中…(img-SVN0axR1##-1586323385489)]


5.多剧本
---
- name: web  ##############################################第一个play
  hosts: webserver
  become: yes ##在此play中提升用户身份
  tasks:
   - name: Apache and firewalld Installed
     yum:
         name:
          - httpd
          - firewalld
         state: present

- name: Configure index.html
     copy:
         content: "Welcome to Apache_firewalld's page"
         dest: /var/www/html/index.html

- name: Firewalld enbeled and running
     service:
         name: firewalld
         enabled: true
         state: started

- name: firewalld permits httpd
     firewalld:
         service: http
         state: enabled
         permanent: yes ##永久添加服务
         immediate: yes ##立即生效

- name: httpd enabled and running
     service:
         name: httpd
         enabled: true
         state: started

- name: Test webserver##############################################第二个play
  hosts: localhost   ##在此play中不需要提升用户身份
  become: no  ##在此play中不提升用户身份
  tasks:
         - name: connect webserver
           uri:
                url: http://servera.rhel8.com ##使用url获取链接
                return_content: yes ##是否返回页面内容
                state_code: 200 ##状态码为200表示OK


![]()


3. 对playbook进行加密
3.1 对原有的文件进行加密
ansible-vault encrypt filename 加密文件
(注意:filename参数可以是多个)
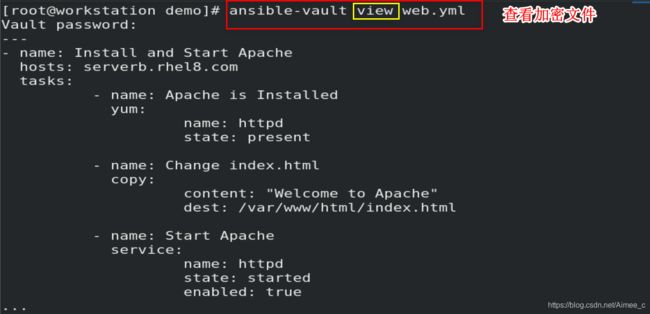
ansible-vault view filename 查看加密文件
原理:将文件解密为一个临时文件,并编辑;保存时,复制内容并删除临时文件 ‘edit命令始终重写文件,因此只有在更改文件时使用,查看尽量使用view’


3.2 对加密文件进行运行
运行加密的playbook,没有密码则报错
![]()
方法一:交互式提供密码
ansible-playbook --vault-id @prompt filename

方法二:使用- -ask-vault-pass提供交互式密码(2.4之前的ansible中使用)
ansible-playbook --ask-vault-pass filename

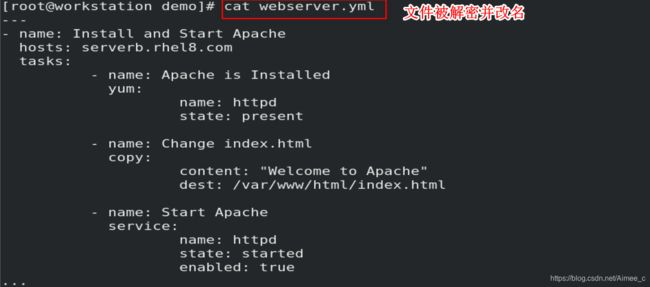
3.3 对加密文件进行解密
ansible-vault decrypt filename 解密文件

ansible-vault decrypt filename1 --output=firename2 解密的同时改名
可以使用–output=filename2将加密文件保存为新的名称,使用此参数时输入文件只能是一个
![]()
![]()
3.4 对加密的文件进行改密码
ansible-vault rekey filename对加密文件进行改密码
(注意:可以一次更新多个文件密码’)

使用vault密码文件时,最好使用--new-vault-password-file

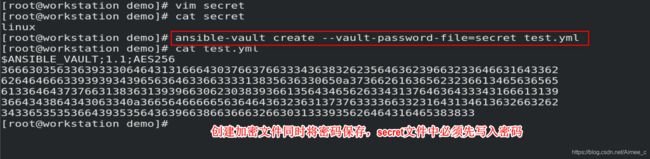
3.5 创建新的加密文件
ansible-vault create filename 创建加密文件

ansible-vaultcreate --vault-password-file=secret filename创建加密文件同时将密码保存
注意:secret文件中必须先写入密码