一点就分享系列(理解篇3)—Cv任务“新世代”之Transformer系列 (中篇-视觉模型篇DETR初代版本)
一点就分享系列(理解篇3)—Cv任务“新世代”之Transformer系列 (中篇-视觉模型篇)
对于上篇介绍transformer得原理,自认为把细节讲得很详细了,作为“前菜”还算满意,这篇言归正传,先介绍最近的transform视觉工作。
提示:在进行这篇阅读的时候,请务必把上篇导读详细阅读,需要你理解清晰transformer的模块结构!transfomer从原理到细节———传送门补课!
文章目录
- 一点就分享系列(理解篇3)—Cv任务“新世代”之Transformer系列 (中篇-视觉模型篇)
- 模型1——DETR
- 一、DETR说明
-
- 1.Backbone 的作用和如何序列化图像
- 2.feature map 的位置编码tensor
- 3.图像转换序列化流程
- 二、DETR-Encoder
- 三、DETR-Decoder
-
- 四、DETR-训练
- 总结
模型1——DETR
这是脸书提出的端到端模型,用于目标检测和全景分割。将Transformer应用到CV领域,抛弃了Anchor和Nms,取得了还不错的成绩。但是实际可能收敛慢,资源成本训练较高等,效果最多<=CNN,但是无论如何,作为每一个CV方向工作者,一个标志性的代表工作,我们都需要了解其原理。
在此之前,你需要对transfomer的结构有一定的了解,transfomer从原理到细节———传送门补课!
[DETR论文地址]
git源码
还有就是其实这个DETR并不算SOTA,为什么要说这个模型呢,主要是阐述它的原理和思想以及细节,就是为了更好理解CV的transformer思路做一个铺垫!
一、DETR说明
假如,您已经阅读过了上篇且知道了transformer的原理,那么DETR作为第一个one-stage 的transformer核心模块检测器,到底做了什么?

我们从上图中可以看出,DETR的结构是通过了CNN--------->Transformer生成了一系列的预测BOX集合,至于多少个BOX,那是人工设定的,但肯定是比GT的多;之后通过bipartite matching loss,二分图匹配计算loss,调整结果。

具体的来说,整体流程如下:
1.Backbone 的作用和如何序列化图像
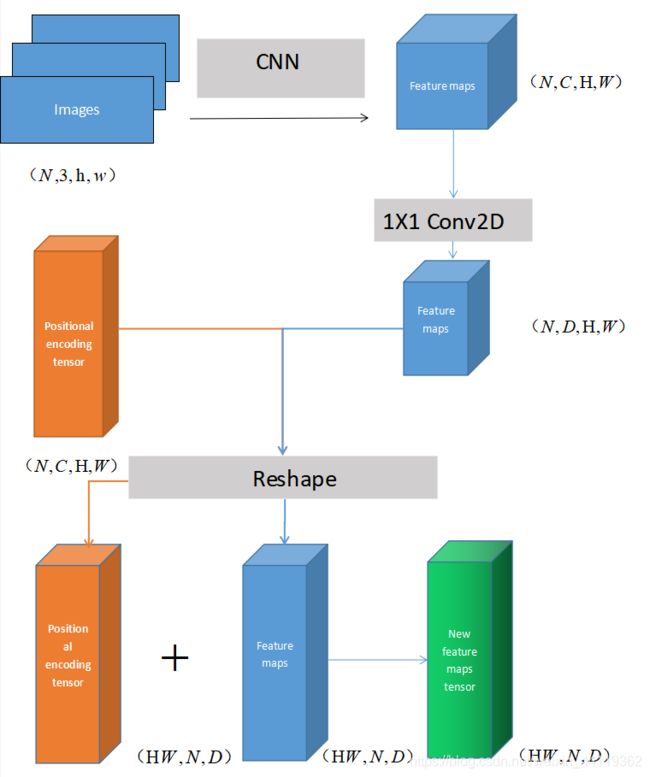
图像通过模型back-one:CNN完成特征提取,假设image图片batchsize=N,维度为(N,3,H,W),将其转化feature map(N,C=2048,H/32,W/32).
- 用 1*1卷积,对特征图的通道2048维压缩到256维,再进行reshape操作feature map ,维度(HW,256,N),这样图像最终转化为了序列化 的形式,符合进入transformer的结构。
- 如图,我们需要把处理的featur map和位置编码信息做Add,这里我们需要一个构造的positional encoding ,那么既然作Add,维度就要相同 ,读过我上篇transformer详细解读篇的细节,第三次安利,里面的trick就包含了位置编码的原理transfomer从原理到细节———传送门补课!,因为transformer本身结构是无法表达位置信息的,所以接下来让我们看如何构造图像的positional encoding tensor。
2.feature map 的位置编码tensor
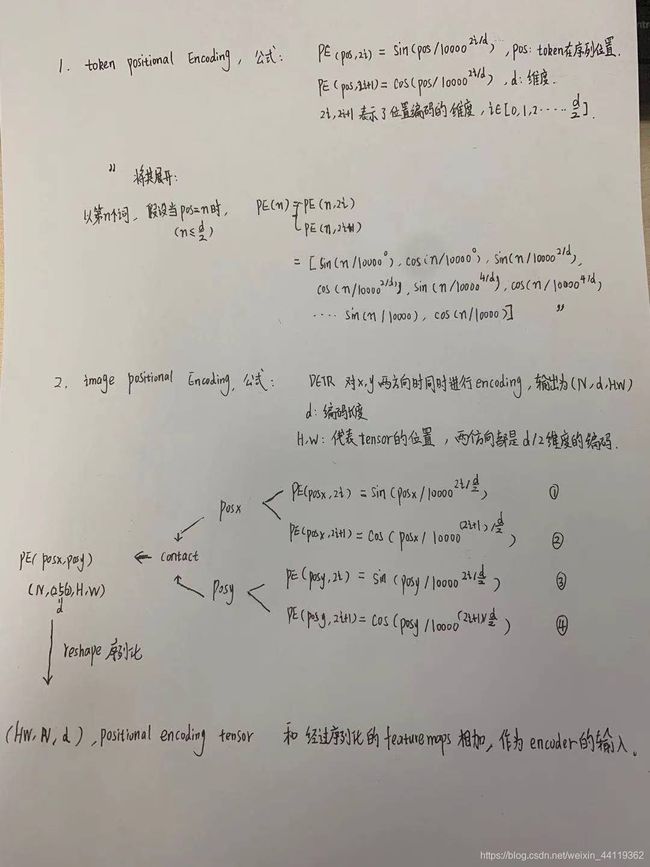
由于在原始的词语token的transformer中表示的序列位置信息,然而在图像中我们需要表示二维信息,主要是好久没自己写字了,怕忘记如何写字,接下来我额外附赠个草稿推导,便于自己和读者们加深理解,这里关于DETR如何构造Positional encoding具体如下手写版:
原版的词句transformer是序列化的,而图像必须考虑2D信息,则需要将位置编码信息变为(X,Y)两个方向,如果公式中的d=256维度,那么每个方向都是128维度的编码。
3.图像转换序列化流程
将上述的步骤转成示意图, 整体流程如下,帮助读者们,加深理解!
二、DETR-Encoder
首先需要明确的是:每个Encoder Layer包含一个multi-head self-attention层和一个前馈网络FFN,区别在于:原版Transformer只在Encoder之前使用了Positional Encoding,而且是在输入上进行Positional Encoding,再把输入经过transformation matrix变为Query,Key和Value这三个张量。但是DETR在Encoder的每一个Multi-head Self-attention之前都使用了Positional Encoding,且只对Q和K使用了Positional Encoding和add操作,V不作计算。
其实很简单,就是在每一个multi-head self-attention层的输入改成加上位置编码张量而已。
三、DETR-Decoder
这里默认您已经熟知原版transformer的结构,开始!
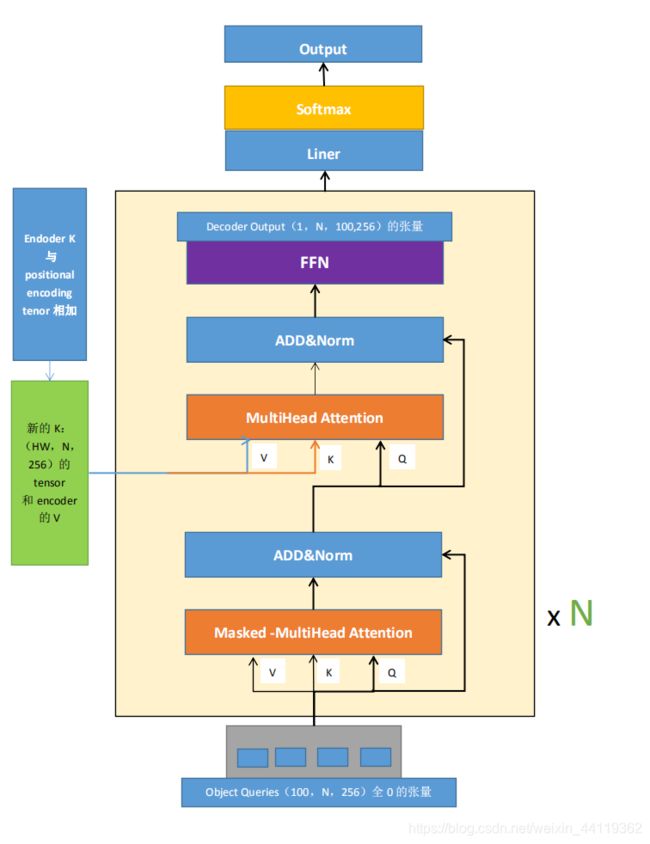
原版token的transformer,在decoder测试输出时候是按照顺序,左到右生成一个一个单词。而图像里,我们需要一次性全部计算,DETR的decoder输入为:
- Encoder输出tensor与 position encoding 之和,产生的tensor。
- Object queries矩阵,(100,N,d=256),Object queries矩阵内部通过学习建模了100个object之间的全局关系,为了推理时候就利用该全局注意力更好的进行解码预测输出。
-
decoder的输入,初始化就是一个 (100,N,d=256)的零向量,和Object queries加在一起作为第1个multi-head self-attention的Query和Key。
为了方便大家理解,我特意画了个图:

-
按图说法,接下来到了每个Decoder的第2个multi-head self-attention,它的Key和Value来自Encoder的输出张量,维度为 (hw,N,256) ,还要对K向量进行位置编码。Query值一部分来自第1个Add and Norm的输出,维度为(100,N,256 )的张量,另一部分来自Object queries,充当可学习的位置编码。所以,第2个multi-head self-attention的Key和Value的维度为 (hw,N,256) ,而Query的维度为[100,N,256]。
-
每个Decoder的输出维度为 [1,N,100,256] ,送入后面的前馈网络,这时候其实Object queries已经充当位置编码向量。
到这里你会发现:Object queries充当的其实是位置编码的作用,只不过它是可以学习的位置编码,而且Encoder的输出V矩阵是不做poitional encoing tensor相加的。
相信对照图和叙述,已经可以知道了 DETR的Decoder特别之处,那就是,
decoder的输入其实是一个可学习的位置编码tensor!
四、DETR-训练
我们拿到Decoder的输出tensor(N,100,256),在经过FFN的结构和,我们会得到:(目标上限默认不超过100)
- 100个预测目标的分类分支tensor维度是:(N,100,类别数+1)
- 100个预测目标的回归分支tensor维度是:(N,100,4),4是代表归一化后的(x,y,w,h)
接着所有检测模型,最难懂的地方就说训练的匹配策略,这里讲下我的理解:
GT和预测的BOX对应策略:我们拿到的结果当前是无序的sets,需要进行分配后和GT进行LOSS计算。这里用的求二分图的最大匹配数和最小点覆盖数的匈牙利算法,这是一个递归的算法,因为强大的Python包已经为我们实现了!一句话,调包!!
from scipy.optimize import linear_sum_assignment
哈哈,来看看源码就好了:
## pred_logits:[b,100,92] ,对应我们说的decoder后的分类和回归的结构,92是COCO数据类别
# pred_boxes:[b,100,4]
        bs, num_queries = outputs["pred_logits"].shape[:2]  #取batchsize和预测的Num queries=100
        # We flatten to compute the cost matrices in a batch
        out_prob = outputs["pred_logits"].flatten(0, 1).softmax(-1)  # [batch_size * num_queries, num_classes] = [100b, 92]
        out_bbox = outputs["pred_boxes"].flatten(0, 1)  # [batch_size * num_queries, 4] = [100b, 4]

# 准备分类target shape=(m,)里面存储的是类别索引,m包括了整个batch内部的所有gt bbox
        # Also concat the target labels and boxes
        tgt_ids = torch.cat([v["labels"] for v in targets])# (m,)[3,6,7,9,5,9,3]
# 准备bbox target shape=(m,4),已经归一化了
        tgt_bbox = torch.cat([v["boxes"] for v in targets])# (m,4)

#(100b,92)->(100b, m),对于每个预测分类结果,把目前gt里面有的所有类别值提取出来,其余值不需要参与匹配
#对应上述公式,类似于nll loss,但是更加简单
        # Compute the classification cost. Contrary to the loss, we don't use the NLL,
        # but approximate it in 1 - proba[target class].
        # The 1 is a constant that doesn't change the matching, it can be ommitted.
#行:取每一行;列:只取tgt_ids对应的m列
        cost_class = -out_prob[:, tgt_ids]# (100b, m)

        # 计算out_bbox和tgt_bbox两两之间的l1距离
        cost_bbox = torch.cdist(out_bbox, tgt_bbox, p=1)# (100b, m)

        # Compute the giou cost betwen boxes, 额外多计算一个giou loss (100b, m)
        cost_giou = -generalized_box_iou(box_cxcywh_to_xyxy(out_bbox), box_cxcywh_to_xyxy(tgt_bbox))

#得到最终的广义距离(100b, m),距离越小越可能是最优匹配
        # Final cost matrix
        C = self.cost_bbox * cost_bbox + self.cost_class * cost_class + self.cost_giou * cost_giou
#(100b, m)--> (b, 100, m)
        C = C.view(bs, num_queries, -1).cpu()

#计算每个batch内部有多少物体,后续计算时候按照单张图片进行匹配,没必要batch级别匹配,徒增计算
        sizes = [len(v["boxes"]) for v in targets]
#匈牙利最优匹配,返回匹配索引
#enumerate(C.split(sizes, -1))]:(b,100,image1,image2,image3,...)
        indices = [linear_sum_assignment(c[i]) for i, c in enumerate(C.split(sizes, -1))]
        return [(torch.as_tensor(i, dtype=torch.int64), torch.as_tensor(j, dtype=torch.int64)) for i, j in indices]
到此为止,我们需要知道匈牙利如何分配:
LOSS公式如下,注意,由于这里的回归坐标采用的是绝对坐标,这样 L1 loss 就会随着物体大小而改变了,因此回归 loss 采用了 L1 + GIoU loss 的形式:
![所以,可以使得 [公式] 最小的排列 [公式] 就是我们要找的排列,即:对于图片中的每个真值 [公式] 来讲, [公式] 就是这个真值所对应的预测值的索引。](http://img.e-com-net.com/image/info8/49bcef9e90e44ee39893bf363f310202.jpg)

LOSS公式其实并不复杂,一句话概括基于匈牙利匹配的L1LOSS和分类交叉熵损失的组合。只是在计算这个LOSS前:排列索引是通过最小化匈牙利匹配得到的 ,就是上述的代码做的事情,然后才能计算LOSS,这样训练后,模型产生的100个预测框,它知道某个预测框该对应的目标是什么和在哪里。
DETR LOSS函数:
def loss_labels(self, outputs, targets, indices, num_boxes, log=True):     #分类交叉熵LOSS
    assert 'pred_logits' in outputs
    src_logits = outputs['pred_logits']
    idx = self._get_src_permutation_idx(indices)
    target_classes_o = torch.cat([t["labels"][J] for t, (_, J) in zip(targets, indices)])
    target_classes = torch.full(src_logits.shape[:2], self.num_classes,
                                dtype=torch.int64, device=src_logits.device)
    target_classes[idx] = target_classes_o

    loss_ce = F.cross_entropy(src_logits.transpose(1, 2), target_classes, self.empty_weight)
    losses = {'loss_ce': loss_ce}

    if log:
        # TODO this should probably be a separate loss, not hacked in this one here
        losses['class_error'] = 100 - accuracy(src_logits[idx], target_classes_o)[0]
    return losses

@torch.no_grad()
def loss_cardinality(self, outputs, targets, indices, num_boxes): #这个LOSS是统计其非空BOX的差,不会造成反向传播
    """ Compute the cardinality error, ie the absolute error in the number of predicted non-empty boxes
    This is not really a loss, it is intended for logging purposes only. It doesn't propagate gradients
    """
    pred_logits = outputs['pred_logits']
    device = pred_logits.device
    tgt_lengths = torch.as_tensor([len(v["labels"]) for v in targets], device=device)
    # Count the number of predictions that are NOT "no-object" (which is the last class)
    card_pred = (pred_logits.argmax(-1) != pred_logits.shape[-1] - 1).sum(1)
    card_err = F.l1_loss(card_pred.float(), tgt_lengths.float())
    losses = {'cardinality_error': card_err}
    return losses

def loss_boxes(self, outputs, targets, indices, num_boxes):   #L1 loss+GIOU LOSS 的回归函数
    """Compute the losses related to the bounding boxes, the L1 regression loss and the GIoU loss
       targets dicts must contain the key "boxes" containing a tensor of dim [nb_target_boxes, 4]
       The target boxes are expected in format (center_x, center_y, w, h), normalized by the image size.
    """
    assert 'pred_boxes' in outputs
    idx = self._get_src_permutation_idx(indices)
    src_boxes = outputs['pred_boxes'][idx]
    target_boxes = torch.cat([t['boxes'][i] for t, (_, i) in zip(targets, indices)], dim=0)

    loss_bbox = F.l1_loss(src_boxes, target_boxes, reduction='none')

    losses = {}
    losses['loss_bbox'] = loss_bbox.sum() / num_boxes

    loss_giou = 1 - torch.diag(box_ops.generalized_box_iou(
        box_ops.box_cxcywh_to_xyxy(src_boxes),
        box_ops.box_cxcywh_to_xyxy(target_boxes)))
    losses['loss_giou'] = loss_giou.sum() / num_boxes
    return losses

def loss_masks(self, outputs, targets, indices, num_boxes):#掩码MASK的损失,有效掩盖由于填充而导致的无效区域
    """Compute the losses related to the masks: the focal loss and the dice loss.
       targets dicts must contain the key "masks" containing a tensor of dim [nb_target_boxes, h, w]
    """
    assert "pred_masks" in outputs
    src_idx = self._get_src_permutation_idx(indices)
    tgt_idx = self._get_tgt_permutation_idx(indices)
    src_masks = outputs["pred_masks"]
    src_masks = src_masks[src_idx]
    masks = [t["masks"] for t in targets]
    # TODO use valid to mask invalid areas due to padding in loss
    target_masks, valid = nested_tensor_from_tensor_list(masks).decompose()
    target_masks = target_masks.to(src_masks)
    target_masks = target_masks[tgt_idx]

    # upsample predictions to the target size
    src_masks = interpolate(src_masks[:, None], size=target_masks.shape[-2:],
                            mode="bilinear", align_corners=False)
    src_masks = src_masks[:, 0].flatten(1)
    target_masks = target_masks.flatten(1)
    target_masks = target_masks.view(src_masks.shape)
    losses = {
        "loss_mask": sigmoid_focal_loss(src_masks, target_masks, num_boxes),
        "loss_dice": dice_loss(src_masks, target_masks, num_boxes),
    }
    return losses
总结:
关键点还是在于Object queries在训练过程中对于 100个目标压缩入对应的和位置和类别相关的统计信息,它抽象了目标的信息特征,某种意义上它真正的取代了anchor,并且是高纬度可学习的,但是因此网络的训练时间也会加长。
编码器提供了全局信息且分离目标信息,而解码器只需要关注细节来区分类和对象BOX边界.
总结
这里给出模型评价:
优点:在相当的计算量下,相比 Faster RCNN DERT 取得了更好的 AP, 且推理速度接近。大目标上效果明显更好, 这可能主要归功于 Transformer 对全局信息的捕捉能力。
缺点: 训练时间长。 小目标检测能力欠缺。
下一篇继续transformer视觉系列,这篇也是前菜!你需要知道这些:
- 图像的transformer如何序列化和位置编码操作;
- 理解DETR的编码器和解码器的结构;
- 特别是Object Queries 这个向量起着决定性的作用,是可学习的;
- 还有匈牙利的LOSS取代了anchor海选模式,完成了1对1匹配;
- DETR的LOSS结构;

