10大开源框架剖析之Glide,基于最新版4.10.1
10大开源框架剖析之Glide
关于 Glide
Glide是一个快速高效的Android图片加载库,注重于平滑的滚动。Glide提供了易用的API,高性能、可扩展的图片解码管道(decode pipeline),以及自动的资源池技术

Glide 支持拉取,解码和展示视频快照,图片,和GIF动画。Glide的Api是如此的灵活,开发者甚至可以插入和替换成自己喜爱的任何网络栈。默认情况下,Glide使用的是一个定制化的基于HttpUrlConnection的栈,但同时也提供了与Google Volley和Square OkHttp快速集成的工具库。
虽然Glide 的主要目标是让任何形式的图片列表的滚动尽可能地变得更快、更平滑,但实际上,Glide几乎能满足你对远程图片的拉取/缩放/显示的一切需求。
API
Glide 使用简明的流式语法API,这是一个非常棒的设计,因为它允许你在大部分情况下一行代码搞定需求:
Glide.with(fragment)
.load(url)
.into(imageView);
性能
Glide 充分考虑了Android图片加载性能的两个关键方面:
- 图片解码速度
- 解码图片带来的资源压力
为了让用户拥有良好的App使用体验,图片不仅要快速加载,而且还不能因为过多的主线程I/O或频繁的垃圾回收导致页面的闪烁和抖动现象。
Glide使用了多个步骤来确保在Android上加载图片尽可能的快速和平滑:
- 自动、智能地下采样(downsampling)和缓存(caching),以最小化存储开销和解码次数;
- 积极的资源重用,例如字节数组和Bitmap,以最小化昂贵的垃圾回收和堆碎片影响;
- 深度的生命周期集成,以确保仅优先处理活跃的Fragment和Activity的请求,并有利于应用在必要时释放资源以避免在后台时被杀掉。
关于Glide详细介绍,可以参考Glide官方文档
Glide官方文档中文版
Glide源码剖析
何谓剖析:「化整为零,分而治之」
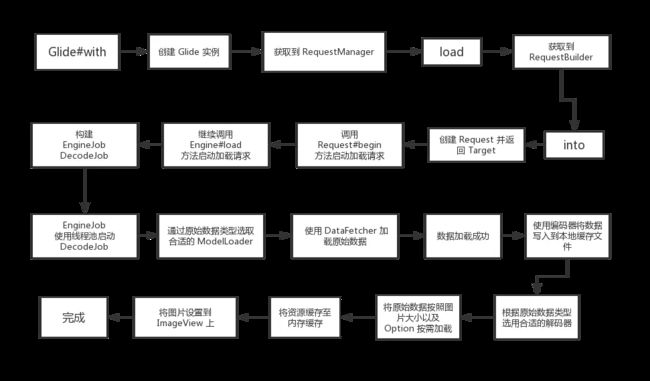
从它的使用开始,我们看一下每个步骤,本篇文章将按照下图所示,一步步对Glide源码进行完整的剖析
1.源码结构概览
- 下载源码,从github下载Glide源码(4.10.1),使用Android Studio打开,打开settings.gradle文件,如下图所示:
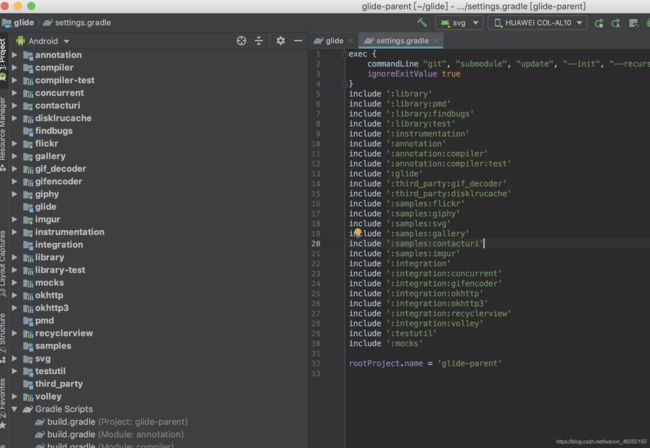
可以看到,官方库还是非常详细的:我们主要关注两个库即可,其他的可以先不看 - library:这个就是Glide的源码文件了
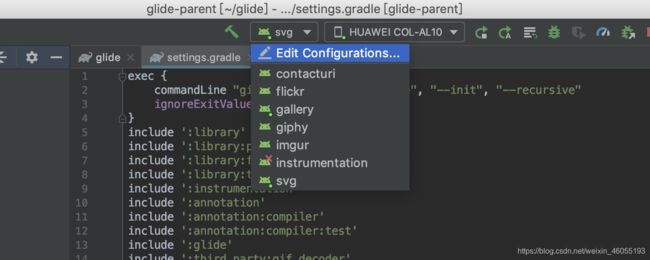
- samples:xxx:这个就是官方的一些使用案例,编译完成后,可以直接运行到手机上
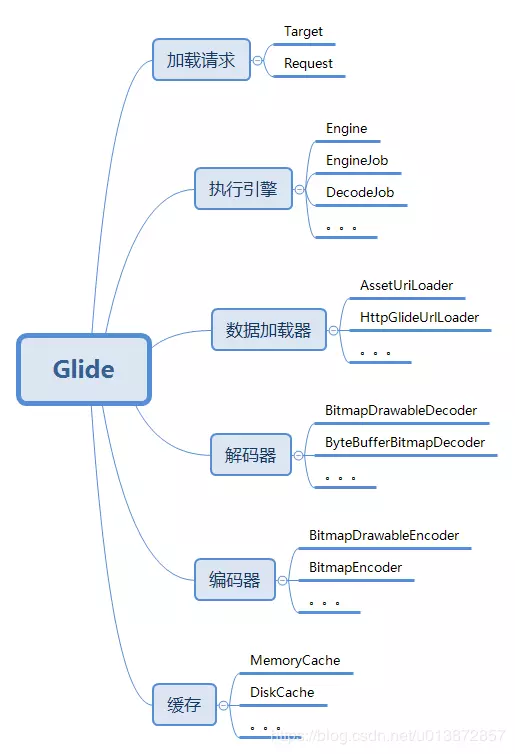
- 查看源码结构:

分包结构还是比较清楚的,看到上面这张图片,是不是感觉也没啥啊,就这么点东西,实际上,Glide的逻辑稍微还是有点复杂的,下面我们就按照逻辑功能的划分,剖析Glide框架:大致分为以下部分:
- 通过加载流程来解析源码
通常:我们使用如下代码加载一张网络图片:
Glide.with(this).load(url).into(imageView);
// 参数说明
// 参数1:Context context
// Context对于很多Android API的调用都是必须的,这里就不多说了

// 参数2:String imageUrl:被加载图像的Url地址
// 大多情况下,一个字符串代表一个网络图片的URL

// 参数3:ImageView targetImageView:图片最终要展示的地方。
所以Glide的源码分析分为三步:
- with()
- load()
- into()
我们的 APP 第一次使用 Glide 加载一张图片,那么流程如下
with()
- 定义:Glide 类中的静态方法,根据传入 不同参数 进行 方法重载
- 作用:得到一个RequestManager对象
根据传入with()方法的参数 将Glide图片加载的生命周期与Activity/Fragment的生命周期进行绑定,从而实现自动执行请求,暂停操作 - 下面先说明一些重要对象名
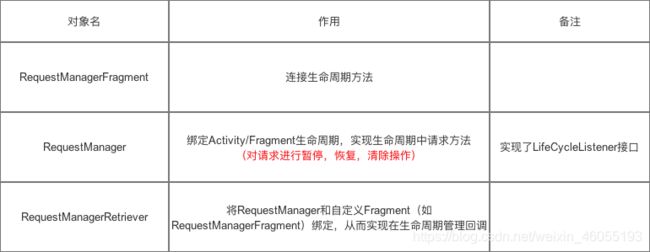
- Glide源码
Glide 是单例类,通过 Glide#get(Context) 方法可以获取到实例。
Glide 类算是个全局的配置类,Encoder、Decoder、ModelLoader、Pool 等等都在这里设置,此外还提供了创建 RequestManager 的接口(Glide#with() 方法)。
使用 Glide 时会最先调用 Glide#with() 方法创建 RequestManager,Glide 中的 with() 方法有五个重载:
RequestManager with(Context context)
RequestManager with(android.app.Activity)
RequestManager with(android.app.Fragment)
RequestManager with(android.support.v4.app.Fragment)
RequestManager with(android.support.v4.app.FragmentActivity)
Glide#with() 方法会将 RequestManager 的创建委托给 RequestManagerRetriever,RequestManagerRetriever 为单例类,调用 get(Context) 创建 RequestManager。
具体源码分析:基于最新的源码v4.10.1
public class Glide {
    ...
    // with()重载种类非常多,根据传入的参数可分为:
    // 1. 非Application类型的参数(Activity & Fragment  )
    // 2. Application类型的参数(Context)
    // 3. 直接传入一个view,通过view.getContext()获取Context

// 参数1:Application类型
  @NonNull
    public static RequestManager with(@NonNull Context context) {
  	//1:获取Retriever 单例实现
  	//2:通过Retriever获取RequestManager&绑定加载的生命周期
    return getRetriever(context).get(context);
  }

// 参数2:非Application类型(Activity & Fragment )
  @NonNull
  public static RequestManager with(@NonNull Activity activity) {
    return getRetriever(activity).get(activity);
  }

  @NonNull
  public static RequestManager with(@NonNull FragmentActivity activity) {
    return getRetriever(activity).get(activity);
  }

 @NonNull
  public static RequestManager with(@NonNull Fragment fragment) {
    return getRetriever(fragment.getContext()).get(fragment);
  }

//这个应该是后面版本加的
@NonNull
  public static RequestManager with(@NonNull View view) {
    return getRetriever(view.getContext()).get(view);
  }

...
}

<-- 分析1:RequestManagerRetriever对象的实例 get()-->
// 作用:
  // 1. 获取RequestManager对象
  // 2. 将图片加载的生命周期与Activity/Fragment的生命周期进行绑定

//入口方法,实际就是对context类型进行判断,然后分别调用对应的方法
  @NonNull
  public RequestManager get(@NonNull Context context) {
    if (context == null) {
      throw new IllegalArgumentException("You cannot start a load on a null Context");
    } else if (Util.isOnMainThread() && !(context instanceof Application)) {
      if (context instanceof FragmentActivity) {
        return get((FragmentActivity) context);
      } else if (context instanceof Activity) {
        return get((Activity) context);
      } else if (context instanceof ContextWrapper && ((ContextWrapper) context).getBaseContext().getApplicationContext() != null) {
        return get(((ContextWrapper) context).getBaseContext());
      }
    }
    return getApplicationManager(context);
  }


  public class RequestManagerRetriever implements Handler.Callback {
      ...

    // 实例的get()重载种类很多,参数分为:(与with()类似)
    // 1. Application类型(Context)
    // 2. 非Application类型(Activity & Fragment )- >>分析3
    // 下面会详细分析

// 参数1:Application类型(Context)会获取到一个单例对象
 @NonNull
  private RequestManager getApplicationManager(@NonNull Context context) {
    // Either an application context or we're on a background thread.
    if (applicationManager == null) {
      synchronized (this) {
        if (applicationManager == null) {
          // TODO(b/27524013): Factor out this Glide.get() call.
          Glide glide = Glide.get(context.getApplicationContext());
          applicationManager =
              factory.build(
                  glide,
                  new ApplicationLifecycle(),
                  new EmptyRequestManagerTreeNode(),
                  context.getApplicationContext());
        }
      }
    }

    return applicationManager;
  }

// 参数2:非Application类型(Activity & Fragment  )
// 将Glide加载图片的生命周期与Activity生命周期同步的具体做法:向当前的Activity添加一个隐藏的Fragment
// 原因:因Fragment的生命周期 与 Activity 的是同步的,通过添加隐藏的Fragment 从而监听Activity的生命周期,从而实现Glide加载图片的生命周期与Activity的生命周期 进行同步。
  @SuppressWarnings("deprecation")
  @NonNull
  public RequestManager get(@NonNull Activity activity) {
    if (Util.isOnBackgroundThread()) {
      return get(activity.getApplicationContext());
    } else {
      assertNotDestroyed(activity);
      android.app.FragmentManager fm = activity.getFragmentManager();
      //===》分析3
      return fragmentGet(activity, fm, /*parentHint=*/ null, isActivityVisible(activity));
    }
  }

    public RequestManager get(@NonNull FragmentActivity activity) {
      // 逻辑同上,此处不作过多描述
      ...

    }

    public RequestManager get(Fragment fragment) {
        // 逻辑同上,此处不作过多描述
      ...
    }

	//直接通过View获取RequestManager
  @SuppressWarnings("deprecation")
  @NonNull
  public RequestManager get(@NonNull View view) {
    if (Util.isOnBackgroundThread()) {
      return get(view.getContext().getApplicationContext());
    }
    Preconditions.checkNotNull(view);
    Preconditions.checkNotNull(
        view.getContext(), "Unable to obtain a request manager for a view without a Context");
    Activity activity = findActivity(view.getContext());
    // The view might be somewhere else, like a service.
    if (activity == null) {
      return get(view.getContext().getApplicationContext());
    }
    if (activity instanceof FragmentActivity) {
      Fragment fragment = findSupportFragment(view, (FragmentActivity) activity);
      return fragment != null ? get(fragment) : get((FragmentActivity) activity);
    }
    android.app.Fragment fragment = findFragment(view, activity);
    if (fragment == null) {
      return get(activity);
    }
    return get(fragment);
  }

}

<-- 分析2:Glide.get(context) -->
  /**
   * 获取一个Glide单例
   *
   * @return the singleton
   */
  @NonNull
  public static Glide get(@NonNull Context context) {
    if (glide == null) {
    //获取注解处理器自动生成的一些配置
      GeneratedAppGlideModule annotationGeneratedModule =     getAnnotationGeneratedGlideModules(context.getApplicationContext());
      synchronized (Glide.class) {
        if (glide == null) {
          checkAndInitializeGlide(context, annotationGeneratedModule);
        }
      }
    }
    return glide;
  }

<--分析3:fragmentGet() -->
// 作用:
     // 1. 创建Fragment
     // 2. 向当前的Activity中添加一个隐藏的Fragment
     // 3. 将RequestManager与该隐藏的Fragment进行绑定(通过RequestManagerFragment)
  @SuppressWarnings({"deprecation", "DeprecatedIsStillUsed"})
  @Deprecated
  @NonNull
  private RequestManager fragmentGet(
      @NonNull Context context,
      @NonNull android.app.FragmentManager fm,
      @Nullable android.app.Fragment parentHint,
      boolean isParentVisible) {
	// 获取RequestManagerFragment
	// 作用:利用Fragment进行请求的生命周期管理
    RequestManagerFragment current = getRequestManagerFragment(fm, parentHint, isParentVisible);
  	//利用manager获取RequestManager
    RequestManager requestManager = current.getRequestManager();
     // 若requestManager 为空,即首次加载初始化requestManager
    if (requestManager == null) {
      // TODO(b/27524013): Factor out this Glide.get() call.
      Glide glide = Glide.get(context);
      requestManager =
      //通过工厂创建requestManager
      // 创建RequestManager传入Lifecycle实现类,如ActivityFragmentLifecycle
          factory.build(
              glide, current.getGlideLifecycle(), current.getRequestManagerTreeNode(), context);
      //调用setRequestManager设置到RequestManagerFragment
      current.setRequestManager(requestManager);
    }
    return requestManager;
  }
小结:with()是为得到一个RequestManager对象 从而将Glide加载图片周期 与Activity 和Fragment进行绑定,从而管理Glide加载图片周期
- 最终返回RequestManager对象
- 这里主要讲解图片加载的功能,所以关于加载图片生命周期的内容暂时不讲解
load()
- 定义 :由于 .with() 返回的是一个RequestManager对象,所以 第2步中调用的是 RequestManager 类的 load()
- 作用:预先创建好对图片进行一系列操作(加载、编解码、转码)的对象,并全部封装到 DrawableTypeRequest `对象中。
- Glide 支持加载 图片的URL字符串、图片本地路径等,因此RequestManager 类 存在load()的重载
- load()方法返回一个RequestBuilder
- 重载的load()方法如下所示:
RequestBuilder<Drawable> load(@Nullable Bitmap bitmap);
RequestBuilder<Drawable> load(@Nullable Drawable drawable);
RequestBuilder<Drawable> load(@Nullable String string);
RequestBuilder<Drawable> load(@Nullable Uri uri);
RequestBuilder<Drawable> load(@Nullable File file);
RequestBuilder<Drawable> load(@RawRes @DrawableRes @Nullable Integer resourceId);
RequestBuilder<Drawable> load(@Nullable URL url);
RequestBuilder<Drawable> load(@Nullable byte[] model);
RequestBuilder<Drawable> load(@Nullable Object model);
//还有两个特别的load方法,用来下载图片文件
RequestBuilder<File> downloadOnly();
RequestBuilder<File> download(@Nullable Object model);
实际上,每一个重载方法都代表了Glide可以加载的一种资源的类型
- 此处主要讲解 最常见的加载图片 URL 字符串的load(),即load(String url)
public class RequestManager implements LifecycleListener {

   // 仅贴出关键代码
   //第一步,调用asDrawable()获取到Requestbuild
   //第二步,调用RequestBuild的load(string)
  @CheckResult
  @Override
  public RequestBuilder<Drawable> load(@Nullable String string) {
    return asDrawable().load(string);
  }

  @NonNull
  @CheckResult
  public RequestBuilder<Drawable> asDrawable() {
    return as(Drawable.class);
  }

  //as方法
  @NonNull
  @CheckResult
  public <ResourceType> RequestBuilder<ResourceType> as(
      @NonNull Class<ResourceType> resourceClass) {
    return new RequestBuilder<>(glide, this, resourceClass, context);
  }
然后在看RequestBuilder对象的相关方法,这里比以往的版本逻辑更简单,只是简单设置加载的类型和一些简单的初始化操作。
public class RequestBuilder<TranscodeType> extends BaseRequestOptions<RequestBuilder<TranscodeType>>
    implements Cloneable, ModelTypes<RequestBuilder<TranscodeType>> {
....
//此处只贴出关键代码
//1.load(string)方法
 @Override
  @CheckResult
  public RequestBuilder<TranscodeType> load(@Nullable String string) {
    return loadGeneric(string);
  }

//2. laodGeneric()方法
//设置需要加载的资源的类型
  @NonNull
  private RequestBuilder<TranscodeType> loadGeneric(@Nullable Object model) {
    this.model = model;
    //设置一个标记,在into方法调用时候,会判断是否为true,如果为false,表示
    //还没有调用load()方法,会抛出非法参数的异常
    // throw new IllegalArgumentException("You must call #load() 	//before calling #into()");
    isModelSet = true;
    return this;
  }
}
至此,第2步的 load()分析完成,相比与以往版本,这个版本重构了一些load()的逻辑,变得更加简单,清晰明了。
into()
RequestBuilder 用来构建请求,例如设置 RequestOption、缩略图、加载失败占位图等等。
上面说到的 RequestManager 中诸多的 load 重载方法,同样也对应 RequestBuilder 中的重载 load 方法,一般来说 load 方法之后就是调用 into 方法设置 ImageView 或者 Target,into 方法中最后会创建 Request,并启动,into()也是RequetBuilder的方法
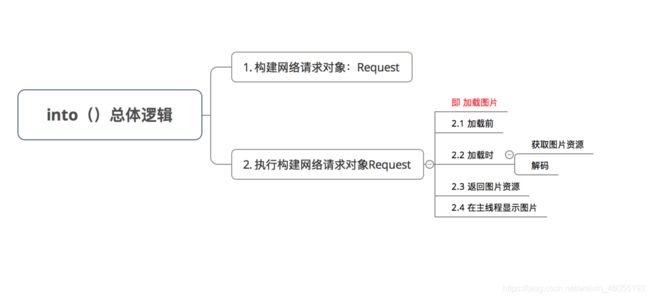
- 作用:构建网络请求对象 并 执行 该网络请求
即 获取图片资源 & 加载图片并显示 - 总体逻辑如下:
RequestBuild中的 into重载方法
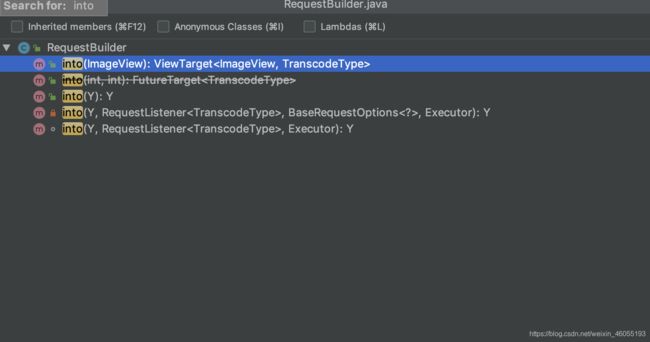
这里我们看一下into(imageView)的方法,源码如下:
 @NonNull
  public ViewTarget<ImageView, TranscodeType> into(@NonNull ImageView view) {
  	//注释1:必须在主线程调用
    Util.assertMainThread();
    //检查view是否为null,为null会抛出空指针异常
    Preconditions.checkNotNull(view);

    BaseRequestOptions<?> requestOptions = this;
    if (!requestOptions.isTransformationSet()
        && requestOptions.isTransformationAllowed()
        && view.getScaleType() != null) {
        //根据ScaleType,更新配置信息
      switch (view.getScaleType()) {
        case CENTER_CROP:
          requestOptions = requestOptions.clone().optionalCenterCrop();
          break;
        case CENTER_INSIDE:
          requestOptions = requestOptions.clone().optionalCenterInside();
          break;
        case FIT_CENTER:
        case FIT_START:
        case FIT_END:
          requestOptions = requestOptions.clone().optionalFitCenter();
          break;
        case FIT_XY:
          requestOptions = requestOptions.clone().optionalCenterInside();
          break;
        case CENTER:
        case MATRIX:
        default:
          // Do nothing.
      }
    }
	//最后调用另一个重载方法,真正创建请求并加载
    return into(
        glideContext.buildImageViewTarget(view, transcodeClass),
        /*targetListener=*/ null,
        requestOptions,
        Executors.mainThreadExecutor());
  }
创建 Request的into方法,源码如下所示:
  private <Y extends Target<TranscodeType>> Y into(
      @NonNull Y target,
      @Nullable RequestListener<TranscodeType> targetListener,
      BaseRequestOptions<?> options,
      Executor callbackExecutor) {
    Preconditions.checkNotNull(target);
    if (!isModelSet) {
      throw new IllegalArgumentException("You must call #load() before calling #into()");
    }

    Request request = buildRequest(target, targetListener, options, callbackExecutor);

    Request previous = target.getRequest();
    if (request.isEquivalentTo(previous)
        && !isSkipMemoryCacheWithCompletePreviousRequest(options, previous)) {
      if (!Preconditions.checkNotNull(previous).isRunning()) {
        previous.begin();
      }
      return target;
    }
	//在requestManager中untrack targer
    requestManager.clear(target);
    target.setRequest(request);
    //在requestManager将target和request关联起来
    requestManager.track(target, request);
    return target;
  }

//=====看requestManager的track 方法======
//=====看requestManager的润Request方法===
  synchronized void track(@NonNull Target<?> target, @NonNull Request request) {
    targetTracker.track(target);
    requestTracker.runRequest(request);
  }

//这里就开始跟踪一个请求,可能开始,可能被清除,也可能加入到pendingRequests队列中
  public void runRequest(@NonNull Request request) {
    requests.add(request);
    if (!isPaused) {
      request.begin();
    } else {
      request.clear();
      if (Log.isLoggable(TAG, Log.VERBOSE)) {
        Log.v(TAG, "Paused, delaying request");
      }
      pendingRequests.add(request);
    }
  }
====
到这里,with(),load(),into 方法就分析完成了,总结:
- Glide.with(**) :创建RequetManager,具体是通过将 RequestManager 的创建委托给 RequestManagerRetriever,RequestManagerRetriever 为单例类,调用 get(Context) 创建 RequestManager。
- RequestManager.load(**) 创建 RequestBuilder ;设置要target的类型,通过建造者模式,进行配置操作。
- RequestBuilder.into(): 会调用RequestBuilder的buildRequest()方法,创建Request,并将target和创建好的request关联,最后通过 requestManager.track(target, request);开始跟踪加载请求和target。
- RequestBuilder.into()最后会返回target
另外几个重要的接口和类:
Target
类声明:
public interface Target<R> extends LifecycleListener {
  /** Indicates that we want the resource in its original unmodified width and/or height. */
  int SIZE_ORIGINAL = Integer.MIN_VALUE;
  void onLoadStarted(@Nullable Drawable placeholder);
  void onLoadFailed(@Nullable Drawable errorDrawable);
  void onResourceReady(@NonNull R resource, @Nullable Transition<? super R> transition);
  void onLoadCleared(@Nullable Drawable placeholder);
 void getSize(@NonNull SizeReadyCallback cb);
  void removeCallback(@NonNull SizeReadyCallback cb);
  void setRequest(@Nullable Request request);
  @Nullable
  Request getRequest();
}
显然:Target 代表一个可被 Glide 加载并且具有生命周期的资源。简单说,就是把图片资源放到哪里去,比如常用的显示到ImageView上,就对应ImageViewTarget。并且Target 具有生命周期感知的能力(继承自LifeCycle接口)
当我们调用 RequestBuilder#into 方法时会根据传入参数创建对应类型的 Target 实现类。
那么 Target 在 Glide 的整个加载流程中到底扮演者什么样的角色呢?Target 的中文意思为:目标,实际上就是指加载完成后的图片应该放在哪, Target 默认提供了很多很有用的实现类,当然我们也可以自定义 Target。
Glide 默认提供了用于放在 ImageView 上的 ImageViewTarget(以及其各种子类)、放在 AppWidget 上的 AppWidgetTarget、用于同步加载图片的 FutureTarget(只有一个实现类:RequestFutureTarget)等等,下面分别来看一下。
Target 的实现类
CustomViewTarget
这个是抽象类,负责加载 Bitmap、Drawable 并且放到 View 上。
上文提到过,如果在 View 还未初始化完成时就调用了 Glide 加载图片会等待加载完成再去执行 onSizeReady 方法,那如何监听 View 初始化完成呢?
CustomViewTarget 就针对这个问题给出了解决方案,其中会调用 View#addOnAttachStateChangeListener 方法添加一个监听器,这个监听器可以监听到 View 被添加到 Widow 以及移除 Window 时的事件,从而更好的管理 Request 生命周期。
另外,构建好的 Request 会通过 View#setTag 方法存入 View 中,后面再通过 View#getTag 方法获取。
但这个抽象类并没有实现类,也没有被使用过,View 相关的 Target 都是继承 ViewTarget 抽象基类,但这个类已经被标记为过期类了,推荐将 ViewTarget 替换成 CustomViewTarget 使用。
ViewTarget
这个类又继承了抽象类 BaseTarget,这个基类里只是实现了 Target 接口的 setRequest 以及 getRequest 方法。
ViewTarget 基本上类似 CustomViewTarget ,只是具体的实现上有点不同。
ImageViewTarget
听名字就知道,这是加载到 ImageView 上的 Target,继承了 ViewTarget,同样也是个抽象类。
构造器中限定了必须传入 ImageView 或者其子类,图片数据加载完成后会回调其中的 onResourceReady 方法,第一步是将图片设置给 ImageView,第二部是判断是否需要使用动画,需要的话就执行动画。
ImageViewTarget 的实现类比较多,总共有 5 个,但内容都很简单,主要用于区分加载的资源时 Bitmap 类型还是 Drawable 类型,这个在构建请求时确定,默认的加载请求最终都是 Drawable 类型,但如果构建请求时调用了 asBitmap 方法那就资源就会被转成 Bitmap 类型,另外一个就是资源使用缩略图展示。
RequestFutureTarget
这是用来同步加载图片的 Target,调用 RequestBuilder#submit 将会返回一个 FutureTarget,调用 get 方法即可获取到加载的资源对象。
AppWidgetTarget
用于将下载的 Bitmap 设置到 RemoteView 上。
NotificationTarget
与 AppWidgetTarget 类似,不同的是这是用来将 Bitmap 设置到 Notification 中的 RemoteView 上。
以上就是一些常用的Target 了
module
module 包下面的 GlideModel 比较重要
这是用来延迟设置 Glide 相关参数的,我们可以通过这个接口使 Glide 在初始化时应用我们的设置,因为 Glide 是单例类,通过这个设置可以保证在 Glide 单例类初始时,所有请求发起之前应用到 Glide。