SSM 框架 搭建整合(IDEA)保姆级mysql
一:搭建整合环境
1. 搭建整合环境
1. 整合说明:SSM整合可以使用多种方式,咱们会选择XML + 注解的方式
2. 整合的思路:
- 先搭建整合的环境
- 先把Spring的配置搭建完成
- 再使用Spring整合SpringMVC框架
- 最后使用Spring整合MyBatis框架
3. 创建数据库和表结构:
create database ssm;
create table account(
id int primary key auto_increment,
name varchar(20),
money double
);
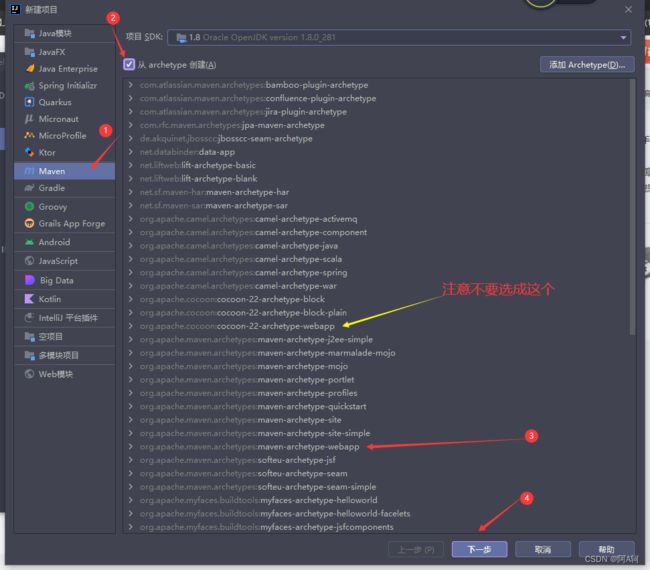
4. 创建maven的工程:
我这里改成了自己的maven , idea自带的可能会有问题
创建好后把pom.xml文件中部分内容删掉 剩下: ,在光标处,再粘贴复制进去下方这些
    5.0.2.RELEASE
    1.6.6
    1.2.12
    5.1.6
    3.4.5
    2.9.4


      org.aspectj
      aspectjweaver
      1.6.8


      org.springframework
      spring-aop
      ${spring.version}

    org.springframework
    spring-context
    ${spring.version}


      org.springframework
      spring-web
      ${spring.version}


      org.springframework
      spring-webmvc
      ${spring.version}


      org.springframework
      spring-test
      ${spring.version}


      org.springframework
      spring-tx
      ${spring.version}


      org.springframework
      spring-jdbc
      ${spring.version}


      junit
      junit
      4.12
      test


      mysql
      mysql-connector-java
      ${mysql.version}


      javax.servlet
      servlet-api
      2.5
      provided


      javax.servlet.jsp
      jsp-api
      2.0
      provided


      jstl
      jstl
      1.2


      log4j
      log4j
      ${log4j.version}


      org.slf4j
      slf4j-api
      ${slf4j.version}


      org.slf4j
      slf4j-log4j12
      ${slf4j.version}


      org.mybatis
      mybatis
      ${mybatis.version}


      org.mybatis
      mybatis-spring
      1.3.0


      org.thymeleaf
      thymeleaf-spring4
      3.0.9.RELEASE


      com.alibaba
      druid
      1.1.10

      org.mybatis.generator
      mybatis-generator-core
      1.3.5


      com.fasterxml.jackson.core
      jackson-core
      ${jackson.version}


      com.fasterxml.jackson.core
      jackson-databind
      ${jackson.version}


      com.github.pagehelper
      pagehelper
      5.1.10


      cn.hutool
      hutool-all
      5.2.3


    ssm


          org.apache.maven.plugins
          maven-compiler-plugin
          3.2

            1.8
            1.8
            UTF-8
            true


        org.mybatis.generator
        mybatis-generator-maven-plugin
        1.3.5


          src/main/resources/mbg.xml
          true
          true
5. 编写实体类。
在src下的main目录下创建 java 和resource 两个目录,在java目录中新建软件包,再在这个新建的软件包中新建 controller ,dao,entity,service 软件包。
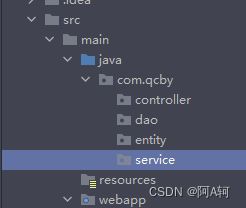 。每一个数据库的表,对应一个实体,实体中 get set和toString方法都要写上。(根据本篇最开始的数据库编写字段)。在entity中新建Account类,写好
public class Account{
    // 主键
    private int id;
    // 账户名称
    private String name;
    // 账号的金额
    private Double money;

    public int getId() {
        return id;
    }

    public void setId(int id) {
        this.id = id;
    }

    public String getName() {
        return name;
    }

    public void setName(String name) {
        this.name = name;
    }

    public Double getMoney() {
        return money;
    }

    public void setMoney(Double money) {
        this.money = money;
    }

    @Override
    public String toString() {
        return "Account{" +
                "id=" + id +
                ", name='" + name + '\'' +
                ", money=" + money +
                '}';
    }
}
6. 编写service接口和实现类,在service中新建AccountService 接口
import com.qcby.entity.Account;

import java.util.List;

public interface AccountService {

    //查询所有
    public List findAll();
}
7.写一个实现类,在service下新建软件包 serviceimpl,在其中新建实现类AccountServiceImpl
实现AccountService接口,加上@service注解,实现相应方法
import com.qcby.entity.Account;
import org.springframework.stereotype.Service;
import java.util.List;

@Service
public class AccountServiceImpl implements AccountService {
    //查询所有
    @Override
    public List findAll() {
        System.out.println("业务层:查询所有");
        return null;
    }
}
8.在resources 目录下创建spring配置,就叫spring就行

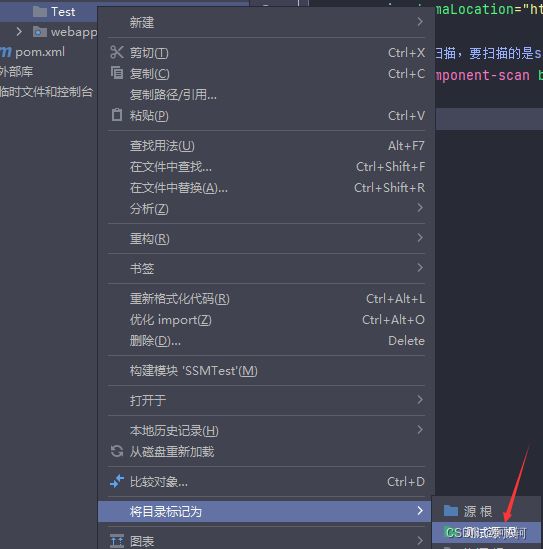
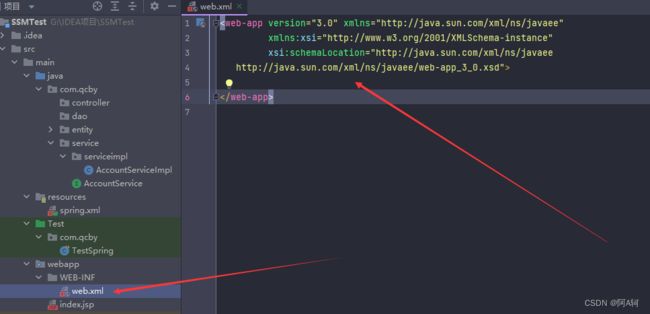
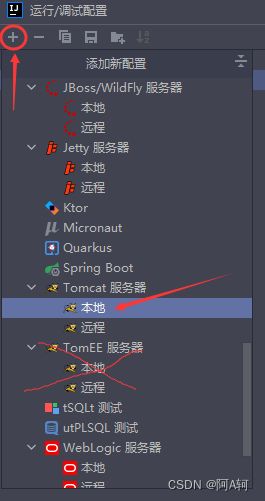
光标出 写入开启注解扫描,然后 光标放在 如果不会。。就直接粘贴下方 进去 不过要注意 base-package= "com.qcby",这里的com.qcby是java下写的大的那个软件包的名称。我写的是 com.qcby,注意写成自己的。 9.测试一下,main下新建个Test目录,作为测试,其中新建com.qcby 其中创建一个测试类 TestSpring 以上是对Spring最简单的配置 Spring整合SpringMVC框架 1. 搭建和测试SpringMVC的开发环境 1. 在web.xml中配置DispatcherServlet前端控制器 注意一定要知道,DispatcherServlet 打开web.xml 全删除掉里边内容,再粘贴进,(因为他自己的版本太老了) 再加入 会有一个springmvc.xml 字段报红,因为我们还没有创建springmvc配置文件 2.现在创建在resource下新建spring配置,取名为springmvc,写进:(还是注意 base-package) 3.在webapp下的index文件删除,再新建html文件命名为 index,因为上上边的代码里写的 开启项目打开的页面 是index.html。注意(href="/项目名/hello") 注意(href="/项目名/hello") ,hello则是在 controller 软件包下新建一个类叫AccountController,写入 可以看到 最后return“suc”,这是返回 suc页面。所以 再在webapp下新建一个叫html的目录,里边新建 suc.html 其中写入 4.在springmvc.xml里再 配置spring对mvc的支持 还需要spring整合Springmvc框架 Spring整合SpringMVC的框架 1. 目的:在controller中能成功的调用service对象中的方法。 2. 在项目启动的时候,就去加载spring.xml的配置文件,在web.xml中配置 ContextLoaderListener监听器(该监听器默认加载WEB-INF目录下的applicationContext.xml的配置文 件,所以要配置全局的变量加载类路径下的配置文件)。web.xml 里找个地方写进 之后 spring整合mybatis Spring整合MyBatis框架 1. Spring整合MyBatis框架 1. 目的:把SqlMapConfig.xml配置文件中的内容配置到spring.xml配置文件中;整合原理就是把Dao生成的代理对象,存入到IOC容器中 2.jdbc.properties。resources 中新建资源包,命名jdbc 里边写入: 要注意修改(mysql8.0以上不可用): 3306 是mysql默认端口号 3.在spring.的xml文件中配置mybatis(注意看里边内容 是否需要修改) 4.在web.xml文件当中设置对spring.xml的访问 6.resources下新建mapper目录 其中新建mabatis.mapper文件 如果之前没配置过是没有的,如果有 下边这一块跳过 ---------------------------------------------------------------- 如何配置: 点 file(文件) ,settings(设置),editor(编辑器),Files and code templates(文件与代码模板) 点 小加号,命名为 mybatis-mapper.xml ,扩展选 xml。填入代码 如: -------------------------------------------------------- 创建命名为AccountDao 之后 这里会有报错因为该有的东西还没写。 在dao层软件包下新建 接口 叫 UserDao,写入 导入 service层下 的 AccountService中 写(之前已经写过了)看看还有没有 在serviceimpl层(service实现层)下的AccountServiceImpl 中写,(dao层的注入,然后return修改返回findAll方法) controller层下的 AccountController 中的 之前写的方法中加一个 for each循环 还剩下一个异常处理 0怎么能当除数呢,这样必然报错。 (传统就是 try catch,前端页面 还是能返回到 suc页面 ,但是后端其实是有报错的。) 在html文件中新建一个error.html页面 一旦出了错就返回到此页面。 在 新建一个conf 软件包 其中建一个异常处理类 SysExceptionResolver,去实现接口HandlerExceptionResolver 这里会先报错,去创建实体对象 entity中新建 类叫 SysException(出错时向前台返回实体对象), springmvc.xml 当中-配置异常处理器- 运行tomcat 访问。并不会报 500错误。
import com.qcby.service.AccountService;
import org.junit.Test;
import org.springframework.context.support.ClassPathXmlApplicationContext;

public class TestSpring {
    @Test
    public void run(){
        ClassPathXmlApplicationContext ac = new ClassPathXmlApplicationContext("classpath:spring.xml");
        AccountService service = ac.getBean(AccountService.class);
        service.findAll();
    }
}
下面配置 SpringMVC
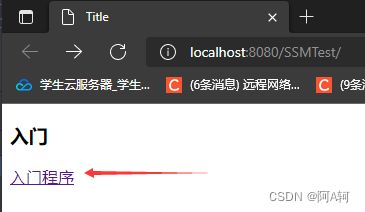
入门
入门程序
import com.qcby.entity.Account;
import com.qcby.service.AccountService;
import org.springframework.beans.factory.annotation.Autowired;
import org.springframework.stereotype.Controller;
import org.springframework.ui.Model;
import org.springframework.web.bind.annotation.RequestMapping;
import java.util.List;
@Controller
public class AccountController {
// service 层注入
@Autowired
private AccountService accountService;
@RequestMapping(path = "/hello")
public String sayHello(Model model){
System.out.println("入门方法执行了2...");
List
Hello
这样springmvc框架样例就完成了

jdbc.driver=com.mysql.jdbc.Driver
jdbc.url=jdbc:mysql://localhost:3306/ssm?useUnicode=true&characterEncoding=utf-8&serverTimezone=UTC&useSSL=false
jdbc.username=root
jdbc.password=2020

 ,再在resources目录下,创建mapper文件夹,再创建 .xml文件。
import com.qcby.entity.Account;
import java.util.List;
public interface UserDao {
public List public Listimport com.qcby.dao.UserDao;
import com.qcby.entity.Account;
import com.qcby.service.AccountService;
import org.springframework.beans.factory.annotation.Autowired;
import org.springframework.stereotype.Service;
import java.util.List;
@Service
public class AccountServiceImpl implements AccountService {
@Autowired
private UserDao userDao;
//查询所有
@Override
public Listimport com.qcby.entity.Account;
import com.qcby.service.AccountService;
import org.springframework.beans.factory.annotation.Autowired;
import org.springframework.stereotype.Controller;
import org.springframework.ui.Model;
import org.springframework.web.bind.annotation.RequestMapping;
import java.util.List;
@Controller
public class AccountController {
// service 层注入
@Autowired
private AccountService accountService;
@RequestMapping(path = "/hello")
public String sayHello(Model model){
System.out.println("入门方法执行了2...");
List整体项目 样例 配置完毕
    @RequestMapping("/findAll")
    public String findAll(){
        System.out.println("执行了...");
        // 模拟异常
        int a = 10/0;
        return "suc";
    }
import com.qcby.entity.SysException;
import org.springframework.web.servlet.HandlerExceptionResolver;
import org.springframework.web.servlet.ModelAndView;

import javax.servlet.http.HttpServletRequest;
import javax.servlet.http.HttpServletResponse;

public class SysExceptionResolver implements HandlerExceptionResolver {

    /**
     * 程序出现了异常,调用异常处理器中的方法
     * @param httpServletRequest
     * @param httpServletResponse
     * @param o
     * @param e
     * @return
     */
    @Override
    public ModelAndView resolveException(HttpServletRequest httpServletRequest,
                                         HttpServletResponse httpServletResponse, Object o, Exception e) {
        e.printStackTrace(); //在命令行打印异常信息在程序中出错的位置及原因。
        // 做强转
        SysException exception = null;
        // 判断
        if(e instanceof SysException){
            exception = (SysException)e;
        }else{
            exception = new SysException("系统正在维护,请联系管理员");

        }
        ModelAndView mv = new ModelAndView();
        mv.addObject("errorMsg",exception.getMessage());
        // 设置跳转的页面
        mv.setViewName("error");
        return mv;
    }
}/**
* 异常处理类
*/
public class SysException extends Exception{
// 提示消息
private String message;
public SysException(String message){
this.message = message;
}
@Override
public String getMessage() {
return message;
}
public void setMessage(String message) {
this.message = message;
}
@Override
public String toString() {
return "SysException{" +
"message='" + message + '\'' +
'}';
}
}
结束!
