Learn OpenGL 笔记3.2 - Basic Lighting
基础知识:
1. Phong lighting model (Phong 照明模型)
The major building blocks of the Phong lighting model consist of 3 components:
ambient (环境光照)
即使天黑了,世界上的某个地方通常仍然有一些光(月亮,遥远的光),因此物体几乎永远不会完全黑暗。 为了模拟这一点,我们使用了一个环境照明常数,它总是给物体一些颜色
代码:直接在fs中的main()函数中这样写
    // ambient 环境光直接就是给所有片元的颜色一个强度
    float ambientStrength = 0.1;
    vec3 ambient = ambientStrength * lightColor;
接着在fs中算颜色的时候:
    vec3 result = (ambient + diffuse) * objectColor;
    FragColor = vec4(result, 1.0);
diffuse (漫射光照)
模拟光对象对对象的定向影响。 这是照明模型中视觉上最重要的组件。 物体的一部分越是面向光源,它就会变得越亮。
漫反射的光线越于物体平行,光照效果越小。
Normal vectors:我们通过使用其周围的顶点来计算出顶点的表面来检索法向量。(三角形的三个顶点,两条向量边X乘,得出垂直的normal vectors)
Calculating the diffuse color:
代码:直接在fs中的main()函数中这样写
光源的向量lightPos:
// lighting
glm::vec3 lightPos(1.2f, 1.0f, 2.0f);Normal法向量:定义vertices的时候,每行的后面三个参数就是法线向量
float vertices[] = {
    //位置                  //法线
    -0.5f, -0.5f, -0.5f,  0.0f,  0.0f, -1.0f,
     0.5f, -0.5f, -0.5f,  0.0f,  0.0f, -1.0f,
     0.5f,  0.5f, -0.5f,  0.0f,  0.0f, -1.0f,
     0.5f,  0.5f, -0.5f,  0.0f,  0.0f, -1.0f,
    -0.5f,  0.5f, -0.5f,  0.0f,  0.0f, -1.0f,
    -0.5f, -0.5f, -0.5f,  0.0f,  0.0f, -1.0f,
}
vertice shader中的读取:
#version 330 core
layout (location = 0) in vec3 aPos; //这里是读取每行的前三个数字
layout (location = 1) in vec3 aNormal; //这里是读取每行的后三个数字

out vec3 FragPos;
out vec3 Normal;

uniform mat4 model;
uniform mat4 view;
uniform mat4 projection;

void main()
{
    FragPos = vec3(model * vec4(aPos, 1.0));
    Normal = aNormal;

    gl_Position = projection * view * vec4(FragPos, 1.0);
}
FragPos片元位置:
vertice shader中的main:
void main()
{
    //FragPos片元位置等于 vertices数据每行的前三个数字(就是Pos位置数据),再转换成model视图的坐标
    FragPos = vec3(model * vec4(aPos, 1.0));


    Normal = aNormal;

    gl_Position = projection * view * vec4(FragPos, 1.0);
}
最终的计算:
    // diffuse
    //法向量,垂直于平面的向量
    vec3 norm = normalize(Normal);
    //光的方向 = 光源位置 - 片元位置
    vec3 lightDir = normalize(lightPos - FragPos);
    //法向量 点乘 光的方向,得出光的强度
    float diff = max(dot(norm, lightDir), 0.0);
    //强度乘以颜色
    vec3 diffuse = diff * lightColor;
vec3 result = (ambient + diffuse) * objectColor;
FragColor = vec4(result, 1.0);
specular lighting (镜面反射光照)
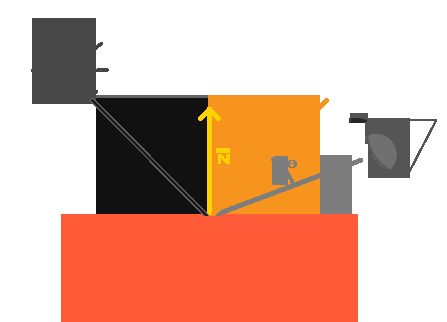
模拟出现在闪亮物体上的光的亮点。 镜面高光更倾向于光线的颜色而不是物体的颜色。
与漫反射照明类似,镜面反射照明基于光的方向向量和对象的法线向量,但这次它也基于视图方向,例如 玩家从哪个方向看片段。 镜面反射照明基于表面的反射特性。 如果我们把物体的表面想象成一面镜子,那么在我们看到表面反射光的任何地方,镜面反射都是最强的。
viewPos 眼睛位置:
lightingShader.setVec3("viewPos", camera.Position); specularStrength 镜面高光的强度:
float specularStrength = 0.5;viewDir眼睛向量:
vec3 viewDir = normalize(viewPos - FragPos);reflectDir反射方向向量:
reflect函数,需要 参数1:光源向量 参数2:法线向量,reflect反射方向和lightDir是基于norm片元法向量对称的
vec3 reflectDir = reflect(-lightDir, norm); //norm就是片元法向量spec 镜面高光中间参数:
眼睛方向 点乘 反射方向 ,然后再 ^32,这个32就是shininess镜面高光的值
float spec = pow(max(dot(viewDir, reflectDir), 0.0), 32);最终计算:
    // specular
    float specularStrength = 0.5;
    vec3 viewDir = normalize(viewPos - FragPos);
    vec3 reflectDir = reflect(-lightDir, norm);
    float spec = pow(max(dot(viewDir, reflectDir), 0.0), 32);

    //镜面高光 = 强度 * 镜面高光参数 * 光的颜色
    vec3 specular = specularStrength * spec * lightColor;

    //结果颜色 = (环境光 + 漫反射光 + 镜面高光) * 目标颜色
    vec3 result = (ambient + diffuse + specular) * objectColor;
    FragColor = vec4(result, 1.0);
gouraud shading(除了Phong lighting model的另一种渲染模型)
vs:
void main()
{
    gl_Position = projection * view * model * vec4(aPos, 1.0);

    // gouraud shading
    // ------------------------
    vec3 Position = vec3(model * vec4(aPos, 1.0));
    vec3 Normal = mat3(transpose(inverse(model))) * aNormal;

    // ambient
    float ambientStrength = 0.1;
    vec3 ambient = ambientStrength * lightColor;

    // diffuse
    vec3 norm = normalize(Normal);
    vec3 lightDir = normalize(lightPos - Position);
    float diff = max(dot(norm, lightDir), 0.0);
    vec3 diffuse = diff * lightColor;

    // specular
    float specularStrength = 1.0; // this is set higher to better show the effect of Gouraud shading
    vec3 viewDir = normalize(viewPos - Position);
    vec3 reflectDir = reflect(-lightDir, norm);
    float spec = pow(max(dot(viewDir, reflectDir), 0.0), 32);
    vec3 specular = specularStrength * spec * lightColor;

    LightingColor = ambient + diffuse + specular;
}
fs:
void main()
{
   FragColor = vec4(LightingColor * objectColor, 1.0);
}


